Main types of extensions
The methods most often used by electricians are:
- Soldering;
- Clamp terminal blocks;
- Screw terminal blocks;
- Crimping using sleeves and cable lugs.
Soldering
This is a popular method for extending copper wires. Rosin is used to prepare a soldering iron - it is a universal flux (solid, liquid and in the form of a gel), which is designed for better spreading of solder over the surface. Soldering is performed with flux or solder - this is a process in which tinned and connected parts are heated with a soldering iron with a drop of solder, and then it is quickly removed to cool and solidify the metal. Be sure to strip and straighten the exposed ends of the wires.
You can use soldering only if it is possible to completely disconnect the outlet from the power supply!
Crimping
The use of tinned copper sleeves (TCL) is suitable for extension of copper materials. The insulation for the length of the sleeve is removed from the wires, the ends of both wires are placed inside. Depending on the cross-section of the wiring and the diameter of the sleeve, they can be installed end-to-end or overlapping. Next, crimping is done using special pliers or a press, after which it is necessary to insulate the structure: using a heat-shrinkable tube would be a good option.
It is strictly not recommended to use pliers for crimping!
Terminal blocks
The use of various terminal blocks is a universal and fast method applicable to working with aluminum material. In old-style houses and Soviet-style sockets, aluminum wiring is often found, requiring caution in choosing the extension method.
- Aluminum and copper can be easily extended using screw terminal blocks. To begin with, the end of the outgoing wire must be stripped and insulated, inserted into the terminal block and tightened with a screw. Be careful not to overtighten or crush the core. An extension wire is inserted into the other end of the terminal block, and the structure is fixed in the socket box.
- Another method is self-clamping terminal blocks of the Wago type, which are convenient and easy to use. However, you should carefully study the instructions. Such terminal blocks differ in characteristics, depending on the type of wiring. When working with aluminum, choose a self-clamping mechanism equipped with a special conductive paste that prevents oxidation.
Under no circumstances is it permissible to twist, especially twisting aluminum wiring with copper wiring.
Thus, extending a short wire in a socket is not difficult enough and does not take much time if you have the tools and skill. It is extremely important to determine the type of wiring and de-energize the work site so as not to cause harm to health and achieve a high-quality result. If you have any difficulties or doubts, contact a professional electrician.
How to extend a wire: basic methods
Here we will talk about the simplest extension of wires, when there is full access to the wire and the cores of the conductors are made of the same metal. Such methods are suitable for both copper and aluminum wires.
- WAGO terminal blocks. They can be used even in cases where the metal does not match. It is very easy to extend wires using them. For clarity, I will show you an image, so it will definitely be clear.
- Connecting blocks for extending wires are the most budget option.
- Twisting of veins among themselves. This method cannot be called safe, but if done correctly, such an extension will serve you for a lifetime. But remember, you need to twist carefully.
- Soldering is the optimal and best option. But, it is only suitable for experienced electricians. In this way, you can even extend wires with a cross-section from 4 to 6 mm.
Remember, you can only connect a copper wire with an aluminum wire using a special terminal.
Read the classification of wires, not everything can be extended.
And so, here we have discussed the main methods with you. Watch the video, it will be even clearer to you.
Now let's talk about situations that may arise. Standard methods are good, but you need to be able to get out of any situation. I’ll tell you about all the situations.
The best method for extending antenna cables
In order to extend the TV cable, you need to take care of a piece of the required length and, of course, the brand. You can rewrite the labeling or even take a small piece with you to the store.
The method of soldering the antenna cable for its extension is not optimal. The connection point will not be strong enough, and the wave resistance indicators will most likely not “fall” into the required values.
Therefore, experts recommend 2 other methods:
1) using F-connectors;
2) through a splitter.
Let's look briefly at each of them.
F-connection
1-2. Remove a small part of the outer shell (1.5 cm).
3. Bend the braided screen towards the wire (contact with the conductor must not be allowed).
4. Remove the insulator.
5. Screw on the F-connector.
Both ends of the wires cut in this way are screwed onto the F-connector. If desired, you can additionally secure the place of twisting with electrical tape.
Splitter
This small box device is designed for creating TV antenna branches or connecting several receivers to 1 wire.
The splitter must be firmly secured in a vertical or horizontal position. And only after this, connect the sections of the cable antenna, cut as described above, with the F-connectors already screwed on.
Soldering
This method is considered universal because it allows you to find a solution to the question of how to lengthen short wires in a socket and increase the cable to a sufficient length. Suitable for extending the cable in a socket only if you have a soldering iron and appropriate experience. The advantages lie in the high quality of the result and the possibility of using large cross-section conductors (4-6 mm 2 ).
For soldering wires, you need to arrange a special place. All tools and materials must be placed in such a way as to exclude the possibility of them getting under the sting. To extend the wire you will need:
- rosin;
- tinol;
- flux;
- soldering iron and stand for it;
- a sponge that can be used to remove dirt from the tip.
Basic methods of extension
First, let's look at how you can extend a wire or electrical cable at home. If the cores of both spliced conductors are made of the same metal (copper or aluminum), then the following extension methods can be used:
- Using WAGO terminal blocks. The most convenient option not only for extending, but also for connecting electrical wires. It is recommended to use even in situations where the conductor cores are made of different metals. The main condition for their use is to connect circuits in which the current does not exceed the rated current indicated on the terminal block. We advise you to buy them in “trusted” places and not to be fooled by the low cost - the market is oversaturated with fakes that melt and burn.
- Budget connecting blocks, so-called polyethylene terminal blocks, allowing you to extend the wiring. The peculiarity is that when the monolithic core is tightened too tightly, the metal part of the terminal block cracks. They cannot connect multi-wire conductors. To do this, they need to be tinned or crimped with an NShVI type tip to obtain reliable and durable contact.
- Twisting of veins. The old-fashioned method, which is one of the most unsafe, but at the same time popular even among experienced electricians. To extend electrical wiring using twisting, it is necessary that the broken end be at least 30 mm (for reliable splicing). Read about how to properly twist wires in the corresponding article. Be aware that twisting is prohibited according to PUE 2.1.21. Therefore, do not use this method in its pure form (without crimping with a sleeve or PPE, soldering or welding).
- Soldering. Another option for extending electrical wiring is to use wire soldering. If you know how to use a welding machine, this method will allow you to efficiently build up a conductor of even a large cross-section (4-6 mm2).
- Shells. Sleeve crimping is an excellent connection method and is well suited for cable extensions. But you may not have enough space to repair the broken wire in the outlet.
- Walnut or other similar branch clamps. With their help, branches are connected for entering private houses from overhead power lines. Also suitable for extending wires. The main disadvantage is its large dimensions.
- Scotch locks are great for branching, connecting and extending low-current wires. They can be used to connect 220V circuits, but are better suited for information lines, such as twisted pair.
We draw your attention to the fact that it is possible to extend aluminum conductors with copper ones only if a special terminal is used for splicing. All other options that allow you to extend the line are strictly prohibited! Read more about connecting aluminum and copper wires in the article: https://samelectrik.ru/kak-soedinit-alyuminievyj-provod-s-mednym.html.
So we looked at what methods exist for extending electrical wires at home. Next, we will present to your attention typical cases when you need to extend the wiring yourself, but now we recommend watching the visual video instructions:
Master class on lengthening a section of electrical wiring using crimping sleeves
Existing connection methods
Two or more sockets can be connected relative to each other and other circuit elements in only three ways: in series, parallel or mixed connection. In other words, the first two methods are called connecting sockets with a cable and a star.
Each of them has its own advantages and disadvantages, which must be taken into account before deciding which socket connection diagram will be used in each specific case - it mainly depends on what cable is needed and its quantity.
No less attention should be paid to what kind of wiring is already installed in the apartment - if the device being connected is high power, then it is likely that to connect the outlet you will have to pull a new wire from the distribution panel near the meter.
The most important rule that in all cases must be taken into account when connecting sockets into circuits is that each twist of wires together is a weak link in the electrical circuit - the more there are, the higher the likelihood that the wiring will fail over time.
Parallel connection - star connection
The essence of the method is that several points are connected in one place, which bears the entire load when electrical appliances are simultaneously turned on.
In practice, parallel connection of sockets means that one main cable comes into the distribution box of the room, from which the remaining sockets are powered. The important point is that with this method, a separate wire goes to each point from the junction box. The advantages of the method are obvious - each outlet works autonomously and if one of them fails, the rest will continue to work. The disadvantage is that if the central contact, from which all points are powered, burns out, then there will be no voltage in any of them, but this is also an advantage, since it will be known with a high degree of certainty where to look for a break.
The next disadvantage of parallel connection of sockets is the high consumption of wire, because a separate wire must be laid from the central contacts to each point. The problem is partly solved by the fact that a wire of a larger cross-section can be laid to the central contacts, and a thinner wire can be run from it to the sockets, but in this case a mixed connection is used.
Serial connection - daisy chain connection
Connecting sockets with a cable means connecting them one after another, and instead of twisting wires, the contacts of the sockets themselves are used.
Those. phase and zero come to the first socket, and from it the wires are transferred to the second, third, and so on - until the last point. In its pure form, connecting sockets with a cable is used only if it is necessary to connect a block of sockets or move the point some distance. In the latter case, the old socket is not always removed - often it is left, because if there is a rearrangement, then it is not advisable to pick at the wall again.
The next feature that distinguishes the connection of sockets with a cable is that you cannot connect powerful devices to them, such as air conditioners, washing machines, microwaves and conventional electric ovens. This ban is dictated by the large number of connections that characterize a daisy chain connection, and each of them is a weak link in the electrical circuit.
Connecting a block of sockets with a cable is described in detail in this video:
Mixed connection and grounding for daisy chain connection
You can increase the reliability of wiring when using a serial connection of sockets by using a mixed connection.
Its essence is that the main cable comes into the junction box of the room, and then the farthest outlet is connected from it. Next, branches are made from this wire to the remaining sockets, which are located between the far point and the junction box. With this connection, wiring cable is saved, and the reliability of the network increases, since if one of the sockets fails, the rest will work (unless the twist near the main cable burns off).
When a series connection of sockets is used, therefore, grounding is also required - if you simply run a grounding wire from terminal to terminal, then if it burns out on one of them, the remaining sockets are left without protection. If you run one cable through all the sockets, but make a branch near each of them, then reliability increases.
How to extend short wires using terminals?
The work process consists of connecting a short cable to a long one using terminal blocks. The extended wires must be of the same cross-section and material. To complete the work you will need:
- heat-shrink tubing;
- clamp terminals;
- the wire;
- socket;
- tools.
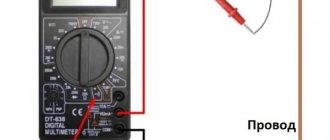
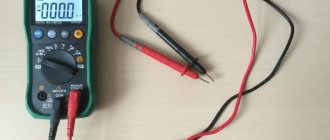
To safely extend the cable, turn off the power from the network. To determine the phase, all contacts are checked with an indicator screwdriver or a multimeter. Thus, the safety of further work is determined.
Next, remove the front panel and disconnect the old outlet. Prepare heat shrink tubes of the required size. The remainder of the protruding cable is stripped of old insulation; the length should be at least 2 cm. The wire is insulated using a tube that is heated with a lighter or blowtorch.
The exposed part should be at least 1 cm. Then insert one end into the hole in the terminal and carefully tighten it. They deal with the second protruding wire in the same way.
The last step will be installing a new outlet. It is installed to replace the old device according to the same principle, resting against the side grooves of the box.
If the socket box fails, new devices have the ability to be attached to the wall using special fasteners. Install a decorative panel. Turn on the electricity and check that the outlet is working correctly.
How to extend the wire in a socket using a terminal?
This method is suitable for splicing conductors from the same or different metals. In this case, it is recommended to observe the following rule: you can connect only those circuits in which the current will not exceed the rated one (it is indicated on the terminal block). Therefore, it is advisable to purchase these elements only in trusted stores with a good reputation, otherwise there is a risk of getting a fake, which can melt and burn.
For this purpose you can use:
- WAGO terminals (suitable for connecting multi-core wires);
- polyethylene terminal blocks (cheaper analogue, not suitable for connecting stranded conductors).
When using the second option, you need to be prepared for the fact that if the monolithic core is tightly tightened, the metal part of the element may crack.
Replacing a single socket with your own hands
To install hidden sockets, a hole is drilled in the wall into which the socket box is inserted. A power cable is inserted into it. During the cosmetic renovation of the apartment, the old socket is dismantled and a new one is installed that meets the requirements of GOST 7396.1-89.
What tools will you need?
To install the decorative body evenly, you need a level. It makes it easy to draw vertical and horizontal lines on the wall. If the fittings are installed after wallpapering, then a construction knife is needed. They use it to cut the wallpaper around the perimeter of the socket box. To remove the insulation you will need side cutters (nippers). You also need 3 types of screwdrivers:
- regular;
- indicator screwdriver;
- Phillips screwdriver.
Algorithm
Before dismantling the old outlet, the network is de-energized - the machine is turned off. The absence of voltage is checked with an indicator screwdriver. When there is no phase, the indicator light does not light. Use a Phillips screwdriver to unscrew the screws and remove the old housing. Pull out the power cable. It has 3 wires (phase, neutral, ground) and 2 layers of insulation:
- outer.
- interior.
The color of the wires is different: zero - blue, phase - brown, ground - green. First, remove the outer insulation with wire cutters, then strip the ends of the conductors. When using WAGO terminal blocks, the insulation is removed by 1.5 cm.
General insulation is removed 2 times more than internal insulation.
At the next stage, they are working on a new socket. It consists of 2 nodes:
- decorative box consisting of a front panel and a frame;
- block, consisting of a housing, contacts, terminals, and mounting tabs.
To connect the wires you need to gain access to the terminals. To do this, the socket is disassembled. Use a screwdriver to unscrew the screw that secures the housing. The next step is basic. The wires are connected to the socket.
During installation, the cable is positioned so that the conductors inside the housing do not touch. If the terminals in the socket are screw, the wire is first bent into a ring, then the screw is tightened, this improves contact. In models with screwless terminals, the wire is inserted into the terminal until it clicks.
At the last stage, install the socket. First, attach the block, controlling the position of the fastening tabs. They must be positioned strictly parallel to the floor line, then the decorative panel will be installed correctly.
How to extend the input cable? Yes, it’s very simple))) In this article you will learn how to do this quickly and reliably. Cable extension is a very common occurrence in electrical installations of various objects. The most common is not leaving a reserve for disconnecting cables in the switchboard, in distribution boxes, etc. There are also often times in new buildings when the developer places a shield in the hallway near the front door. This seems logical and correct. But it happens that the owner of the apartment has completely different plans for the wall on which the billboard from the developer hangs. Therefore, he decides to move the shield to the opposite side or moves it a little further into the apartment. In such situations, accordingly, the existing length of the input cable is not enough and it has to be increased. This connection is very important, since the entire load of the apartment will flow through it. It is worthwhile to build up the input cable if it is not possible to completely replace it from the floor panel to the apartment. Very often, the developer lays the entrance along the floor and fills it with screed. In this article I will tell you in detail and show an example of building an input cable.
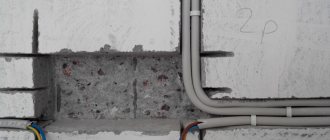
So, let's get started))) This project was made by guys with experience in electrical engineering since 1996, as they said. They only called me to assemble the shield from what they had made and extend the input cable. For some reason they did not decide to do this work themselves. It seems like a great experience. When I first came to inspect the scale of the disaster, I saw the following.
The developer planned the switchboard to the left of the front door and he brought out a five-core cable here, since the input is three-phase. Now extension cords for construction workers and temporary lighting are temporarily connected to one phase. They planned to move the shield to a small room like a storage room, which is located about five meters from the entrance. All the cables were already laid there. The guys said that they already had all the materials for the work and didn’t need anything. We agreed that when they were ready, they would call me.
Several months passed and the call came - come. They bought a large junction box for indoor installation. Here you need a very large one, because... The cable is thick with a cross-section of 10mm2 and five-core. All this needs to be carefully placed in a box. I expected that a niche would be hollowed out and a box would be mounted into it. Everything turned out differently. Since the decorative bricks had already been glued on, the guys said they wouldn’t hammer into the wall, otherwise the bricks would fall off. I tried to convey that the box itself for internal installation will not be beautiful. In response there was a phrase from Vovochka from the distant kingdom - “And so it will do”))) In the end it turned out like in the photo below. I don’t know how the customer will accept this))) My task was to reliably connect two cables and that’s it. This is how I calmed myself down.
The input cable must be extended using crimping with GML sleeves. This is the most reliable way. Thick cables, twisted or otherwise, are very difficult to connect properly. Of course, it was possible to do this with “nuts”, but they would not all fit in the box.
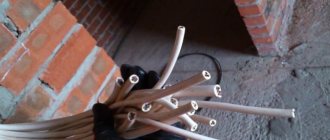
First, we estimate the length of the cable stock that will fit in the box, cut it off and cut it. The cable cores in the sleeves will be connected end-to-end. Therefore, it is necessary that the veins extend to the same depth on each side. How to make sure that one vein does not go too far and there is very little room left for another? We measure the length of the sleeve and divide it in half. It's simple. Here we used sleeves 3 cm long. Therefore, half is 1.5 cm. Therefore, we strip all the cores strictly to 1.5 cm. Then we boldly put on the sleeves and crimp them on one cable. To do this, you need to use a hydraulic press.
I work with a PRGS-70 press. This is a manual hydraulic press for crimping copper and aluminum lugs and sleeves with a cross-section from 4mm2 to 70mm2. This range of matrices is quite enough for me to solve most problems. It is worth noting that this press has an automatic pressure release valve (APV). Those. they will not be able to compress, since the valve will release excess pressure. The presence of ASD is indicated by the small letter “c” in the abbreviation. I have seen a lot of conventional hydraulic presses PRG-70, i.e. which are without valve. They all already required replacing the o-rings. We all don’t know the limits and believe that the more we pump or twist, it will be better. That’s why the O-rings are squeezed out, the slots on the screws and screwdrivers are torn off, the threads on the nuts are stripped, something breaks, etc. Therefore, it is better to pay a little extra and buy a press with a pressure relief valve. This will greatly extend the life of this tool.
We do the same with the second cable. We measure the length, cut it, strip the cores in my case by 1.5 cm. Before the final crimping, do not forget to put on the heat shrink tubes. We will isolate all connections to it. I use heat shrink with the index “ng”, i.e. which does not support combustion. I always put on two tubes - one smaller and one larger. This will be double insulation. We bend the veins the way we need. We crimp and shrink the heat shrinks using an industrial hair dryer. It is worth noting that the width of the press dies is small. Therefore, each half of the sleeve must be pressed twice, shifting the press to the width of the matrix. This is clearly visible in the photo. A sleeve 3 cm long is crimped four times.
Then we carefully put everything in a box and tighten it with zip ties if necessary. This connection has access if required. There is also the necessary reserve length of the cores.
I completely agree with you - this box in the hallway looks very “collective farm”))) At least it’s good that I won’t have to blush in front of the customer.
In this apartment it’s somehow the other way around. The box for recessed installation is installed outside, and the Legrand Plexo shield for external installation is installed inside))) And it will do! Is that right?)))
Consequences of incorrect installation
Incorrect or poor-quality work at any stage of installation of such devices can lead to undesirable consequences. The most common ones are:
- Unreliable fixation of the working part of the device in the socket box.
- Overheating of contacts, as well as melting or fire of dielectric parts of the case.
- A short circuit occurs when connecting power to an outlet.
- Sparking or breakage (burnout) of electrical contacts.
Cable extension in water
It may be necessary to extend the cable, which will later be located in the water, for example, when using a submersible well pump. In this case, the answer to the question of how to extend the wire in a socket can be only one solution: you need to connect the wires using a terminal block. After splicing, the joint must be insulated. For this purpose, it is recommended to take heat-shrinkable tubing. To do this, you need to cut a piece of the required length (10% larger than the size of the terminal block), pull this piece onto the wire, and then heat it with a lighter (or other fire source), moving from one end to the other.
The heating rate and the required temperature are most often selected experimentally, so it is recommended to first experiment on an unnecessary piece of wire. This will avoid possible insulation problems in the future, which is very important, because the cable will be in water.
Wire extension: everyday situations
A vein in the wall broke
If this happens, you must decide whether there is enough wire to connect everything. If there is enough, then we use any method that you might have seen before. If it’s broken so you can’t get under it, you have to break the wall and carry out all the actions there.
How to extend cable in water
This situation arises in cases where it is necessary to lengthen a section of cable running in water, for example: to increase the wire for a submersible pump. Here you will need heat shrink tubing. We do everything only as shown in the picture. This method is suitable for underground cables.
Remember, you can heat it with a lighter, but make sure that the tube must fit tightly onto the wire.
How to extend a wire or cable to power powerful electrical devices
In this case, only one option is suitable - soldering. Don't even look at others - it will only bring trouble. Powerful electrical appliances include: air conditioning, electric stove, etc. The conductor cross-section should be (4mm).
How to extend a cable or cord of low power
For example, if you decide to extend the cord for a microwave or washing machine, throw this idea out of your head. After all, if you connect it incorrectly, there will be big problems. And you can mistakenly connect the grounding with the phase. In this case, it is easier to stretch the wire under the baseboard, and safer.
Increase the length of the temperature sensor wire for heated floors
Initially, read the instructions for it, if there are no problems, use the terminal blocks.
How to extend twisted pair
In this case, there are no problems, but remember, you need to build up each vein separately. Don't forget to carefully insulate the wire extension area.
How to extend the wire of an LED strip
To do this, you will need to purchase special connectors; they allow you to gradually increase the wire for LED lamps. Other methods and materials will not suit you in this case.
Should I wire the socket from the socket or not?
The option of installing an additional outlet will help get rid of quarrels between family members who require electrical points to turn on various household appliances.
This problem arises especially acutely in the kitchen with the purchase of new equipment - a blender, mini-processor, yogurt maker, bread maker, multicooker and other appliances.
It turns out that the existing sockets can no longer cope with their responsibilities - their number is physically insufficient to meet the needs of all households. On our website there is a whole article dedicated to the selection and placement of kitchen outlets.
Therefore, it would be advisable to decide to install an additional outlet from an existing one.
But here you may encounter a real problem - it is not always possible to complete such a task. There are a number of restrictions when it is categorically impossible to carry out such a modernization of the existing electrical network:
- if you need an outlet for an electric stove;
- when you decided to connect a boiler with the washing machine;
- if the total power of the devices is more than 2.2 kW.
In houses or apartments where the owners purchased a new electric stove to replace the old gas stove, a new outlet will be required to connect it. In such a situation, it is impossible to wire another one from a regular outlet to turn on this powerful device.
Here you will need to install a separate branch from the distribution box, or even better, from the panel. Yes, and a residual current device for powerful equipment needs to be installed. In order to learn about the rules for connecting an outlet for an electric stove, we recommend reading this material.
Another unfortunate example is when the bathroom only has an outlet for the washing machine. But over time we purchased a boiler. Read on to learn how to properly position and connect sockets in the bathroom.
These devices cannot be plugged into one double socket at the same time - the wiring may burn out. It will always be problematic to control the order in which the boiler and washing machine are turned on.
It is also necessary, even before starting work on installing another outlet, to calculate the expected power of the devices that will simultaneously be included in the new block of outlets.
Often they plan to upgrade the connection point to the electrical network, which is powered by a wire with a cross-section of 1.5-2.5 mm 2. Therefore, the total power of the devices can be slightly more than 2 kW.
Short wires in socket –R
Replacing an outlet is a fairly simple matter when everything goes as it should. In some cases, it is not possible to connect a new outlet due to some reasons. For example, short lengths of old wires that could simply break off over time; or the design of the new socket is designed in such a way that the existing length is not enough for a high-quality connection of conductors. How to extend short wires? Let's consider several ways.
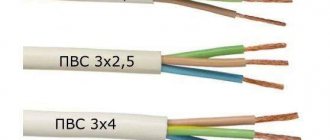
Cable and types of conductors
There are single-wire (for example, AVVG, VVG cable) and multi-wire conductors (PVS wire). The first type is represented by one, solid, rigid wire, which is why they are also called monolithic. They have a low level of flexibility. Stranded wires are softer and consist of several thin wires. They are called multi-core, flexible. The more thin wires there are, the higher the flexibility. Depending on the type of cores, the method of connecting them is selected. For stranded ones, screw terminal blocks and bolts are not used due to the inability to create strong and reliable contact.
Connecting wires using terminal blocks and sleeves
Extension of the wire in a socket occurs by connecting a piece of an old conductor to a new one. In another case, a new cable is laid from the junction box, which is more expensive. You can connect two wires using terminal blocks. There are two main types: clamp and screw. Clamping devices have a design in the form of an insulated housing and contact with a spring. Clamp terminal blocks can also be used to connect wires with stranded conductors.
Popular products on the market are Vago terminal blocks. Screw terminal blocks are structurally represented by a housing made of insulated material and a contact that is clamped using a screw. The design of terminal blocks may vary.
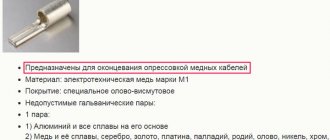
Cable lugs and sleeves. Used to connect cable ends using crimping. For this, a special tool is used - a press or pliers (depending on the diameter of the sleeve). It is not recommended to crimp tips and sleeves using pliers, especially for permanent use.
Why can't you use pliers? The reason is the round shape of the sleeve and wire. When using this tool, crimping occurs in such a way that the shape of the connection is flattened. This leads to the formation of voids in the sleeve, where the wire may go over time, although at first such contact may seem reliable. As a result, the contact will weaken and the conductor will jump out of the sleeve. Or the connection point will heat up and damage the insulating layer, which can lead to a short circuit and other adverse consequences.
Crimping sleeves according to the rules. A special tool for crimping is pliers or presses. In this case, the sleeve is placed in the opening in the shape of the letter “P”, clamped with a screw or hit with a sledgehammer. The joint becomes almost round or square in shape, where a good contact area is maintained for a reliable connection.
Experienced crimping electricians can crimp the sleeve evenly on all sides, forming a neat hexagonal or square crimp.
How to extend a wire. Extension of wires by soldering. This effective method can be used with copper wires. If it is not possible to de-energize one or another outlet group separately, you must use a gas soldering iron or a battery-powered soldering iron. Soldering, unlike welding, can be done extremely carefully without damaging the decorative coating of the walls.
Connecting short conductors in a socket
Which of the above connection options is suitable for extending the conductive cores of a wire in a socket? In this case, such inconvenient accompanying conditions may arise as:
- limited space, when it is very difficult to get to the short ends of the wire in the socket box;
- the presence of soft copper cores that require careful handling;
- unwanted overheating of short sections of cores, when damage to the insulating layer cannot be allowed (in some cases it will be difficult or impossible to build up).
If the above conditions exist, let’s consider which method is best.
Soldering is used for copper conductors and the ability to disconnect the socket group with which work will be carried out, or when using other safe options for organizing the soldering process. The use of screw terminal blocks is also relevant. If there is not enough space, remove the plastic case from the terminal block, install the wire and then insulate it. This method is used for copper and aluminum wires. They can be multi-wire or single-wire. Crimping is performed using an NShVI tip.