Pros and cons of backlighting
Kitchen cabinet lighting has its advantages and disadvantages:
| pros | Minuses |
|
|
Be sure to look at the options for interior filling of kitchen cabinets.
The photo shows the backlight of the glass apron
What is LED backlighting
LED lighting, LED strips, luminaires, lamps can provide the most comfortable, optimal level and degree of illumination. Such systems organically complement and fit into the overall interior concept of the kitchen and other rooms in the house. Correct distribution of light flux and properly selected lighting are an important component of an effective, stylish modern design. We can say that ice strips perform a functional and aesthetic role. Such a lighting source brings new notes to the overall design, design, and interior of the space.
LED strips are used for decorative lighting of niches, cornices, furniture sets, and suspended ceiling structures. When planning lighting, LED lamps and LED strips for the kitchen are most often used as additional effective lighting for the work area.
LED lighting is a thin flexible strip with a self-adhesive base on which LEDs are installed. Light diodes are special semiconductors that emit a uniform luminous flux when electricity passes through. The degree of brightness of the lighting depends on the type and chemical composition of the light diodes.
The lighting system consists of:
- power generator (BP);
- controller, which is necessary when using LED strips with colored diodes;
- special connectors (dimmers) that allow you to easily connect individual elements of the tapes.
When planning the installation of LED lighting or LED strips yourself, with your own hands, you need to take into account that the installation is never carried out directly. The LED strip can overheat and break, so the main condition for connecting the backlight is the presence of a stabilizer.
What lighting options are there?
LED lamps for kitchen cabinets come in 3 types.
Check out our article about organizing lighting in the kitchen.
Spotlights
Round, square, rectangular - they can either be built into the bottom of the box or mounted on top of it. Spotlights look good both under cabinets and under open shelves. To ensure there is enough light, choose the appropriate brightness and place the sources at a suitable distance from each other.
LED panels
To achieve soft, diffused, homogeneous light, there is no better option. Unlike strips or spots, panels typically occupy the entire bottom surface of cabinets, ensuring an even flow of lumens. The panels do not heat up, are safe for the eyes, and last about 50,000 working hours (~15 years). Easy to install and maintain. The only drawback is the relatively high cost.
Important! Any diode lamps - strips or panels - are characterized by energy-saving properties. They consume much less energy compared to conventional incandescent lamps and even energy-saving lamps.
In the photo, illumination with spotlights
LED Strip Light
An affordable option with a low price. Just like panels, tapes do not emit heat and last for many years. They can be installed anywhere:
- the angle between the apron and the bottom,
- in the center of the bottom,
- near the front side.
At the same time, you can install lighting in the kitchen under the cabinets yourself, without the help of specialists. The only disadvantage of the tapes is the serial connection. That is, if one LED burns out, all of them will stop working, which means the strip will have to be changed completely.
Important! Any lamps used to illuminate the work area must be marked IP65 or higher. This marking confirms that the equipment can be used in wet areas.
Why choose LEDs?
The era of incandescent lamps has long passed; now even energy-saving solutions, which had a number of significant advantages over their predecessors, are gradually being replaced by new developments. LEDs, although they have been known for a long time, today have firmly established themselves in the household segment. They have only one drawback - cost. But the number of positive aspects of this choice presented below immediately eliminates any doubts:
- economical with high light output;
- compact sizes of even ready-made lamps suitable for store-bought kitchen cabinets;
- minimal heat transfer with proper installation;
- enormous service life compared to conventional light bulbs;
- lack of flare-up characteristic of fluorescent lamps;
- the luminous flux is practically independent of the network voltage;
- Anyone can make LED lighting.
Decorative work surface lighting
LEDs have varying degrees of protection from moisture, which allows you to use such lighting in the kitchen even in the most dangerous places for electricity - near sinks, refrigerators, washing machines and dishwashers - wherever there is water.
If you currently have lighting installed in your kitchen, for example, long fluorescent lamps, do not rush to completely disassemble the wires and fixtures. In modern stores you can find LED lamps for any base, any shape and power, which will allow you to simply replace old and uneconomical solutions with more ergonomic options, and the lighting for kitchen cabinets will be greatly updated.
Using fluorescent lamps in the kitchen
Where is the best location?
Kitchen cabinet lighting, depending on its location, performs different functions.
Above the work area
In this case, the lamps are mounted in the center of the cabinets (built-in) or closer to their front side (overhead). Then the light will fall down, creating the right effect and helping to concentrate vision on preparing the products: cutting, cleaning, etc.
Advice! In order not to disturb the appearance, order a special “threshold” along with the cabinets, which will hide the lamp housings.
In the photo there is lighting in the corner under the cabinets
On the apron
Because The main purpose of such lighting is still decorative, so the apron should be suitable. Suitable:
- they threw off with drawings;
- plain tiles;
- textured surfaces.
Of course, part of the flow will fall on the countertop, so you can highlight the apron even if there is a slight lack of light in the kitchen.
Ribbons are usually attached to the top, but can be added to the bottom and sides.
In the baseboard
How to position the main lighting correctly?
How to make lighting effective? The main task of the lamps that will be installed as the main light is to provide as much brightness as possible above the work areas. You can start with the entire kitchen at once, that is, install LEDs on the ceiling. This will illuminate the entire area of the room and allow you to be comfortable in it.
- You can install an LED strip in the kitchen under a transparent or light suspended ceiling, which will softly and evenly diffuse the light throughout the illuminated kitchen. However, for such large-scale lighting you will need a fairly large number of lamps hidden under a light-transmitting fabric.
Stretch light-transmitting ceiling for the kitchen
- A less effective way to install LED lighting in terms of the amount of light, but a perfect complement to the main light, is to hide it under plasterboard protrusions near the ceiling. In a composition with a light ceiling, this method will give a good increase in soft and comfortable lighting, enhancing the luminous flux of the main lamps.
Decorative ceiling lighting with white light in the kitchen
In addition, in this case you can use not only white or yellow light, but also diversify it with other colors, their combinations or tints.
Decorative ceiling lighting with blue LEDs in the kitchen
- Having dealt with the general lighting in the room, you need to move on to the work areas. The most common places where additional light is important are the countertop where food is cut, the area near the sink and where dishes are stored, and the kitchen apron. Over such places in a classic kitchen hang cabinets, under which it is very convenient to install lamps. Here you need to use classic white or slightly bluish light, and there should be a lot of light - the worktop for cutting should be without shadows that interfere with the hand. Although such light cannot be called the main one in any kitchen, illumination of kitchen cabinets provides a significant increase in overall lighting. Creating a pleasant twilight when other lights are turned off, it can serve as an excellent night light.
Illumination of the main worktop and sink with white light
- After all the most important surfaces are abundantly flooded with bright light, you can proceed directly to decoration. The photo above already touches on a similar topic - lighting of kitchen units and floors. Lighting fixtures are usually installed under countertops or at baseboard level. LEDs, the light of which is directed downwards to the floor, illuminate work areas very well, as well as the contents of the drawers when they are opened.
Decorative lighting for furniture and floors in the kitchen
In addition, such LED lighting is a great way to complement and diversify the colors of the new furniture installed in the kitchen. An interesting effect, called “floating furniture,” is achieved by installing LEDs along the bottom contour of a cabinet standing on the floor. It is important that the crystals themselves are not visible - they can be directed downward, and the lamps can be hidden under the ledges of the doors. With the main light turned off, it will seem that the furniture is not standing on the floor at all, but is hanging beautifully in the air. This LED lighting is very easy to do with your own hands.
“Floating furniture” in the kitchen - the effect of installed LEDs
Which switch will be more convenient?
Let's start with which option is better to refuse. The most impractical switches for lighting in the kitchen above the work area are those with motion sensors. As planned, they should be as comfortable as possible and turn on the light every time someone enters the room.
In fact, you don’t need to turn on the lighting every time, and the equipment works intermittently and can turn off while you are preparing something and practically not moving (for example, standing still while chopping).
LED strips in the kitchen interior
When decorating a kitchen space, LED lighting is used for a variety of purposes:
- lighting of various functional areas;
- lighting of furniture sets, modules, showcases, cabinets, drawers;
- lighting stained glass, kitchen apron, bar counter;
- illumination of paintings, decorative and interior elements, walls.
Using LED strips, you can organize combined lighting and divide the kitchen space into separate functional areas. Using ice strips you can effectively illuminate a multi-level ceiling structure. You can also place the tape in the space between kitchen cabinets.
Install the sealing tape into the side wall near the sink, next to the faucet. The lighting of the apron in the kitchen looks especially beautiful if it is made of frosted glass.
LED lighting in the kitchen can be installed monochrome (one color), or colored if there are LEDs of different colors on the ice strip. Single-color ribbons can give off a white, green, purple, and red glow. The brightness of the backlight can be adjusted using a dimmer. White color can have different shades - from cold blue to warm yellow.
Colored tape can produce either one color or alternate colors in a certain sequence through an installed program on the controller. The RGB color strip can also glow in different shades, cold and warm, which adds zest to the lighting design of the kitchen space.
LED strips fit harmoniously into any interior, kitchen design, ranging from classic to high-tech, minimalism, country, modern. To add newness to the interior design, the best option is colored LED modules. To illuminate functional areas, give preference to monochrome LEDs.
How to do it yourself?
Attaching the LED backlight is not difficult, the main thing is to have all the necessary tools and follow the instructions.
Tools and materials
The main thing that installation cannot do without is the LED strip itself. When choosing, pay attention to the following parameters:
- Color. LED strips glow in the RGB model. Diodes are white, red, blue, green. The remaining shades are obtained by including several basic shades at once. There are RGB strips - they are colored, or WRGB - with colored and white diodes. However, the most suitable for the kitchen are ordinary white ones, which in turn are divided into warm and cold.
- Flow. Brightness is measured in lumens - the more there are, the brighter it will be when the tape is turned on. This parameter depends on the type of LEDs and their number, as well as the density of the arrangement. There are 2 main types: SMD3528 (without RGB) and SMD5060 (5050). The first ones are smaller and are placed more often, the second ones are larger and placed less frequently. For backlighting, a standard double-density SMD5060 or SMD3528 tape is suitable.
- Protection. Let us remind you once again that for a long service life in the kitchen, models marked IP65, 67, 68 are required.
In addition to the tape with diodes, you will need a power supply (adapter), a switch, a wire for connecting with a reserve (section ~2.5 mm), a plug into a socket (or a cable pulled out of the wall), electrical tape, double-sided tape or other fastening. Tools you will need are scissors, a screwdriver, pliers, and a soldering iron.
Important! LEDs operate at a voltage of 12 watts, not 220, so you will need to install a transformer.
Step-by-step instruction
6 steps for successful LED strip installation:
- Cut to the required length. This should be done exclusively in the place indicated on the tape itself. Typically, orange marks are located through 3-4 LEDs, often scissors are drawn on them.
- Connect the cable and power supply. The safest way is to expose the contacts on the tape and solder the wire, but you can also use connectors.
- Isolate. A mandatory step for the kitchen to protect the connection from excess moisture. Use electrical tape or special tubes.
- Attach it in place according to the level. The method depends on the specific model; some aluminum profiles have an adhesive side. If not, use double-sided tape.
- Connect electricity. Insert the plug into the socket or connect the tape to the wire coming out of the wall, and turn it on.
- Complete installation. At this stage, you should attach the switch, secure and hide the adapter, and put a transparent or matte diffuser on the profile.
Important! Do not forget about safety precautions: carry out installation with the power off, observe polarity, insulate all exposed wires immediately.
Video
To understand the LED strip connection diagram in more detail, watch the video using a socket for an exhaust hood:
Types of tapes
When planning to organize lighting in the kitchen using light diodes, you must take into account that ice strips come in different types. Therefore, in order to choose the optimal lighting option, before purchasing, be sure to inquire about the characteristics of the various models presented. Do not forget that the kitchen is a room with variable temperatures and high humidity.
One of the main differences is the type of LEDs installed on the strip as a lighting source. To organize additional lighting, diodes such as SMD-3528, 5050 are most often used.
LEDs marked SMD-3528 consist of one crystal, two terminals, have lower brightness, and generate a rather weak flow of light. Therefore, such ice ribbons are used exclusively for design ideas.
SMD-5050 light diodes consist of three crystals and have six pins. They provide a monochrome or colored glow if red, yellow, blue, purple, and orange crystals are installed on the tape. Ice strips of this class can be used for aesthetic purposes, for additional illumination of the work area in the kitchen.
The brightest, most powerful light diodes are SMD-5630, 5730, 2835. Such elements have a wide lighting angle (up to 140–160 degrees), provide a bright, uniform glow and can illuminate every corner of your kitchen.
There are also DIP LEDs of the “piranha” class on sale, which imply deep installation technology in systems. Provide uniform diffused directional light. The distribution angle of the luminous flux ranges from 75 to 95º. Such modules have a cheaper cost and are best used only for design purposes, for example, for lighting, cabinet lighting, interior decorative items in the kitchen.
When choosing an LED strip for the kitchen, you should also consider the number of diodes per linear meter. Uniformly intense, soft illumination is provided by ice strips and lamps with the most dense arrangement of components.
Types of LED strip according to degree of protection:
- Open (unsealed). Marked IP33. They have unprotected conductive paths, so installation of tapes of this type can only be carried out where moisture is prevented.
- One-sided. Manufacturers mark them IP65. Sealed from the electronics side, that is, all contact elements are filled with silicone sealant.
- Sealed double-sided ice tapes. They are produced in special protective casings made of completely transparent polymer plastic.
To organize additional, aesthetic lighting in the kitchen, preference should be given to strips marked IP65, IP67, IP68. It is equally important to choose a power generator based on power level and protection class.
Advantages and disadvantages of backlighting
It must be said right away that this additional lighting has more advantages, but the backlight also has disadvantages. How serious they are is for the future owners to judge.
pros
These include:
- bright light guaranteeing maximum comfort while cooking;
- the ability to use lamps as the main source of light at night;
- visual effect - visual expansion of a small space.
- inconvenience if the wrong model was chosen when purchasing: this concerns the brightness of the lamps;
- the need to find a place for the power supply, if one is provided for the device.
The last advantage of lighting is its wide range, allowing you to find “your” device for any kitchen. It’s easy to choose a model to suit your taste, the color and style of the room and furniture.
Minuses
They are relative. The disadvantages include:
Another obstacle that may arise on the way to your goal is the need to install additional sockets or switches. In this case, you will have to look for a place for them, which is often not enough in small rooms.
LED lighting in the kitchen
The most common place to use LED strips and spotlights in an apartment is the kitchen. Directional lighting will make the cooking process more convenient and the interior more modern.
Where to place lighting in the kitchen?
In fact, the LED strip in the kitchen can be placed anywhere, for example:
Light wall cabinets with glass doors from the inside.
Such lighting will highlight the beauty of exquisite sets. If the cabinets contain unremarkable dishes, the glass can be made frosted. Then a soft light will come through it from the cabinets.
Place the LED strip above the wall cabinets.
When turning LEDs onto the ceiling, this solution will visually increase their height.
Under the lower cabinets.
This solution will create an original floating effect. When using an LED strip in this case, the kitchen will be illuminated in an unusual place, which will definitely surprise your guests.
Under the countertop.
The countertop should be slightly wider than the lower cabinets to allow for hidden installation of the tape.
Light up the countertop or dining table itself.
This option looks great with a glass tabletop, decorated with decorative matte and carved elements.
Install a luminous kitchen apron.
Innovation in interior design. In this case, it is not the top edge of the apron that glows, but the apron itself from the inside.
Work area lighting.
An excellent solution in the kitchen is LED lights above the work surface. They should not be too bright, otherwise, during long cooking, your eyes will get tired.
LED lighting for the kitchen under cabinets
The use of LED lighting for kitchens under cabinets has recently become very popular. Both upper and lower cabinets can be illuminated from below. The main thing is to install sealed tapes, observing fire safety rules, since moisture is likely to get into such places (for example, water from a desktop or steam from a kettle).
Using overhead LED lights for the kitchen under cabinets
Overhead lamps are attached to the outside of the cabinet and are often equipped with a rotating mechanism, making it possible to change the direction of the light (for example, from a cabinet to a tabletop).
The main advantage is that installing overhead LED kitchen lights under cabinets does not require preliminary preparation.
Application of recessed LED furniture lamps
Such elements are intended for interior lighting of cabinets and drawers. They look very harmonious, but their installation is possible only after preliminary work: drawing up a plan and preparing the cabinets.
Organization of kitchen apron lighting
When organizing lighting for the kitchen space, it is very important to think about comfortable lighting for the work area or kitchen apron. The work area includes: cutting tables, stove, sink. For personal comfort and convenience, this area of the kitchen should be evenly and well lit. At the same time, the luminous flux should not be excessively bright so that the cooking process is as pleasant and comfortable as possible. To illuminate the kitchen apron, give preference to soft lighting.
If the kitchen has only basic lighting, there are no additional lighting fixtures or built-in spotlights, then during the cooking process the work area may be poorly lit. Therefore, in the kitchen, using an LED strip, you can successfully highlight individual interior elements and additionally illuminate important work areas.
To ensure uniform lighting, work area lighting is installed under wall-mounted kitchen cabinets. The systems can also be placed between kitchen cabinets and shelves. It is important to correctly calculate the power and number of LED modules.
As an option, you can organize automatic switching on of the lighting when the doors of the furniture elements are opened. In this case, the light will turn on when the doors are opened, and when closed, they will automatically turn off, which is economical in terms of electrical energy consumption.
LED systems are also suitable for lighting the eating area, dining table, and bar counter. In this case, it is worth installing ice strips along the perimeter of the wall surface, in niches, and below the hanging shelves.
LED lamps can also be used as additional lighting. The modern market offers a wide range of LED lamps that can be installed in spotlights, wall and ceiling lamps.
LED lamps are available in various wattages, so you can always choose the best option for organizing lighting design and a harmonious interior in the kitchen.
LED spotlights installed under the ceiling structure look especially impressive when decorating a kitchen or dining room. Spotlights have an affordable price, high quality parameters and can be made in any design.
DIY LED strip installation
The work is not difficult if you understand the process and prepare everything you need for installation. Select the tape in advance, calculate the quantity according to the size of the cabinets, but always make a small supply just in case.
Materials and tools
Lighting in the kitchen under cabinets with LEDs can be done in an hour or two if you prepare everything you need in advance. In addition to the tape, you need the following:
- Aluminum profile with tape glued to it. This element protects the backlight and serves as a radiator that removes excess heat. LED strips work much longer with a profile than without it. You can choose an option with a diffuser, it is more expensive, but it gives more even light.
The profile for the LED strip greatly simplifies installation. - Small self-tapping screws for fastening or durable double-sided foam tape. You can buy it at an auto store, where the quality of the tape is higher and it can withstand adverse influences.
- A screwdriver with a set of drills and attachments for self-tapping screws, if such fasteners will be used.
- Tape measure and pencil for measurements and markings.
- The cable for connecting the LED strip, the cross-section should be selected according to the power of the equipment. Typically 0.74 mm is used.
- A soldering iron with a small tip, as well as solder and rosin.
Soldering iron with a thin tip and USB charging - Insulating tape, heat shrink tube of suitable diameter.
- Scissors or construction knife.
Sometimes double-sided tape is not needed if there is a high-quality adhesive layer on the back of the tape. But if it does not inspire confidence, it is better to use an additional fixation element.
Guide to action
Cut location
Installing an LED strip in the kitchen is not much different from that in other rooms. The installation itself, carried out by yourself, will take place according to the following scheme:
- First you need to measure the length of the piece of tape that we will install. Using a tape measure, measure the length we need and cut it with scissors. This is done with your own hands at once;
Note! The LED strip should be cut exclusively along the intended lines.
Soldering contacts
- then you need to expose the contacts at the ends of the tape by about 1-1.5 cm;
- solder two pieces of cable to the exposed contacts;
- then we isolate the contacts. To do this, we use either special heat-shrinkable tubes or electrical tape;
- We prepare the working surface in order to attach the light source to it. The surface itself must be thoroughly degreased and cleaned of various contaminants. First we clean the surface with cleaning agents, and then treat it with alcohol;
- Now you need to secure the tape. We take a profile or corner and attach tape to its outer side. At the same time, on the other side, we install the tape itself. To do this, you need to remove the protective film from its base;
- We install a transformer in the immediate vicinity of the installed lighting. To do this, remove the body from it. Next, on the low voltage side, solder the bare leads
Ribbon on the cornerfrom the tape. Then, on the other side, we attach the plug and cable;
- in the cabinet on which the tape was placed, we drill a hole and pull the excess wires into it. The wires here need to be secured using electrical installation brackets;
- All wires should be brought together in the place where the power supply will be located. An excellent place to place it would be a hood;
- The wires should be connected to each other “+” to “+” and “-” to “-”. After that, connect them to the power supply;
- then we install the switch and the power supply can be connected to the mains;
- Now all that remains is to disguise the wires. They are masked using a special plastic box in which they are placed after installing the product.
Now everything is ready.
Ready backlight
Design and principle of operation of LEDs
Depending on the type of LEDs, the backlight can serve as additional lighting or decorative.
The design of the LED includes a 5 mm long housing, in the upper part of which there is a lens, and in the lower part there is a reflector. Inside the case is a crystal that emits light. The LED has 2 terminals - anode and cathode. A reflector is attached to the cathode, and a crystal is attached to the anode using a jumper made of gold wire. By means of the relative position of the reflector and the polymer body, the radiation angle and its direction are set.
Electrical energy is converted into light due to a pn junction, the essence of which is as follows: during the passage of electric current, interaction occurs in the active zone of 2 types of p and n type conductors. A conductor is either positively or negatively charged. When differently charged electrons interact, light radiation is produced.
Standards
Any artificial light source has its own standards. For kitchen lighting, it is important to know and determine the following characteristics:
- Colorful temperature;
- color rendering index;
- power;
- flicker;
- illumination.
Colorful temperature
This is an important standard for lamps, especially LED ones. The feeling of comfort when being in the kitchen depends on the color temperature.
Color temperature is measured in degrees on the Kelvin scale. Depending on the value of this parameter, the color of the light flux emanating from the artificial light source changes. Lamps according to color are divided into three groups:
| Color temperature, K | Emission color |
| Below 3500 | Warm |
| 3500–5300 | Neutral - white, daytime |
| 5300 and above | Cold |
A conscientious manufacturer indicates the CG value in the markings on the base, lamp bulb or in the accompanying documentation. To illuminate the kitchen work area, it is better to purchase lamps with a central heating value of 4000–4500 K. Fluorescent and LED lamps fall into this range.
Color rendering index
The CRI or Ra parameter characterizes artificial light in human perception of the realistic appearance of illuminated objects. The highest Ra index is for incandescent lamps and halogen lamps, it is 99–100. Fluorescent light bulbs have Ra = 90–100, LEDs have Ra = 80–89.
Flicker
Light pulsation is the uneven emission of light from a source during its operation, when with a certain periodicity (usually imperceptible to the eye) it shines either brighter, then weaker, or does not shine at all. Light flicker leads to headaches, eye irritation and even disruption of the cardiovascular system.
This phenomenon is observed in all light sources operating from alternating or pulsed current, so for us it is not the fact of its presence that is important, but its characteristics. At a frequency of 50 Hz, light pulsation of more than 40% is visually perceived as a stroboscopic effect. SNiP 23-05-95 “Natural and artificial lighting” states that the pulsation coefficient of illumination of the working area should not exceed 10–20%, while only those pulsations that are perceived by the naked human eye are normalized, that is, with a frequency of up to 300 Hz.
12-volt LED strips are especially notorious for the problem of flickering.
Check the lamps before purchasing on Alexey Nadezhin’s website - Lamptest.ru.
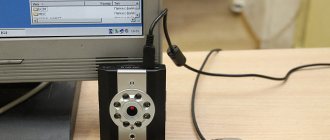
You can also check flicker using a mobile phone. Turn on the video camera and point it at the lamp. The flickering will be immediately visible on the smartphone screen. Do not buy lamps with this effect.
Illumination
Check the quality of lighting on the working surface of the kitchen wall using a smartphone. For housewives who are constantly busy preparing dishes in the kitchen, good visibility of items on the desktop is important. The illumination of the workplace should be in the range from 300 to 1000 Lux.
To measure this parameter, you need to download the Luxmeter program to your phone. To measure the backlight intensity, you need to place your smartphone on the table and turn on the LuxMeter. The display will show the number in lux. To check the lamp before purchasing, you need to ask the seller to turn it on and hold your smartphone with the Luxmeter turned on at a distance of 60 cm. If the test shows 300 Lux or more, then you can buy it.
Expert opinion
Bashir Rabadanov
Technologist at the furniture company Woodband
Professionals use portable lux meters. For example, Mastech MS6610, LuxLiner LMI-20 or Testo 540.
Calculation of lamp power
Power is directly related to brightness. Strong light irritates the eyes and can even cause headaches. Low lighting will strain your eyes and make you feel uncomfortable. It is important to choose lamps whose power will not irritate or tire your eyesight for some time.
For the kitchen work area, the recommended illumination is 300 lumens per square meter. See the table below for comparing luminous efficiency and power.
If there is no marking on the base or bulb of the light fixture indicating the power, then you can calculate this parameter yourself. To do this, you will need a multimeter and the ability to connect a lamp in the store. You need to take two measurements with the tester.
For DC lamps, measure its power in operating condition by connecting the tester in series. Then you need to move the device switch to the voltmeter position. Take readings by connecting the multimeter to the lamp in parallel.
For AC lighting fixtures, take both readings using a parallel-connected tester. Having received the results in volts and amperes, apply the formula: P = UI, where P is power, U is voltage, I is current. By multiplying the values, you get the lamp power in watts.
You can also calculate the power by measuring the resistance and current of the lamp, using the following formula: P = I2R, where P is power, I is current, R is resistance in ohms.
Recommended backlight power:
- spotlights - 20 W x 3 pcs. = 60 W;
- recessed fluorescent lamps with base GX 53 - 20 W x 3 pcs. = 60 W;
- overhead lamps 12 V - 8 W;
- light beams (LED consoles) 40 W;
- LED strip 5 m - 7 W x 5 = 35 W;
- wireless lamps (3 AAA batteries) - 5 W x 4 pcs. = 20 W.
Selecting the type of backlight
To illuminate the kitchen workplace, the following are used:
- Spotlights;
- recessed lanterns with GX 53 socket;
- overhead lamps and spots;
- light beams (consoles);
- LED Strip Light;
- lighting for glass aprons;
- wireless lamps.
Spotlights and spots
For spotlights (TS), halogen, fluorescent and light-emitting diode (LED) lamps are used. All three types can be installed for lighting in the kitchen. Incandescent light bulbs are not used for lighting due to their high heat and low efficiency - damage to the bottom of the kitchen shelf is possible.
The problem with installing vehicles is their height and the thickness of the bottom of the wall cabinets. Recessed models require a minimum vertical space of 40mm. If the thickness of the bottom panel of the cabinet made of MDF or laminated chipboard is 19–22 mm, then where should the protruding parts of the lanterns inside the boxes go? To keep the lamp bases out of the way, they can be hidden in special boxes or covered with an auxiliary shelf.
This causes additional inconvenience. In addition, you need to hide the wires. There is a way out - fastening the cabinets from the bottom of the installation platform from MDF with a thickness that covers the lack of space. The mounting holes must be cut with a hole saw installed in the drill chuck. In this case, you will have to cover the spring legs and wiring with some material. Therefore, it is best to place the vehicle in close proximity to the wall. Internal wiring and lamp bases will not interfere with the placement of items inside the cabinets. The distance between point light sources should be at least 40–45 cm.
Recessed lights
LED and fluorescent lamps in the GX 53 recessed sockets are especially popular. They have a small height of about 25 mm. When installing lanterns for kitchen furniture, you will need an additional strip. It must be secured to the outside or inside of the cabinets.
Sometimes only a 20 mm thick contact block is used to mount the lamp. This makes it possible to mount lamps in the bottom panel of wall cabinets without installing additional elements. The protruding body of the lamp increases the angle of distribution of the light flux, which enhances the illumination of the tabletop.
Thousands of different types of spots in the GX 53 format are sold on the electrical market. You can buy a lamp, for example, at Leroy Merlin. There is a convenient catalog on their website.
Expert opinion
Bashir Rabadanov
Technologist at the furniture company Woodband
Be careful when purchasing Ecola products. To reduce the cost, some models used fragile plastic without metal radiators, which crumbled after a short time of operation.
Surface-mounted lamps
Cabinet light monoblocks are surface-mounted linear luminaires. They are mounted under the upper cabinets. The wires leading to the devices are hidden behind the back wall of the pencil cases. The best place to place the lights will be the corner between the wall and the furniture. The fastening is simple - with self-tapping screws to the bottoms of the cabinets. Also, overhead devices are hung on dowels inserted into the wall.
The overhead type can also include an LED panel.
Step-by-step instructions for installing surface-mounted lamps
Online stores offer a choice of lightweight vehicles that are attached to the furniture surface with Velcro. To install them, do this:
- Cut the double-sided tape into pieces that cover the contact surface of the flashlight housings as much as possible. It is better to use thin transparent tape.
- Wipe the attachment points with alcohol or soap solution.
- Wipe the surfaces dry.
- Remove the protective film from one side of the tape and stick it on the lamps.
- Remove the second film and press the lights to the furniture.
- Hide external wiring behind pencil cases.
- Connect the switch and plug.
- All you have to do is connect the plug to the socket - and the backlight is ready for use.
As additional lighting, install oriented lighting devices - spots. Their main function is to concentrate the light spot on a separate section of the lower horizontal surface of the kitchen wall. Due to the hinged mounting, the spot light can be directed in different directions. So, for example, while cooking food on the stove, the light of the spot can be directed to this area. To enhance lighting in other places, simply turn the lamp in the desired direction.
Spot light with swivel mount
Light beams
These are tubular products with LEDs inside. This type of product also includes fluorescent lamps. For the kitchen they are installed in special protective decorative boxes. Fluorescent lamps cause eye irritation for many people when used for a long time. Both types of lamps are sometimes hung on special brackets under cabinets.
The plastic LED length gauge is flexible. The light beam is convenient to use for organizing lighting under cabinets in corner kitchen units. The hose emits a soft light stream that does not tire your eyes. The device operates on 220 volts. They can be found on sale in lengths of 3 and 6 meters.
LED Strip Light
Universal lighting for the kitchen work area - LED strip. Luminous strips with Velcro can be attached both to the bottom of cabinets and to tiles on the wall. Tapes are sold in reels. They have markings in those places where they can be divided into the required segments.
The LED strip is connected via a 12-volt power supply, which is installed inside the cabinet or on top. Brightness and color are controlled by a remote control with touch keys.
An LED strip with one power supply should be no more than 5 meters. Otherwise, you need to connect an additional strip in parallel with another power supply.
The tape may come off the furniture over time. In this case, use double-sided tape or additionally secure the strip with a stapler.
The LED strip can be installed in a special end profile-handle. Look at the video how this is done:
Lighting for glass splashbacks
Kitchen aprons occupy the space between the wall and floor parts of the furniture set. They are impervious to various contaminants coming from the stove, work table and sink. Glass skins, in addition to their protective function, serve as accent walls. They are covered with various images. Lighting from inside the apron not only adds volume to the paintings on glass, but also illuminates the work area along its entire length.
The transparent panel must be installed after the lighting fixtures are installed in the wall and connected to the power supply. Skin backlighting is usually performed in two versions:
- LED strip screen.
- Light beams.
LED strip screen
Place foil on the grease-free surface of the wall. Attach the LED strip to the finished screen with a snake. Mount the switch in an inconspicuous place. Place the power supply and socket where they will be invisible behind the apron.
Light beams
Attach 2 length gauges at the top and bottom of the wall. It is important that there is a gap of at least 5 mm between the surfaces of the light sources and the apron. It is better to choose lamps that are powered directly from the household electrical network. In some cases, light beams can be covered with cornices so that the light does not hit the eyes, but evenly illuminates the work table, stove and sink.
Wireless lamps
Lighting devices of this type help solve some problems:
- no socket is needed to connect to the mains;
- no need to hide wires;
- no DC power supply required;
- installation does not require special fasteners.
Wireless lamps (LB) are available with two power options - battery-powered and battery-powered. In both cases, they are very convenient to use. The cabinet base is attached to the bottom shelf of the wall cabinets using double-sided tape. A flashlight with LEDs and a box for batteries or accumulator is inserted into it.
Switching on is accomplished by simply touching the light panel. Because of this, they are also called “pushlight”. There are two types of BS on the electrical goods market - spotlights and panels with 5 LED lights and a charger. Replaceable power supply consists of three AA batteries.
To illuminate the desktop, it is enough to glue 3 or 4 spot devices or 2 light panels to the bottom panel of the cabinets. BS need timely replacement of batteries or recharging of the battery. This is not very convenient for those who spend a lot of time in the kitchen.