History and design of the hood
Since the beginning of ancient times, people have thought about ventilating indoor spaces.
This was especially true in food preparation areas. Initially, all actions were reduced to simple ventilation or such an arrangement of the cooking area that naturally removed combustion products. With the development of house building, kitchens also changed. They began to use stoves and fireplaces in which chimneys were used to remove combustion products. In the 19th century, the Russian scientist E. H. Land suggested that high-quality ventilation is impossible without artificial air exchange. The production of hoods was mainly developed thanks to the Italian company Faber, which released the first plastic hood in 1958.
But only since the 1970s, kitchen hoods gained popularity and began to be installed in Europe and America. In the countries of the USSR, the first household hoods appeared in the early 80s, but only with the arrival of foreign manufacturers on the market in the 90s did they take their place in kitchens.
Modern hoods fully cope with the tasks assigned to them. Without losing performance, they have become compact and easy to use. Competition between companies leads to constant improvement of product technical characteristics, such as performance, noise reduction, and reliability.
Types and principle of operation
A kitchen hood is a device designed to clean the air from smoke , odors, particles of fat, and moisture that arise during the cooking process.
Depending on the operating mode, kitchen hoods are either flow-through or circulation. The first type involves exhaust mode, when the exhaust air is drawn outside from the room, most often into the ventilation shaft. This mode is more preferable than the second. The circulation mode is based on passing air through a filter system and returning it back to the room. According to their appearance, exhaust devices are divided into the following types:
- dome;
- flat;
- built-in
Despite their appearance, their operating principle and structure are the same.
The main part of a kitchen appliance is the motor. The quality of air purification depends on its operation and location. Having an exhaust fan, it ensures the creation of air flows passing through the filter elements. An asynchronous motor is used as a motor. Its axis follows the movements of the pumped or discharged air flow. Such an electric motor consists of a rotor located inside the stator. The distance between them is no more than two millimeters. The stator is a core with slots on which the winding is wound. The rotor, the moving part with the shaft, consists of a core with a short-circuited winding. This design resembles a squirrel wheel in appearance.
When alternating current is supplied to the stator winding, according to the laws of physics, an alternating magnetic field appears. Electromagnetic induction occurs on a closed conductor placed inside this field, which leads to the appearance of a current, and this, in turn, causes the rotor to rotate. Due to the fact that the stator has several leads, connecting different numbers of them leads to a change in the fan rotation speed.
Structural elements of the system
A special element of the hood is the check valve. It can be electric, with a motor opening when starting, or mechanical, triggered by the pressure of the air flow. Its job is to pass air in one direction and prevent it from passing in the opposite direction. In addition to the electric motor for the hood and the valve, the device includes:
- frame;
- power unit;
- control board;
- control unit panel;
- motor holder housing;
- backlight lamps;
- filters.
The body itself is made of sheet steel and is powder coated to prevent rust. The power supply is designed to start the electric motor and provide the required voltage to the control board and backlight lamps. The motor holder is used to reduce the level of vibration and noise from its operation, as well as to securely fasten it. The filters have different designs, but in all cases a perforated aluminum mesh is used as the primary element. It effectively protects parts of the hood from contamination with grease. The control unit is made in the form of mechanical buttons or touch surfaces.
How often should you clean your hood?
A kitchen hood is usually equipped with one of two methods of air purification - a carbon filter or a metal grille. Sometimes both methods are used simultaneously.
Your kitchen hood will work properly for several years if you clean it regularly.
The carbon filter is a cartridge that absorbs grease and odors. There is no need to wash it, since the carbon filters need to be replaced as they become dirty. Usually they become clogged and become unusable after three months of use. In some hood models, carbon filters can be changed once a year.
The metal grille in kitchen hoods is removable and can be cleaned periodically. It is made of metal. The most commonly used materials are aluminum or stainless steel. Also, for improved air purification from fumes, the mesh is supplemented with padding polyester or non-woven fabric. There are several features in the operation of the equipment by which you can understand that the metal grill needs to be cleaned:
- During operation of the hood, extraneous noise appeared;
- traction force decreased;
- An unpleasant burning smell appeared during cooking.
The grille must be washed monthly so that the kitchen hood works properly and dirt does not eat into the grille.
A kitchen hood is an integral part of every kitchen. It performs the most important task: it eliminates odors and fumes during cooking, and also traps fat on the filter, which accumulates and dries over time. Some hoods do not simply blow out the air, but clean it and return it back, then they also contain an additional carbon filter. When used for a long time, the hood filters become clogged, they begin to pass air poorly, and the hood may break down completely. Therefore, it is important to clean it on time. The carbon filter is usually disposable and will be replaced with a new one. And the grease filter will last as long as the device is used. If washing the outside of the device is not difficult, then washing the metal grill (grease filter) is not an easy task, but it is quite doable.
Preparatory stage - disassembling the hood
To wash the hood from accumulated grease, you first need to disassemble it. You can do this in the following way:
- Make sure that the device is de-energized.
- Press the latches and pull the cover (metal grille) out of the grooves.
- Remove the carbon filter, if provided by the appliance model.
- If necessary, remove the pipe.
The corrugated pipe that draws out air also needs to be cleaned periodically. If it is removable, then washing it will not be difficult. Some owners replace the pipe every few months, believing that it is easier than washing.
Disassembling decorative elements and removing the mesh
Some models have decorative elements, and in order to remove the filter, you must first remove the decorative panel (if the design has one). To remove the metal mesh, snap off the locks (grooves) and pull it out of the frame of the ventilation hood.
How to remove the filter?
Different models contain different parts and filters. If the device not only extracts air, but also cleans it and returns it back (circulation hood), then it contains a carbon filter inside behind the grease filter (mesh), which is replaced every three or four months.
To remove the carbon filter, you must perform the following steps:
- De-energize the device.
- Remove the grease filter by pressing on the grooves.
- Remove the desired filter from the cassette.
- Install a new filter - there will be a characteristic click. Throw away the old filter. Do not wash or reuse. This may damage the device.
- Assemble and turn on the device and check for noise and vibration. If installed correctly they will not exist.
How to clean a kitchen hood filter?
Every housewife sooner or later wonders how to clean the kitchen hood from grease. Cleaning the hood consists primarily of cleaning the grease filter from contaminants. The best way to deal with them is special chemical cleaning products, which can be purchased in the household chemicals department or through a distributor.
Using household chemicals, cleaning is carried out according to the following algorithm:
- Prepare a soap solution (you can dissolve dishwashing detergent) and soak the filter (grid) in it for a while.
- Apply the product liberally to the filter and leave for as long as indicated in the instructions for the product so that the contaminants dissolve.
- Rub the grate with the hard side of the sponge, a special dish brush or an iron sponge.
- Rinse off the product and pour over boiling water.
- Dry naturally and install in place.
Cleaning with modern detergents
The best chemical products that can easily cope with any old stains are, according to housewives, such products as “Shumanit”, a stove and oven cleaner and “Faberlic”.
Read also: Why are hubs needed for UAZ
They come in the form of a gel, which is applied with a brush or sponge to the dirty surface and washed off after 15-20 minutes.
- “Shumanite” has a pungent odor and can also cause burns to the mucous membranes, so it is necessary to open the window when using it. When rinsing, it is better to use cold water to avoid the spread of an unpleasant chemical odor.
- Products from Amway and Faberlic are odorless, but, as with Schumanite, you must use protective gloves; without them, skin burns cannot be avoided. These products are one of the most effective in the fight against old greasy stains - you don’t need to make special efforts and rub the devices, the dirt comes off without difficulty, all you have to do is wash it off with a sponge.
- “Silit Beng Anti-fat” is another effective remedy. Available in the form of a liquid, which is applied using a sprayer. Copes with all contaminants. It can wash dishes and stainless steel parts, so it is suitable for cleaning metal grates. The product is sprayed and left for 15-20 minutes, then washed with a metal brush (sponge), rinsed and dried naturally. When spraying, be careful not to get the product into your eyes or mucous membranes, and also open a window or vent for air circulation: the product smells very strongly.
- "Mr. Mole" - a pipe cleaner. Another method that is advisable to use only as a last resort: only 1-2 times during the operation of the device. If the grease is very old and difficult to wash off, pour water into the sink, add pipe cleaner and place metal grates there for a while. Then wash with a metal sponge, rinse with cold water and dry.
Digestion method for severe contamination
If for some reason it is impossible to use household chemicals (for example, an allergy to a cleaning product), then there is another effective method - digestion.
To clean the metal filter of the hood using this method, you must:
- Boil water in the largest container that will fit the filter.
- Add one cup of baking soda.
- After dissolving the soda, put a grate into the solution and boil it for about half an hour: by this time all the fat should have come off.
- Rinse in clean water and dry.
How to clean the hood and protective mesh from grease?
When cleaning a kitchen hood, not only the metal filter is washed, but also the outer dome (ventilation hood) of the appliance itself. External metal mesh, which is removed by pressing the grooves. It is a fat filter, which consists of two layers of ribbed surface, reminiscent of fish scales.
Further inside the hood there is a fan and a pipe. How to clean the protective grease mesh of a kitchen hood is described above.
Treating the ventilation hood with modern detergents
The ventilation hood or hood also needs to be cleaned, since steam and grease also settle on it. You can clean it just like the filter using chemicals. To do this you need:
Kitchen hood design: schematic diagram
The main components of any hood are:
- exhaust fan with electric motor;
- speed switching diagram;
- lighting lamps;
- filters.
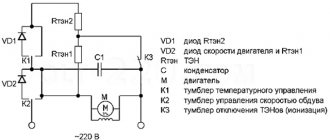
Standard electrical diagram of a kitchen hood
Exhaust fan
The fan is, without a doubt, the main element of this device. It is this that ensures the movement of air flows through the filtration elements on which fat is retained. Fan rotation in hoods is usually ensured by a high-speed asynchronous motor.
For your information! The design of a multi-speed AC motor includes a squirrel-cage rotor and a stator with several independent windings. Changing the engine speed is achieved through different connections of the stator windings.
Switching diagram for a three-speed motor: when the switch is in position L, the rotation speed is minimum, in position H - maximum
The fan itself can have an axial or tangential design. From a performance point of view, the latter are preferable to the former, as they are able to create a more stable air flow. From a reliability point of view, the situation is similar - the loss of one blade will have virtually no effect on the performance of the tangential structure, which cannot be said about the axial one. Therefore, kitchen hood repairs and replacement of exhaust fan spare parts in tangential models are carried out less frequently.
We recommend: How to make ventilation in the basement: diagram, materials, calculation
Speed shifter
Switching speeds in different models can be implemented by:
- buttons;
- slide switch;
- sensor
The first two options are the simplest. Using buttons or a movable lever, the necessary contacts are switched, supplying voltage to the electric motor windings. It is precisely due to their simplicity that such switches are considered quite reliable. All that can happen to them is oxidation or burning of the contacts. But even in this case, the repair is not particularly difficult.
More expensive models are equipped with touch controls. The panel has additional lighting and looks very stylish. However, the maintainability of the sensor is low. Often you have to completely replace a failed control unit, which costs a lot of money.
Kitchen hood speed switch
Lighting
Lighting the hob is an important point in the cooking process. Modern hoods can be equipped with incandescent, halogen or LED lamps, the power and quantity of which depend on the model of the device.
Note! The most economical are LED lamps. With the same luminous flux, they consume 8-10 times less power than incandescent lamps. In addition, their service life is more than 30,000 hours.
In most cases, repairing a kitchen hood whose backlight has burned out can be done by any housewife with her own hands. However, there are situations when a more professional approach using measuring instruments is required.
Hob lighting
Filtration elements
Kitchen hoods can use two types of filters: grease and carbon. A grease filter is installed on all models without exception, since without it the internal components of the device will very quickly become covered with an oily film, which will subsequently lead to their breakdown. Based on the number of applications, such filtration elements are divided into disposable and reusable. The first ones are made of acrylic, padding polyester or non-woven fabric and must be replaced every 2-3 months. The latter are made of metal, so their service life is equal to the service life of the hood itself.
Carbon filters are installed in recirculating models and are designed to remove odors. The basis of these elements is activated carbon - a high-quality adsorbent that absorbs all kinds of gases very well. Since the resource of carbon filters is not unlimited, they must be replaced periodically, approximately once every 3-4 months.
Metal grease filter
The device and design of ventilation in the kitchen
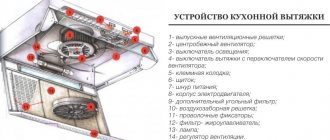
You need to understand the structure of the hood itself and the configuration of the model that is installed in the kitchen. Each of them contains the following nodes:
- ventilation grilles;
- fan;
- engine;
- pay;
- lighting toggle switch;
- toggle switch for turning on the hood;
- power and ventilation regulators;
- terminal block;
- shield;
- frame;
- power cable;
- carbon filter and grease trap;
- air intake grille;
- clamps;
- lamp.
Newer models have reduced noise levels with high performance and reliability. The hoods differ:
- power switching method;
- possibility of touch control of the fan;
- design;
- the location of the fan blades, lighting fixtures, installed filters and the quality of components.
The fan blades have axial and tangential placement. The second option is more reliable, fewer breakdowns have been recorded. Hood lighting is provided by:
- incandescent lamps;
- halogen sources or LEDs.
There are several types of filters installed in hoods:
- coarse and fine cleaning;
- grease-catching.
They are made from different materials and require replacement approximately every 3 months. The reusable filter is made of metal; it is enough to wash it regularly under running water.
How to disassemble a kitchen hood yourself
In order for the hood to effectively clean the air in the room, it is necessary to clean the filter from accumulated fat deposits once a month. Modern manufacturers have tried to make this process as easy as possible for the average consumer.
Before you begin disassembling the device, it must be disconnected from the power supply. Then read the instructions, since each hood model is disassembled and cleaned differently.
- The placement of filters can be vertical or horizontal. To change the horizontal one, you need to place the slide in the “roll out” position, then remove the filter and assess the degree of contamination. If necessary, replace it with a new one or wash it in soapy water.
- With the filter element in a vertical position, remove the hood pan and remove it.
- The next step is to remove the duct. This is not difficult to do: you just need to pull it towards you and remove it from the ventilation system. We clean the pipe using cleaning reagents.
- We check the performance of the ventilation with a special device - an oriometer. The air movement rate is 0.3 cubic meters.
- Wash the surface of the hood itself with cleaning cream and a dishwashing sponge.
- We assemble the device according to the factory instructions, without deviating from the rules and regulations for installing ventilation.
- Finally, we check the efficiency of air circulation using devices such as a tachograph and a gas analyzer.
How to disassemble the hood to wash it
To extend the life of the hood and maintain its functionality, it is necessary to regularly clean this device. After all, many people know that over time, this device forms fumes, grease, and plaque, which are quite difficult to remove. For this reason, it is important to know how to disassemble the hood in order to wash it.
When exposed to various vapors, the device quickly becomes dirty.
Before you start cleaning your device, there are a few steps you should take:
- the first thing you need to do is study the instructions in detail, important recommendations from the manufacturer that relate to proper cleaning of the hood;
- It is imperative to carefully study the list of dismountable elements of the device;
- before proceeding with disassembly, you need to disconnect the device from the electrical network;
- dismantling and disassembling the exhaust device must be carried out in accordance with the process characteristics in the technical documentation - this will avoid losing important parts, as well as putting them back in their place.
If you want to wash the hood, namely its important parts, then you must disassemble it. When disassembling, the following rules should be observed:
- the first step is to remove the top surface of the case;
- then the mesh is removed, which covers the internal cleaning device;
- All important parts and the retainer must be removed and placed in a separate container with soap solution. Leave them there for a while so that the coating of fat and burning comes off;
- then the filter is removed;
- at the end, a pipe is unscrewed, which is designed to remove contaminated air into the ventilation system.
Read also: Test drive Toyota Corolla 2008 video
Chemical cleaning products
After all parts have been removed, you can begin washing the device. It is also necessary to clean all removed parts. When washing, you can use special cleaning agents - both chemical and homemade.
The hood is designed to get rid of odors in the room; it is through it that fumes and exhaust air are drawn out of the kitchen. Since the kitchen hood operates 24 hours a day, the grille of the device quickly becomes dirty. Dust and grease settle on it. There are several effective ways to clean your hood grille.
Causes of breakdowns
Most often, malfunctions in the operation of hoods can be corrected independently.
First of all, you need to read the instructions for the device. Famous manufacturers such as Shindo Domestic, Faber. Turboair, France, Pyramid, Elikor and others indicate typical malfunctions and options for eliminating them in their instructions. The most common breakdowns are: decreased performance, inability to control speed, appearance of extraneous noise, disappearance of lighting, lack of response to switching on.
Motor failure is usually due to overheating. Working in conditions of hot steam removal at high power, the device, due to clogged grease filters, receives insufficient cooling, which leads to its heating and burnout of the windings. Therefore, it is necessary to monitor the condition of the grease filters and clean them regularly.
It’s easy to check if the filter is clogged - you need to hold a sheet of thin paper with the hood on to the filter grille and see if it is attracted to it - if not, then cleaning will be required. A clogged filter also affects the overall performance of the hood.
We recommend: Double-circuit electric boilers: how to choose an energy-saving water heating boiler unit, review of the best models and their characteristics, reviews and prices
By operating the hood modes with dirty hands, you cause the control elements to become clogged, which leads to their failure. Therefore, it is advisable to carry out all manipulations with control and switching on with clean hands. It is also necessary to ensure that splashes or water do not fall on the surface of the control parts and in the middle of the device.
To protect against damage to electrical components, the use of protection devices is required - such as a circuit breaker, voltage control relay, voltage stabilizer. Their use will protect the device from power surges.
Service life and performance are also affected by correct installation. Installation and connection of the exhaust device must be carried out in accordance with all recommendations in the operating instructions. In particular, the distance from the stove should not be less than 65 centimeters, and the exhaust duct must correspond to the performance of the device.
Thus, if the hood in the kitchen does not work, and what to do is not clear from the instructions, first of all you can look for typical faults for the model being repaired.
Causes and Effects
We found out how to disassemble the hood, now you can move on to its repair itself, which can be done with your own hands if you have a minimum of tools. All work is performed depending on the specific “symptoms” of the problem.
Electrical part
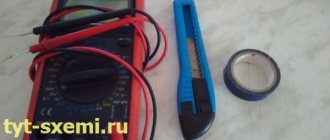
If the device does not turn on and there is no response to pressing the controls, then you first need to work on the control unit. A multimeter that looks like a device with an indicator and two probes will be a very good helper here.
The first thing to do is determine whether power is supplied to the device itself. If the lamp is on, then the problem is in the cable connecting the control unit to the motor or the controller itself. You can also check the presence of current with a tester. Having disconnected the cable entering the control unit and switching the multimeter with the regulator to the ACV 750 position, the first of the probes is placed on one contact coming from the power supply, the second on the other. If readings appear on the tester, it means power is supplied from the electrical network at home. If not, then the problem needs to be looked for up to the hood itself - in the distribution panel or connecting wire. If there is voltage, then the current wire is connected back to the control unit. Afterwards, the device itself is turned on using the control knobs and the output voltage is measured with a multimeter on those contacts that go to the motor itself.
If there is no reading, then the problem is in the control unit. You need to inspect it for the presence of a fuse and disconnect the device from the 220 V network and replace it. You can also check whether the old one is working or not using a multimeter. Having removed the fuse from the control unit and connected the tester probes to both of its contacts, and switched the device itself to the dialing mode or measuring the resistance level, observe the change in the indicator readings - if, when touching the contacts, the device registers the passage of current, then the fuse is working.
Important. Carry out all operations with electrical parts wearing non-conductive rubber gloves.
If the fuse is replaced, but the unit still does not react in any way and no current appears at its contacts, then some serious damage has occurred to the control part itself. Here you need to either call a specialist or have basic knowledge of electronics.
No. 1 - The engine is noisy, but does not turn over
This is often associated with the motor wedge. To fix it, first remove the protective box from the mechanism. It is often secured with a few bolts or a special mounting plate. Disassemble, clean, lubricate the sliding bearing, shaft and seats of the rear and front bushings.
It is best to lubricate with a lubricant for car brake systems - it is most suitable for high-speed engines. Reassemble everything in reverse order and crank the engine by hand. Make sure the structure is assembled correctly.
In some cases, the engine gasket will need to be replaced.
No. 2 - What to do if the control panel is broken
If the motor runs all the time but does not change speed, then in 92% of cases the problem lies in the control panel. It’s better and easier in this case to just buy a new one and replace it; repairing the board yourself is quite difficult.
Now let’s look at possible minor hood malfunctions.
No. 3 - What to do if the hood does not turn on
There are several possible problems here:
- The device may not be connected to the electrical network. You need to check both the fact of connection and the presence of voltage in the outlet.
- The functionality of the switch is checked by a tester. If this element does not “ring”, it must be replaced.
- It may turn out that there are problems with the power supply. They can occur due to a breakdown of the machine or failure of the fuses.
- The power plug may also fail. By the way, the plug may have a built-in fuse that may blow out - in this case it will need to be replaced.
- The internal wiring of the device can also cause malfunctions. It must be checked with a tester, and any bad contacts found are eliminated by tightening the screws or crimping the tips with pliers.
- But electric motor malfunctions require major repairs and professional intervention.
No. 4 - The hood works, but does not eliminate odors
If there are still foreign odors in the kitchen when the hood is running, then most likely the problem is in the filter. The efficiency of the hood decreases if it is not replaced (not cleaned) in a timely manner. For example, the carbon filter located immediately behind the air intake grille must be replaced approximately once every 3 months. This type of filter can be dismountable, in which case only the carbon granules are changed (photo on the left).
Disposable grease filters (paper and fabric) must also be replaced. They are not restored and cannot be washed. But metal mesh structures need regular cleaning (they can even be washed in the dishwasher - approximately once a month).
If you are sure that the problem is not in the filter, then you can solve the problem as follows - increase the operating time of the device, turning it on a few minutes before turning on the burners and turning it off a quarter of an hour after the stove is free.
No. 5 - No lighting
Possible reasons: one of the lighting fixtures or the lighting switch has failed.
Repair: Before you run to the store for a new lamp, you should check its functionality. Incandescent lamps and halogen lamps are checked with a tester (multimeter) in resistance measurement mode. The nominal resistance of the thread is usually several tens of ohms. The absence of readings on the device indicates a burnt-out filament.
With LED lamps the situation is somewhat more complicated. Inside such devices, in addition to the LEDs, a control driver is installed, which cannot be checked with a conventional multimeter without disassembling the lamp. In this regard, to check the functionality of the LED lamp, it is easier to screw it into the working socket.
Important! Before testing the lamp in another socket, make sure its rated voltage is 220 V.
If all the lighting fixtures are working properly, then there is a high probability that the light switch button is not working. It can also be checked with a tester - when pressed, the resistance between the contacts should be less than 1 Ohm.
We recommend: What temperature should be in the central heating radiators: the norm, what should be the temperature of radiators and pipes in the apartment
Measuring the resistance of an incandescent lamp with a digital multimeter
Basic malfunctions and ways to eliminate them
Unfortunately, even with the most careful treatment of equipment, breakdowns cannot be ruled out. Let's consider the most common user complaints and the ability to repair a kitchen hood yourself.
The backlight does not light up
Hood lamps are convenient to use to illuminate the work surface. If the backlight stops working, you need to:
- Turn on the hood and make sure the fan is running.
- Check the serviceability of the lamps. Incandescent and halogen lamps can be checked with a tester (multimeter) in resistance measurement mode. If the readings on the device tend to infinity, then the lamp is burnt out and needs to be replaced. Due to their more complex design, it is impossible to check LED lamps in this way; their suitability can be determined using a working cartridge. Replacing lamps is the simplest manipulation that any adult can handle.
- If the lamps are working properly, use a tester to check the off button (the resistance between the contacts when pressed should be less than 1 ohm) and subsequent elements of the electrical circuit. Using the method of elimination, find the faulty part and replace it.
READ MORE: Mammillaria cactus 38 photo species with names How to properly care for them at home Care during flowering How to replant and propagate
Insufficient traction
In this case, odors are not effectively eliminated and condensation accumulates on the windows. The “culprit” can be either the general unsatisfactory condition of ventilation in the house or breakdowns inside the device. To find out the real reason, you need to:
- Check the draft in the shaft of the house. If it is not available, you should contact the appropriate utility services. It is impossible to clean or restore the ventilation duct on your own.
- Open the windows and ventilate the room - a vacuum effect may occur in a room with tightly closed windows.
- Check the level of contamination of the filter elements. If necessary, wash the grease filter and replace the carbon filter.
- A broken fan blade may be the reason why the hood doesn't draw well. It is necessary to disassemble the hood and replace the part.
The fan is noisy
Often, a high noise level is a consequence of poor quality assembly, which is typical for cheap Chinese products; in this case, only replacing the device will help. Owners of high-quality equipment also often wonder how to reduce noise when the hood is operating. To do this you need:
- Make sure that the device is properly secured to the wall and elements of kitchen furniture. A slight gap can lead to noise and knocking during operation. To fix this, you need to tighten the fasteners.
- Check the air duct - often its clogging increases the engine noise level.
- Place pieces of foam rubber or soundproofing material under problem areas.
This is the worst case scenario - the backlight does not light up and the engine does not start. In such cases, in order to repair the hood yourself at home, you need to have basic knowledge of electrical engineering and some experience working with electrical appliances. Armed with the necessary tools, you need to:
- The fuse has blown and needs to be replaced.
- Sequentially check the voltage in the outlet using an indicator screwdriver, the circuit breaker on the distribution panel, and the integrity of the cord and plug. If everything is in order, you need to look for a breakdown in the device itself.
- Test the entire circuit with a tester (multimeter). You should start with the switch on the panel - perhaps one of the contacts has come loose. Then check the fuse, which protects the device from voltage surges, then the capacitor - it should not be swollen. If everything is in order, ring the motor windings. If the circuit breaks here, it is better to buy a new engine; repairing the old one is impractical.
Motor wedge possible. You will need to disassemble it, clean it, lubricate it and reassemble it.
In this case, repair of hoods consists of:
- Check the switch by first removing the protective screen. Push-button and slide switches are the most reliable and repairable. Usually it is enough to change the worn element or clean the contacts. The touchpad will most likely have to be completely replaced.
- Check the starting capacitor. If necessary, replace it with a new one.
Before you begin troubleshooting a household appliance, you need to realistically assess your abilities. Perhaps in some cases it is more advisable to entrust the repair of kitchen hoods to specialists. This decision can save you from more expensive repairs or replacement of equipment.
Repair of hoods at home will be required in case of various breakdowns, malfunctions or complete failure of a kitchen electrical appliance. The most common types of breakdowns:
- a significant reduction in air suction power, a decrease in work productivity,
- malfunction in the lighting system, backlight does not work,
- the device does not turn on and does not respond in any way to commands given through the control panel or using buttons and keys,
- The fan speed controller does not work, the device operating modes do not switch,
- the electric motor is broken.
If the hood begins to work worse, there is no need to rush to call a specialist. It is recommended to inspect the device first. Poor performance may be caused by clogged filter elements or broken impellers. Very often, poor draft is not due to the fault of the hood, but due to the lack of draft in the house.
The exhaust duct may become clogged and may not be able to effectively exhaust air into the system. You can check this with a candle flame or lighter. When placing a fire near a ventilation grille, deviations of the flame tongue in the direction of air flow should be visible. If it is weak, you should clean the ventilation ducts yourself or call a technician from the management company.
This and a number of other malfunctions in the operation of the hood can be resolved at home. For example, a malfunction in the lighting system is usually associated with a burnt-out light bulb. Less often, the power button gets stuck or the contacts loosen. It is quite possible to fix the lighting yourself.
But if you have any doubts or lack the skills to do the work, call a specialist. Service center specialists, as a rule, perform hood repairs at home. The design of the product is quite simple, the component (working) elements have a minimum dead weight and compact dimensions. More complex types of breakdowns are usually associated with a malfunction of the electronic control system.
How to change the hood motor
- Turn off the power supply to the hood.
- Remove the filters by pulling the tab. Unscrew the bottom panel of the hood, holding it from below so that it does not fall.
- Disconnect the backlight wire connectors, this way you will disconnect both panels from each other.
- Remove the hood or remove it from the cabinet by unscrewing the screws and place it carefully on the floor. Attention, the hood is heavy, so it is advisable to remove it with a partner.
- Remove the fan from the engine by releasing the spring clip or other fastener.
- Now you need to remove the engine. To do this, disconnect the green ground wire from the screw on the hood body, and then cut the wires connected to the motor. Remove the 3 screws from the mounting plate as shown in the photo below, remove the plate and pull the fan motor out of the hood.
- Connect the new motor to the mounting plate, then place it in the hood body, ground wire back.
- Reinstall the fan blades using the spring clip. Install or build in the hood in its place, fasten all the body panels back and connect the power supply, check the operation of the new motor.
Tips for installation and operation
Compliance with the rules and regulations for the installation and operation of a kitchen hood allows you to avoid functional problems. Experts recommend adhering to a number of basic points:
- Correctly performed installation of the device preserves the integrity of the wire connections, corrugations, prevents broken contacts and reduces the noise level.
- Timely cleaning and replacement of filters, meshes and gratings increases the service life of the engine and saves energy consumption.
- Compliance with standards during installation. The device should be located directly above the stove: 65-75 cm from an electric stove and 75-85 cm from a gas stove are acceptable. When installed below this level, the structural elements of the device will overheat and, as a result, become deformed. If the distance between the hob and the hood is too large, its efficiency will be reduced.
- Consider additional protection against power surges in the network. To do this, install a stabilizer or a protective relay.
- The hood should start working at minimum speed. If there is a manual switch, the speed must be controlled. Turning on the device immediately to maximum power often leads to an increase in the load on the electric motor and its failure.
- Timely maintenance of filter elements. With constant use of the hood, they quickly become clogged, and this affects the ability to pass air. It is important to remove all dirt from the outside using gentle cleaning products. Dirty filters often cause ineffective operation. Clean the mesh grease trap at least monthly, and the coal grease trap once every 3-6 months. Modern expensive models of hoods are equipped with highly functional carbon filters, the service life of which is about 2 years.
- Make sure that the fan is not turned on when the burners are running and there are no dishes on them. Due to the high temperature, this may cause the control panel to become deformed.
- A couple of minutes before the hob starts working, you need to turn on the kitchen hood. After finishing cooking, do not rush to turn it off; leave the device to work for another 10 minutes.
Knowing and following all the recommendations for the operation of the hood, you can not only avoid breakdowns, but also extend its service life. If you cannot avoid this, try to fix the problem yourself. In cases where there is absolutely no experience in repairing electrical appliances, it is wiser to seek help from professionals.
Step-by-step instructions for eliminating defects of various models
Depending on the manufacturer, kitchen hoods differ in performance and internal structure. It is better to study the repair features of the manufacturer’s hoods, and then proceed to disassemble and diagnose the equipment.
Crown
If there is a problem with the kitchen hood of contaminated air, then perform the following steps:
- First, do a little checking. To do this, turn on the device before starting cooking and turn it off only after 30 minutes. If the odors are not eliminated, then the filters need to be cleaned.
- Unplug the equipment from the outlet. You need to unscrew the housing bolts, take out the panel with the grease filter, and remove it. Remove the carbon filter and replace it with a new one (it cannot be cleaned).
- When installing a carbon filter, the blades around the hole must accurately fit into the blades on the motor body. To do this, place the petals side by side, press the center towards the engine and turn until aligned.
- Wash the grease filter thoroughly with detergent.
- Then clean the grates from dust and dirt using a brush and rag.
Otherwise you will need:
- Connecting the plug to the socket, checking the electricity in the network.
- Check the fuses in the electrical panel.
- Inspect the power cord for damage.
- Use a tester to identify a place where there is no electricity. If the switch does not work, it is enough to replace it.
If the engine itself fails, then it will not be possible to repair it at home; you will have to buy and replace it.
Cata kitchen hoods are of high quality and rarely break. But filters have to be cleaned or replaced, and light bulbs can also burn out. To change the lamp, simply remove the protective glass.
In case of any breakdown, it is necessary to inspect the hood, which will require disassembling it:
- disconnect the device from the power supply;
- remove the grease filter located below;
- unscrew the protection panel;
- Remove the lighting panel and control board.
