Currently, most housewives know about the convenience and efficiency of using multicookers in the kitchen from their own experience. The use of multicookers in everyday life has become an integral part of the life of a modern housewife.
The purpose of this electrical appliance is to prepare a large number of a wide variety of dishes. The versatility of the device allows you to stew, steam, fry, boil, steam and so on. This household appliance operates independently, and there is no need to control the cooking process.
However, despite their fairly high reliability, like all electrical appliances, multicookers break down over time.
Problems in the functioning of multicookers
Among them are the following:
— The latch (latch) of the multicooker lid is broken - this can be fixed by restoring the latch, replacing the lid, or replacing the latch. The repair option is selected by the technician depending on the design of the particular multicooker.
— The multi-cooker does not turn on. We check the power cord, and if it is ok, we need the help of a specialist. The power supply or electronics may have failed.
— When you press the buttons on the control panel, the multicooker does not respond. Diagnosis and repair of the touch membrane or control module is necessary.
— The multicooker takes a long time to prepare the dish. A possible reason is lack of pressure. The lid valve is clogged with food debris or grease has accumulated. This prevents the multicooker from releasing steam. Food cooks more slowly due to a violation of the thermal regime.
— In a slow cooker, food burns or is undercooked. In this case, the reason is electronics. Diagnostics is required to install the faulty element.
— If the temperature sensors (one or more) malfunction, the device may turn off during operation.
— The multicooker turns on, there is an indication, but it does not heat up. The electronics or heating element may fail. Diagnostics required.
Is there anything in the lid?
2. and 4. Wires going into the cover:
On the left there are 2 black wires and a yellow one, on the right there are 2 blue ones
The yellow wire on the left is ground. The black wires on the left are the temperature sensor in the lid (there in the lid it is glued to the lower aluminum part of the lid using sticky aluminum foil):
Temperature sensor from the lid
(here the wiring is randomly blue, because this sensor is from the M70 model, and the previous photo is M45011)
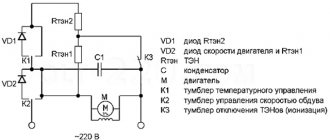
This temperature sensor, exactly the same as in the “button” below, is an NTC thermistor (the resistance of which is lower, the higher its temperature) in a glass shell. The resistance of this resistor at 25°C is 50 KOhm.
The blue wires on the right feed the corded heating element (tubular electric heater) in the lid, which was also glued to the lower aluminum part of the lid using adhesive aluminum foil:
Cord heating element from the lid. Resistance 2.8K (17 W, taking into account the fact that it is powered from 220 volts). Connects to 220V network via triac BT131.
5. The cord-heater around the tank looks exactly the same as in the photo above. Also glued with foil. But its resistance is 1240 Ohms, respectively, the power is 40 W. Connects to the network via a triac BT134.
3. Main disk heating element with a hole in the center:
Power 860 W, resistance 54 Ohm, connected to the network via an electromagnetic relay. Therefore, while the multicooker is operating, “something” (namely the relay) clicks all the time.
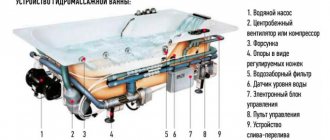
Product design
To carry out repairs, you must become familiar with the operating principle of the electrical appliance and its structure. All multicookers resemble an ordinary saucepan in appearance with a side or top display and buttons for setting cooking modes. It closes at the top with a snap-on sealed lid. The multicooker bowl is enclosed in a thermally insulated casing and placed inside. The direct cooking process takes place in it. Under the bowl and on the sides there are heating elements, control and power units for the multicooker. The bottom is covered with a plastic lid. This is the bottom of the multicooker.
Repair it yourself or...?
It is recommended to repair the multicooker yourself only after the warranty period has expired.
When a breakdown occurs, some craftsmen decide to repair multicookers themselves. Is it possible to carry out the procedure at home?
Repair of such a device is divided into three categories:
— Simple - there is no need to disassemble the device. For example, replacing the power cord.
— Medium – partial disassembly of the device is required. Repair and replacement of latch or buttons, for example.
— Major – complete disassembly of the device and its components.
Some consumers, faced with dishonest or poor-quality service at a service center, come to the idea of trying to repair multicookers with their own hands?
Below in the article we will look at several typical breakdowns. We will also describe how to repair a multicooker at home.
The device must be used correctly
To avoid having to repair multicookers yourself, you need to take care of the correct use of this useful household appliance.
This mainly concerns the sequence of placing products in the multicooker.
First you need to place them in a removable bowl, and only then can this container be installed in the device.
Whether it’s an appliance or a Polaris multicooker, DIY repairs may be necessary if you put food directly inside without removing the bowl:
- If, according to the recipe for a particular dish, you need to add milk or another liquid substance to it, there is a high probability that it will get on the electronics due to the carelessness of the cook.
- Sooner or later, you may forget to insert the removable bowl into the appliance and pour something directly into the multicooker. Thus, the device will inevitably fail.
Appliance cover
Today we will tell you how to repair the Redmond multicooker. We will try to fix the lid with our own hands.
This is a standard breakdown for most types of multicookers. Damage to this cover is due to planned aging, that is, the manufacturer deliberately makes it unreliable. The finger on the button broke... The lid moved as a result of the temperature... The rods reach special grooves and the lid is inserted, but a few millimeters are missing...
We will need small magnets and will make a magnetic lid that closes, is held on by magnets and is opened under force. You need to glue 4 magnets - two on the lid and on the body of the multicooker itself. The multicooker bowl is pre-removable.
We select the points where we will glue the magnets. Degrease the surface with alcohol. First, apply high-quality glue to selected points on the body and press the magnets. Let's wait until the glue dries. Now, not forgetting to respect the poles of the magnets, glue them to the lid. In this case, it is more convenient to apply glue directly to the magnet. If there is a need and the height of the magnets is insufficient, you need to glue two magnets on top of each other. Here we are already acting empirically.
This, of course, is not the most common way to solve the problem of a broken multicooker lid latch. Basically, experts solve it by replacing the handle, if the mounting points are not damaged, but the handle itself is broken. Or, as an alternative, drill holes in the handle and fix it with screws. The choice is yours.
Multicooker valve
Let us carry out another repair of the Redmond multicooker with our own hands.
So, model RMC-M110. Problems: the multicooker does not build up pressure.
We turn on the device. After about 5 minutes of operation, steam starts coming out of the lid valve. The pressure still doesn't build up. The service valve is closed. The cause of the malfunction is the lack of a rubber valve gasket. The first sign that you have a missing valve rubber is if you can open the lid of the multicooker itself during cooking.
We reset the program, release the pressure from the working valve. Disconnect the multicooker from the power supply. Let the device cool down. Open the cover and install the missing valve gasket. The loss of this gasket is one of the most common causes of pressure problems in a multicooker.
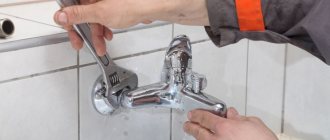
Cleaning the multicooker valves
Problems with pressure in a multicooker can occur due to clogged valves. The operating instructions recommend cleaning the inside of the multicooker lid. We remove it by first unscrewing the central nut and wash the valve rubber, which was mentioned above.
Let's move on to cleaning the second valve. Using pliers or wrenches, unscrew the valve nut, remove the bushing and washer. Turn the lid over and remove the valve. Wash with cleaning agent and wipe the valve elements. We collect it in random order. Just pay attention: it is very important to place the valve rubber correctly, on the right side. We assemble the second valve, not forgetting that its rubber band should be on the outside of the lid. We return the lid to the multicooker, screwing it with a nut.
Is there anything in the lid?
2. and 4. Wires going into the cover:
On the left there are 2 black wires and a yellow one, on the right there are 2 blue ones
The yellow wire on the left is ground. The black wires on the left are the temperature sensor in the lid (there in the lid it is glued to the lower aluminum part of the lid using sticky aluminum foil):
Temperature sensor from the lid
(here the wiring is randomly blue, because this sensor is from the M70 model, and the previous photo is M45011)
This temperature sensor, exactly the same as in the “button” below, is an NTC thermistor (the resistance of which is lower, the higher its temperature) in a glass shell. The resistance of this resistor at 25°C is 50 KOhm.
The blue wires on the right feed the corded heating element (tubular electric heater) in the lid, which was also glued to the lower aluminum part of the lid using adhesive aluminum foil:
Cord heating element from the lid. Resistance 2.8K (17 W, taking into account the fact that it is powered from 220 volts). Connects to 220V network via triac BT131.
5. The cord-heater around the tank looks exactly the same as in the photo above. Also glued with foil. But its resistance is 1240 Ohms, respectively, the power is 40 W. Connects to the network via a triac BT134.
3. Main disk heating element with a hole in the center:
Power 860 W, resistance 54 Ohm, connected to the network via an electromagnetic relay. Therefore, while the multicooker is operating, “something” (namely the relay) clicks all the time.
The multicooker does not work
In this section we will talk about possible breakdowns when the multicooker does not turn on at all. Option one is the Redmond RMC-PM380 multicooker. When the power is turned on, there is no indication, the buttons do not work.
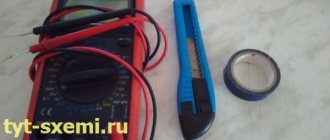
Let's start repairing the Redmond multicooker with our own hands. Turn the device over and turn off the power. Unscrew the bottom. We begin the inspection with the thermal fuses, which are located inside, in the very heart of the multicooker. Usually they are covered with cambrics and dressed in wires of different colors. We test the fuse contacts with a multimeter. If they do not ring through, they need to be replaced. After replacement, we test the device. The indicator lights up, the multicooker is working. We remind you once again: the thermal fuse needs to be looked at first.
Cleaning the board
If the Polaris multicooker breaks down, repairing it yourself requires caution: the internal parts and cables are made very thin, they can be accidentally damaged when disassembling the device.
So, the fee has been removed. To clean it, you need to choose a brush with soft bristles, similar to a cosmetic facial brush. Inspect the board for grease stains. If there are any, wrap cotton wool around a toothpick, soak it in alcohol, and gently wipe the dirty area, being careful not to apply excessive pressure to the board.
You need to approach the process with caution and responsibility, otherwise repairing multicookers with your own hands can end in disaster. Change the cotton wool after each stroke, otherwise you will simply smear fat on the microcircuits and capacitors.
Multicooker "Redmond RMC-M22"
Malfunction: there is no indication, the multicooker does not respond to control buttons. Let's start disassembling and try to repair multicookers with our own hands. After unscrewing the screws on the bottom, disconnect the lower part of the stand from the base. We get access to the power supply, switching circuit and several functional elements. Unscrew the 4 screws of the power board.
We inspect the transformer for the presence of solder joints and tracks. We test the transformer windings with a multimeter. If the transformer is broken, replace the thermal fuse after unsoldering it. We call diode bridges, transistor. We replace elements and parts when breaks are detected.
Another option for repairing multicookers with your own hands with a “won’t turn on” fault, which generates an alphanumeric error code. Deciphering the codes allows a technician who knows them to understand the cause of the malfunction and begin to eliminate it.
For example, the code “e0-e4” displayed on the screen indicates malfunctions associated with short circuits and breaks in temperature sensors. They are located on the top or bottom of the multicooker. There may be a problem with thermal fuses, we have already discussed them above. Different manufacturers have their own codes. It is necessary to remove the multicooker body and use a multimeter to look for an open circuit, measuring the level of resistance. Then eliminate the detected breaks by replacing or repairing the necessary elements.
How to get to the board
To repair multicookers with your own hands, you first need to figure out how to get to the board in each case.
To do this, you need to unscrew three or four screws that are located on the bottom cover.
Then the cable (a set of thin wires) that connects the board to the power supply is disconnected.
Then you should disconnect the heating element, which is fixed with three or four screws and a pressure plate.
Particular attention should be paid to disconnecting the built-in thermocouple (thermometer) located in the center of the device. This element is fragile and easy to damage.
The next step, which involves repairing multicookers with your own hands, is checking the fuses. For this, a device called an ohmmeter is used.
Before cleaning the control and power boards, they must be carefully disconnected, otherwise it will not be possible to clean them on both sides.
Multicooker board repair
The boards that modern multicookers are equipped with are divided into control and power.
At the bottom of the multicooker, under the scrolling lid, there is the main board, which is responsible for heating. The control board is located inside the case.
We carefully inspect the microcircuits. Here are some of the signs of problems that can be detected by visual inspection: broken solder seams, peeled tracks, carbon deposits, blackened resistors, swollen capacitors.
If one of the above points is found, we restore the board tracks and soldering by tinning the areas that are damaged. We use scratch paper. We fix the soldering and traces using varnish, which will protect the circuit from leaks and oxidation. In addition, we repair or replace parts that are found to be defective or burnt out. We make jumpers from burnt resistors and use their legs.
Repair cost
Redmond multicookers are among the most popular in their class in Russia.
Many service centers offer repair of these devices as a separate service. How much does it cost to repair a Redmond multicooker? In most Russian services, the repair price varies from 650 to 1,500 rubles, depending on the complexity of the breakdown. The cost of repairs usually does not include the price of parts. The cost of diagnostics is usually not included in the cost of repairs indicated in the price lists of services.
In most cases, only after diagnostics are carried out, the exact cost of repairs is determined by the service center technician.
What to do if the multicooker breaks down - try to fix it yourself or use the services of a service center, of course, is up to you to decide. We hope this article will help you make the right decision.
Board diagnostics
A typical slow cooker, such as the Scarlett or Maxwell, has two electronic boards. One of them is power, the second is the control board.
Let's say you need to repair the Scarlet multicooker. You can almost completely disassemble the device with your own hands and remove the inner part, made in the shape of a cylinder. The power board is located near the bottom, and you will find the control board when you remove the cylindrical part of the multicooker.
Take a close look at the microcircuits. You need to look for signs of carbon deposits, broken tracks, soldered seams, and peeling tracks. Capacitors should not be swollen, and resistors should not be blackened.