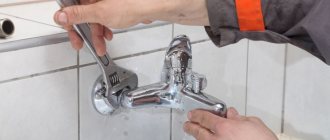
Mixer dirty
The liquid will flow in a weak stream if there is a blockage in the faucet spout
. The pressure will be equally bad for both cold and hot water. To fix the problem, it is necessary to carry out a number of procedures.
- Close the riser to turn off the water.
- Carefully remove the mixer.
- Unscrew the spout from the general body.
- Remove the mesh and rinse it under running water. If salt deposits or heavy dirt forms, let it soak in a special cleaning solution.
- Rinse the faucet spout thoroughly and clean the insides of dirt using a brush.
- Reassemble the mixer in reverse order and install it in place. Don't forget to open the riser.
This procedure may take some time; alternatively, you can simply replace the clogged faucet with a new one. Experts recommend replacing worn parts every few years to avoid serious damage in the future.
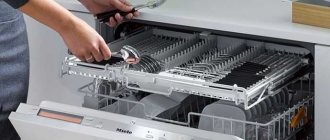
Tools for disassembling and assembling water heaters
To disassemble the device, you will need a small number of tools; in most cases, every person has them at home, so no additional costs will be required.
We recommend: Inverter heater for home: principle of operation, technical qualities, pros and cons
Before you start disassembling the water heater, you need to prepare all the tools in advance and lay them out in front of you, so that if something happens you won’t be distracted by searching for a particular screwdriver.
List of required tools:
- Indicator screwdriver.
- Phillips and flat-head screwdrivers (depending on the screws with which the parts are fastened).
- Adjustable wrench.
- Set of spanners.
- Knife and scissors.
- Tow.
- Microfiber cloth to wipe down the insides and parts.
Required Tools
Trouble-shooting
Having discovered a problem unit, you need to begin restoring the boiler’s functionality. The procedure depends on the specific reason that is interfering with the normal operation of the device. Let's look at the most common situations.
Scale clogged
Water heater clogged with scale
Scale is deposits of insoluble carbonate salts on the walls of water heating devices. It is found in kettles, washing machines, and water heaters.
The amount of scale depends on the hardness of the water. In regions with hard water, even after a year of operation of the boiler, the amount of salts deposited on the walls may be sufficient to completely block the lumen of the heating element tubes or significantly narrow it.
If scale causes the water heater to fail, repairs must be carried out in the following order:
- Open and remove the protective cover from the water heater.
- Unscrew the nuts holding the heating element in place and remove it.
Dismantling the heating element
Wash the boiler walls and heating element coil from carbonate deposits. Organic acid - lemon or oxalic acid - will help dissolve the hard crust. You can also use industrial products - anti-scale agents. Soak the part in an acid solution to free it from accumulated deposits.
Cleaning the heating element from scale
- Using a tester, make sure that the heating element coil has not burned out due to a violation of heat removal by scale.
- If the spiral is intact, assemble the device in the reverse order of dismantling.
If the heating element fails, you will have to look for a new one or buy a new boiler - you need to choose the most economical solution. If repairs require large financial expenses, it is more profitable to immediately purchase new equipment.
Failure of the pressure reducer
The pressure drops of the incoming water in the system can range from 2.5 to 7 atm. To compensate for surges, a special unit is installed at the boiler inlet - a gearbox. Its task is to ensure equal pressure at the outlet of the boiler and from the tap. If it falls due to a gearbox failure, it is necessary to adjust its operation or replace the broken part.
Low pressure in the main water supply also leads to a drop in pressure at the outlet of the water heating boiler or instantaneous water heater. Unscrew the hose and check the pressure level: if water comes from the main water supply in a thin stream or does not flow at all, you should wait, as the problem may arise due to repair work. If the pressure has not been restored within several hours, you should contact Vodokanal.
Thermostat failure
If the water leaving the boiler does not heat up enough or does not heat up at all, the cause may be a failure of the thermostat - it is responsible for maintaining a constantly high temperature. To carry out diagnostics, turn off the power to the boiler and remove the thermostat from the housing.
Next you need to do the following:
- Press the thermostat button.
- Heat the copper tip of the thermostat. If the node is working properly, the button should turn off.
- Test the electrical circuits of the thermostat using a tester.
Typically, a thermostat malfunction is caused by the overheat protection tripping. As a result of the operations performed, the device should work, and the problems will disappear after it is installed in place. If the tester shows an open circuit, you will have to replace the burnt out thermostat.
Faucet clogged
If water comes out of the boiler with sufficient pressure, but flows out of the tap slowly, the reason lies in the faucet being clogged with scale or rust. You will need to turn off the water, disassemble the faucets and thoroughly clean the filter mesh. You also need to inspect all the rubber seals and make sure that the valves are working properly.
Malfunctions and their possible causes
When operating a water heater, you may encounter various problems.
If the device functions intermittently, it needs repair
Those who are constantly faced with burning out heating elements should consider the only possible cause of equipment malfunction - the deposition of a large amount of lime in the heating tube.
If the boiler of the equipment “does not see” the boiler, that is, does not react to the flame, this can only mean one thing - a malfunction of the electrode.
When the owner of a boiler is concerned about the flashing of the display, he should check whether everything is in order with the thermostat, RCD and electrical cord of the equipment.
Table: the most common causes of boiler malfunctions
| Malfunction | Possible reasons |
| The equipment does not turn on |
|
| Poor or long water heating |
|
| Overheating and sudden shutdown after a few minutes of operation |
|
| Boiler leak |
|
| Boiler check valve stopped working |
|
| The water heater emits current through the water |
|
| Presence of air in the boiler |
|
| There is no water flowing into the equipment |
|
| Rapid waste of hot water in the boiler |
|
| The water heater turns on and off |
|
| The whistle of a gas water heater heating water |
|
| Black tap water |
|
| Bloating of the water heater, which can result in an explosion of the equipment |
|
| The boiler thermostat does not make a click when the temperature changes |
|
| Knocks out the thermal relay |
|
In an extremely dangerous situation, when a pipe breaks off a water heater, a faulty emergency pressure release valve or a broken thermostat should be blamed. In some cases, a pipe breaks off from a boiler due to the fact that both metal and plastic pipes were not used when installing the equipment.
Video: why the boiler explodes
When you need specialist help
Some types of Termex boiler malfunctions can only be repaired by a specialist, and it is highly not recommended to carry out repairs yourself in such cases. Problems that only a specialist can solve:
- incorrect operation and emergency shutdowns of new equipment that is not out of warranty;
- settings on the electronic thermostat are reset;
- The RCD often turns off the unit;
- tank leaks, although the effectiveness of such repairs is questionable - it will be cheaper to purchase a new device.
But before you call the service, make sure that there is pressure in the line through which cold water is supplied. There are models of units that turn off the boiler if there is no pressure in the supply.
How to repair a boiler yourself
Let's look at the main faults and ways to eliminate them.
Heater leak
The most common problem with electric boilers is leaking. Occurs due to tank corrosion when individual elements fail. Most often this is:
- Lack of grounding, which leads to electrocorrosion.
- Natural wear and tear.
- Safety valve failure.
What to do if the tank leaks? You cannot fix a leak yourself: this can lead to irreparable consequences!
Why you can’t repair the tank:
- The external and internal parts are inseparable.
- Modern technology uses glass enamel, which is easily damaged and cannot be repaired.
It happens that a leak occurs from under the flange that secures the heater. Then you need to drain all the water, remove the gasket and assess its condition. If it is damaged or worn, replace it. In order not to make a mistake with a new gasket, take the old one to the store.
No water heating
If cold water flows instead of hot water, the heater is broken. In addition to the lack of hot water, the RCD may trip the circuit breaker when connecting the boiler to the network. Problems with heating elements arise due to corrosion and scale.
How to understand that scale has completely covered the heating element:
- As it precipitates, a rumbling noise can be heard when drawing water.
- You can smell sulfur.
Diagnostics will help you make sure that the heater is broken and not working:
- Drain the water tank.
- Open the heating element cover.
- Measure the voltage at the heating element terminals using a tester (220-250 V).
- If everything is in order, set the multimeter to resistance measurement mode.
- Unplug the heater.
- Disconnect the heater contacts.
- Attach multimeter probes to them.
- If there is a break, the indicators will tend to infinity.
- If the part is operational, 0.68-0.37 Ohm will appear on the screen.
Additionally, make sure that there is no current leakage to the housing:
- Attach one probe to the copper pipe, the other to the contact of the heating element.
- If there is no leak, the screen will show 1.
- If there is, the tester will give values with a minus sign or, conversely, too huge.
The heater cannot be repaired, it must be replaced
It is important to choose the right part for your model, so it is better to write down the item number or take it to the store
Water temperature exceeds normal
If the water supply is too hot, the problem is in the thermostat or thermostat. An additional sign of failure is the lack of heating when the thermostat does not turn on the heating element. To perform diagnostics and repairs, the thermostat must be removed.
Troubleshooting:
- Disconnect the boiler from the network.
- Drain off all the water.
- Remove the tank from the wall.
- Remove the cover (for vertical models the cover is located at the bottom, for horizontal models it is on the left, for Thermex models the panel screw is in the middle).
- The thermostat is marked in yellow in the picture. Disconnect its contacts and remove it from the case.
Now you can check the part for serviceability. The easiest way:
Press the safety button as shown in the photo:
- Heat the copper tip with a lighter.
- If normal, the button will turn off.
Diagnostics with a multimeter is carried out as follows:
- Set the tester knob to the maximum value.
- Measure the resistance at the contacts.
- If the multimeter does not respond, the part cannot be repaired; it is better to replace it immediately.
The boiler does not turn on for a long time and often turns off
This also indicates problems with the heater. Due to scale, water can take a very long time to heat up, and energy consumption increases as heat dissipation is impaired. To avoid breakdowns, change the magnesium anode on time, which cleans the water of impurities.
The following problems occur:
- During operation of the device, the surrounding equipment also heats up. This happens when the plug is designed to consume more power than the socket, or the contact between them is broken. It is better to call an electrician to check and replace.
- Weak water pressure. You need to check whether cold water is being pumped normally. Inspect the mixer, this may be the cause. If everything is in order, inspect the safety valve. Clean it from dirt and scale.
- The boiler does not turn on at all. After repair, the device still does not work? You need to check the electronics and the main board. It is better to entrust this work to a specialist.
Now you are aware of the main problems with boilers. Carry out preventive inspections, install water filters, clean heating elements in a timely manner, then problems will not affect you.
This is interesting: Calculation of a current transformer for a load power of 250 kW - we describe it from all sides
In what cases is it necessary to disassemble the boiler?
Gas boiler wiring diagram.
The magnesium anode in the boiler, used as a catalyst to protect against corrosion of the tank walls and aggressive effects on the heating device, must be changed periodically.
We recommend: Glass door for a fireplace - distinctive design features, choice of materials and instructions for making it yourself
The service life of the anode depends on the quality of the water used in the boiler (it is recommended to install a special filter on the cold water supply pipe), the operating temperature of the water, and the intensity of operation of the water heater.
The standard period of use of a magnesium anode, indicated in the boiler operating instructions, does not exceed 6 months. When using the boiler in a gentle mode, the magnesium anode can last 1-1.5 years without replacement.
Along with replacing the anode, as a preventative measure for the water heater, it is necessary to thoroughly clean the inside of the tank from scale and wash the walls.
The heating element must also be cleaned using special chemicals or a regular metal dish sponge.
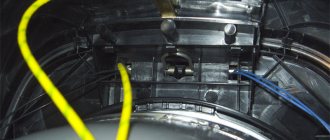
An additional need to disassemble the water heater arises as a result of an accident, breakdown or reaction of the boiler to non-standard operating conditions.
As a rule, the heating element fails.
Diagram of connecting the boiler to the network.
If the water from the boiler has an unpleasant odor, yellow or brownish tint, this indicates corrosion and clogging of the tank. The same is evidenced by the fact that the water takes too long to heat up and the appearance of loud extraneous sounds during operation of the heating element.
It is necessary to immediately disassemble the boiler, determine the malfunction and eliminate it. In any case, you should thoroughly rinse the boiler and make sure that both the walls of the storage tank and the heating element are clean.
If there is a leak in the boiler, you need to make sure that the rubber waterproofing gasket is reliable. If necessary, the gasket should be changed.
If the leak occurred as a result of depressurization of the storage tank itself, it is not possible to repair such a breakdown with your own hands. This may be a manufacturing defect - then the boiler must be replaced in accordance with the warranty agreements.
Sometimes, as a result of improper operation of the boiler, the walls of the storage tank may rust. In this case, the procedure for replacing the storage tank may cost more than a new water heater.
Do-it-yourself troubleshooting
Heating of the cold water supply pipe can only occur for two reasons:
- The safety valve is faulty.
- The valve is not installed in its original place.
The repair boils down to replacing the faulty valve or simply installing it at the junction of the cold water pipe and the boiler pipe. Installation of a safety valve, if included, is required by the manufacturer. Failure to install it will result in denial of warranty repairs. The absence of a valve can lead to tank rupture due to water hammer.
A water heater tank leaks when the connection between the flange and the body is leaking or when the tank wears out. If the internal tank is damaged, it is impossible to repair the water heater yourself and you will have to replace it, if the boiler model allows it. Or you will have to buy a new water heater.
If it is determined that the flange gasket is leaking, drain the tank as indicated above, remove the flange, and visually assess the condition of the gasket. Buy a new one, using the faulty one as a sample. Replace the gasket and continue using the boiler.
Heating of the plug can occur due to loosening of the contacts in the socket and insufficient contact between it and the plug. With prolonged use and constant overheating of the contacts, the housing may melt, which will lead to a short circuit.
Heating of the plug can also occur if the power of the outlet and electrical wiring in the apartment is insufficient. The socket body must be marked 10A.
If the plug body melts, cut it off and replace it with a new one.
The boiler gives an electric shock, the machine turns off or it does not heat the water - this indicates a failure of the heating element. If, when disassembling the boiler, it is discovered that the heater is black and has burst lengthwise, this will unmistakably indicate its failure.
If the heating element does not have obvious signs of failure, you can diagnose the malfunction using a multimeter.
- Step 1: Wet the heater tubes with water. Set the multimeter pointer on the ohmmeter scale to the maximum value and measure the resistance, touching the heating element tube with one probe of the device, and any of its contacts with the other. If numbers appear on the display, the heater is faulty and needs to be replaced. “1” indicates no leakage “to the body”
- Step 2. Touch the contacts of the heating element with the probes. If the numbers appear, there is no break in the spiral, it is working properly. “1” on the display in this case indicates a rupture of the spiral and a malfunction of the element.
These are the main boiler malfunctions when DIY repairs are possible.
How does a boiler work?
There are storage and instantaneous water heaters. The first ones consist of a large container in which a heating element is installed. Water enters the device and is stored there at a certain temperature.
Using a temperature sensor connected to a thermostat, the temperature is maintained at the set level. To prevent loss of thermal energy, the body of the storage tank is covered with a layer of insulation.
Flow models work differently. They also have a housing and a heating element, but do not store water inside. The device turns on the moment water flows through its body. The liquid quickly heats up to the desired temperature. These devices are more powerful than storage models; they consume more electricity. But their sizes are compact and installation is a little easier.
And yet, in everyday life, a storage version of the water heater is more often used. Failures of different types of devices are similar, and they are eliminated using approximately the same means.
To automate the operation of the water heater, use a thermostat. This element receives data about the current state using a temperature sensor. It turns the heating element on and off based on incoming information. This helps not only maintain the optimal temperature inside the drive, but also makes it possible to save energy.
The device also prevents dangerous overheating of water, which could cause a serious accident.
Hot water is gradually withdrawn from the tank and replaced by cold streams from the water supply. At this moment the heating element usually turns on. If the hot water in the boiler has not been used for a long time, it may cool down. Too low a temperature also gives a signal to turn on the heating element.
Types of heaters according to the heating element used
There are boilers with “dry” and “wet” heating elements. In the first version, the heating element is placed in a special flask, and in the second it is in direct contact with water. Both models have certain advantages. In terms of boiler repair, it is believed that it is much easier to replace a “dry” heating element than a “wet” one, since to do this you just need to remove it from the flask and put a new element there.
In the case of a “wet” heating element, you will first have to completely drain the water from the container, and only then replace it. Typically, “dry” heating elements are less efficient than the “wet” version, so not one, but two such heating elements are most often installed in a boiler.
Due to the nature of their operation, “dry” heating elements burn out more often and need to be replaced, therefore models with “wet” heating elements are more popular. It is worth noting that you can also find modern boilers with very reliable “dry” heating elements of the latest generation, but the cost of such devices may be too high.
But the type of heating element does not affect the amount of scale formed during operation. But if with a “wet” element scale deposits directly on the surface, then with a “dry” heating element the deposits accumulate on the protective flask.
Features of connecting an underfloor water heater
Since such a heater is installed on the floor, all connections to it are located not on the bottom panel, but at the bottom of the side or rear vertical wall. In everyday life, such storage boilers are rarely used, since the smallest of them have a tank volume of 100–150 liters. In addition, they take up a lot of space and have high power, which places serious demands on electrical wiring and safety automation.
The water connection for floor-mounted heaters is similar to wall-mounted models. Due to the relatively high power, the connection to the electrical network must be done exclusively through a separate panel.
rmnt.ru
Types of leaks
If the boiler is leaking from above or below
It is necessary to disconnect it from the power supply, substitute a basin and perform a thorough visual inspection. Water leaks can be different: water can simply drip, or it can flow in a stream under pressure. In most cases, water leaks from the bottom of the water heater. Use a flashlight to find the source of the leak.
The simplest case is when the leak occurs from the safety valve. It is adjusted at the factory so that excess pressure when heating water is released through a small fitting.
A simple solution to this issue is to drain this water into the sewer using a plastic flexible tube with a diameter of approximately 8 mm. In this case, you need to think about where to connect the other end of the tube. If the boiler hangs in the toilet, you can lead this tube into the flush tank;
Leakage from connections
The source of the leak may be from loose connections of the inlet and outlet pipes in the boiler itself. This can be easily resolved by repacking all threaded connections;
Leakage from under the cover
Next, use a flashlight to determine the place where the water is flowing from. If leaks are detected from under the cap, this is one of the best options. Since the cover is pressed against the boiler body through a gasket, you can try to eliminate the leak by tightening the nuts of the bolts on the cover.
If this does not work, you need to drain the water from the boiler, remove the lid and change the gasket. Before doing this, you need to disconnect all electrical wires.
Advice:
To avoid confusion in the future, you can first photograph all the connections with a digital camera or smartphone and display them on the laptop screen.
These are, perhaps, all the options in which you can eliminate boiler leaks without replacing it. However, in most cases, about 80 percent, the leak comes from the top or bottom of the boiler body.
It is important to know: often the location of the fistula in the body is almost impossible to determine, since it is covered with heat-insulating material and an outer casing. Water may flow down under the insulation or leak out around the thermometer. At the bottom of the boiler there are special holes, in case of water leakage from which you can accurately determine that it is the water heating tank that is leaking
There are special holes in the lower part of the boiler; if water leaks, you can accurately determine that it is the water heating tank that is leaking.
These are the most difficult and unprofitable options. All of the listed leak options refer to the most common brands on the market, such as Ariston and Termex.
Do-it-yourself Termex boiler repair
Before you begin the repair, first gather the necessary tools: a set of wrenches, an adjustable wrench, electrical tape, various screwdrivers, pliers. After this, turn off the water by closing the inlet and outlet valves to the water heater. Then drain the water from the boiler tank and disconnect it from the power supply.
The next step is to remove the protective cover. If you have a vertically located boiler, then the lid is located at the bottom, and in the case of a horizontally located one, it is on the left or in front.
When removing the cover, pay attention to the stickers. Often the screws for fastening it are located under these stickers
If you have unscrewed all the screws and the cover still does not come off easily, check the stickers again.
Replacing the heating element
First, perform all of the above steps and remove the tank cap.
To make it more convenient to work, you can even remove the tank from the wall.
It is worth noting that most Thermex models have not one, but two heating elements. Therefore, it is imperative to remember how and in what sequence the parts need to be connected. It’s better to photograph the whole process.
To remove the heating elements from the Thermex water heater, remove the top cover by unscrewing the bolt; disconnect all plugs and unscrew the bolts securing the heating elements.
The heating element itself is turned off as follows:
- After removing the cover, find the protective thermostat, remove the tips from it;
- also remove the tips (3 pieces) from the heating element;
- cut the plastic clamp;
- Unscrew the screws, removing the sensor;
- now disconnect the cable and unscrew the four screws;
- then you need to dismantle the nut on the clamping bar and pull out the heating element.
After dismantling the heating element, it is necessary to clean the surface of the tank from dirt and scale. Only after this can you install a new heating element and put everything back together.
Do not forget that the heating element does not always need to be changed. If the water in the tank still heats up, but it happens slowly, then, most likely, scale has formed on the heating element. Then dismantle it and descale it. Then install. The problem should go away. Also, do not forget that it is advisable to clean the heating element with chemicals rather than scrape off the dirt. In the latter case, there is a possibility of damage to the part.
To clean the heating element, you can use a solution of citric acid or vinegar (its percentage in the solution should be about 5%). The part must be immersed in liquid and wait until the scale falls off. Then you need to wash the heating element.
Faulty thermostat
The thermostat in Termex water heaters is located under the cover, next to one of the heating elements, and its sensor is located inside the tank.
Sometimes the thermostat fails. This element cannot be repaired; it must be replaced. To perform the replacement, you need to do all the preparatory steps, remove the cover, then remove the thermostat. But before dismantling, we recommend checking this part. To do this, use a lighter to heat the tip of the sensor (copper). If the thermostat is working properly, you will hear a characteristic click, which means that the protection mechanism has activated and the circuit has opened. Otherwise, you will have to replace the part.
Tank leak
No matter how trivial it may sound, but first you need to find where the water is coming from. A lot depends on this, since if the tank is rotten, you will have to buy a new water heater. So:
- if water oozes from the side seam, then the container is rusty and repairs will not be possible;
- If water comes out from under the lid at the bottom, then you need to disassemble the tank.
If traces of leakage are found in the places where the heating elements are attached, then your water heater is not hopeless and can be saved by replacing the gasket.
In the case of the second option, complete all preparatory steps, then remove the plastic cover. Next, take a close look at where the water is leaking. If it comes out near the flange, then the rubber gasket has deteriorated (less often this is a problem with the heating element). Otherwise, the tank is rusty and the boiler can be thrown away. To replace the gaskets, you need to remove the heating element. But it is necessary to carefully examine the heating element itself. If it is cracked, it is also better to replace it.
Other faults
If you have checked and replaced all the parts, but the boiler still does not work, then it is quite possible that the electronics have failed. The control board cannot be repaired, and it will be extremely difficult to find a similar one in a store. Therefore, in this case, we recommend contacting specialists.
Basic rules for servicing the device
For long-term and trouble-free operation of the water heater, it is important to follow the rules of its operation and maintenance. Otherwise, breakdowns are inevitable.
The fact that problems have arisen in the operation of the device may be indicated by some changes in its operating mode:
- increasing the time for heating water to a given temperature;
- the appearance of unusual sounds accompanying the operation of the device;
- the appearance of foreign impurities in tap water, changes in its color, smell or taste.
If at least one of these signs is observed, you should immediately clean the water heater.
To do this you will have to perform the following operations:
- Disconnect the device from the power supply.
- Remove the protective cover.
- Disconnect the contacts of the electrical wires.
- Shut off the cold water supply.
- Use a hose to remove any remaining water from the tank.
- Unscrew the bolts that hold the heating element.
- Remove the heating element and descale it.
- Clean the inside of the drive from dirt and scale particles.
- Rinse the device thoroughly.
- Check the serviceability of the magnesium anode.
- If necessary, replace this element immediately.
- Wait for the cleaned tank to dry completely.
- Reinstall the heating element.
- Reassemble the device.
- Check the reliability of all fastenings.
- Connect the water heater to the power supply.
- Check for grounding.
The heating element should be removed from the tank carefully; the bolts may be too stubborn; sometimes the heating element is difficult to remove due to too much scale.
The heating element is cleaned by mechanical or chemical means, as is the removal of contaminants from the tank. If a large amount of scale is found inside the device, you should consider reviewing the operating mode of the water heater.
This phenomenon is often observed when the device operates at maximum power for a long time. It is recommended to set the maximum heating temperature no higher than 60 degrees to increase the life of the device and reduce the number of breakdowns.
If the body of the heating device receives an electric current, the heating element may be deformed and ruptured, or there may be a breakdown in the control system.
We carry out dismantling
Every owner of Ariston water heaters should know that when replacing the thermostat, relay and safety valve, dismantling the tank is not required. Draining the water and completely disassembling the boiler is carried out only during maintenance work and when replacing a burnt-out heating element.
Disassembly of the product is divided into standard stages:
- Disconnect the water heater from the home electrical network.
- Drain the water from the tank.
- Remove the flanges and gain access to the inside of the water heater.
Before disassembling the product, you need to make sure that it is disconnected from the network: if the heater is powered by a separate line, then you need to turn off the circuit breaker, but if it’s just through a cord, then simply pull out the plug from the socket.
Some readers may wonder: why emphasize these points so often? But statistics say that during home repairs or when replacing burnt out parts, very often craftsmen who neglect safety precautions receive electrical injuries of varying severity.
Only after turning off the power can you begin dismantling the Ariston boiler with your own hands:
unscrew the cover, which is secured with screws; before starting dismantling, take a photo of the location so as not to confuse anything during assembly; disconnect the three-wire cable, the first two wires - phase and neutral were connected to the thermostat, so you can carefully remove it.
All electrical work has been successfully completed, and you can begin draining the water from the tank.
Removing water
If the initial installation of the water heater was carried out by a service technician, then he had to install a special tee with a drain tap and screw a fitting into it. Quite a convenient device - the user easily connects the hose, as shown in the photo, and drains the water into the bathroom. In the absence of a special device, water is removed by connecting a hose directly to the nozzle of the product.
Draining the water can take several minutes if the heater capacity is up to 50 liters, and when you have an 80-liter Ariston, the wait will last up to 30 minutes or more.
Hose with fitting
Opening access inside
All modifications of products under the Ariston brand have an oval flange on which heaters, a magnesium anode and a tube with a thermostat inside are installed. An elastic rubber gasket is placed on the flange body from below to ensure tightness. The flange is secured with a U-shaped strip, which is secured with a nut.
We unscrew the nut, carefully push the flange in, turn it and pull it out. Next, the failed parts are replaced and the surfaces are cleaned of salt and lime deposits.
Remove excess debris at the bottom of the tank, visually inspect the rubber seal, if everything is in order, then do not change it - it is very expensive, and it is very difficult to get a new one. Dismantling and subsequent assembly can be done independently by any user without special training. We attach this video to help:
The operation statistics of similar heaters allows us to conclude: regular inspections of the wear of the magnesium anode, cleaning of the heating elements, and preventive maintenance of the internal coating of the tank must be done regularly and by doing this you will significantly extend the service life of the product.
Features of various designs
Before you start repairing a water heater with your own hands, you need to figure out what type of device it is. There are several varieties:
- electric boilers;
- flow-through;
- indirect heating systems;
- geysers.
Electric heaters
This type of boiler is considered the most popular. The design consists of a tank, a thermal insulation layer (polyurethane foam is often used), and an upper casing.
The heating element is located at the bottom of the device. The water is heated to a certain temperature, which is pre-set on the thermostat, the maximum value is +75°C.
If no water is drawn, the device maintains temperature readings by turning the heating element on and off. It is equipped with overheating protection, so when the maximum performance is reached, the device turns off.
The optimal temperature value is +55°C; it is in this operating mode that the structure will last longer and save electricity.
This device is the most common
Hot water is drawn through a tube located at the top of the device. The cold liquid inlet is located at the bottom of the device. The metal tank is protected from corrosion by a special magnesium anode, which has a certain working life. The element must be replaced once or twice a year, depending on the hardness of the water.
Indirect heating systems
Such products do not independently generate thermal energy; water is heated using a coil in which the coolant is located.
Cold water comes from the bottom of the device, hot water comes out from the top. Indirect heating devices can provide large quantities of hot water, which is why they are often installed in large houses. The operating principle is to exchange heat between liquids at different temperatures. In order for the output to be +55°C, heating is carried out to +80°C.
The process takes a lot of time, this feature must be taken into account when choosing a suitable device. Like their electrical counterparts, indirect ones are equipped with a magnesium anode. The structures can be wall-mounted or floor-mounted; in addition, they can be connected to a double-circuit gas boiler. More expensive models are equipped with additional electric heating elements, which reduce heating time as needed.
Water heater device
Both electric and gas boilers are installed in apartments. The most popular electric water heater consists of the following elements:
- a thermostat that shows what the temperature of the water is in the tank and is a digital indicator or scale with an arrow;
- a thermal insulation layer responsible for maintaining high water temperatures;
- a tube that discharges hot water;
- outer box for all parts, made of metal or plastic;
- internal stainless steel tank;
- heating element or heating element, which periodically needs to be replaced;
- magnesium anode, which protects the tank and heating element from rusting;
- tubes through which cold water enters the tank;
- thermostat that controls and automates water heating;
- an insulating gasket that seals the structure and protects against electric current.
In an electric boiler, in most cases, the heating element and magnesium anode break down
A gas instantaneous water heater is made up of other parts. Its design includes:
- pilot and main burners;
- solenoid valve;
- gas combustion unit;
- heat exchanger;
- thermometer (thermoelectric);
- device for measuring thrust conversion;
- piezoelectric igniter.
The device can be equipped with an anode