Design and principle of operation of the hair dryer
Externally and functionally all devices are identical. The operation of the equipment is based on a fan and a heater. The first one sucks in air from the room, passes it through the heating element and discharges the already heated flow outside. In addition to these two main components, the design of the device also includes other necessary elements:
- engine;
- power cable;
- thermal protection;
- speed controllers, temperature controllers, and so on.
Features of the device are as follows:
- The reduction coil built inside the heating element is designed to reduce the voltage to the required value;
- The diode bridge helps equalize the voltage;
- A fan is installed on a metal shaft located on the engine, which can consist of two, three or four blades;
- The heater is a spiral-shaped tubular element with a nichrome thread wound on a fireproof base for safe operation;
- The thermostat and temperature controller prevent overheating of the product;
- If there is a “cold air” function, the unit operates without turning on the heater, that is, it blows out a cool stream.
Interesting!
The thermostat is a useful part responsible for protecting the device from overheating; not all models have it. At the moment of maximum heating of the coil, the thermostat turns off the power and turns it on only after the heating element has cooled down.
Electrical circuit of a hair dryer
In general, the electrical circuit of all devices is the same. The number of spirals H indicates the number of modes - if the device has 3 spirals, then H1 is responsible for supplying power to the engine, and H2 and H3 are for heating. The highest position of SW1 indicates that the system is de-energized. In the first position, the device operates at minimum power, since only one coil is turned on, in the second - at medium (2 units work), and in the third - at maximum (all 3 are turned on). If there is a “cool” button, then the device can work without heating, that is, the second and third spiral elements are turned off, and the engine runs, blowing cold air. The circuit also includes inductors L1, L2 and capacitors C1, C2, which minimize interference during operation, as well as thermal fuse F1 and thermostat F2.
Electrical circuit of a hair dryer
Healthy!
The electrical circuit is designed to convert current and regulate the operating modes of the device. It is not difficult to understand, since it contains few elements, and a detailed description can always be found in the instructions supplied with the technique.
Brief design
A hair dryer consists of a motor, a fan, heating elements, and an electrical circuit that makes the elements work in harmony.
Depending on the number of modes, the manufacturer, the element base, appearance, and composition of the switches are different. But there won’t be anything more complex than a semiconductor thyristor inside. Therefore, we will carry out home repairs of hair dryers with our own hands. The body is held on by screws. The heads are often non-standard. This is a plus sign, an asterisk, a pitchfork. Therefore, first of all, before fixing a hair dryer, let’s take care of a tool that can cope with such a task. Fortunately, a set of bits costs 600 rubles today.
Sometimes the case doors are additionally secured together with special latches. This is a separate problem: experienced craftsmen often break plastic, despairing of dealing with it using civilized methods. There are no tricks, they come up with hidden screws hidden under stickers, plastic inserts, and removable regulator caps. The fastener is fictitious. There are no useful functions.
The hair dryer motor is powered by direct current 12, 24, 36 V. A diode bridge is used to rectify the mains voltage; in cheap models, a single diode is used. Filtering of power harmonics is carried out by a capacitor connected in parallel with the motor windings or included in a more complex filter. Due to their enormous mass, inductors are rarely used in hair dryers. Therefore, knowledge of the principles of smoothing ripples with RC circuits is enough to cope with the construction of a circuit diagram of a hair dryer being repaired. Sometimes the filter element uses one spiral (inductance).
The hair dryer switch simultaneously closes the circuit through which the coils will be powered and starts the motor. Further intervention schemes are determined by complexity:
- only the rotation speed or only the temperature is regulated;
- the ability to individually select heating and air flow intensity.
In most hair dryer models, there is parallel protection against turning on the heaters when the motor is idle. Protects the spiral.
An optional thermostat in the form of a special resistance or other sensitive element. Let us describe the breakdowns that occur in the faithful assistants of the fair half of humanity.
Typical faults
Due to the simplicity of the operating principle of the hair dryer, its possible breakdowns are typical and even a simple user can cope with them.
Smells something burnt
The problem is usually due to hair, dust or lint getting on the coil. If the element becomes dirty, the rotation speed of the impeller drops, the overheating protection system is triggered, which causes an unpleasant odor. To resolve the situation, just clean the heater and then check the functionality of the device. If the burning aroma does not disappear, you should contact the service center.
The filter is located at the back of the hair dryer, on the air intake side
Lack of power
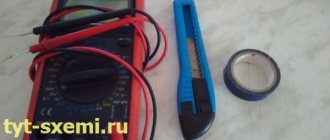
First of all, you need to make sure that there is electricity in the outlet and that the power cord is not damaged. Even if no external damage is noticed, you need to make sure that current is flowing through the wire. For this:
- It is necessary to disassemble the case and check the power contacts using a special tester;
- The next step is to check the power button to make sure that its pressing is not interfered with by debris or stuck dust. A uniform color without charred marks will indicate that the contacts are working properly;
- If damaged connections are identified, they need to be cleaned with a knife or sandpaper;
- Connect the device to the network, but do not turn on the start button on it. It is necessary to bring the tester to the terminals of the button to find out whether voltage is passing through.
Healthy!
If a cable malfunction is detected, it should be replaced with a new one. If this is not possible, it is permissible to use electrical tape to insulate the stripped and twisted contacts. If you find problems with the button, you can try cleaning the contacts or disconnecting the part altogether, then the unit will start immediately after connecting the plug to the socket.
Hairdryer won't turn on
Just as in the previous case, the problem may be due to a lack of electricity or a broken cable. Then the procedure is similar to that described above. Another possible reason is that the electric motor has broken down. The precursors to this problem are the following symptoms:
- a slight cracking sound is heard during startup;
- the motor runs intermittently;
- the smell of burnt wiring is heard;
- When the fan does not rotate, a hum is heard.
If such a malfunction is suspected or detected, it is almost impossible to resolve it yourself, since it is very difficult to identify the specific cause. In addition, the cost of repairs will not be cheap; in many situations it is easier to buy a new device.
Performance has decreased
If this problem occurs, it is worth checking the condition of the fan. Most often, it begins to spin more slowly due to the fact that hair, dust or other contaminants have accumulated on it. Then it is enough to clean the part from debris. If you perform the manipulation periodically, light cleaning with a toothpick, an old toothbrush or tweezers will help. If the device has never been cleaned or this happens rarely, you will need to disassemble the case in order to carry out high-quality cleaning.
DC motor
The fan rotates quite slowly
As in the previous option, this is most likely due to hair wrapping around the part or excessive clogging of the housing. You should also clean the device.
Cold air blows
A heating element, a spiral, is responsible for heating the flow. This part is one of the most vulnerable in the device, especially in the absence of overheating protection in the equipment. If there is no automatic shutdown when the maximum temperature is reached, you need to know what signs indicate that it is time for the device to rest:
- the appearance of a burning smell during operation, which may persist even after shutdown;
- The housing is too hot during operation; a working unit should not overheat.
To figure out the problem, you will need to disassemble the hair dryer. If the heater ruptures, it is noticeable to the naked eye. If there is minor damage, you can easily fix the problem by connecting the ends of the spiral and soldering them. If the gap is in several places, it is better to buy a new heating element, most importantly - from the same company as the equipment itself.
Important!
It is necessary to determine why the part was damaged. If you do not understand the cause and do not eliminate it, the problem will recur soon.
What to do when you make a bob? Lots of photos + recipe on how to lay the bob yourself.
Hello dear readers. I finally got to the next review.
And it all happened at the moment when I decided to radically change my hairstyle. She cut her hair and made a bob.
Coming home beautiful, I realized that I had absolutely no idea how to style a bob. And what’s more, I don’t have anything for this except a regular hairdryer.
I came to my favorite Airek for advice and chose the Polaris PHS 1002 Hairdryer Brush.
The issue price is 1999 rubles in the Eldorado store.
Hair dryer brush comes with 2 attachments: a thicker one and a thinner one. As it turned out, for the square you have to use both. But more on that later.
And, before I forget, the large nozzle has a ceramic base, and the thin one has a plastic base.
The bristles on the attachments are quite long and capture fairly thick strands when working, and this is known to reduce styling time.
All the necessary information was written on the packaging, but in order not to clutter the review, I will post here a photo of the most important and necessary one.
And now about controlling the hair dryer. You turn on the blowing mode, there are three of them
And alternately turn on the direction of rotation of the nozzle
It’s very good that there are two directions, it’s convenient to work with different parts of the head.
Well, that seems to have said everything, except that the plug is standard.
And now about the most important thing: how to lay a square: Very simple
1. Wet your hair (not too much, but slightly moisten). Apply styling foam or any product you need.
2. Divide your hair into two parts. Just separate the top of the head and strengthen it with crab.
3. Dry all lower hair with a fine nozzle. Curling your hair inward. It takes exactly 7 minutes to cover the entire perimeter of the head.
4. Unravel the top hair and dry with a thick nozzle. Curling the ends inward.
And that’s it, your hair looks like it came out of a hairdresser’s.
OK it's all over Now. I showed and told the most useful information and interesting photos.
How to disassemble a hair dryer: inspection procedure, disassembly and repair
Disassembling the device is not difficult if you follow the instructions, have the necessary tools on hand and have at least some knowledge in the field of electronics.
Cord
First of all, you need to inspect the wire. You should start with a power outlet to make sure there is electricity. If there is light, then move on to checking the cord - from the body to the plug. Inspect the integrity of the wire, look for kinks, breaks, melting. Inside the case, after disassembling it, observe the state of the electrical resistance - a pair of detachable contacts, soldering or wiring with plastic caps.
Permanent connection
If the wiring is embedded in plastic caps, then we are talking about a permanent connection. This option is quite difficult to test and requires the following materials:
- regular needle;
- tester;
- lamp;
- indicator.
The check is performed as follows:
- A needle is attached to one terminal - it should be inserted into the power core near the cap all the way to the copper;
- The second terminal covers the antennae of the plug;
- Both wires ring at once.
Healthy!
You should not make more than one puncture per core, since the operation of the device does not exclude moisture from entering the housing.
Contact pad
It is much easier to ring the wire when the joints are visible to the naked eye.
If damage is found, it is better to replace the cord with a new one that has a permanent plug. The second option is preferable, since in the first case restrictions are imposed on the choice of insulating materials that prevent moisture from entering the cores. Attention!
The most vulnerable spot is at the contact of the wire with the body. Constant bending and twisting of the cord leads to chafing and cracking. Damaged copper strands begin to spark, burn electrical tape and melt.
Switch and switch
You can check the functionality of the switch by short-circuiting the part.
If a three-position switch is used, the corresponding check will need to be performed three times - for each mode separately. It is better to sketch out the wiring diagram to avoid mistakes during assembly. Once a defect is identified, it should be carefully inspected and processed. Burn marks should be cleaned off with a file, eraser or sandpaper, contacts should be treated with alcohol. If an element cannot be restored, it should be replaced with a new, similar one.
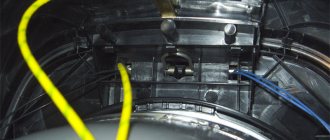
Fan
A clogged air duct is a common problem when operating equipment. If there is a filter, it must be removed and thoroughly cleaned; clogged dust can be removed using a soft brush. If you find hair wound around the motor axis, it is better to remove the fan from the shaft and then remove the dirt.
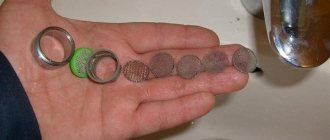
Spirals
Most often, devices are equipped with several heaters at once, which outwardly do not differ from each other. After disassembling the unit, you should make sure that the heating elements are identical; if there are breaks, they need to be soldered or the ends twisted. In addition, the ends of the spiral can be connected using thin copper tubes.
Engine
A breakdown of the motor is indicated by the occurrence of a strong crackling sound and the presence of sparks when turned on.
If a malfunction is detected, remove the motor winding from the electrical circuit and check all connections. Replacing the winding requires certain skills and knowledge in the field of electrical engineering, so if you don’t have them, it’s better to immediately turn to professionals. Healthy!
If the winding is in good condition, it is enough to clean the surface and evaluate the tightness of the brushes to the copper surface. In this case, the shaft should rotate freely, and it is better to lubricate all rubbing elements.
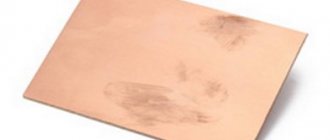
Chip:
- The getinax substrate periodically cracks, which leads to rupture of the track. If a damaged fragment is found, it should be buried, covering it a little with solder;
- A malfunction of the capacitor is indicated by swelling of the product; if it breaks, it bends outward. If a breakdown is identified, the only way out is to replace the part with a new one;
- When the resistor burns out, it darkens. Even if it is not faulty, it is worth replacing.
Thermostat
Some models are equipped with a self-regulation function. Operation is carried out by using a resistive divider, in which one arm is responsible for responding to temperature. In the future you can proceed as follows:
- Eliminate the sensor by breaking the circuit, and then check its functionality.
- Close the wires and observe the reaction of the device.
There is a high probability that the attempt will not be successful if the device only responds to certain resistance values.
Electrical circuit of a hair dryer
Let's look at the electrical circuit in Fig. 1 of a hair dryer:
One diagonal of the diode bridge is connected to an external 220V AC voltage source.
The other diagonal of the diode bridge is connected to the electric motor.
The electrical circuit consists of the following elements:
- toggle switch that implements the temperature control mode - K1;
- a toggle switch that controls the rotation speed of the electric motor rotor and controls the blowing speed - K2;
- Toggle switch for turning off heating elements - K3;
- fan electric motor - M;
- capacitor - C;
- heating elements - RTEN;
- diodes - VD1, VD2.
Through the diode bridge circuit of one diagonal of the bridge, the rectified current of two potentials +, - is supplied to the electric motor. When moving from the anode to the cathode, the current flows at a positive half-cycle of the sinusoidal voltage.
Two capacitors connected in parallel in the electrical circuit serve as additional smoothing filters.
The blowing speed occurs due to the variability of resistance in the electrical circuit, that is, when the speed toggle switch is switched to the highest resistance value, the rotation speed of the electric motor rotor decreases due to a voltage drop.
The number of heater heating elements in this circuit is four. The temperature regime of the hair dryer is controlled by a temperature control toggle switch.
Heating elements in an electrical circuit have different resistances; accordingly, the heating temperature when switching from one section of the electrical circuit to another - heating of the heating elements will correspond to its resistance value.
The general appearance of a construction hair dryer with its names of individual parts is shown in Fig. 2
The following electrical diagram of a construction hair dryer, Fig. 3, is comparable to the electrical diagram of Fig. 1
There is no diode bridge in this electrical circuit. Controlling the blowing speed and controlling the temperature regime occurs when switching from one section of the electrical circuit to another, namely:
- when switching to a section of an electrical circuit - consisting of a diode;
- when switching to a section of an electrical circuit that does not have a diode.
When current flows in the anode-cathode junction of the diode VD1, which has its own resistance, the heating element2 will heat up according to two resistance values:
- resistance at the transition anode - cathode of diode VD1;
- resistance of heating element heating element2.
When current flows in the junction, the anode - cathode of diode VD2, the voltage supplied to the electric motor and heating element1, will take the lowest value.
This is interesting: Beautiful girls with brown hair: makeup secrets
Accordingly, the rotation speed of the electric motor rotor and the heating temperature of the heating element for a given section of the electrical circuit will correspond to the direct transition of the current of the diode VD2. The heating of heating element 1 for a given section also depends on its internal resistance, that is, the resistance of the heating element is taken into account.
Do-it-yourself hair dryer repair: electrical circuit, ceramic element
Operation of a household hair dryer
The hairdryer operates on 220 V, 50 Hz. Any hair dryer has two main parts - a heating element and an electric motor.
A nichrome spiral is usually used as a heating element; it provides warm air. Hair dryers mainly use DC electric motors with a power of up to 50 watts, there are exceptions.
Passing through the spiral, the current loses its initial strength, since the spiral has a certain resistance; it is this current that is rectified by the diode bridge and supplied to the electric motor.
Electric motors in hair dryers are designed for voltages of 12, 24 and 36 Volts; only very rare models use electric motors with a power supply of 220 Volts, in which case the voltage from the network is directly supplied to the electric motor. A propeller (propeller) is attached to the engine rotor, which removes heat from the spiral; it is thanks to this that a fairly strong directed flow of warm air is obtained at the output. The power of the hair dryer depends on the thickness of the coil used and the power of the installed electric motor.
The hair dryer that was brought was disassembled, it turned out that the problem was a broken track on the circuit board with the switches. After filling it with solder, the device worked fine.
But most often, the main reasons for malfunction are a broken spiral, a non-working motor, switch contacts melted from heat, a broken power cord or plug.
What does the hairdryer consist of:
Elements in the diagram: 1 — diffuser nozzle, 2 — body, 3 — air duct, 4 — handle, 5 — cord anti-twist guard, 6 — “Cold air” mode button, 7 — air flow temperature switch, 8 — flow speed switch air, 9 — “Turbo” mode button — maximum air flow, 10 — loop for hanging the hair dryer.
This is interesting: Is it possible to wash your hair with laundry soap, is it harmful to the scalp?
Wiring diagram of a simple hair dryer
The electric motor is supplied with DC voltage obtained through a diode bridge consisting of four diodes (or simply from one diode).
Let's highlight two elements of the circuit that are consumers (loads), these are the spiral and the diode bridge (we do not count the motor, because it is the load of the bridge). In the circuit, the elements are arranged in series (one after the other), which means that the voltage drop across each of them will depend on its own resistance and their sum will be equal to the network voltage in the third position of the switch.
Most entry-level hair dryers have a simple electrical circuit; such hair dryers have only one switch that turns on the fan and heating element. Heaters can be made in various modifications, but in all hair dryers they are made of nichrome twisted into a spring.
However, almost all simple modern hair dryers have 2-3 stages of power and air flow adjustment.
More advanced hair dryers have smooth controls for blowing speed and temperature of the blown air.
Rules for using hair dryers
The recommended maximum operating time is 5 minutes. Upon completion of work, turn the temperature regulator to minimum, leave it on cold air for half a minute, and only then turn off the hair dryer. Try not to handle it with wet hands, otherwise moisture may get on the internal elements of the circuit, which can lead to a short circuit. Author: AKA KASYAN.
Cold air blows
Possible malfunctions: burnt out spiral
As a rule, a break is visible to the naked eye, even without a multimeter. There are several ways to repair a spiral:
- You can place the broken ends of the spiral in a thin brass or copper tube and crimp it with pliers.
- The spiral is supported on a frame made of heat-resistant, non-conducting plates. In such a plate, you should carefully make a round hole with a diameter of about 2–3 millimeters with a sharp tool, insert a short bolt with a washer there, tuck the torn ends of the spiral under the washer and tighten.
- Throw one broken end over the other.
- The broken ends can simply be twisted together. It should be noted that the third and fourth methods are less reliable than the first two. The fact is that when the broken ends are connected by casting and twisting, the repaired section of the spiral has increased resistance and therefore overheats and soon burns out in the same place.
- Disassemble the donor hairdryer (of course, if you have one) and take it from there.
- (not for everyone): you can wind the spiral yourself. Where can I get nichrome? For example, order from China.
- You can buy a ready-made spiral. To find the one you need, enter > in your browser's search bar. Spirals come in different capacities and are sold in bags of several pieces.
READ MORE: How to connect a printer to a laptop via WiFi: setup options
Disassembly algorithm
Repairs must begin with a routine inspection of the device, that is, diagnostics. Algorithm:
- It all starts with the outlet. Look to see if the contacts are burnt or if they are loose. If you notice any malfunctions, it is necessary to clean or tighten them. Make sure that the plug engages the contacts when applying some force.
- Next comes the power wire. Diagnostics must be carried out at the place where it enters the handle of the device. Here you can find the contact block. From it to the plug itself, an inspection should be carried out for any damage to the insulation or kinks.
- Most often, dismantling this device begins with disassembling the housing. The body structure is made of two halves, connected with screws, and in front of the nozzle with specially designed latches. Disassembly must be done carefully, as these latches can be broken. There are also screws that are hidden with stickers, plastic inserts and removable covers.
Important! Almost all Rowent models have the same appearance; they are disassembled in the same way as a standard hair dryer. However, the hair dryer comb is dismantled a little differently due to some design features.
Therefore, before disassembling, be sure to read the instructions.
- Fan. In front of this element there is a protective grille and a filter, which prevent hair from getting inside the hair dryer. Very often this protective grille can become clogged with hair, so it needs to be cleaned. Cleaning is carried out using a small brush.
- Electric motor. If this element does not function correctly, then the entire device will malfunction. The reasons for incorrect operation of the electric motor can be: breakdown of the winding or burnout of the diode bridge. After dismantling, it is necessary to lubricate the rubbing components of the electric motor. It is also important to tighten problem areas; this can be done manually.
- Spiral. Almost all models have several spirals that help operate various air heating modes. They can be restored by soldering. Defects can be immediately noticed without any problems. In some cases, it is possible to replace spirals with components made of nichrome thread. They also have similar characteristics.
- Microcircuits. There are types of failure. For example, a base made of getinax may crack. In this case, the tin track breaks. Areas that are damaged can be tinned, and then coated with solder. Another problem is capacitor swelling. You just need to install new capacitors. There is also a possibility that the resistors are faulty. They become dark. It is important to simply replace them.
Attention! To repair a hair dryer, it is important to know how to use a soldering iron. If you do not have such skills, then it is better to contact specialists who will repair the hair dryer without any problems. If you decide to fix your hair dryer yourself, check out our article.
Repairing devices from Rowenta, Philips, Ionic, Remington, Dewal and others has its own difficulties, especially for those who are not educated in this. Since they have modulating controls, the coils are made from specially designed alloys. If you need to connect them, then you are unlikely to be able to do it reliably.
Before dismantling this device, you need to find the electrical circuit of the device. If you couldn’t find the instructions, you can consult with a specialist. Remember a simple truth - disassembling a device is not difficult; it is much more difficult to reassemble everything.
Causes of malfunction and ways to eliminate them
There are several types of faults that you can fix yourself at home. Let's take a closer look at them. Note! Any work must be carried out with the hairdryer unplugged.
Problem with the cable: no power is supplied and the hair dryer does not start
No voltage is supplied. Most likely the problem is with the power cable.
Before repairs, you need to carefully inspect the cable along its entire length, starting from the power plug and up to the housing, for visible damage. If they are present, you need to cut out the damaged area and solder the ends of the cable. Usually this turns out to be the only malfunction, and after fixing it, the hair dryer works again.
The fan does not spin at all or does not pick up speed quickly enough
There may be a problem with the engine. Most often this occurs due to hair wrapped around the motor shaft. To remove them, you need to dismantle the impeller. The same must be done if you need to install a new motor shaft or lubricate it. Grab the base of the impeller with your fingers, pull it away from the hair dryer and remove it.
On my own behalf, I would like to add that the most convenient way to check an electric motor for your own safety is to dismantle it and then connect it to a power supply that is protected from a possible short circuit. If the motor does not rotate, check the windings and their integrity using a multimeter. If problems are found with the winding, it is better to simply install a new motor. Of course, you can try to rewind the old one yourself. But this is more likely to be suitable for your own entertainment, to improve fine motor skills.
Video: removing the fan from the hair dryer motor
Engine malfunction: smell of burning wiring, sparks slipping
Sometimes when using a hair dryer it smells like something is burning. In such cases, even the blown air may be too hot. The simplest reason is that the motor shaft is wrapped in hair. They need to be removed urgently and carefully. They can melt and damage the spiral, which will lead to engine failure. The same hair, when burned, can cause sparks.
By the way, if the hair dryer sparks quite strongly, then it is better to replace the motor with a new one. You can disassemble the hair dryer and carefully wipe its parts with alcohol. After this, be sure to wait until the device is completely dry before turning it on again. This method helped me, but not for long. In the end, it turned out to be easier to install a new engine.
Heating element malfunction: hair dryer blows cold air rather than hot air
In this case, most likely, the coil in the hair dryer is burnt out. Usually its break can be seen with the naked eye, without using a multimeter. There are several ways to repair a spiral.
- Take a thin tube made of copper or brass, place the ends of the spiral into it on both sides, and crimp with pliers.
- The spiral is held on a heat-resistant frame consisting of plates that do not conduct current. In the plate you need to use a pointed object to make a hole with a diameter of 2–3 mm, and install a short bolt and washer of suitable size into it. Place the ends of the spiral under this washer and tighten well.
- The torn ends can also be thrown over each other or twisted together. This method is not as reliable as the previous ones. This is due to the fact that the place on the spiral, repaired by casting or twisting, often overheats greatly due to increased resistance and usually burns out quickly.
- If you have an old donor hair dryer whose coil is in working order, disassemble it and replace the part.
- The finished part can be purchased in specialized electronics stores or ordered in an online store. You can also wind the spiral yourself from nichrome thread. Order the material on a popular online platform.