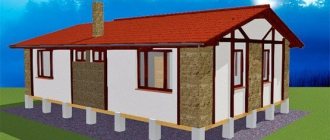
Features of the construction of a brick foundation strip
If a decision is made to build a brick foundation, then the main nuances of the upcoming construction should be taken into account:
- bricklaying technology;
- types of brick foundations;
- soil features.
Additional measures to ensure the reliability of a brick foundation are:
- waterproofing;
- insulation;
- arrangement of the underlying layer;
- drainage
We must not forget about the climatic conditions of the construction site; issues of construction organization should occupy a worthy place. Self-construction of a brick foundation is quite accessible with minimal skills in mastering the mason profession or gradually learning it during the construction process.
Sequence and features of work execution
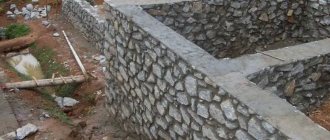
It is not difficult to erect permanent brick formwork; it is important to follow the masonry technology. Rubble masonry techniques are mainly used. After a certain distance, a brick is placed, which serves as an anchor. Usually the step is set to two elements.
After construction, the walls are thoroughly dried. Then pour the base inside.
A sand-cement mixture prepared in certain proportions is used as a working solution.
Before erecting the formwork for a brick foundation, preparatory work is carried out:
- A pit is dug under the future foundation. The lower platform is reinforced with sand and gravel. The height of the layer is made at least 0.3 meters.
- The prepared base is reinforced. I make the surface smooth and durable.
- Brick laying is carried out in compliance with technology.
- To reduce the pressure on the prepared base, the plane of the rows should be made parallel.
- The side faces of the future foundation form a system of perpendicular zones with longitudinal and transverse seams.
- To keep the walls strong, you cannot place bricks edge-on.
Soil properties
The main problem of all foundations is soil heaving. Often this factor has different indicators within one area.
The degree of soil heaving can only be determined based on soil analysis in laboratory conditions. But geological surveys of a building site are expensive and time-consuming, and therefore developers of small houses often use the advice of colleagues from neighboring sites, or use standard recommendations.
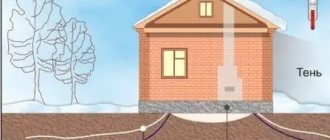
The first rule that should be followed for the optimal choice of foundation: a brick foundation must stand on dry soil. A brick foundation is rigid, its strength level decreases sharply under the influence of moisture. That is why a brick base is optimal for dry soils with low groundwater levels.
Important! If this condition cannot be met, then a set of drainage works should be carried out or another solution for constructing the base of the structure should be used.
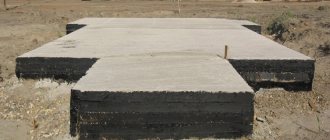
Device
The base is an almost complete copy of a traditional reinforced concrete strip made of brick. It is located in a trench with a shallow immersion depth (recommended).
The problem with a brick strip is that it is unstable to moisture, so it is advisable to use this type of foundation only on soils that do not require deep immersion - sandy, sandy loam, ideally a rocky platform.
At the bottom of the trench, a sand and gravel cushion is installed, which performs leveling and drainage functions. The backfill layer is carefully compacted, after which a double layer of roofing material is laid to cut off capillary moisture from the lower soil layers.
After this, the tape is laid and other measures necessary for high-quality insulation of the base from moisture are carried out.
NOTE!
A leveling concrete layer about 10 cm thick can be poured on top of the sand and gravel cushion, strengthening the base for the masonry and reducing the risk of the tape being squeezed out when heaving loads appear.
Design selection
After approximately determining the type of soil, you can begin to select the design of the brick foundation:
- For highly heaving soils, a strip foundation with a depth below the soil freezing mark is selected.
- For medium heaving, a columnar base is considered the best option.
- In the case of minimal heaving or its absence, the foundation can be made in the form of a shallowly buried strip of brick.
Based on the fact that brick is a fairly expensive material, installing a brick foundation strip below the freezing point is almost always impractical for a number of reasons. For example, it will not be possible to select soil exactly according to the width of the foundation due to the inconvenience of laying masonry in a deep trench. In addition, the pit will need to be expanded to install vertical waterproofing of the brick, which entails an increase in the volume of excavation work.
Important! Below the freezing point, it is more rational to install concrete monolithic reinforced strips - construction will cost less and will go much faster.
Of course, there are no prohibitions on making a deep strip of brick - it is arranged in the same way as a shallow strip. The question of choosing between brick and concrete is in the sphere of economics, rationality and the capabilities of the developer.
There are two options for the type of brick foundation for building a house: columnar and strip with slight depth. Both types are acceptable, but must take into account the advantages and disadvantages of the base material.
Stages and technology
The first stage of construction is foundation calculations:
- its height,
- depths,
- wall thickness.
The burial depth should be at least 10 cm below the soil freezing level. Quantities are also calculated:
- bricks,
- fittings,
- solution and other materials.
Online calculators help you accurately calculate the parameters of the foundation. But in any case, the width of the tape should be greater than the width of the walls of the house, at least 5-7 cm.
After calculations and purchase of materials, construction of the foundation begins:
- Excavation. The site is marked, and on its basis a trench is dug for the foundation. Its width should be sufficient for masonry and two layers of waterproofing. If the soil is clayey, the base needs backfilling, which increases the width of the trench by 1 m.
- Arrangement of a sand cushion - a layer of sand is laid out at the bottom of the trench and compacted. Layer thickness – from 10 to 15 cm.
- Waterproofing. It is recommended to use polymer materials, but roofing felt in several layers is also used. Sheets of materials are folded into a pocket so that they completely cover the bottom and walls of the trench, without seams.
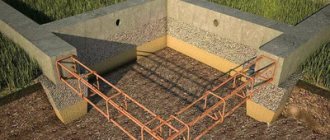
- Installation of formwork 10 cm high - under the pouring of a concrete pad, which increases the bearing capacity of the foundation.
- Pillow reinforcement is optional.
- Pouring concrete.
- Hardening of concrete.
- Carrying out masonry.
Laying begins from the corners of the building, with the joints completely filled with plaster at the bottom of the foundation. To increase the strength of the base, the masonry is reinforced with mesh or pins every 3-4 rows.
The following materials are suitable:
- geotextiles;
- extruded polystyrene foam;
- special cement compositions;
- bitumen.
The upper part of the foundation, on which the walls of the house are erected, is also covered with waterproofing.
The last stage is filling the space between the foundation and the walls of the trench with fine construction waste, sand, crushed stone or gravel - this layer acts as drainage. A concrete blind area is made on top of the drainage, at a slight slope from the walls.
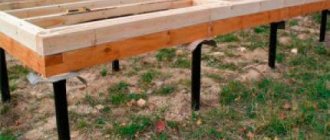
Construction of a belt for pillars
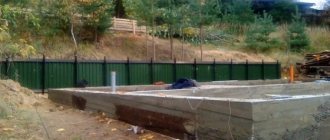
A heavy fence also needs reliable support, which is brick pillars. A shallow strip foundation is being built for them.
When the soil freezes to a depth of more than 80 cm, a trench 1 m deep is dug, the same applies to areas with a high groundwater level and heaving soil. In other cases, a depth of 50 cm is sufficient.
Construction stages:
- Calculation of foundation parameters.
- Digging a trench with a width 20 cm greater than the thickness of the tape.
- Waterproofing – a layer of roofing felt and polyethylene.
- Filling with sand in a layer of 5-7 cm.
- Filling of crushed stone with a layer of up to 15 cm.
- Installation of formwork.
- Laying reinforcement with a cross section of 8-12 mm.
- Pouring concrete.
- Hardening of concrete, dismantling of formwork, construction of brick pillars.
Fence posts can be built without a strip base. But the concrete tape increases the strength of the entire structure and ensures its correct geometry.
Advantages
Brick as a material for constructing a foundation has a number of advantages over a monolith:
- no formwork is required, which allows you to reduce the cost of construction and give the belt structure any configuration;
- in a brick foundation, any damaged part or element of masonry can be easily restored;
- brick is a piece material with optimal weight for manual work, and therefore is available for building a foundation with your own hands;
- making a brick ribbon does not require mechanisms or heavy structural elements;
- masonry mortar can be prepared directly near the foundation tape by manual mixing;
- Reinforcement of a brick strip is most often carried out using ready-made factory-made mesh, which eliminates the process of forming and knitting a reinforcing frame.
The disadvantages of brick as the main foundation material lie in the source material for its manufacture - clay. No matter how well you burn it, the moisture content of the clay will still increase over time, which can lead to destruction of the material.
Making corners
Now, using the knowledge gained, we set the corners brick by brick. The main thing is not to forget that the quality of the masonry of the entire wall will largely depend on how correctly the corners are set. Therefore, we use both an eye and devices that will help us in setting angles.
Using a plumb line, we check the verticality of the masonry. A plumb line is considered a very accurate device for checking the verticality of a surface. Probably the simplest and most accurate compared to the building level, which can sometimes fail. There is no point in using a plumb line when we have 1-2 rows of masonry laid, since it is difficult to determine by eye the discrepancy from the vertical in such a small area.
In the picture we have displayed 3 points equally distant from the masonry. Based on the fact that the distances in these segments are equal, we can conclude that our masonry is laid out exactly vertically. To work with a plumb line, you, of course, need to have a good eye, since we determine all the distances between the masonry and the plumb line visually, by eye.
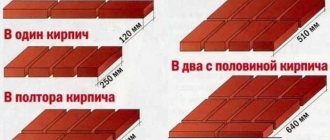
To maintain identical horizontal seams and to control the horizontalness of the masonry, we recommend using rows. They will be especially useful for people with little experience in bricklaying. The orders are established strictly vertically (plumb or level) and are attached to the masonry using U-shaped brackets. The distance between the order divisions is 77mm for a single brick (brick thickness 65mm + seam 12mm) and 100mm for thickened bricks (88mm + 12mm).
Choosing a brick for the foundation
In the construction environment, there is constant debate about the quality of bricks and, in particular, the suitability of their use in foundations.
Lifetime
Some builders and designers believe that the service life of a brick foundation is limited to 30 years, others give a slightly longer period - 50 years. But there is a category of professionals who indicate the possible life span of a brick at 300 and even 500 years. In fact, both sides are right, and in history there are many facts about the longest period of use of brick in foundations.
Brick in modern factories is not initially designed for a long service life - this is a normal situation for any products manufactured by the mass production method.
Brick formwork
Brick formwork for monolithic construction. For any person who has come into contact with construction, this combination of words sounds somewhat absurd. After all, monolithic construction is, in principle, an alternative technology to brickwork. Don't rush to conclusions. A note should be made in the margins that there is a patented technology of movable formwork for laying brick walls. As you can see, the words formwork and brickwork may well appear in the same sentence.
Brick formwork
But let's return to monolithic construction. Yes, removable brickwork as formwork is not only meaningless, but also technologically impossible - it will simply be impossible to dismantle it without breaking the bricks. However, using this ancient and traditional building material as permanent formwork that does not need to be removed is not only possible, but in current conditions it is very relevant. The relevance of the issue will be discussed below, while we will tell you how to independently make a formwork structure for a foundation, plinth and brick walls.
Brick formwork for foundation and basement walls
Brick formwork for plinth
Brick formwork for a permanent foundation is easy to construct. You need to follow masonry technology. Some tips and sequence of work.
- After excavation work, it is necessary to strengthen the bottom with a layer of sand or gravel, at least 300 millimeters, compact it well, moisten it and compact it again.
- When creating brick formwork, the same masonry is used as for walls, with a shift. It is necessary to lay bricks perpendicular to the laying plane through 2 bricks.
- When creating a foundation and basement floor, you should not lay bricks on edge.
- After laying, you need to let the finished wall dry well so that the mortar sets firmly, and then pour the concrete mortar inside, as in the usual case of creating a monolithic foundation.
The resulting permanent formwork and, accordingly, the final structure will be very durable. And it is not at all necessary to use a new brick; a used one will do just fine. It is also not necessary to make masonry from heavy solid bricks. In practice, it uses not only brick, but also concrete blocks.
When creating formwork from brickwork for pouring external walls and internal partitions, you can lay the masonry on an edge. The technology for constructing monolithic walls does not differ from the technology using modern modular formwork systems made of polystyrene foam and other materials. It also rises in height, the space between the planes is reinforced and concrete is poured, followed by compaction. It should be noted that it can be raised by 50 centimeters or more; laying with mortar adds additional rigidity.
Reinforcement of brick formwork
The advantages of this technology include the following obvious points.
- The resulting wall structure will be incredibly durable. A sandwich of two rows of bricks and a reinforced concrete monolith in the middle, such a house is a fortress in the literal sense of the word. For those who are concerned about how to further increase the strength of walls, here is a great solution.
- Brick has excellent heat-insulating and noise-absorbing properties.
- Unlike permanent foam formwork, the house will already be grounded.
- Use facing or decorative brick as the outer layer to avoid subsequent external finishing work.
- When constructing buildings using this technology, it is possible to create, in principle, any geometry of walls in a horizontal section, even fractal.
The disadvantages of this method of architecture are obvious - labor costs, time costs, high financial costs, compared to monolithic construction using removable panel formwork.
Strip foundation
Options for installing a brick foundation strip depend on the expected loads on the foundation, the depth of soil water, the possibility of flood phenomena and a number of other climatic features.
The following sequence of construction of a brick strip is recommended:
- Layout of the site surface. It is carried out manually or mechanized over the entire surface of the building site.
- Laying out the foundation on the site plane. Usually the corners of the house are determined, the cord is pulled around the perimeter, the axes and edges of the tape are beaten off, and the accuracy of the breakdown is checked by the equality of the diagonals.
- The width of the tape should be 5-10 cm greater than the estimated width of the house wall on the outside and inside. When marking, the possibility of installing a sand cushion under the tape and, possibly, a leveling layer of cement-sand mortar is taken into account. The width of the pillow and layer of solution must exceed the width of the tape by no less than 5 cm on both sides.
- Excavation of soil to the designed depth. When the lower specified mark (the bottom of the trench) is reached, the soil is leveled, cleaned and compacted.
- A sand and gravel cushion under a brick foundation for a house is poured with a thickness of at least 10-15 cm, depending on the soil, and compacted layer by layer.
- A mortar screed is optional, but desirable for more accurate masonry work. The generally accepted thickness is 5 cm.
- A layer of bitumen mastic is applied to the cushion or screed layer and roofing material is laid - a layer of horizontal insulation is created. It is possible to use other insulating materials and mastics.
- The masonry is carried out in accordance with the rules for constructing brick walls, the mutual overlap of bricks in the rows is mandatory, the horizon of the rows is constantly checked by the building level.
- Reinforcement of the brickwork of the foundation is not a prerequisite; it is only necessary in cases of large total weight of the structure. As a rule, reinforcement is carried out every 3-5 rows of bricks using masonry metal mesh with a pitch of 50x50 mm, 4-6 mm thick. Profile reinforcing bars with a diameter of 8 - 12 mm are used much less frequently.
- The external joints of the brickwork are completely filled and rubbed, creating a smooth surface for vertical waterproofing.
- The side surfaces of the tape are coated with adhesive mastics. Sometimes a high-quality layer of hot bitumen is enough for sufficient insulation, but usually successful waterproofing is carried out using special film coatings or roll insulating materials.
- At the bottom of the foundation, along the perimeter, a mortar screed is made with a slope to ensure water drainage away from the foundation.
- The upper plane of the brick strip foundation is also covered with waterproofing materials if necessary.
Step-by-step installation instructions
Tape
This option can withstand a more serious load, up to a small wooden house. Brick strip foundations can be shallow or recessed. The second method is used when taking into account the depth of soil freezing. The main work is carried out in areas with heaving soil (the most suitable option); in addition, it is recommended to additionally sprinkle the area with sand and gravel so that in the future there will be no situations with deformation of the structure and the house will not move to the side.
Preparation
The preparatory stages involve the same actions as in the case of a columnar foundation. A trench approximately 1 m wide is dug around the entire perimeter of the project. The dimensions of the extension are agreed upon in advance. If there are processes in the area where the groundwater level is high or the soil itself is too wet, the width of the proposed pit should be 1 m larger than the building itself (a necessary condition for drainage). The procedure ends with the bottom being covered with sand, water is poured in, and then compacted.
Reinforcement
If work areas are characterized by problematic soil, reinforcing rods must be installed under the brick partition. Such a measure will strengthen the structures, allow them to withstand serious loads in the future, and eliminate dismantling. A metal rod with a width of 5 to 6 mm is suitable for work. In order for the masonry to be done correctly, it is important to cover the reinforcement with 2 mm of cement mortar. The rods must be lined on the outside with a length of half a brick from the side area of the strip structure. As transverse reinforcement, you need to make a wire mesh, the size of which is 4 mm in diameter.
Columnar
It is this foundation type that is most often included in projects. Step-by-step instructions include the following steps:
- To prevent the pole from sagging in the first year, it is important to choose a perfectly flat surface.
- Using twine, markings are made, the main angles are determined, the design is checked for the accuracy of the diagonals, and the pegs are driven in.
- A string is pulled, which separates the wall from the pillars along the perimeter.
- Foundation holes are dug to a depth of 60 cm, taking into account the reserve for powder.
- The bottom is lined with geofabric, which is capable of allowing water to pass through and prevent the absorption of sand. Afterwards crushed stone is poured in a 15 cm layer and compaction occurs.
- For additional reinforcement, white pillars are strengthened using concrete solutions, as is the case with the strip type.
- Next, reinforcement is carried out, after which the device is filled with solution.