Advantages and disadvantages
Advantages of a concrete pond:
- low costs for materials;
- high structural strength;
- ease of maintenance;
- the ability to create ponds of various shapes and sizes;
- the designs are compatible with various engineering equipment;
- long service life.
The disadvantages include:
- duration of installation work;
- painstaking work;
- the need for cladding with a frost-resistant agent;
- For an optimal habitat for the aquatic world and to increase the service life of the structure, liquid glass waterproofing is needed.
Return to contents
How to drain a pond with a piece of hose
Even in moderately cold climates, a pond with fish 600 mm deep can be left filled with water for the winter without a twinge of conscience. If ice forms on the surface, it will protect the water from freezing. But during extremely cold winters, make sure that the reservoir does not freeze to the bottom. Fish can live in a state of hibernation under a layer of surface ice, but if the reservoir completely freezes, they will die. Due to this, for the winter or for a certain period of severe frost, fish and plants must be transferred from the reservoir to the indoor space. Regardless of weather conditions, it is sometimes necessary to drain water for dyeing and cleaning. There are several options for performing this work - from scooping up water with a bucket to pumping it out with an electric pump. But if you have places on your site whose level is below the bottom of the reservoir, you can pump out the water with a water seal from a garden hose. The easiest way to get a water valve to work is to attach it to a water faucet to draw water into the hose and push out air. Then close the hose end with a plug and close the tap. Place the end of the hose with the nozzle below the level of the bottom of the reservoir, and remove the other end from the tap and close the hose hole with your hand. Keeping the hose closed, lower it into the pool and remove your hand. Water should begin to flow out of the reservoir. If the garden faucet is placed too far from the pond, try another, slower method. Lower the hose, open at both ends, into the water (be patient: the hose fills with water slowly, and there should be no bubbles), then you need to take one end of the hose, close it with your hand and take it to a much lower place. Open the hose and water should start flowing out.
Required tools and materials
Determine the level of illumination of the area allocated for the pond.
The choice of materials for building a pond is influenced by:
- planned location;
- relief;
- life time;
- speed of construction;
- planned cash investments.
The following materials are used to build a pond with your own hands:
- reinforcing wire;
- sand;
- cement;
- water;
- crushed stone;
- roofing felt;
- reinforced metal mesh;
- primer.
You will need the following tools:
- scoop;
- stretcher;
- concrete mixer;
- brush;
- shovel;
- bucket;
- welding machine.
Return to contents
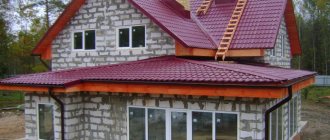
DIY concrete pond, pond.
DIY concrete pond and waterfall
The most popular material in the manufacture of a pond, home pond or swimming pool is still concrete, due to its cheapness, availability and the fact that almost everyone has a little experience working with building mixtures. And if the soils on your site are quite mobile, then the only possible stationary option. A concrete pond is the most durable and allows you to freely experiment with the creation of reservoirs of various shapes and levels, is easily combined with various engineering structures, and is the least labor- and resource-intensive for further operation. In addition, if you fail to create a high-quality waterproofing layer, you can later combine technologies by covering the concrete bowl of the reservoir with PVC film, using it as a foundation and supporting walls.
Do-it-yourself concrete pond, pond - choose a place.
I already wrote about choosing a place for a home pond in the article “Do-it-yourself pool, pond. Planning". I just want to add that you should not leave water and sewer pipes under the future pond, not to mention power cables. If a pond made of PVC film, although troublesome, can be drained, rolled up and troubleshooted, then a concrete pond created with your own hands will simply have to be destroyed.
The second important rule is that a concrete pond should not rest on an old foundation left over from an old building. This must be an autonomous structure, otherwise, under the influence of shrinkage and soil displacement, the bowl will shift over time and lose its tightness.
Stages of making a pond from concrete.
The construction of a concrete pond can be divided into several stages.
- Carrying out earthworks.
- Filling the drainage layer and laying the waterproofing layer.
- Laying the 1st layer of concrete and its reinforcement.
- Laying the 2nd layer of concrete.
- Installation and fixation of embedded parts.
- Sealing of communication inputs and embedded elements.
- Leveling the surface of a concrete pond bowl.
- If necessary, treat the reservoir bowl with liquid glass.
A clear breakdown of work into stages with detailed detailing is necessary for the correct selection of the time required to complete the work, as well as not to miss the little things and lay all the embedded elements on time. Before starting each stage, it is advisable to study the weather forecast. There is no point in starting to dig a pit or carry out concreting on days of probable rainfall.
Carrying out earthworks.
At the first stage, markings are made on the site of the future reservoir and adjacent communications (power supply, underwater and outlet pipes), and a foundation pit is dug. Marking can be done with white sand or spray paint. The pit should be 25 centimeters deeper than the planned reservoir. At this stage, the shape and levels of the future reservoir are formed if it is planned to create a multi-level pond. All tree roots extending into the pit are carefully removed. The bottom of the pit is leveled and the soil is compacted. During the work, it is advisable to organize a drainage system in case of heavy rains.
Filling the drainage layer and laying the waterproofing layer.
At this stage, crushed stone of various fractions is poured into the bottom of the pit in two passes. On the bottom there is coarse crushed stone with a fraction of 20-40 mm, on top there is smaller crushed stone - 10-20 mm. We compact the crushed stone after each backfill. The height of the crushed stone layer should reach 25 centimeters. We fill in 5-10 centimeters of sand, moisten it and compact it thoroughly. If your future concrete pond is small in size, or you are planning a small fountain, then the size of the drainage pad can be reduced.
Then we lay a waterproofing coating on the bottom. We start from the bottom of the reservoir towards the shores. The covering should lie freely, without tension and have a margin of 15-20 centimeters. As a waterproofing coating, you can use geotextile fabric + film or a layer of roofing felt on bitumen mastic. When making waterproofing from several parts, the pieces are laid with an overlap of 10-15 centimeters. External waterproofing should not be ignored. Over time, concrete, under the influence of ground and external waters, begins to collapse.
Laying the 1st layer of concrete and its reinforcement.
One of the most critical stages is concreting the reservoir bowl. It is carried out in 2 stages separated in time and begins with laying the 1st layer of concrete. It is first necessary to lay all the embedded parts, such as: water supply and drainage pipes, electrical networks, and in places of lighting, filters, pumps, etc. lay pieces of solid insulating material of appropriate shape, which can be easily removed after the concrete has hardened. If this work is postponed until later, then in the future you will have to work with a jackhammer on the finished concrete bowl of the reservoir, which will lead to the formation of numerous microcracks.
For concreting the bowl, concrete of a grade no lower than M 350 is used. When making concrete for constructing a pond yourself, you need to mix coarse river sand, cement and crushed stone in the following proportions 2.5x1x3.5 with the addition of a plasticizer. The plasticizer increases the strength, waterproof, frost-resistant and corrosion characteristics of concrete.
Now you can lay the first layer of concrete, no more than 10 centimeters thick. To complete this task, you must have sufficient time; laying the entire 1st layer must be completed in one step. Drying the entire reservoir bowl evenly will prevent it from cracking. Therefore, it is better to prepare the required amount of concrete in advance, or invite helpers. As practice shows, there will always be people willing to help build something extraordinary. Applying concrete should begin from the walls, after preliminary wetting the formwork or waterproofing coating with water, moving to the floor of the reservoir. As soon as the concrete begins to harden, a reinforcing mesh is pressed into its surface. There is no need to smooth the first layer, just leveling it is enough. The second layer will better catch on the roughness of the base and protruding elements of the reinforcing mesh.
It happens that it is not possible to lay a layer of concrete at once, and when concreting multi-level ponds this is practically impossible. When laying the concrete mixture intermittently, it will be necessary to form so-called “cold joints”. If you see that you do not have time to completely complete the stage of laying the 1st layer, then you must strive to carry out concreting from corner to corner so that cold seams form at the corners - the intersections of walls or walls and floors. When continuing concreting, it will be necessary to use a special adhesive composition that improves the adhesion of new concrete to old, and before continuing to lay the concrete mixture, mechanically clean the hardened surface from cement films.
Laying the 2nd layer of concrete.
After the 1st layer has dried and become hard enough to walk on, we begin applying the 2nd. Pre-wet the 1st layer with water. If this is not done, it will draw water from the new solution and it will not reach the required strength. The second layer is applied similarly to the 1st, but about 5 centimeters thick. At the same time, the required shape and slope of the walls of the future pond are finally formed. The edge of the top layer should completely cover the 1st layer at the upper joints.
The time for concrete to gain strength under normal conditions is about 20 days. It is enough for us to withstand 3 days, after which it will acquire 30% of the declared strength, and we can continue work. To fully gain strength, I recommend covering the concrete bowl with cellophane film for 3 days and periodically watering it with water, especially in the hottest part of the day. In the absence of cellophane, as a last resort, cover the concrete from direct sunlight with hay, straw or torn weeds.
Installation and fixation of embedded parts.
To eliminate pressure leaks in the walls of reservoirs and pools and quickly fix anchors and parts, a quick-hardening cement-based cement mortar, for example Litoblock Aqua from Litokol, is used. It has a quick setting, is waterproof, resistant to water pressure, and does not cause corrosion when interacting with steel elements.
Sealing of communication inputs and embedded elements.
For this purpose, hydrophilic rubber is used, which ensures sealing of communication inputs and joints by increasing in volume up to 1.5 times in direct contact with water.
To repair and restore concrete bowls of reservoirs, you can use ˮLitorapid Fluid Ankerovochnikˮ - a high-flow, non-shrinking mortar for anchoring on a cement base, resistant to various types of load after hardening. It has high adhesion to concrete, stone and steel reinforcement.
Leveling the surface of a concrete pond bowl.
To level the concrete pool bowl, a latex additive based on an aqueous dispersion of synthetic resins Idrokol X20-m is used. It is used as an additive in the preparation of cement mortars, high-adhesive and high-strength plasters and putties, to increase the resistance of mixtures to mechanical and temperature influences. But one of the most basic purposes is the preparation of adhesive cement “milk” to continue pouring between old and new concrete, ensuring seamless adhesion of the bottom of the reservoir to the side walls.
Coating the surface of a concrete pond bowl with liquid glass.
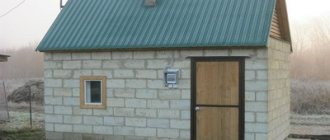
Decorative pond with fish
After 3-4 days, we free the surface of the concrete bowl from the protective elements and clean it. In the future, you can limit yourself to applying several layers of waterproof paint for pools or special sealants. But if you plan to populate a concrete pond made by yourself with flora and fauna, then applying a glass film will not allow concrete chips to release harmful impurities into the water and will prevent the formation of fungus and mold.
Liquid glass (also called silicate glue) is applied to the surface with a layer thickness of 2-3 mm with a wide brush in the same sequence as concreting, first on the walls, then on the bottom of the reservoir.
Attention! This operation must be carried out with gloves, as alkali in contact with human skin causes burns and inflammatory reactions.
Advice. I do not recommend adding liquid glass to cement when applying the second layer. A solution with such an additive will harden very quickly.
Then all that remains is to improve the surrounding area. Do-it-yourself concrete pond is ready.
sadowody.ru
Construction stages
Scheme of a concrete pond.
The construction of the pond begins by determining the location. To do this, it is better to contact a geodesy specialist who will perform topographic and design work. It is better to build a pond on level ground. It is not recommended to dig a pond under trees, as plant roots can damage the bottom of the structure, and fallen leaves will deteriorate the water. It is advised to install a pond with your own hands in a place where shade predominates. You should not carry out construction in areas where utility lines are located. It is important to determine the level of water in the soil and the ability of the soil to deform due to temperature conditions.
Installation of a recess with water includes the following steps:
- The first stage involves digging a pit.
- Next, a layer of waterproofing is laid.
- At the next stage, the first layer of concrete is laid.
- A reinforcing frame is installed.
- Liquid glass is poured.
At the first stage of construction, you need to decide on the size of the structure and mark its territory with pegs. After the area has been determined, we begin to calculate the amount of concrete solution. You can prepare the solution yourself, or you can buy it ready-made in the store. To prepare the mixture yourself, you will need the following ingredients:
- cement;
- water;
- sand;
- crushed stone;
- plasticizer
At the initial stage, the possibility of drainage, installation of lighting and water filtration are considered.
Return to contents
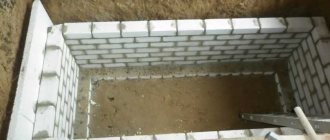
Digging a pit
After the preparatory work, they begin to dig the excavation. The bottom of the dug pit is compacted and the surface of the solution is leveled. Next, backfill with sand 2 cm thick and lay a waterproofing layer on top along the entire perimeter of the pit.
To make the notch even, you need to set the pegs at equal intervals. The deep part of the pit is marked with pieces of wood half a meter from the edge. Only then do they start digging. Take care of your future beauty at the preparatory stage. To do this, you need to leave a small distance around the perimeter of the pit; in the future, decorative items will be placed there. To ensure that the dug elements are level, use a construction water level. They begin to remove soil from the middle of the hole.
Return to contents
Laying waterproofing
After the pit is dug, waterproofing begins. Ruberoid or polyethylene film is used for it. The installation of waterproofing begins from the middle of the pit to its edges, while fixing the edges with heavy objects. Lay the waterproofing layer so that it protrudes ten centimeters beyond the sides of the pit. To avoid damage to the film, lay it flat, without stretching it.
Return to contents
Laying the first layer of concrete
The next step is to lay the first layer of concrete. This process must be completed within 24 hours, but if the filling is delayed, it threatens the appearance of cracks.
The first layer is laid with a thickness of more than ten centimeters. And they begin laying from the walls of the pit, after which they smoothly move to the bottom. The layer should be smooth and not contain voids or bumps. The bottom can be leveled only after installing a reinforcing frame on the walls, which is installed in a concrete solution that has not yet hardened.
Return to contents
Concrete reinforcement
To improve the strength of the structure, reinforcement with metal mesh is used. Fix the reinforcing layer first vertically, then horizontally. Check the dryness of the solution by walking on it with your feet. The reinforcement is immersed in a concrete solution that has not yet hardened.
Return to contents
Laying the second layer of material
After completing the first stage of pouring and installing the reinforcing structure, they begin laying the second layer. The second layer is also laid without interruption, like the first. To do this, you need to lay a solution of concrete with a thickness of five centimeters on an area previously moistened with water. The edge of the second layer should protrude further than the first, while their edges are pressed with a film that protects from moisture. After laying the second layer, it is important to thoroughly level the surface of the walls and bottom.
Return to contents
Filling the bowl with silicate glue
Fill the surface of the bowl with liquid glass 3-4 mm thick.
They begin to fill the ponds with silicate glue (liquid glass) three days after laying the second layer of concrete. Liquid glass has excellent adhesive ability. To obtain it, use an aqueous solution of sodium silicate. You cannot apply glue right away, as concrete crumbs can release toxic components that are dangerous for the aquatic inhabitants of the future pond.
Using a wide brush, apply silicate glue in an even layer of two millimeters. Start from the walls and move to the bottom. Silicate glue also requires installation in one go. Before applying the layer, the surfaces must be thoroughly wiped. You can also treat the surfaces in ponds with a sealant or primer, but you should remember that these materials are dangerous for further living creatures in the pond. There is another type of material with which ponds are formed - liquid rubber, which is resistant to frost and does not lend itself to mechanical stress.
Return to contents
Decoration and care
An interesting stage in the construction of a reservoir is decoration. The bottom of the pond, which is made of tiles, looks beautiful; it can be plain or colored. A bottom made of white tiles can make the water blue, and this solution will also make the water visually transparent. Experienced builders experiment by creating different patterns using colored glass. People with great imagination will be happy to decorate a pond with their own hands, because there is plenty of room to have fun.
An installed fountain looks beautiful on a pond. To create a natural look for the pond, various pebbles, small pebbles, and crushed stone are sprinkled around its perimeter. You can also put stones of various sizes and shapes, plant grass and wildflowers in them. You can improve the area of the pond with small trees, spruces, thujas; their choice is huge. You can add color to the palette with the help of flowers planted in special baskets. It is recommended to fill the water space with fish and frogs 7 days after its construction.
To prevent the water from becoming cloudy and remain clean, a filtration system or separate filters are used. The reservoir must be maintained in a clean condition throughout its entire service life; it should be monitored especially carefully if you plan to breed aquatic life. Filters with a pump, ultraviolet sterilizers, and lights are used. These devices will improve the pond environment and prevent algal blooms. In winter, the water is drained, as it should not solidify in the pond; this is especially important for a structure with vertical walls.
Return to contents
Preparing for work
Before construction work, you should prepare the necessary materials and tools:
In an artificial pond, subject to certain conditions, it is possible to breed ornamental plants and fish.
Pit construction
Construction work begins with digging a pit. Before this, a location for this object is selected, taking into account the listed conditions. Next, the configuration of the future reservoir is marked out with pegs and rope, while space should be allocated for the formation of decor. The configuration of the additional dredging of the bottom is separately noted; soil excavation begins precisely from such areas. The pit is dug manually or using special equipment.
Tamping
Before compacting, the bottom of the pit is further deepened by 25 cm to add strength to the base. The resulting depression is filled with a 15 cm layer of gravel, leveling it. Next, a sand cushion 10 cm thick is formed, wetting it with water and compacting it. Remains of roots of trees and other plants are removed from the walls of the pit. Then they begin to compact the surfaces of the recess, using a spare tire of a passenger car as a tool.
Waterproofing
Polyethylene film is used as a means to prevent water from leaking from the reservoir. It is laid from the central part of the pit to the edges of the structure, preventing the appearance of blisters, but also without stretching it. The film should protrude 10 cm beyond the bowl configuration. Fix the waterproofing layer with pebbles.
Installation instructions
To obtain the desired result, when building a pond, you should follow the installation instructions. Initially, a pit is dug using various tools. At the end of the work, compact the bottom well and level the surface. Tamping is carried out using a special unit or heavy object. Finish leveling the walls as soon as they acquire a dense and even structure. Next, they begin to fill the sand three centimeters thick and lay waterproofing. After that, they begin to install the first layer based on a concrete solution.
Laying starts from the walls and goes to the bottom; the whole process should take no more than one day. While the concrete has not hardened, reinforcement is inserted into it in two layers. They begin pouring the second layer of concrete after the first has hardened. The solidification density of the solution is checked by the presence of dents after walking on it. There should be no traces left on the hardened concrete.
Experienced builders recommend wetting the surface before applying each layer of concrete. The concrete reaches its strength after three days, then they begin to apply silicate glue with a wide brush. The layer should be single and even, without any bumps or holes.
Return to contents
Strengthening the pond bank and planting algae
Planting vegetation in a man-made country house for fish farming is an important point, since you need to choose the right species. There are algae that clean man-made bets from foreign matter or produce oxygen. Both are very important for the formation of a normal ecosystem of an artificial reservoir. When planting vegetation, mesh pots or flowerpots are used - they are lowered to the bottom and attached to a plastic mesh located there.
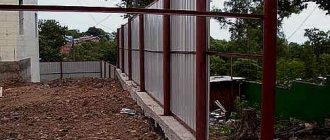
Protection and safety
Before deciding to build a pond, you need to understand all the responsibility for it and the living creatures living in it. For example, the presence of exotic fish, which by nature are whimsical and cannot easily tolerate temperature changes, requires covering the pond with blankets that are specially designed for this. They are fixed with strong frames around the entire perimeter of the water container. It is also important to protect aquatic life from floating away during heavy rainfall; for this purpose, safety gear or filters are installed.
To protect children from possible harm, they use special protection for the water container - a fence. It can also be decorated, for example, with climbing grass or flowers. The fence is made collapsible, but at the same time strong.
Return to contents
Conditions for fish breeding in an artificial pond
It is important not only to choose the technology for creating an artificial pond for breeding fish and implement it, but also to create the necessary living conditions for the inhabitants of the reservoir. Otherwise, their growth and reproduction may slow down and there is a risk of death.
For fish reproduction in an artificially created reservoir, the following conditions are important:
- Oxygen. If it is not in the water, the fish in the pond will simply die. The source of oxygen is various aquatic plants. Preference is given to water lilies, water hyacinth, and water chestnut. You should purchase flora useful for an artificial pond in a specialized store. If you take plants from a natural reservoir, then the risk of their death in unusual conditions is high.
- If you plan to populate the pond with plants, then you need to select them in accordance with the depth of the reservoir. For a shallow pond, it is good to use susak, chastukha, and burr. Reservoirs of medium depth are well populated with water lilies or pondweed. If a deep pond is organized, then to fill it you can use basilisk, Siberian guillemot, and loosestrife.
You may also be interested in reading about pond fertilizer and its proper use.
- Timely cleaning of an artificial reservoir. It is necessary to remove debris, fallen leaves, and grass. Otherwise, rotting processes will begin, which negatively affect the level of oxygen in the reservoir and can lead to the death of its inhabitants.
- Optimal acidity level. You need to focus on the type of fish that you intend to breed. The best option is a neutral acidity level.
- The presence of necessary elements in the water. Proper feeding of pond fish will help maintain a healthy population. Fish need iron, phosphorus, potassium salts, and nitrogen compounds. It is necessary to properly saturate the reservoir with them. You can buy special additives in a specialized store - the dosage and other conditions of use are indicated on the packaging. You can also make food yourself. Making food for pond fish with your own hands is not an easy task, but it will cost less than expensive food.
- Water temperature. Fish can be released only after the water in the artificial reservoir has warmed up to 24 degrees.
- Silt layer. It forms when a pond filled with water sits for at least a month. After this, it is recommended to change the water, but there is no need to touch the silt layer. After changing the water, you need to wait a few more days.
It is recommended to introduce fish into an artificial reservoir in stages. You need to start with just a few individuals - 4-5 fish are enough for this. They need to be carefully monitored - this allows you to make sure that all the necessary conditions for aquatic inhabitants are available. If the fish feel good, then you can release the remaining individuals.
Other maintenance rules depend on the specific type of fish being bred. Each of them has its own characteristics - it is recommended to study all the necessary information in advance.
It is not difficult to create an artificial reservoir for fish farming with your own hands. It is important to choose the right site for the pond, prepare the necessary materials and carry out the necessary work. A prerequisite is the creation of optimal conditions for fish - this is necessary for its successful existence and reproduction.
0
0
Copy link