Read the article about the requirements for foam concrete blocks, what their pros and cons are, and how to build a strong and durable shed from them.
Advantages and disadvantages
Advantages of foam block construction:
The short time frame within which the building can be erected. The work goes quickly, as laying the blocks is quite simple.- Moderate thermal insulation. Since foam blocks are able to retain heat indoors, you can not only store tools in a barn, but also keep livestock.
- The material is not flammable. Even if a fire occurs, it will not release harmful substances.
- Light weight and impressive volume of blocks, thanks to which the building can be erected on any soil and on a lightweight foundation.
- Convenient stone processing. It is easy to cut into the desired shape.
- Maintaining a comfortable microclimate inside the building due to good vapor permeability of the blocks.
Unlike a brick building, a shed based on foam blocks will cost 2-3 times less.
However, this popular building material also has several disadvantages, including:
- Unattractive appearance. To make the barn look presentable, exterior finishing is required.
- The need to use additional waterproofing to protect foam blocks from moisture. The fact is that they have a porous structure, which means they will absorb water.
If you ignore the last point, the barn will quickly collapse, which will be facilitated by temperature changes.
Material requirements
To build a shed, you need to choose materials manufactured at the factory. Since the production process is simple, they are often stamped in artisanal conditions.
You should not use such material, as it will allow moisture to pass through, will not be able to retain heat inside, and will quickly crack. As a result, the building will collapse in 2-3 years.
Factory foam blocks are always packed in plastic film, designed to protect them from moisture. It must be marked with information about the characteristics of the building material.
It is recommended to build the barn from D600 foam blocks. They have optimal strength class B2.5, which corresponds to the M-35 concrete grade.
The building will not freeze or collapse in the cold season, thanks to the following properties:
- The thermal conductivity of the blocks is low (the coefficient is 0.13-0.14).
- Frost resistance is moderate (coefficient F15-F35).
The blocks are not very heavy, so you can cope with the task on your own, or hire a small team.
Construction of a shed from foam blocks
For permanent residence outside the city, you will need not only a warm and cozy house, but also non-residential buildings, one of which we suggest you build a practical shed from foam blocks. A barn usually means an unheated and non-residential indoor space, which is traditionally used for keeping livestock or storing various property or hay.
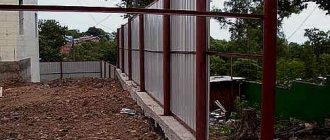
Shed made of foam blocks with a roof made of metal profiles
Design and calculation of the number of blocks
Before you begin to carry out the work yourself, or hire a construction team, you need to draw up a project for the future construction and calculate the amount of building material. This is necessary in order not to purchase extra foam blocks.
Key points to consider when drawing up a project:
- Decide on the size of the building. The dimensions of the barn are most often 4 * 6 m. Such a building can be divided into 2 separate rooms, for example, a workshop and a pen for pets.
- Select the area where the work will be carried out. It should not be located in a low area, as it will constantly be flooded with water.
- Select the shape of the roof, specify the location of windows and doors.
Be sure to take into account:
- the total height of the building including the roof,
- height of the walls,
- sizes of windows and doors.
Example of a barn project:
To correctly calculate the amount of building material, you need to adhere to certain rules.
Let's look at them using the example of standard foam blocks measuring 20*30*60 cm (grade D600):
- The length of the wall is divided by the length of the block, that is, 6m = 600 cm, 600/60 = 10 pcs. This number of blocks will be required to lay the bottom row of a long wall.
- Using the same formula, the number of blocks for a small wall is calculated, but from the value of its length you need to subtract the width of the block, previously multiplied by two: (400 - (20*2))/60. As a result, we get 6 blocks.
- So, to lay one row you need 2 times 10 blocks and 2 times 6 blocks, a total of 32 units.
- If the height of the barn is 2.5 m, we use the following formula: 250/30 = 8.3. Round up to 9 blocks.
- In total, one barn will require 288 blocks. We get this figure by multiplying 9 by 32.
The calculations are quite simple, so it’s not difficult to handle them yourself.
Consumables and tools
Materials you need to purchase:
- Adhesive for foam blocks.
- Floor boards.
- Lag and rafter system for the roof.
- Self-tapping screws.
- Nails.
- Reinforcement and wire.
- Crushed stone, sand, waterproofing material.
- Roofing material
Tools required for work:
- Level, tape measure, square.
- Concrete mixer or drill with a mixer attachment.
- Shovels.
- Watering can.
- Saw on foam block.
- Pump or hose for supplying the solution.
- Stairs.
- Hammer and spatula.
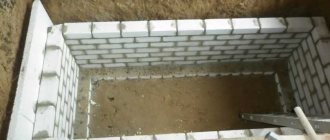
Laying the walls of a barn from aerated blocks
So, your foundation is ready, you can go buy blocks. They should be unloaded close to the installation site, on a specially prepared flat area that is not flooded with rainwater. You cannot store in two tiers!
It is not advisable to put the blocks into work right away; they need to rest for one or two weeks. If the products are autoclaved, during this time the initial humidity will decrease slightly, for which the shrink film is removed from the sides of the stack. If the blocks are not stored under a shelter, it is better to leave the top of the stack closed.
If the blocks are not autoclaved, there is a possibility that they did not have time to gain 100% strength at all, which requires at least 28 days. It is not profitable for the manufacturer to wait so long, and blocks most often go on sale with 70% strength. So waiting will be beneficial in any case.
How to start masonry
You need to apply the contours of the future masonry to the foundation using dye thread, dowels or a grinder to get an accurate plan of the walls.
- Then check the horizontalness of the base surface and, if necessary, level it with sand-cement mortar. The thickness of the screed should not exceed 20 mm. Without waiting for this layer to harden, you can immediately perform waterproofing.
- Most often, narrow roll materials with a width corresponding to the thickness of the masonry are used for this purpose. If nothing needs to be leveled, they are glued to the base using bitumen mastic. At the joints of the strips, an overlap of 15 cm must be provided.
- The first row of blocks will be laid on top of the waterproofing, also on a solution of cement and sand. Which masonry mortar should be used next will depend on the geometry of the blocks. If you are using substandard material to build a shed, it is better to use the same DSP for masonry, since the seams will be thick and working with glue in such a situation is unprofitable.
Perhaps you have leftover autoclave blocks from building a house, or you simply decided to buy high-quality material for your outbuildings. Then only the first row is placed on the DSP, the remaining rows of blocks will be mounted with glue - cement or polyurethane.
- The masonry begins with corner blocks that will act as beacons. The first beacon is placed on the corner that turns out to be the highest - and the rest are already aligned with it. If the shed is more than 10 m long, an intermediate block must be installed. If there is a transverse internal wall, the middle beacon is placed precisely at the intersection.
- A mooring cord is attached to the corner blocks, which will serve as a guide for laying intermediate blocks. Although there are special devices for fixing the cord, this can also be done using nails that are easily driven into aerated concrete.
The cement-sand mixture is applied only to the base (horizontally), it is better to coat the vertical seams with glue. And if the blocks used have end-cut grooves and ridges, their joints can be generally left dry.
How to prepare mortar and glue
If you decide to use DSP for laying blocks (the first row or all walls), you need an M75 mortar. It can be made from different grades of cement, which determines the dosage of sand. If you use M300 cement, then one part of it will use 4 parts of sand. At M400, the proportion of sand increases to 5 parts, and at M500 – to 7. The maximum sand fraction is 2.0 mm. Water is added after mixing the dry ingredients until the solution is workable.
If you have bags of cement glue at your disposal, you only need to mix it with water, which is why you need an electric drill with a mixer attachment. The amount of water is taken according to the instructions on the package. It is poured into a container, after which the dry mixture is poured into it. It is recommended to mix the entire bag at once; on average, the resulting glue is enough to lay a cubic meter of blocks. After stirring, the mixture is infused for 10 minutes, then mixed again. Application requires a toothed bucket or carriage, but for small volumes of work you can get by with a spatula-comb. Only the width of its canvas must be matched to the thickness of the wall.
The easiest way is to use polyurethane glue, but it can only work with category 1 autoclave blocks. Only with good geometry of the products will the glue consumption be minimal, and the bottle will be enough for 1 m3 of masonry. Before use, shake the container well with the valve facing down, then screw it onto the gun. The glue is applied in strips to the horizontal and vertical surfaces of the blocks. The number of stripes depends on the thickness of the masonry: if it is 150-250 mm, two strips are enough, if more - 3 strips. When installing partitions, only 1 strip is applied.
Next rows
The installation of blocks of one row should be carried out immediately along the entire perimeter of the barn, after which you can proceed to the next one. They start it again from the corner, installing the block so as to ensure that the vertical seam is ligated at least 10 cm. Thus, all the seams in the row will be ligated.
No more than 4 rows are laid out per day; overnight the glue gains strength and you can continue working. Unevenness may form in each row due to height deviations of the blocks. The difference must be eliminated using an aerated concrete plane or trowel. The resulting dust must be swept away with a brush so that it does not impair the adhesion of the adhesive to the aerated concrete.
In each row of masonry there must be extensions - at the end of the row, or closer to the opening. To do this, the block is sawed with a hacksaw or circular saw, after which the cut area is leveled with a float. The minimum size of addition is a quarter of the length of the product. If this requirement cannot be met, another full-size block must be reduced.
Pre-made pencil markings will help you make an even cut, or you need to use a jig square. You cannot cut blocks directly on the wall.
Is it necessary to reinforce
Reinforcement helps the masonry resist tensile loads and reduces the risk of cracking. Therefore, areas above door and window openings are subject to mandatory reinforcement. If you decide to use lintels to cover them, then you need to reinforce those areas where they rest. The reinforcement is inserted deep into the masonry 50 cm from the vertical border of the opening.
Horizontal rows, if the length of the barn is less than 6 m, do not need to be reinforced - only the first row is reinforced. Under the ceiling, it is better to pour a belt of monolithic concrete, or lay it out of clay brick.
DIY construction instructions
A shed made of foam blocks is built according to the following algorithm:
The area for the foundation is leveled.- A trench is dug along the perimeter to a depth of at least 50 cm. If the soil is silty, then it should be 100 cm. The width of the strip foundation trench is 30 cm.
- Pour sand into the bottom and compact it. The layer of sand should be 10 cm. Cover it with the same layer of crushed stone and lay a waterproofing layer.
- Formwork for pouring concrete is made from wooden planks. For reliability, it is fixed with clamps and spacers. Reinforcing mesh with a rod thickness of 10-12 mm is laid on the waterproofing layer.
- Fill the prepared trench with concrete. The optimal grade is concrete M200-250. After 4 weeks it should completely harden.
- The concrete is cleaned of contaminants, protrusions and irregularities are cut off, and covered with roofing felt.
- Prepare a solution for fixing foam blocks. For this, sand and cement are used in a ratio of 1:3.
- The first block row is laid. They start laying from the corner and go further along the perimeter. The thickness of the seam should not be more than 30 mm. To make the walls of the barn strong, reinforcing bars with a diameter of 8 mm are laid on top of every fourth row of foam blocks.
- Once the wall is erected and the glue has set firmly, the roof is installed. To do this, beams are attached to the top row on metal studs. The studs themselves should be at a distance of 1 m 20 cm, no more. 2 layers of roofing material are laid on top of the beams.
- They install the outer trusses, stretch the twine between them, and attach them to the mauerlat. When they are fixed, the remaining trusses are installed.
- A rafter system is installed and covered with a layer of waterproofing material. The sheathing and roofing material are installed on top.
The outer walls of the shed are primed and insulated. The following can be used as insulation:
- Styrofoam,
- mineral wool,
- polyurethane foam or penofol.
Install doors and windows. The barn is being painted and plastered.
Construction of a barn
When the preparatory work is completed, we begin to build a shed from foam blocks with our own hands. We carry out the work sequentially according to the instructions:
- Preparation of strip foundation. After leveling the surface intended for construction, we make markings. The width of the required trench, which we will dig around the perimeter, should be 30 cm, the depth from 50 cm to a meter, depending on the degree of soil freezing in winter (below the freezing level). We pour sand, then gravel, then crushed stone into the ditch in even layers (total height up to 25 cm). We compact each layer. Then we lay a layer of waterproofing material so that it completely covers the trench.
- We install the formwork (its edges should be higher than the level of the trench). We secure the formwork with supports. It should stand firmly while pouring.
- Then we lay a mesh of reinforcement or a frame of metal rods in the trench.
- Fill it with concrete. For pouring, choose a warm, sunny, but not hot day. The concrete screed will take more than a month to dry. From time to time it must be sprayed with water to avoid cracking.
- After the foundation has dried, we clean the concrete coating from dirt, repair defects in the pouring, and cover it with roofing felt (or waterproofing material).
- Before laying the blocks, prepare a sand-cement mortar (1:3).
- We begin laying from the corner of the future barn along the perimeter of the foundation. It is advisable to use a corner foam block with an ideal angle. We check with a building level and plumb line that each row is erected correctly.
- Please ensure that the thickness of the seams is no more than 30 mm.
- In order for the walls to be strong, reinforcement rods are placed on the blocks of every 3rd row.
Difficulties and errors
Mistakes that should not be made during construction:
- Concrete for the foundation can only be poured in sunny weather. There should not be extreme heat.
- You cannot start laying the bottom row from the center of the foundation. The first block is always located at the corner.
- You should not save time and materials on pouring the foundation. If the foundation is too weak, the structure may sway or collapse. You definitely need to wait for the foundation to shrink.
- Refusal to reinforce foam blocks. This can lead to unsteadiness of the building and the appearance of cracks.
- Failure to comply with installation technology: you can only use a special adhesive solution with a layer thickness of 10-12 mm. When erecting walls, be sure to use a building level.
- The optimal time to start construction is summer.
- Saving on waterproofing material.
- Pulling out the exterior trim. There is no need to delay this.
Price for construction work
The cost of building a shed from foam blocks in different cities of Russia:
- In Moscow and the Moscow region, the cost of building a turnkey shed starts from 180,000 rubles.
- In Yekaterinburg, prices start from 155,000.
- In Kazan, such a service can be provided for 190,000 rubles.
Prices are negotiated individually and depend on the volume and complexity of the work to be done.
Preparatory work
In order for the construction of a shed made of foam blocks to go smoothly, you need to carefully prepare for it: draw up a drawing and indicate on it all the necessary dimensions.
Barn project
To make the barn as comfortable as possible, it is better to build a building measuring 6x3 m.
A barn with dimensions of 6x3 m is considered the most popular option, as it is quite spacious and does not take up much space.
In a room 3 m wide and 6 m long, it will be possible to create two compartments with dimensions of 2x3 m and 4x3 m. Thanks to the arrangement of these rooms, you can achieve the multifunctionality of the barn. For example, a building can simultaneously be a shelter for livestock and a workshop.
In a 6x3 m barn you can create 2 rooms - one spacious for storing large things and one small for auxiliary purposes
It makes more sense to make the roof of the barn gable. The rafter system, which forms a roof with two slopes, allows you to create an additional attic compartment in the utility room. You can store fruits and grains in it.
The height of the roof depends on how the outbuilding is used. If you need a barn with 2 floors, then the roof with two slopes is made as high as possible.
For a barn, a roof 3 m high may be enough, because under it you can easily place boxes with vegetables