Garage floor requirements
So that during operation the flooring in the garage does not create problems during repair work on the car, it must meet the following requirements:
- Strength and reliability of the floor against mechanical damage. Almost every day its surface is subjected to abrasive friction, impacts and high loads, since the vehicle has significant weight. Therefore, an incorrectly executed garage floor screed can make the top finishing layer unusable. Resistance to fuel and lubricant mixtures and chemical reagents. Both laminate and linoleum will quickly deteriorate under their influence.
- Fire safety. Based on this requirement, it can be argued that wooden floors cannot be laid in garages due to their increased flammability.
- Wear resistance. The room where the car is located is intensively used.
- Moisture resistance. Heating in garages is infrequent, which leads to the formation of condensation on the walls and ceilings. In the winter season, snow falls off the fender liners and wheels of cars and melts. Therefore, the floor covering material must be moisture resistant.
Based on the above requirements, a concrete garage floor can be called the best solution.
A reliable base for garage flooring
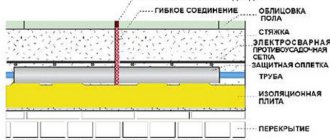
The main problem with arranging a garage floor is that it is located close to the ground, which contains a large amount of moisture. This feature can cause serious trouble to the car owner and cause significant material damage. The concrete floor screed in the garage is laid on the prepared base. Concreting the floor in the garage and installing the floor covering is carried out according to the so-called “pie” principle, which is considered the most optimal option.
The sequence of layers in the direction from the ground upward looks like this:
- Gravel (crushed stone) embankment. Performs the function of a kind of drainage that helps remove excess liquid and prevent its penetration into the concrete.
- Soft clay or sand. This layer is responsible for removing moisture from the concrete and transferring it to the gravel.
- Strengthening layer of concrete mixture.
- Waterproofing. Thanks to it, groundwater does not penetrate into the floor of the building. The starting layer is made of mastic, and the main layer is laid in two layers.
- Insulating material.
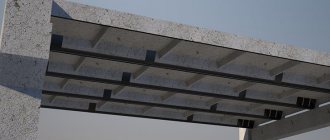
- Concrete screed plus reinforcement.
- Self-leveling floor covering. This layer is poured at the request of the garage owner and is not necessary, but it will significantly improve the quality of the concrete-based screed. By the way, a properly made base allows you to pour inexpensive compounds.
Types of waterproofing materials for garage floors
There are restrictions on materials used for waterproofing: you should not use membrane or film products, since they do not have the required elasticity and are not able to cope with the amount of groundwater in spring and autumn.
Experts consider inexpensive roll coatings with good consumer characteristics to be the best choice of materials for the waterproofing layer in the above-described pie. Professionally performed waterproofing work in a room will protect it from dampness, prevent the appearance of mold and the spread of fungus, and thereby prevent the building from collapsing, and the property located in the garage will not deteriorate.
There are several types of waterproofing floors in a garage building:
- anti-pressure, which protects against the ingress of groundwater;
- non-pressure - prevents the harmful effects of flood runoff and rain;
- anti-capillary – protecting the structure from the negative effects of capillary moisture.
In addition to creating waterproofing in the garage, it is necessary to install an effective ventilation system.
Screed alignment
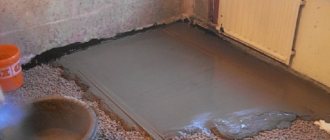
Correctly done do-it-yourself pouring will provide the garage owner with a reliable and durable coating. When leveling the floor, it is necessary to take into account the possibility of water entering the room when washing a car or clearing snow in winter and spring. To do this, the floor must be leveled with a 2% slope towards the exit or drainage pit located in front of the garage. Alignment is carried out from the far corner towards the entrance gate. The screed must be completed 1 day in advance, since partial filling can lead to cracks on the surface.
Phased construction of a concrete screed in a garage building
When installing a floor screed in a garage with your own hands, all steps are performed in stages.
Carrying out preparatory work
The previous floor covering must be removed. A new screed should not be installed on an old base.
A high-quality result can only be achieved by replacing all the layers of the previously existing “pie”. If there is an inspection hole in the building, the remains of used waterproofing, wall coverings and the old floor structure are also carefully dismantled. The lower level in the room must be cleaned down to the ground as much as possible.
Laying a bed of sand and gravel
The soil, well cleared of debris and various debris, is compacted and leveled. To create a sand and gravel cushion use:
- crushed stone (gravel);
- fatty clay (sand is fine).
When choosing gravel, experts recommend using single-caliber medium-fraction material. The fact is that the use of bulk material of large or small size leads to a decrease in the quality of the finishing surface. The “pillow” is poured and leveled, focusing on the level. The ideal thickness of the compacted layer should be 4-5 centimeters, and the minimum – 2 centimeters.
Before leveling the floor in the garage, a layer of river sand is poured 10-12 centimeters high. You can use soft clay. Then the gravel-sand cushion is carefully compacted. Both layers in total should have a height of approximately 15 centimeters. After completing the work, check the quality of installation using a level.
If there is an inspection pit in the garage building, a bed of gravel and sand is laid not only on the floor of the room, but also on the bottom of the basement. To make the work easier to carry out, the layer level is marked along the perimeter of the walls or posts with marks are installed.
Fixing sand level
Before screeding the floor in the garage, professionals recommend covering the sand and gravel cushion with a 1.5-centimeter layer of cement with the addition of sand in a ratio of 1:4 or 1:3 to make the coating more durable and reliable. Next, you need to take a break in work for about a day so that the concrete is completely dry.
Performing initial waterproofing and gluing rubber-based tape
The inspection hole and the base of the floor are covered with a thin layer of bitumen mastic, partially covering the walls at a low height. Before this, the places where the walls of the room meet horizontal surfaces are glued with self-adhesive rubber tape with waterproof properties.
Laying layers of basic waterproofing
In order to protect the premises from the destructive effects of groundwater and various types of precipitation, before pouring the screed in the garage, it is necessary to select the appropriate waterproofing roll material.
Suitable for this job:
- hydrostekloizol;
- bitumen roofing felt;
- polyethylene film with a thickness of 1 millimeter.
Rolled waterproofing material is laid evenly, avoiding waves and folds. The pieces of canvas are overlapped by 15-20 centimeters and glued to the walls using waterproof tape. When creating waterproofing, the material is placed at the bottom of the pit and the floor of the building so that it extends onto the walls at a distance of about 10-12 centimeters.
There must be at least two waterproofing layers. In this case, a combination of different materials is allowed. For example, a plastic film is laid down, folded twice, and roofing material is placed on top of it. If in doubt, you can additionally add another waterproofing material. As a result of such measures, a favorable microclimate will be created in the room, and tools and objects will not be damaged by humidity and corrosive processes.
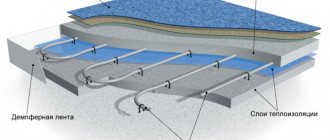
Installation of the thermal insulation layer
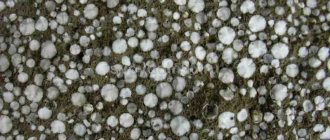
A necessary step before making a screed in the garage is laying insulation. Building materials for thermal insulation are selected taking into account the climate in a given region and the functioning or absence of a heating system in the room. High-quality insulation work will allow you to stay in the garage in comfortable conditions at any time of the year. You can use either mineral wool or glass wool, or polystyrene foam. Extruded polystyrene foam is also used.
The insulation is installed in a layer 7-10 centimeters thick - if necessary, the material is folded several times, and to create a temperature gap, the joints and the perimeter are fastened with damper tape. Thermal insulation must be performed on all surfaces inside the garage building without exception. It is recommended to insulate the area where the entrance to the room is located more; for this, more material is rolled out there.
Concrete reinforcement
There are a number of recommendations on how to properly make a screed in a garage. To prevent it from cracking and spreading, a reinforcing mesh consisting of metal rods with an 8-9 mm diameter, which form cells ranging in size from 15 to 20 centimeters, is placed on the floor base and on the surfaces available in the inspection hole.
When screeding in a garage with your own hands, you should not forget that the area where the car will be located and heavy equipment or other objects will be placed is additionally reinforced with another layer. It is allowed to lay metal mesh with larger cells. As a result, the coating will become more wear-resistant, since it will be protected from the appearance of defects.
The reinforcement is fixed in such a way that before starting work it is located in a suspended state, rising above the level of the base by 4-5 centimeters. To do this, it is customary to use supports made of metal or plastic. The distance between the edge of the mesh and the walls of the room is maintained within 5 centimeters.
Pouring screed in the inspection hole
A reliable coating is made from a solution containing fine gravel, M200-M400 cement and river sand in a ratio of 5:1:3. The thickness of the screed in the garage in the inspection hole, as a rule, should be 10-12 centimeters, and it is not necessary to level its surface perfectly.
Installation of beacons
In order to obtain an even floor covering, before pouring the screed in the garage, you should use beacons made of metal profiles or tubes with a cross-section of 2.5-3 centimeters (read: “How to pour a garage floor with your own hands - instructions”). They are fixed to the flooring using a thick concrete mixture. The guides are placed at intervals of 1.5-2 meters from one another. The beacons are treated with machine oil to make them easier to remove after completion of work.
Preparation of concrete solution
To do this, usually take 1 part cement, 3 parts sand and water in an amount equal to ½ cement volume. In some cases, a little fine gravel is added. Now on sale there are ready-made building materials for creating screeds, containing fiber fiber and special plasticizers that ensure the creation of a strong and durable coating. Uniform mixing of the solution is ensured by the use of a low-speed mixer.
Semi-dry floor screed technology
The installation process itself is not very different from the process of pouring a garage floor screed in the traditional way, but there are certain nuances, by adhering to which, you can get a strong, reliable and durable coating.
Surface preparation
At the first stage of the work, it is necessary to prepare the foundation. If there was already a screed in the garage before, then check its strength; if there are cracks, they must be repaired with mortar. If the old screed is in poor condition, it is best to remove it completely.
If you are making a new floor in the garage, then when preparing the base, it is covered with sand in a layer of 5-10 cm and compacted well. To make it easier to compact the sand, it can be slightly moistened, after which the surface is tamped with high quality.
The junctions between the floor and walls must be taped with damper tape; this must be done when arranging the floor, both in the garage and in the apartment. This ensures good sound insulation, but in a garage this is not so important, and the walls will not absorb moisture from the mortar. In addition, the solution will have the opportunity to expand slightly, so cracks will not form.
Installation of waterproofing
If the installation is carried out on an old screed and if it is in good condition, then the floor is covered with a primer, which will not allow liquid to escape from the solution.
If the installation is carried out on a sand cushion, then it is necessary to use plastic film, it is better that it is solid. If this does not work, then the canvases are laid with an overlap of 15-20 cm, and the joints are taped with construction tape. They also make overlaps on all walls; they are 10-15 cm and should be above the level of the screed.
Laying reinforcing mesh
When installing a floor in a garage, the use of reinforcing mesh is a prerequisite, since the floor can withstand heavy loads. You can buy a ready-made metal mesh, or you can weld it from reinforcement, 8-10 mm thick, the cell size should be 10x10cm. The reinforcement should not lie on the ground, so with the help of special stands it is raised above the floor level by 5-10 mm.
Installation of beacons
Using a laser level, a zero mark is struck and beacons are placed along it; the distance between them will depend on the size of the rule used. To fix the profiles, you can use plaster or alabaster.
First, the two outer beacons are leveled and securely fixed. After this, a fishing line is pulled between them, and the remaining beacons are already placed along it. This method allows you to set profiles to the desired level much faster. In the garage, it is recommended not to make a perfectly horizontal floor, but with a slope towards the gate or towards the drain grate.
Pouring mortar and grouting joints
At the next stage, we prepare the solution, as we wrote above, and evenly fill the space between the beacons with it. The beacons remain in the screed, and the surface is leveled using the rule. To obtain a durable and monolithic coating, pouring must be done in one day, and the intervals between portions should be no more than 30-40 minutes.
15-20 minutes after pouring the solution, it is necessary to grout the joints; it is better to do this using a trowel, which you can rent. This operation will not only level, but also strengthen the surface.
To prevent the appearance of shrinkage cracks, shrinkage joints are cut into the finished floor; their depth should be about 30% of the thickness of the screed; the seams are made using the rule.
To create an optimal microclimate, it is recommended to cover the floor with plastic film; this will prevent the liquid from quickly evaporating, the process will proceed evenly and you will get a durable surface, without cracks or breaks.
Summarizing
In order for the screed to be strong, reliable and durable, it is necessary to create optimal conditions for its drying.
There should be no changes in temperature and humidity in the room, no draft should be created and it is best to cover the floor with film. If you decide not to leave the beacon slats, then after 10-12 hours they need to be pulled out, and the resulting voids should be filled with the same solution, after which the seams should be rubbed well; this can be done using a grater. After just 12 hours you can walk on such a surface, and you will be able to fully use it in 4-5 days.
After the floor has completely hardened, it is recommended to cover it with special primers and paints that will help close existing pores and improve the performance characteristics of the coating. If you properly do a semi-dry floor screed in your garage with your own hands, then such a floor will serve you for 50 years or more.