04/12/201604/12/2016 master
In recent years, LED strip has firmly taken its place in the lighting market thanks to a whole host of advantages that allow it to be used to create lighting in various areas of human activity.
The main advantage of such a product is the ease of assembly and installation with your own hands. But to do this, you need to know the structure of the LED strip and the principle of its operation. At the same time, many people prefer to make a control system for lighting together with it. This article will try to help you understand the design of the product.
Where is it used?
Controller and remote control
Many people often use LED strips to control the lighting system and create a unique play of light in their home. But for a control system with such a light source to work, additional equipment is required: a controller and a remote control.
Today it is impossible to do without an LED strip in the following situations:
- creating hidden lighting on the ceiling;
- night lighting of billboards and store windows;
- car tuning;
- night lighting at home;
- creating a romantic atmosphere and much more.
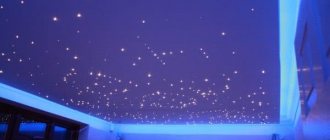
Ceiling lighting
All this diversity is based on a wide range of types of such light sources.
Available variety
The lighting market today surprises us with its diversity. But if we take only the part that is represented exclusively by LED strips, we will also have something to look at. Today the most popular models are:
- SMD 3528;
- SMD 5050;
In addition, such products can have different voltages: 12 volts and 220 volts. To connect a 12-volt product to a 220-volt power supply, you must use a power supply. It will allow you to connect a 12-volt strip to a standard 220-volt network without any problems.
Knowing how the tape is structured makes it possible to properly control its luminous flux using additional equipment. Let us consider separately each type of tape in terms of its structure.
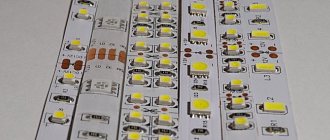
Characteristic differences between LEDs
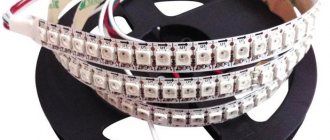
Some designs use one or three crystal LEDs placed on a meter of tape. They differ in glow color, brightness, moisture-proof properties, performance class, electrical parameters, energy consumption.
2.1 Diodes
Color of the section of the LED strip
The following types of low power are used: SMD 3528, 2835. And also more impressive ones, such as SMD 5050, then SMD 5630, and finally SMD 5730. The decoding letters are indicated above. The numbers indicate length 3.5 and 5, width of the LED - 2.8 and 5 mm. The dimensions of the case depend on the number of built-in emitting crystals. The first contains only one with a luminous flux of 3-6 lumens. The second case size contains 3 crystals. Its brightness is in the range of 13-19 lm.
The glow of the LED strip can be monochrome or multi-colored, designated by the abbreviation RGB.
The letters are marked in order of priority: red, green, blue.
Each crystal is controlled by a controller that regulates the formation of the desired glow color.
Type and sizes of LEDs SMD 3528, 2835, 5050, 5630 and SMD 5730
First model
Model SMD 3528 is one of the most popular tapes that are widely used in a wide variety of applications today. The design of such a tape is simple and it easily connects to a power supply or controller. The SMD (SLW) 3528 device involves placing 30 LEDs in one meter of strip. They are spaced at intervals of 33 mm. The diagram of such a device is shown below.
Scheme
Each LED has a brightness of 5 Lumens with a white glow. As a result, the brightness of one meter of SMD 3528 will be 150 Lumens. The SMD 3528 LED strip can be additionally protected from the negative effects of moisture with a special layer of silicone. With this modification, it can be installed in places such as on the ceiling in the bathroom or kitchen. Moreover, it can even be used in water, for example, to illuminate swimming pools.
Note! When installing this light source, you must remember that cutting into pieces of the required length should be done only in specially designated areas. To create a control system, you will need to solder wires from additional equipment to the tape at the contact points. The connection diagram here is the same as when connecting two sections of the product.
It is worth noting that the cut points of the waterproof SMD 3528 models are also equipped with silicone protection. There is SMD (SLW) 3528 tape on sale, which has 60 LEDs per meter. In this case, the device has a diode spacing of 17 mm. Consequently, such products are characterized by twice the brightness of the previous version. A device of this type consists of the following parts (the diagram is shown below):
- metal backing;
- 3 wires that run inside this substrate. Of these wires, one is a common minus “-“, the second is a common plus “+” and the third is a jumper between the LEDs included in the unit.
Scheme
Each block contains three LEDs. This device is determined by the supply voltage. At a voltage of 12 volts, three LEDs connected in series produce 4 volts. This is the nominal voltage. Therefore, the tape is cut in blocks - every three LEDs.
Tape laying
Existing methods of its installation are optimal for performing different tasks and show different results. When installing the device, do not break, bend or twist the substrate, protecting it from damage to current-carrying connections.
Attaching tape to furniture in the room. Illumination of cabinets, niches, aesthetically impressive areas. The tape is placed inside objects and interiors. It is necessary to clean and degrease the surface, and then firmly attach it. Don’t forget about heat dissipation, since the heaters also heat up,
Installation in wall and ceiling niches. When installing the SDL on a plasterboard surface, it is first puttied, leveled, and covered with one layer of primer. The location of the converter and controller does not impair heat dissipation and allows free access for their inspection and repair. Additionally, the sides are strengthened, dissipating the flow of light that blinds the eyes. The LED strip is installed after all plasterboard boards are finally secured with screws. Otherwise, they may damage the tape or cause a short circuit.
Installation of LED strip indoors. It can be mounted on polyurethane baseboards or at any height (zone) of the room, first in a grease-free place. The device is in a special box. Low mechanical strength requires mounting it in aluminum profiles with an external light filter. They protect against mechanical damage, twisting, ruptures, dust and partially moisture. Before fixing the profile, plan and highlight the line of its placement on the plane. Once secured, the SDL is glued inside. It is quite safe to install such a device close to the floor.
Second model
The LED strip model SMD 5050 has a completely different design than the previous version. The diagram of its device is as follows.
Scheme
SMD 5050 tape
The difference is that there is a different number of diodes. Here there are three crystals in one LED. But the differences do not end there, since the crystals here have different colors. SMD (SLW) 5050 uses three basic colors:
- blue;
- red;
- green.
In this case, such a device will glow in one color - red, blue or green, respectively. But there is another option - glowing with all three colors at once. In such a situation, the glow will turn out white. Additional equipment can be used to control brightness and luminous flux. To control, we connect a controller and here you can already fantasize: make the brightness of one crystal minimal, and leave the other two at the same level, etc.
Note! Using a controller with an SMD 5050 tape, you can obtain a luminous flux of up to 16 million different shade variations.
If you need to organize lighting on the ceiling using SMD 5050, you need to take into account the brightness of the tape. SMD 5050 has a brightness of 12 lumens. This strip produces three times more brightness than can be achieved using other types of LED products. As a rule, the 5050 model has a voltage of the same 12 volts. Therefore, it also requires a power supply to connect to a 220 volt network. But there are models that have a voltage of 220 volts. Here a power supply is not needed, since the strip and network will have the same voltage. But SMD 5050 at 220 volts is used less often than 12-volt ones.
Connection diagram for LED strip via power supply
In order for a 12-volt LED strip to operate stably for many years, it must be connected to a switching power supply with an output voltage of 12 V. This is the most correct option - switching power supplies are light in weight and compact in size, have high efficiency and stabilization coefficient, and are also safe in operation. Disadvantages include the generation of impulse noise sent back to the network and the complexity of the circuit, which requires special skills to repair.
An article on choosing a power supply for an LED strip will help you make the right decision in favor of one power source or another.
Up to 5 meters
Very often, ordinary users are interested in the question of how to connect an LED strip up to 5 meters long? Everything is very simple here. Just use the diagram below.
The connection procedure is performed in the following sequence:
- using a connector or by soldering, connect 2 supply wires with a cross-section of 1-1.5 mm2 to one of the ends of the tape;
- the free ends of these wires are clamped into the corresponding terminals of the power supply (+V, -V), observing the polarity;
- A network cable is connected to terminals L and N (220V AC).
In a similar way, parallel connection of several segments to one power supply is performed. The main thing is that the power of the power supply is at least 30% greater than the total power of the connected LED strip.
To ensure that the brightness of the LEDs is uniform along the entire length of the LED strip, it is recommended to connect wires from both ends to sections longer than 4 meters. This is due to a voltage drop on the current-carrying printed conductors (tracks), as a result of which the furthest LEDs receive a voltage of less than 12 V and their brightness decreases. The advantage of this method is a uniform glow, and the disadvantage is the cost of additional wires.
Over 5 meters
The fact that the length of the LED strip in a reel is limited to 5 meters is not an accident, but a forced technological measure. The fact is that the conductive tracks glued along the tape are very thin, narrow, and are designed to connect a certain number of LEDs. It is for this reason that 2 sections with a total length of more than 5 meters cannot be connected in series.
To avoid current overloads, connecting LED strips 10, 15 and even 20 meters long should be done according to one of the diagrams below. The first option involves the use of one high-power power supply capable of providing a current of up to 20 A to the load. To ensure uniform illumination of the LEDs, the supply voltage is supplied to each of the 5 meter segments from both sides. In the second option, each segment is powered from a separate 12V source. Implementing this circuit is a little more difficult, since you will need another power supply and more connecting wires. In the third diagram, in addition to two 12 V DC voltage sources, a dimmer and a single-channel signal amplifier are added to the circuit. The dimmer is used to adjust the brightness of the light flux. The task of the signal amplifier is to exactly duplicate the signal from the dimmer for those LED strips that are powered from the second power supply.
The considered methods of switching on LED strips are typical, but their variations can be used to develop more complex circuits in order to implement certain tasks or meet customer requirements.
Connecting RGB or RGBW LED strips
The connection rules and features mentioned above must also be observed when installing multi-color analogues. However, functional diagrams with RGB and RGBW strips will look a little more complicated due to the appearance of a controller and additional wires. The RGB/RGBW controller significantly expands the capabilities of the lighting system by dimming individual colors, creating lighting effects and control from the remote control (RC). The RGB/RGBW controller is designed for connecting multicolor strips with separately located white LEDs, which allows you to use such a system not only as an additional one, but also as the main light source in the room.
For the convenience of readers, all basic diagrams, installation rules, examples and nuances of switching on multicolor strips are collected in a separate article about connection diagrams for LED RGB and RGBW strips.
Connection
LED models SMD 3528 or 5050 are connected to the controller to control the light according to the same scheme as when connecting a 12-volt strip to a 220-volt network. In this case, you should connect a power supply that will make it possible to reduce the voltage to 12 volts. This diagram is shown below.
Connection diagram
Cut location
The products are 5 meters long in a skein. Therefore, very often they should be cut to attach, for example, to furniture. Subsequently, these pieces are either connected to each other, or attached to a power supply (for connection to a 220-volt network) or a controller. Therefore, we will begin our consideration of the connection diagram with the procedure for preparing the light source. The connection diagram is implemented as follows:
- measure the required section of the tape and cut it in a strictly designated place;
Note! The length of the required piece of product is determined by where you intend to attach it.
Soldered wires
- after cutting the wires that should be connected to the light source, you need to strip them at the ends;
- Wires should be connected to the contact pads that appear at the end of the tape. To do this, using a soldering iron and a soldering kit (rosin and tin), solder the wires to the contact pads;
- after the wires, in strict accordance with their sign (“-” and “+”), have been soldered to the contact pads, we process the working surface;
- then contact insulation is necessary. If the insulation is poor, there is a risk of a short circuit, and the lighting device will continue to work incorrectly and short-lived.
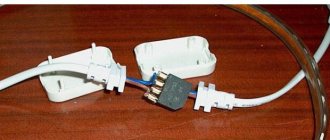
Separately, it is worth noting that the easiest way to connect the wires is to use a special LED connector. This is the so-called mechanical method.
LED connector
It is enough to simply attach such a connector to the contact pads (the contacts of both products must match) and slam the lid. That's it, no need to work with rosin and tin.
Note! Using an LED connector is an expensive proposition. For the price, one such contact will cost you about half a meter of LED strip. And it itself is not the cheapest purchase.
Therefore, the old method of soldering contacts remains more than in demand and relevant today.
Cost difference between expensive and cheap tape
Reliable, the product is manufactured at branded enterprises that have their own website with contact information for the buyer. It is produced under its own brand Samsung, Philips, LG, Epstar. Firms carry out control at all stages of production, checking the quality of components. Their costs for equipment, technology, and expensive materials affect the final cost of the products.
Cheap tape is made in small firms, where some advanced technologies are replaced by manual work. Components are chosen to be inexpensive. There is no complete quality control. Therefore, their price is lower and their durability is limited.