Application area
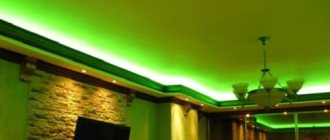
Particular demand for 220 volt LED strips is observed in show business and various commercial structures, where with the help of bright lighting effects you can attract a person’s attention. This could be illumination of billboards, design of concert stages, creation of color and musical fountains or huge inscriptions and figures. For non-commercial purposes, LED strip powered by 220 volts is often used as decorative lighting in interior and exterior decoration.
You can purchase this version of LED strip in any specialized store. We can definitely recommend Giant4.ru as a time-tested supplier of quality products with low price tags.
Many buyers purchase LED strips from AliExpress due to the very reasonable price tags, but this choice is extremely questionable due to the low quality of the product.
Looking ahead, it is worth noting that due to the design features of the power supply, 220-volt LED strips are not recommended for indoor use.
Safety precautions and professional recommendations
- When working from home, you must follow all necessary safety rules.
- When planning to connect the LED strip, immediately decide how you plan to connect it to a source of electricity, via USB or to a 220V network. At the same time, the USB input is the best solution if you are planning lighting design for the equipment, as it allows you to relieve the sockets. In addition, by choosing USB, you get the chance to comfortably attach the backlight to your monitor, speakers or TV. At the same time, 220 volt power supply is the most universal and allows you to install lighting in any part of the house.
- Proper selection of a power supply for 12V or 24V tapes is another important point. Decide right away whether you need colored lighting in your home. If yes, then you need to purchase a special unit. In any case, if the power of the central network is 220 volts, such an adapter is strictly required! Do not forget that you should not allow the LED strip to work for a long time while it is still wound into a reel. When connecting it to a 220 volt power supply for testing, do not leave it unattended.
- When installing LED lighting at home, do not subject the strip to mechanical stress.
Kinds
The classification of 220 V LED strips is no different from the classification of low-voltage analogues and is based on technical parameters. Based on the type of chips used, high-voltage LED strips are divided into many types. It is only worth noting that most products are made on SMD LEDs 2835, 3014, 3035, 3528, 5050, 5060 or on modern, more powerful SMD 5630.
The current consumption and luminous flux of the LED strip depend on the type and number of chips per meter.
As a rule, according to the degree of protection, high-voltage tapes are divided into two types: IP67 and IP68. A high level of protection prevents accidental human contact with live parts of the LED strip and allows it to be used in an open external environment. Just like low-voltage LED strips, 220-volt LED strips vary in power and glow color.
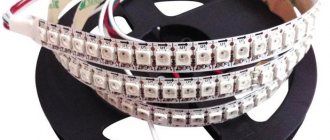
Depending on the type of installation, a 220-volt LED strip can be either self-adhesive or without an adhesive layer. Separately, it is worth mentioning the 220 volt RGB LED strips, which are assembled on three-color LEDs (usually SMD 5050). They have 4 contacts on a flexible printed circuit board, and they are connected through a special RGB controller.
Important. On the Internet you can often come across the concept “duralight LED strip”, which can have a double meaning. Recently, online stores have begun to call luminous flexible strips powered by 220 V that way. This is not entirely correct. In fact, a duralight lamp is a transparent cord made of flexible polymer, inside of which there were originally incandescent lamps, and now LEDs. The internal space of the cord is filled with polyvinyl chloride in order to increase strength and degree of protection. In appearance and method of use, the 220v LED strip and the duralight cord are very similar, which, in fact, creates confusion.
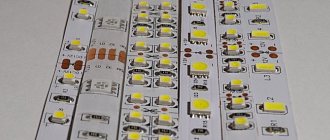
Design and principle of operation
Conductive tracks are applied to the base of the LED strip, which connect SMD LEDs and resistors into a single electrical circuit. Then the flexible printed circuit board with the elements is coated with a silicone layer or a transparent PVC shell is created.
The main design feature of the 220-volt LED strip is the absence of a step-down converter used as a power source. Instead of an expensive switching voltage stabilizer, the power supply unit (PSU) consists only of a diode bridge located in a sealed housing.
On the one hand, it includes a network cable, and on the other, a wire with a connector for connecting to the LED strip. The voltage at the rectifier output is constant and is about 200V. In order for the LEDs to operate without overload, they are combined into groups, compensating for excess voltage with resistors.
As a rule, LEDs used in 220 V LED strips have a voltage drop of about 3.3 V, so each group includes 60 chips.
The voltage after the rectifier is pulsed in nature, which clearly affects the quality of the light. Rectified pulses with a frequency of 100 Hz, although invisible to the human eye, negatively affect the functioning of the brain and nervous system as a whole.
Light sources with such a high pulsation coefficient cannot be used as main lighting.
It would seem that the problem can be solved by installing a capacitive filter at the output of the diode bridge. However, this will lead to an increase in the average rectified voltage to 280 volts, which is unacceptably high. Logically, manufacturers could increase the number of LEDs connected in series in each chain, but so far there are no such products on sale.
Connecting LED strip to 220V network diagram
To power the LED strip from a regular household AC network 220V 50Hz, three conditions must be met:
- convert AC network voltage to DC;
- equalize voltage levels: reduce the mains voltage to 12V or change the LED connection circuit so that high voltage can be supplied to them;
- stabilize electrical power parameters.
The easiest way is to use a ready-made power supply for a 12V LED strip; it is designed for safe voltage. But there are also disadvantages to using this power supply: it costs money and is not so easy to assemble; in addition, due to the low voltage, LED strips should not be placed far from the power supply; thick wires will have to be used to compensate for voltage losses.
The second option: remake the LED strip and instead of switching LEDs in series-parallel, use serial LEDs. With this connection scheme, the LED assembly is powered by a low current, but at a high voltage. In addition, if you sacrifice galvanic isolation, the power driver circuit is greatly simplified. Attention!!! Circuits without galvanic isolation from the network can be used where there is no danger of electric shock, for example in a dry room on the ceiling.
The most interesting thing is that a circuit for such a driver can be made from parts of a used energy-saving light bulb!
Let's consider connecting an LED strip to a 220V network; the diagram is shown in the figure.
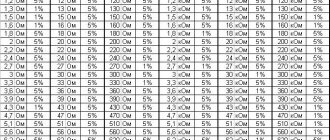
Table of nominal values of circuit elements:
- C1 – 2.2 µF 400 V
- R1 – 1.3 kOhm
- R2 – 4.3 kOhm
- R3 – 47 Ohm
- VD1 .. VD4 – 1N4007
- VT1, VT2 - 13002
Three nodes can be distinguished in the diagram:
- AC voltage rectifier and filter on elements C1, R1, VD1 – VD4;
- current stabilizer on R2, R3, VT1, VT2;
- assembly of LEDs HL1 – HLN.
You can read about the operation of the rectifier here. In this circuit, in addition to the diode bridge of 4 diodes, a current-limiting resistor R1, which protects against current surges, and a filter capacitor C1 are added. When a mains voltage of 220V/50Hz is applied to the input of this rectifier, a constant voltage of approximately 300V with a ripple frequency of 100Hz will appear at the output of the rectifier (on capacitor C1). The greater the capacitance of the capacitor, the less ripple will be.
LEDs require power supply with a stabilized current; they are often supplied with a stabilized voltage through a current-limiting resistor, for example, as in LED strips. But why should we make compromises if it is easier to make a current stabilizer that operates at high voltages than a voltage stabilizer? The operation of the current stabilizer circuit was discussed here.
And the last element is a sequential assembly of LEDs from a strip. A standard LED strip is assembled according to a circuit of three serial LEDs and one current-limiting resistor. Such a section is connected in parallel to a bunch of other similar sections and all this is connected to 12 V. The voltage drops from 3.3 V to 3.6 V on each diode, thus leaving about one and a half volts for the current-limiting resistor.
To increase the voltage, sections of three diodes are connected in series with each other, and the resistor can be removed, short-circuited, or replaced with jumpers, i.e. whichever is more convenient from a topological point of view. Attention!!! Observe the polarity; if an error in the polarity of connecting the LED at such a voltage will be fatal for the LED.
The current that flows through the three LEDs can be approximately calculated by dividing one and a half volts by the resistance of the current-limiting resistor. That is, with a resistance of 150 Ohms, the current through the LEDs will be 10 mA.
I came across just such a strip with 10 mA LEDs, and the driver parameters were calculated for it. If you need to reduce the current, you will have to proportionally increase the resistance value of resistor R3.
With a mains voltage of 220 V, the described circuit is capable of providing a serial connection of up to 25 groups of three diodes or 75 individual ones. If the network voltage is often low, then it is better to reduce the number of LED groups to 20 or even 15.
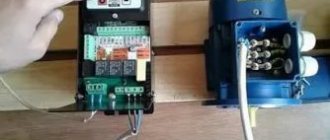
And here is the board from the energy-saving paw, from where you can get the necessary radio elements.
The light bulb broke, but the board remained in working order.
By the way, the polarity of diode connections and transistor terminals can be copied directly from this board, everything you need is marked there. We extract elements from this board and assemble a new circuit. The photo shows that transistors in a low-power TO-92 package such a package will not dissipate power more than 600 mW. And the total power of a circuit with such a transistor will not allow it to supply more than a couple of watts to the load. If you need to assemble a circuit for a more powerful load, then transistor VT2 should be in a more powerful package and preferably with a radiator.
Differences from low-voltage LED strips
Those who have held 12V powered tape in their hands have probably noticed cut lines at small intervals. You cannot cut a 220 volt LED strip in this way. In it, the cutting lines are multiples of 50 or 100 cm (depending on the installation density of the LEDs), that is, every 60 emitting diodes. This is the first difference that matters when decorating rooms, since due to the larger multiple length, unnecessary “tails” may remain. The operation of electronic equipment is calculated on an operating network voltage of 220–230 volts. How many real volts are there in an outlet? By taking a measurement with a conventional voltmeter, you can see any number that differs from the norm and is located in the range from 190 to 240. Oddly enough, such a spread is considered normal according to existing standards, which means that electrical appliances must withstand such network differences for a long time.
Since the power supply for a 220v LED strip does not have a stabilization function, the LEDs are forced to operate at the voltage that is supplied to them. With Unet = 220 V, the output of the diode bridge will be 198 V, which is ideal for powering 60 light-emitting diodes. If there is about 30 volts less in the socket, then taking into account the rectification coefficient, the output will be 170 V. It is easy to guess that each LED will receive about 0.5 volts less, which will inevitably lead to a decrease in brightness along the entire length. Increased network voltage, on the contrary, overloads each element of the luminous chain, trying to be evenly distributed on each LED.
Short-term network fluctuations are unable to sharply reduce the working life of the product. If a U network of more than 240 V is considered the “norm,” then it is better to use a voltage stabilizer so that the LED strip does not begin to rapidly lose brightness. At reduced network voltage, the 220 V LED strip is in a gentle mode and can be used for a long time without a stabilizer, but due to its low light output its use becomes questionable.
power unit
LED strips can illuminate the space in front of the mirror or be mounted behind the mirrors. Helpful information! Options for lighting the ceiling with LED strip Due to its compactness, large grooves are not required to mount the light track on the ceiling. Thus, it is necessary to determine the luminous flux of a meter of diode strip, taking into account the commercially available models.
Evgeniy To cut the tape, use ordinary scissors; the cut is made along specially marked contours.
When connecting several segments in series, the voltage of capacitor C2 is multiplied by their number.
Installation nuances Experts know well how to connect an LED strip circuit to a network.
As a result, instead of a parallel connection, you will get a chain of series-connected segments of the LED strip, capable of withstanding a voltage of volts. The light temperature and color palette of the glow are varied. Typically, such tapes are well protected from external influences, but as the reliability of protection increases, the possibility of cooling sharply decreases. For 24V devices, the density of LED elements reaches units. Switching power supply Such devices are homemade or factory-made - this is the best, although the most expensive, option. Calculation and connection of the power supply for the LED strip.
Connection
The circuit for connecting high-voltage tapes is extremely simple.
The entire connection sequence can be divided into several successive stages:
- The required length is cut, a multiple of the minimum allowable length of the tape.
- A pin connector is inserted into the cut end of the 220 V LED strip and fixed with glue or sealant.
- Observing the polarity, the connector is connected to the output of the rectifier.
- The reverse part of the segment is closed with a plug.
- The entire structure is checked for tightness and reliability of connections.
Advantages and disadvantages
Firstly, the most obvious advantage of a 220-volt LED strip is the absence of a bulky and expensive power supply.
It is replaced by a miniature block with an input and output cable. When connecting to a 220 volt network yourself, it is enough to buy the required diode bridge and thin copper wires or special connectors. Due to the use of high voltage, the current in the load is small, which makes it possible to use a wire with a cross-section of 0.75–1 mm2. Secondly, thanks to the consumption of only 20–150 mA per meter of length, a single piece of tape can reach 100 meters, which is important when creating large-scale advertising projects. For comparison, the longest length of a low-voltage LED strip powered from one end is only 5 meters.
The main disadvantages of LED strips powered by 220 volts are their limited scope of application due to harmful flickering with a frequency of 100 Hz and dangerous voltage that runs along the entire length. In addition, you cannot ignore the following obvious disadvantages:
- non-repairable, since replacing the SMD chip will lead to damage to the sealed layer;
- minimum multiplicity 50 or 100 cm;
- poor quality of cheap Chinese-made products;
- lack of adhesive base in some models.
Results
To summarize all of the above, let us draw your attention to the pros and cons. The advantages are:
- No power supply.
- A small cross-section supply wire is used.
- The length of a single piece can be 100 m.
Connecting a 220 Volt tape
Now the cons:
- The voltage is 220 volts, which means installation and operation must be carried out with a high degree of caution.
- There is a certain shimmer.
- Trimming is done according to the length of pieces of 0.5: 1.0: 2.0 m. And this is not always acceptable or convenient.
- Unfortunately, it fails more often than conventional models.
The disadvantages indicate that the 220V LED strip is limited in its scope of application. It is best used as additional lighting, or as lighting for office spaces. Some people use it as decoration, façade lighting, and so on.