The use of LED strips in home interiors is becoming increasingly popular. They are used as additional or main lighting sources.
As demand increases, the cost becomes lower, which ensures prevalence. If you are interested in how to make an LED strip yourself, we offer you a short instruction.
Advantages of the device
Comparing LED strips with other lighting devices, we can highlight several advantages of the former. The most important among them are economy, compactness, and versatility.
Thanks to the power supply for the LED strip, which produces 12 Volts, it is possible to install the strip in a damp room. By the way, here comes another plus - low electricity consumption.
What do we need
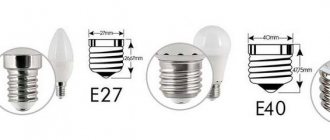
Let's immediately determine the voltage:
— 220V
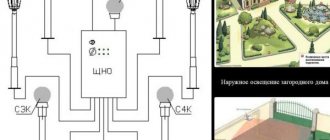
– not suitable for lighting, used only as outdoor lighting. The light pulsates and such a lamp should not be in a living room.
— 24V
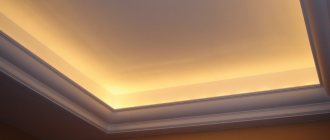
– a popular voltage of LED strips in the field of powerful lighting, for example, is used when organizing the lighting of plasterboard niches, niches in the ceiling, illumination of signs and shop windows. In general, where more power is needed. The main disadvantage is that it is not always possible to buy power supplies with such an output voltage everywhere.
— 12V
– universal voltage. Such a tape can be powered from the on-board network of a car or motorcycle, and used at home with a power supply. You can find them in any electrical goods store, or use unnecessary power supplies from household appliances; for low-power lamps, a power supply from a router is suitable.
First of all, you need to choose an LED strip. The stores offer many brands and nameless products; you can also order from Aliexpress. But if you want the product to last for a long time, you need to approach the choice responsibly. Experts say that tapes from a manufacturer such as Arlight have the optimal price-quality ratio.
There are other options that deserve attention, such as:
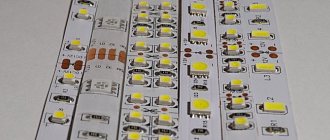
Brands such as Philips, Osram or Cree are rightfully considered the best, but their products cannot be called budget. For example, there is OSRAM VF900-G2-830-05 61.2W 24V BT1 - this is a white tape, its cost is 6000 rubles for 5 meters. Whereas the cost of a white Arlight tape is around 500-600 rubles per 5 meters (we are talking about tapes like SMD5050, 3528, 2835 with the number of LEDs 60-120 per linear meter).
We will not provide comparative tables with characteristics; you just need to understand that Osram is expensive because they have high-quality LEDs, the strip shines brightly, heats up poorly and lasts a long time. Cheap analogues have worse characteristics.
In addition to the LED strip, you need to buy a power supply. There can be 2 options for the lamp:
1. In a perforated case
with terminal blocks for connecting wires. These are those power supplies that look like a board covered with a perforated cover; the wires are connected to them using terminal blocks. Their protection class is usually IP20.
2. In a closed case
with a plug and plug or wires for connecting the tape and supply voltage. Power supplies with a plug and a plug are similar in appearance to power supplies for laptops - if you use them for crafts, then their appearance will not be so artisanal. Such power supplies can be either sealed (IP66-6i8) or non-sealed (IP20), but their housing still prevents electric shock and prevents accidental contact with high-voltage conductive parts.
Self-production
It is very difficult to accurately copy a factory LED strip, since it uses a flexible printed circuit board and special LEDs.
However, you can do without this by purchasing a textolite strip and ordinary LEDs. Also, you will need resistance - as you know, on a factory tape, it is practically not noticeable.
Assembling a lamp (+ 3 ideas)
Now that we have figured it out and selected the components, let’s start assembling the lamp, we need:
1. Connect the LED strip to a power source. This can be done by soldering wires from the power supply to the contact pads of the tape or using connectors. If the power supply output has a round plug, there are special mating parts (sockets) with terminal blocks for connecting to the tape wires. This will be convenient if the lamp is supposed to be disconnected from the power supply during operation or used autonomously, for example, from a battery.
2. Install the LED strip into the housing of the finished lamp or make it yourself.
about how
to solder and cut LED strips in earlier articles.
What will you need?
Before any work, you need to prepare all the tools. For today's task, you need to get sharp scissors, a thin drill, a soldering iron and a hair dryer.
As for manufacturing materials, you will have to go to the nearest specialized store. You should calculate in advance the required number of LEDs, which will depend on the voltage indicator.
You can buy LEDs in three primary colors and make multi-colored backlights. In addition, resistance, textolite strip, wiring and heat-shrinkable tubes are required.
How to manage the feed?
With normal connection, the tape will constantly light up. Multi-colored LEDs will not give a beautiful effect at all in this case.
Therefore, we recommend using a specialized controller. You can adjust the color, brightness and other settings as you need. Pre-installed programs will help you create a fading or transfusion effect.
There are several options here too. These can be simple controllers with manual switching, or with various control methods - via an infrared port, Wi-Fi.
DIY fan: how to make a homemade powerful fan. Basic parameters and properties of fans (130 photos)- Why do you need a security alarm, what functions does it perform?
How to choose winter workwear and not make a mistake - recommendations from the pros
LED strip in the apartment - Bathroom.
Bathroom lighting with diodes has more of a decorative purpose than a practical one. Do you want to create a romantic atmosphere, surprise your beloved half, or just cheer yourself up? LED decoration is suitable for all this.
What can be decorated with ribbons?
- mirror;
- wash basin;
- perimeter of the floor and ceiling;
- cabinets, shelves, recesses;
- shower stall;
- bath and jacuzzi.
It is recommended to use waterproof strips insulated with a silicone sheath. There are a lot of hazards in the bathroom in the form of water, splashes and splashes that can damage LEDs. Therefore, it is better to protect both the device and your apartment from unplanned fires and short circuits.
Niches, openings and arches.
There are several options for decorating an apartment in these areas:
- a niche in the wall sparkling with colors attracts more attention to itself;
- the illumination of the bedside area has a romantic connotation and is used as a night light;
- window framing around the perimeter creates an impressive view from the street;
- Zoning of the room can be achieved by installing LED strips in the passage arches.
Unlike the bathroom, in this case the diodes have a practical purpose. They can be used as a night light. At night, the flow of main lighting from the chandelier will hit unaccustomed eyes hard. The way out of this situation is to frame arches and doorways with LED strips that will illuminate your path to the kitchen or restroom.
Floor and baseboard.
The LED glow looks attractive not only above, but also below. To transform the floor, people install an LED strip under the transparent baseboard. In this way, you can decorate already familiar kitchens, bathrooms and bedrooms. By choosing the right shade and temperature of the glow, you can highlight the thoughtful features of the interior. By running strips under a transparent floor, people add drama and a sense of weightlessness in the dark or dimly lit. A special combination will be for LEDs with matte or colored glass tiles.
Steps.
Staircase lighting not only adds color to the surroundings, but also ensures safe movement at night. The LED strip is glued to the end of all steps. More often, the tapes are located over the entire surface of the end, but there is an option to install diodes only in the middle. Glass steps take on a special look. You can illuminate the stairs with one strip running down the wall, parallel to the steps.
Furniture
LED devices illuminate:
LED strips frame the bottoms of shelves, beds and tabletops to create a floating effect. To make it easier to find an outfit, the wardrobe is also equipped with LEDs that will light up when the wardrobe is opened.
Computer and workplace.
If you work at a computer or watch TV in the dark, the load on the retina instantly increases. To avoid visual impairment, it is recommended to use an external light source. Few people want to turn on the main chandelier - it gets in the way and destroys the coziness effect. Few people place night lights near the computer either. And the LED strip will come in handy, adding mood to anyone who sits down at the table.
Users who have gone deep into the process glue LEDs to everything: to a computer mouse, keyboard, mouse pad, and to cover the system unit inside and out. And no one will say that this does not fit into the overall interior.
Houseplants and aquariums.
Flowers and animals, like people, need sunlight. At home, it is difficult to achieve the required number of rays, even if the flower pot is on the windowsill. Especially during the current winters with their frosts and snowfalls. What kind of sun is there? For this, various types of artificial lighting are used, including LEDs. Aquarium strips must be waterproof as there is a risk of contact with water. Plants need special nutrition in winter, which is easily provided by an LED device without heating the surrounding objects, like incandescent lamps. As the duration of photosynthesis increases, the sprouts receive a larger volume of nutritional components.
Separate interior elements, curtains and drapes.
The tape is used to accent landscapes, still lifes and portraits. The device is installed around paintings or photographs and illuminates the work of art. Using LEDs you can stylishly decorate your window space. There are no limits to imagination here. Create your unique design the way you want it to be.
How to connect an LED strip in an apartment?
Strips can be connected in different ways:
- via power supply;
- directly to the network;
Let's talk about each one separately, taking into account all the features and nuances.
Recommendations for using LED strip in an apartment.
If your design solution requires a monochrome glow, then you are better off using 220 V LED strips. They are easier to connect, they are cheaper and much easier to connect into serial lines up to 50 m.
Read more about 220 V tapes here.
If you need dynamic lighting, it is better to use a 24 V RGB or RGBW strip.
Read more about these RGB or RGBW strips here.
power unit
12 V and 24 V tapes should absolutely not be connected directly from the outlet. 220 V coming from the network will destroy the entire LED lamp in an instant. For example, you can hold 10 kilograms of weight, but you are forced to lift 200 kg. You, of course, cannot do this, just like a tape that passes 12 or 24 V power.
In this case, the power supply will help. It takes 220 Volts from the network, converts the power into the required amount and transfers it to the device. The tape itself is connected to the power supply, which, in turn, goes to the outlet.
There are markings on the power supply and on the tape itself that help you understand which wire to connect where.
There are 4 of them in an RGB device:
- "R" - red;
- "G" - green;
- "B" - blue;
- “+” - common wire.
- "R" - red;
- "G" - green;
- "B" - blue;
- "W" - white;
- “+” - common wire.
A monochrome device has 4 wires:
- “+” - red or brown;
- “-” - black or blue.
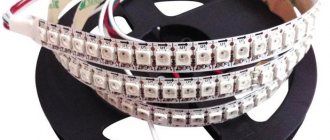
Typically, for multi-color ribbons, a controller is purchased, with which you can control the shades, glow dynamics and brightness intensity. Then the tape is connected to the controller, the controller is connected to the power supply, which takes energy from the outlet.
Installation
Place all control elements next to the light source. If you decide to make several tapes, supplement the electrical circuit with repeaters.
To install an LED strip with your own hands, you can use several methods - plastic clamps, double-sided tape, self-tapping screws, “liquid nails”. It all depends on their location, and which method is most profitable.
Looking for where to start?
That's a lot of information for sure. If you're new to LED strip lights, your head is probably full of information and you're left with more questions. If so, ask yourself these simple starting questions that will help you work through the guide above to find the best LED strip lights and parts for you!
- What will you be covering?
- Where will they be installed?
- Do you want to dim the lights? With remote control?
- With a wall switch?