Planning
Before you begin work on organizing street lighting, you need to draw up a detailed plan. You can carry out planning activities in one of three ways, whichever seems most convenient:
- Make several copies of the registration certificate. This can be done using a printer. Place the planned objects on the received copies. Draw up a drawing showing the lighting system diagram.
- If there is no technical passport, draw the plan on the drawing sheet. To do this, create a situational diagram. This paper is convenient due to the presence of cells, so there should be no problems with scaling the area. It is recommended to stick to a scale of 1 to 100, which corresponds to one centimeter for every meter of land.
- The plan can be drawn using a computer program. Any application for organizing landscape design will do. You can also choose a special program for lighting calculations.
The main purpose of planning is to determine the location of system elements. The plan should show a diagram of the electrical circuit with all the lights, sensors, switches, and wiring. You should also take into account the costs of purchasing materials and tools. The plan does not have to contain absolutely accurate—down to the millimeter—calculations. The main thing is a clear concept that gives a clear idea of what and how to do.
The plan must also contain a list of work to be performed:
- Calculation of material consumption.
- Selection of lighting fixtures and method of their installation.
- Determining the method of laying electrical wiring.
- Preparing the workspace.
- Laying wires.
- Installation of supporting structures.
- Connecting street lighting.
- Installation of monitoring and regulating devices.
Cable routing
Even at the planning stage, you need to choose a method for laying cables. Wires are pulled from the electrical panel in one of three ways:
- Underground cable. This option is used most often, since in this case the wires will be invisible and will not spoil the appearance of the area. The underground method of laying cables is the safest, since no one will damage it with careless movement.
- Overhead cable. The most financially accessible method, as well as convenient in terms of low labor costs. However, it is used only when it is not possible to lay the cable underground, due to the obvious disadvantages of its open location. They try to hide the wires under the roof or hang them on supports (poles). To reduce the number of supports, lightweight cables with a plastic or galvanized sheath are used.
- Terrestrial cable. Used as a temporary option. Ground wiring is used, for example, to organize the lighting of a street Christmas tree. The cables are simply laid out on the ground.
Electrical wiring calculation
At this stage, the number of lamps, their type, power, length and cross-section of wires, power of automatic switches, as well as residual current devices are established. Taking into account the fact that lamps are marked in watts, and electricity meters and fuses in amperes, to select suitable machines you will have to recalculate these parameters. To calculate electrical wiring, a simple formula is used.
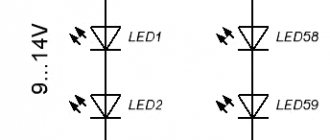
Note! If you plan to install LED lamps, you will need a low-voltage cable. A step-down transformer should also be provided at the main electrical panel.
Creating an electrical diagram
For clarity, we can give the following example. In the area in front of the house, it is necessary to organize lighting for the porch and the area near the gate. Lay two wiring lines. On the first there is a lamp and switch O and “B1”. On the second line (coming from the gate), the lamp (“L2”) is connected to the switch (“B2”) near the front door. Also on the second wiring line near the gate there is a motion sensor (“D”).
Electrical equipment for outdoor lighting must meet all safety requirements. When organizing wiring, the following circumstances should be taken into account:
- Cables are laid underground at a certain depth - no closer than 70 cm from the surface. The cable should not be too close to the building - at least 60 cm. If there is a pipeline nearby, the distance between it and the cable should not be less than 50 cm. The distance between parallel laid cables is from 30 cm.
- Overhead wiring is located at least three meters from ground level.
- Lamps should be installed so that they do not blind neighbors.
- Only copper wires meet modern requirements.
- Cables laid in walls must be placed in corrugated channels made of non-flammable plastic.
- Switches are located in dry places not exposed to direct water.
- All luminaires must be grounded.
Principles of organizing street lighting
Before you begin installing street lighting, you must understand exactly what you will need.
All equipment can be divided into 3 large groups:
- Lamps for street lighting. For this purpose, only special devices that are designed to operate in different climatic conditions are suitable. Their main characteristics are tightness and lack of moisture throughput. This group also includes motion sensors, which will react as you move around the area and the light will turn on in those areas where it is necessary.
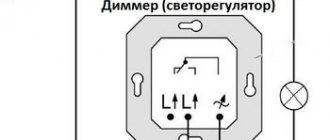
- Control equipment. Such devices will be needed in order to automate the system and spend a minimum of time on its maintenance, but at the same time obtain high-quality lighting in the dark. Plus, standard switches are added to this to allow you to independently regulate the intensity of the lighting.
- Conductors and cables. This group includes wires, pipes, terminals, ties and other parts, without which it is impossible to create a single power supply circuit to all devices.
Important! To ensure that street lighting functions properly and for a long time, take a responsible approach not only to the installation process, but also to the choice of consumables. Their quality determines the reliability of the system and its safety for all residents of the house.
Necessary materials
To organize street lighting you will need a set of materials:
- Wires. For outdoor conditions, cables with a double layer of insulation will be needed. All their cores have a polyvinyl chloride coating, as well as a general protective layer. Copper conductors are used since they do not lose their qualities when bent. At the same time, the cost of copper wiring is significantly higher compared to aluminum. If the cables will be laid overhead, they will need tension to support them. To do this, a stainless steel coated wire with a diameter of 4-5 mm is pulled between the supports. The power cable is connected to it with small pieces of copper wire. If it is laid underground or along the walls of a building, it is placed in a metal-plastic box.
- Lamps. For outdoor lighting, you need to choose a closed type lamp with a sealed housing. The base of the device must be made of ceramic. Outdoor indoor lights are unsafe and will not last long.
- Lamps.
- Circuit breakers. The street lighting system must be equipped with an automatic circuit breaker so that in the event of a short circuit the entire building will not be de-energized. The system must not be connected to a regular outlet. A machine is required on the electrical panel.
- Switch boxes. The wires are connected to them. Steel boxes are used to install the lamp. Such designs can be purchased at an electrical supply store.
Advice! It is better to purchase the above materials from one seller, since in this case it is easier to get a good discount.
Selection of luminaires and lamps
Separately, it is worth mentioning the choice of suitable lamps and light bulbs. The most popular types of lamp designs include:
- wall;
- on poles or other vertical supporting structures;
- hanging;
- on legs;
- spotlights;
- diode strips.
Any type of lamp is suitable for street lighting, but they all have the following features:
- Incandescent lamps. Currently considered obsolete due to wasteful energy consumption, tendency to overheat and fragility. Typically, such lamps are used only as a temporary option.
- Halogen lamps. In fact, they are a type, albeit more advanced, of incandescent lamps. They occur most often. They are distinguished by efficiency, durability, and high-quality luminous flux. The disadvantages of halogen lamps include noise and toxic fumes inside the device. However, in street conditions these shortcomings are not critical.
- Mercury lamps. These include almost all Soviet-style street lamps. Control is carried out using a starting device. The connection speed of a mercury lamp is related to the ambient temperature. In cold weather, the lamp lights up noticeably longer. Mercury lamps are unstable to voltage surges, as a result of which they often fail. The lamps are prone to overheating, which is compensated by the presence of special heat-resistant wires. Mercury lamps are designed to illuminate large areas.
- Metal halide lamps. They contain mercury, inert gas, and halogens. Due to the heating of solids, a gas is formed that produces radiation. The power of a metal halide lamp depends on the number of bases used. Such lamps are characterized by energy efficiency, high luminous efficiency, and high-quality color reproduction. Disadvantages include high cost and lengthy startup process.
- Fluorescent lamps. They are the most progressive light source to date. The advantages of such lamps include efficiency, long service life, lack of overheating and flickering, and high-quality light. Disadvantages include high cost and gradual decrease in brightness.
When purchasing an outdoor lamp, you should pay attention to the following characteristics:
- Level of protection from external influences. Each lamp is marked with the letters IP and a numerical code (two digits). A street lamp must have a degree of protection of at least IP65. Lamps with IP68 code are an even better option; they can be placed under water without losing their performance.
- The material from which the lamp body is made. In outdoor conditions, the best option is a metal case (aluminum). Plastic structures are not suitable for outdoor use.
- Deflector shape. Round luminaires are ideal when you need clearly focused light in a small area. Square fixtures illuminate large areas, while tubular fixtures are used to illuminate modest areas.
Sensors
You can save energy by optimizing the operation of the lighting system by installing motion sensors. These devices turn on the light when it detects a moving object within a certain radius and turn off the light when the object moves away.
There are other types of sensors, for example, those that respond to light levels. As soon as it gets too dark outside, the light automatically turns on. And, conversely, with the onset of morning it turns off.
All outdoor sensors are protected from moisture and dust. Such devices are used both in winter and summer.
Installation of street lighting - work plan
The work plan is an important step in the process of organizing street lighting. Therefore, make yourself a schedule of the necessary work in advance or adhere to the following sequence:
- Drawing up a street lighting diagram.
- Calculation of consumables.
- Selection of lamps and method of their installation.
- Choice of cable laying technology.
- Preparing the work area.
- Wiring installation.
- Installation of poles for street lighting.
- Connecting street lighting.
- Installation of control and regulation devices.
Important! To quickly figure out which street lighting scheme is most suitable in your case, look through photos of ready-made projects. This will help to avoid serious mistakes when developing a project and installing devices, which means there will be no risk to your health.
Installation of a street lighting system
Installation of the luminaire on a support is carried out by performing several sequential operations. Before starting electrical installation work, you should disconnect all devices from the electrical network so that the installation process is safe.
Preparatory work
- We remove all debris from the support installation area.
- We buy all the necessary materials.
- We are preparing tools for electrical installation work.
- We dig a trench for laying wires.
In the process of installing street lighting, you will need the following tools and materials:
- brace;
- trough for mixing the solution;
- bayonet shovel;
- Master OK;
- sand;
- cement;
- water;
- materials for formwork (boards, bars or plywood).
Installation of supports for lamps
Installation work is carried out in one of several possible ways. The choice of a specific installation method depends on the type of retainer.
Fixing the lamp on the wall:
- We mark the installation area of the lighting fixture.
- We check the evenness of the support using a building level.
- We make holes in the walls with a drill.
- We hammer in anchors or dowels.
- We fix the brackets in the wall.
Attaching the lamp to a pole installed on the ground:
- We dig a hole of the required diameter.
- Pour sand into the bottom of the hole and tamp it down.
- We assemble wooden formwork.
- We lay a plastic pipe of the required cross-section between the slats. Then we run the cable inside it.
- We seal the pipe ends. This is necessary so that the pipe becomes sealed and the construction mixture does not get inside in the future.
- We prepare concrete and fill the formwork with it.
- We place an anchor in the center to secure the support under the lamp. The anchor must be strictly vertical, so we use a building level.
- We wait until the solution hardens.
- We install poles on all anchors.
Installation of the lamp
Installation of a street lamp is carried out as follows:
- We stretch the cables from the distributor to the area where we install the lamp.
- We lay the cable in a trench or prepared hidden cavities.
- We install the lamp in place.
- We clean the ends of all lead wires with a knife.
- We fix each phase wire to the central contacts of the lamp.
- We wrap the twisted areas with electrical tape or heat shrink tubing.
- We make sure the integrity of the insulating layer, check the resistance and grounding with a multitester. If no problems are identified, tighten the nuts so that the lamp is securely held in place.
Features of installation of external lighting systems:
- To install an external light source, a new cable is laid, since an independent power line is required for the safe operation of the systems.
- When connecting outdoor lighting in the city of Moscow, you need to draw up projects before laying the cable and installing lighting poles. Electrical installation work begins after permission to lay a new cable in the ground has been received, otherwise there is a risk of affecting existing utilities.
- When installing street lights at pedestrian crossings and intersections, it is important to comply with the minimum permissible lighting standards, which will ensure good visibility in accordance with traffic regulations.
- To illuminate sidewalks, parks, and other crowded places, it is important to use high-intensity lighting fixtures that will illuminate even the darkest places.
- If it is planned to use motion and light level sensors in local street light source systems, this must also be provided for in the design plan.
- It is mandatory to install electricity meters when installing external lighting at the customer’s expense.
- It is possible to use LED lamps when installing outdoor lighting in Moscow; they help save energy, and their cost pays off very quickly.
Service cost
The price for installing street lighting depends on the specific situation; each specialist sets prices independently based on the client’s request. The type and number of light sources, the area of work, the list of necessary tasks and additional services are taken into account. The exact cost of installing street lighting fixtures on a pole is calculated after drawing up an estimate.
By hiring specialists through our service, you don’t have to worry about the safety of new systems and compliance with the law. Specialists use reliable armored cables and provide installation services for transformer substations, if required. Leave a request on the website to order installation of outdoor lighting from a contractor from Moscow.
Connection to electrical panel
How to connect a lamp to an electrical panel is described in the Electrical Installation Rules. The PUE, in particular, states that the device body must be self-extinguishing, that is, made of metal coated with heat-resistant material or heat-resistant plastic. The installation location must meet the following requirements:
- fire safety;
- natural light;
- the presence of artificial ventilation or natural ventilation;
- location in a free access area.
The electrical panel contains the following elements:
- electric meter;
- residual current device;
- bus zero;
- grounding bus;
- introductory automatic machines (30-60 A);
- socket outlets for high-current electrical appliances (25 A);
- socket outlets for low-current electrical household devices (16 A);
- automatic devices for lamps (10 A).
When all the circuit elements are in place, the connections are tested. Zero resistance with phase is also measured.
The luminaire is connected to the electrical panel after turning off the general voltage in the metering panel. Next, we bring all the wires to the correct places. Due to the responsibility of the task, it is better to entrust this work to a professional electrician.
Advice! After connection, it is recommended to sign all machines. The task is made easier by the presence of special niches in each of them.
The lamp can be connected directly or through a dedicated outlet. In the latter case, to de-energize the network, it will be enough to remove the plug from the socket.
All stages of street lighting installation.
We won't bore you with a sea of text. We’ll talk only about the most important things and accompany each assembly step with photographs. So, the instructions will be more visual and understandable.
Laying underground communications
Before you start digging trenches, you need to draw up a plan of your site, preferably on a clear scale, and mark the locations of the lamps and the optimal position of the routes to them.
- On the plan, be sure to mark all objects that may interfere with work. This will save you from unnecessary steps and help you accurately calculate the required amount of material.
- Next, from the location of the panel board RShch-0.4 kV, we dig a trench 70 centimeters deep along all points of the future lamps, as you marked earlier on the plan.
- A layer of sand is poured onto the bottom of the trench. The height of the pillow should be 10-15 centimeters. If sand is not available, then loose soil can be used instead, but this option is not the best, since significant shrinkage of the soil will subsequently be possible.
- A HDPE pipe is laid on top of the cushion. It should have an outlet at the point of each lamp, that is, we bring it to the desired place, bend it upward and cut it off above ground level.
- We immediately lower the cut part down and lead it further to the next point. The result is a classic circuit with parallel connection of light sources.
- Depending on the connection diagram and the method of placing the lanterns, it may be necessary to bring both three and four pipes to the surface.
- By the way, it would not be superfluous to install garden sockets, for which you also need to provide conclusions. This device will be very useful, for example, if you use an electric lawn mower.
- HDPE pipes have a cable inside, or in other words, a probe. With its help, the cable is pulled inside.
- Do this and leave 30 centimeters of margin at the terminals for the convenience of further work.
- The cable is cut in the same way as the pipe and stretches to the next lantern.
Advice! If the line in your area is branched, then it is recommended to mark each cable somehow for orientation during connection.
- After the wire pulling is completed, the cable must be covered with a layer of sand. Its thickness is also 10-15 centimeters. As a result, the pipe ends up inside the pillow.
- Then we pour about 20 more centimeters of earth on top of the sand and tamp it down.
- We still have about 30 centimeters left to ground level. At this depth, it is recommended to lay a warning tape, which may one day save someone's life. The price of such a tape is mere pennies, but it is difficult to overestimate its importance.
Installation of street lamps
Naturally, there can be no question of attaching lamps directly to the ground, except, perhaps, for the most compact options that can simply be stuck into the ground. Even short products require a strong and reliable base.
- A concrete foundation will be an excellent foundation for ground-mounted lamps, and even more so for lighting poles.
- We install formwork from boards at the outlets of HDPE pipes.
- It is knocked together in the form of a rectangular box. Its size will depend on the size of the thrust bearing of the mounted lamp post.
- In order for the lantern to stand securely, the base must be buried at least 30 centimeters into the ground.
- It is recommended to lay a reinforcing mesh inside, which must be raised by 5 centimeters.
- Next, the formwork is filled with concrete. For these purposes, a solution of grades M150 or M200 will be sufficient.
- The concrete needs to sit for several days to harden. After this, the formwork is dismantled, and the trenches can be completely filled with earth and compacted.
By the way, there are lamps equipped with a special lower stand, which is immersed in the ground. For such options there is no need to make mortgages.
Their installation proceeds as follows:
- We fill the base with ASG, gravel or crushed stone in order to ensure good drainage for rainwater.
- Next, using cement mortar, the lower part of the base is well fixed. It must be installed strictly level, so use a suitable tool.
- The solution is poured only from the outside of the cabinet. It is not needed inside - there will only be wires and their connections.
- Next, the upper disk is installed and the wires are connected. Be sure to do this through the terminals for reliable protection and isolation of the contacts.
- Then the lamps and glass of the lamp are installed - that’s it, it’s ready for use.
There is another way to create a strong base for lamp posts, and we must mention it.
- Take a flange whose diameter corresponds to the diameter of the lamp post;
- A reinforcement frame is welded to it, as shown in the photo above;
- A hole of sufficient depth is made in the ground using a garden drill;
- Next, everything is poured with concrete, naturally, after all the wires are brought out.
Such a base will be much stronger than the one we considered first in this chapter, and at the same time the mounting pins will be brought out, which is very convenient. But let's return to our first foundation to figure out what needs to be done with it next.
- We take the lower mounting part of the lamp post, pass the wires into it, place it on the base, and use a pencil to mark all the attachment points.
- According to the markings, we use a hammer drill to make holes of the required diameter and depth for the prepared anchors.
- We insert dowels into the holes - they can be plastic - and attach the thrust bearing. Everything here is simple and clear without further ado.
- Then all the wires are connected. This is done inside the distribution box, which most poles are equipped with.
- The connection is made in any convenient way, but it is better, as we have already said, to use terminals. This is both more reliable and much faster than twisting.
- It is very important to make high-quality insulation of connections. In some cases, junction boxes are filled with compound, as shown in the picture above.
- Before doing this, be sure to check the functionality of all connections, otherwise picking out the terminals later will be a very difficult task.
- The sealed box is mounted at the base of the pole, after which it is completely installed according to the attached instructions.
- Not all poles are equipped with a distribution box. There are more modern and convenient solutions when special contact blocks are included in the design - very convenient, but you will have to overpay a little.
All lamps and sockets on your site are installed in the same way, after which you can move on to the most interesting part - connecting them.
Safety regulations
To ensure a secure system, it is recommended to adhere to the following rules:
- It is advisable to avoid low-quality Chinese products; they can be unsafe and almost always short-lived.
- Use a voltage stabilizer, it makes the system safer.
- Install lamps intended for outdoor conditions.
- Use reliable insulation.
- For outdoor use, supports and brackets with anti-corrosion coating should be installed.
- Underground wiring is located at the appropriate distance (according to the rules of the Electrical Code) from other objects.
- The cable must be accompanied throughout its entire length by a support cable.
All work can be done with your own hands if you follow safety precautions and installation instructions. In the absence of at least basic knowledge of electrical engineering and experience, it is better to entrust the work to an electrician.
Technology for installing lighting devices on the NPG support
What lighting devices can be installed?
Depending on the parameters of the object, the following lighting devices can be installed on the support:
- Console lamps. The most common and popular option. The light device is attached to the bracket horn through a hole located on the side. Nowadays, models with LEDs are used as lamps. They have a compact body, operate for a long time and consume minimal electricity. Lighting devices are protected from external influences according to the IP67 standard to remain operational in the rain and not break due to dust getting inside.
- Crowning lamps. Such lighting devices are more often used when a beautiful bracket with curved arms and streamers is placed on the top of the NPG. Their reflectors have a spindle-shaped, cup-shaped or spherical shape. Lamps act as part of a decorative composition.
- Floodlights with symmetrical beam. They are installed on high supports, with the help of which parking lots and other similar objects are illuminated. Thanks to the special shape of the reflector and diffuser, the beam propagates at the same angle in all directions relative to the spotlight body.
- Spotlights with asymmetrical beam. The beams of these light devices can have different angles. Such options are used for lighting sports facilities. In this case, the beam illuminates the playing area, but does not blind the spectators in the stands.
When purchasing a support, you need to decide on the type of bracket. The following options are available:
- According to the installation method: for supports with a faceted barrel, the standard option is a bracket that has a long tail part limited by a washer. The manufacturer also produces models of brackets that are attached to a cylindrical part - the shell. But they are usually used with tubular structures.
- By type of lamp: the brackets for flood light lamps and spotlights that shine with a strictly directed light beam are fundamentally different from each other.
How are lamps installed?
The bracket consists of arms made from a hollow steel pipe. Thanks to this, all wires are laid inside the structure and are not visible from the outside. This protects the wiring from damage caused by mechanical stress or natural factors.
The diameter of the bracket horn coincides with the diameter of the mounting hole of the light device. Therefore, the connection is not difficult. The luminaire is fixed using bolts, which allows you to remove the light device and reuse it without damage, as well as perform assembly at the installation site.
Where to go?
Our company provides comprehensive services to clients who want to build or modernize an external lighting system for a facility. We independently manufacture and sell supports, organize their delivery to the site, and provide assistance in assembly and installation.
To receive advice on lighting issues and fill out an application for the purchase of poles, fill out the form on the website or call the sales department managers.