Types of ties and the possibility of removal
You can dismantle any screed; the only difference is the labor intensity.
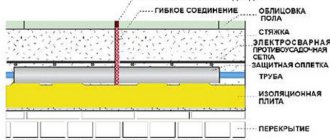
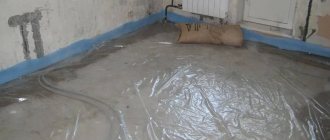
- Wet floor screed. This classic method, proven over decades, is still widely used today due to the low cost per square meter of finished coating. Apply to a dust-free base, primed and dried. Requires the installation of a damping tape around the perimeter adjacent to the walls for waterproofing and suppression of the spread of structural noise. To increase strength, a reinforcing mesh - metal or plastic - is placed in the screed. Requires additional surface leveling. Dismantling such a screed is the most labor-intensive; it requires crushing, sawing or milling of a permanent structure firmly connected to the ceiling and walls. Professional equipment is required, and it is also difficult to remove residues after dismantling.
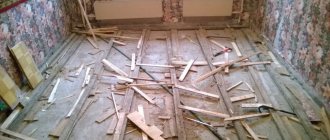
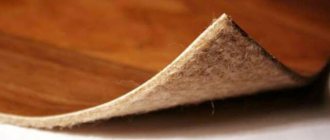
- Dry screed. This is a fast technology; the screed material is poured between the beacon lags, compacted and covered with sheets of plywood or OSB. It is also necessary to seal cracks and depressions in the base and waterproof it. It is important that the sheets rest not only on the logs, but also on the surface of the backfill material. This type of screed is more expensive than a wet one; it is more susceptible to moisture. Dismantling of such a structure is easy - just unscrew the screws, remove the sheets and joists, load the backfill material into bags and take them out.
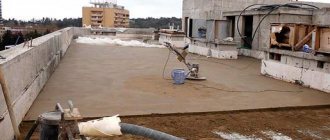
- Semi-dry screed. It is performed using a mechanized method; a large amount of fiber fiber is added to the cement mixture. A solution with a small proportion of water is supplied to the surface by a pneumatic blower, after which it is compacted. Fiber fiber increases internal adhesion, so mesh reinforcement is not necessary. The cost is also high, due to the high cost of equipment and the involvement of qualified specialists. It is easier to dismantle such a screed than a wet one and harder than a dry one.
Wet screed
Usually, when choosing a type, they do not think about how to subsequently remove the concrete screed, nor do they take into account the cost and complexity of its dismantling.
How to remove a layer of concrete from a floor
A concrete or cement screed is used to level the surface of a concrete subfloor before laying the finishing floor covering.
How to remove a screed from the floor when it becomes unusable or the time comes for major repairs, this question affects many during repairs.
The choice of method and the overall complexity of the operation depend on the type of screed, its thickness and the area of the dismantled coating.
Tools and protective equipment
The work will require a small amount of tools and equipment, but it must be professional and highly productive, and hand tools must be serviceable and reliable:
To destroy the screed you will need:
- jackhammer, compressor, hoses;
- if a compressor with an internal combustion engine is used, the length of the hoses should be sufficient from the place where it is installed on the street to the farthest corner of the apartment;
- hammer drill with replaceable attachments;
- an angle grinder with a diamond disc for destroying the reinforcing mesh;
To clean up construction waste you must:
- durable metal scoop;
- hard broom;
- savvy;
- construction vacuum cleaner;
- a large number of bags for collecting and disposing of waste or a construction hose secured under the window;
- trash container.
Personal protective equipment you will need:
- vibration-proof gloves for working with a jackhammer or hammer drill;
- a large number of construction gloves for loading debris into bags;
- construction helmet with integrated or separate vibration headphones;
- supply of respirators;
- construction shoes with steel toe cap.
For power tools, you should provide a supply of consumables - disks, tips, hammer oil.
Preparatory work
Before you start reading the work, you need to make sure that there is an accurate plan for all communications running both in the screed and in the floor underneath it. When using powerful routers, circular saws, or jackhammers, there is a significant risk of damage.
Therefore, ALL communications, even those that lie below the layer being removed, must be turned off for the duration of the work: electrical networks are de-energized, water or coolant must be drained from the pipelines.
During dismantling, a large amount of dust is generated, so all furniture, equipment, household appliances, windows and all horizontal surfaces remaining in the apartment must be securely covered with polyethylene sheets or special non-woven covering material.
Next, you need to completely clean the disassembled screed from all objects standing on it, and remove the old floor covering.
At this stage, the condition of the screed is assessed and the final decision is made - to repair it or replace it.
Stages of dismantling work
Actually, disassembling the screed is divided into several stages:
- Open a small piece of the covering, evaluate the actual thickness of the screed, the presence and quality of the reinforcing mesh, the presence and direction of communications (and the compliance of their location with the existing plans). The measurement will make it possible to estimate the volume and duration of work and the amount of construction waste generated.
- Bypassing the communication routes, destroy the screed in several places with a jackhammer. You should start removing the coating from the far corner of the room.
- Connect the starting points with strips of the removed screed; when the wall is clean, move towards the exit in the same way with stripes. Care must be taken not to destroy the floor instead of the screed.
- In order to notice in time and not damage communications, you should often put broken pieces in bags.
- Periodically remove bags of garbage so as not to clutter the room and not to overload individual overlap points. It is not recommended to stack bags in several rows.
- After removing the waste bags, sweep and vacuum the exposed floor.
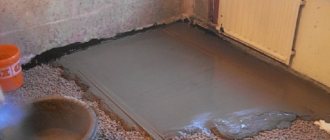
Screed dismantling stage
Now you can begin preparing for the installation of a new screed.
Source: https://betfundament.com/kak-snyat-sloy-betona-s-pola/
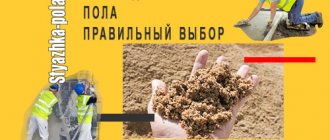
Types of screeds and dismantling possibilities
Dismantling a floor screed is a complex and time-consuming process. Before you begin to remove the old coating, you need to find out what technology it was made using. Today there are 3 types of floor screeds:
- Wet . This flooring technology was used many decades ago. And now this screed also does not lose its popularity. Wet technology is in such high demand due to its low price and ease of installation. Before using it, the master needs to prepare the surface: clean it from dust, prime it and wait until it dries completely. After this, for better fixation, it is necessary to install a mesh made of metal or plastic. If you encounter this type of screed, you will have to spend a lot of time and effort to remove it. When dismantling such a structure, heavy tools are used: a hammer drill, a jackhammer, a large drill and a grinder. This procedure takes the builders several full days.
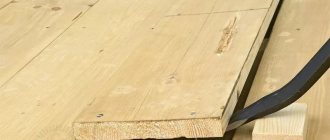
- Dry . A very easy to install type of screed. It is produced in the form of a dry mixture. This material must be poured between pre-prepared joists. After this, the resulting structure is compacted and covered with fiberboard sheets or thick plywood. Before using this type of mixture, it is necessary to thoroughly treat the floor with waterproofing agents. Despite the ease of use, this type of screed is not very popular due to its high cost. Removing screed from dry floors is very simple and quick. Simply lift the wooden sheets that cover the joists and load the mixture into the bags with a shovel.
- Semi-dry. The only type of screed that cannot be applied without the help of special tools through which the mixture and a small amount of water are supplied. The composition also includes a special fiber that strengthens the integrity of the screed and completely replaces the mesh made of reinforcement or plastic. It is necessary to dismantle a semi-dry type floor screed in the same way as a wet one - using a special tool. Only the removal will happen much faster.
Relevance of dismantling
The strength of screeds is always lower than that of the main building structures, and the daily loads on it are no lower. In addition, these loads are not constant and occur in different places. Therefore, the screed wears out, and wears unevenly. After a few years, areas near doors stand out and weaken, where the flow of people passing is concentrated, near kitchen equipment, plumbing fixtures, etc. The least wear is observed in the corners, where there is practically no variable load. In addition, the condition of the screed is affected by periodic and permanent displacements of the base elements, especially if it is made up of several slabs.
During a major renovation, the project almost always includes dismantling the old screed and installing a new screed. This is often easier to do than carrying out defect detection, determining the degree of safety of individual sections and their suitability for further use. And a new screed will last longer than a partially corrected one.
If the defects are obvious, for example, settlement of the coating along the joint of the slabs or at the junction with the supporting wall or pillar, partial dismantling is carried out and a new screed is installed in the damaged area.
The old screed is dismantled if:
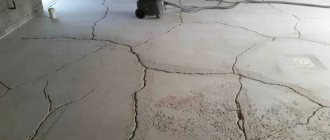
- base defects were found;
- numerous cracks are visible;
- installation errors were detected;
- level reduction required;
- it is planned to install (or replace) heated floor equipment;
- it is necessary to replace the communications embedded inside the screed.
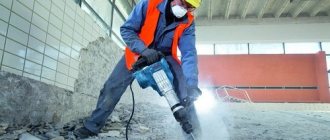
The work of dismantling an old screed is physically difficult, labor-intensive, and the process generates a lot of waste and dust. They require professional equipment and specific skills.
There are cases when, if the condition of the old screed is acceptable, they decide to pour a new one directly on top of the existing one. This decision should be made with great caution, especially if the thickness of the old screed is large. The total load on the floors may be unacceptable. In each individual case, strict engineering calculations are required.
Features and methods of screed removal
Removing wet and semi-dry screed comes down to mechanically breaking it up by one method or another into separate pieces and removing these pieces.
The method by which an old screed can be removed from the floor is selected based on the thickness and material of the coating, the total area, thickness and material of the floor, the number and type of communications inside the screed and in the underlying floor.
For partial disassembly in a small area (corner of a room, toilet, etc.), you can get by with hand tools, such as a chisel and a small sledgehammer.
If the thickness of the screed is more than 3 cm, or it is reinforced with steel mesh, you cannot do without serious units. To destroy the coating the following are used:
- pneumatic jackhammer;
- a powerful hammer drill with a lance- or spade-shaped attachment;
- high-power circular saw equipped with a diamond blade for working on stone and iron.
To remove the screed you will need a pneumatic jackhammer.
There is another way in which you can also remove the screed layer. You can use a hammer drill or a circular saw to dismantle it in a limited area. On an apartment scale, you will have to use a jackhammer.
Before deciding to start working with a hammer drill or jackhammer, you should definitely obtain written consent from residents of nearby apartments to carry out work on certain days and hours.
Tools and protective equipment
The work will require a small amount of tools and equipment, but it must be professional and highly productive, and hand tools must be serviceable and reliable:
To destroy the screed you will need:
- jackhammer, compressor, hoses;
- if a compressor with an internal combustion engine is used, the length of the hoses should be sufficient from the place where it is installed on the street to the farthest corner of the apartment;
- hammer drill with replaceable attachments;
- an angle grinder with a diamond disc for destroying the reinforcing mesh;
To clean up construction waste you must:
- durable metal scoop;
- hard broom;
- savvy;
- construction vacuum cleaner;
- a large number of bags for collecting and disposing of waste or a construction hose secured under the window;
- trash container.
Personal protective equipment you will need:
- vibration-proof gloves for working with a jackhammer or hammer drill;
- a large number of construction gloves for loading debris into bags;
- construction helmet with integrated or separate vibration headphones;
- supply of respirators;
- construction shoes with steel toe cap.
For power tools, you should provide a supply of consumables - disks, tips, hammer oil.
Preparatory work
Before you start reading the work, you need to make sure that there is an accurate plan for all communications running both in the screed and in the floor underneath it. When using powerful routers, circular saws, or jackhammers, there is a significant risk of damage.
Therefore, ALL communications, even those that lie below the layer being removed, must be turned off for the duration of the work: electrical networks are de-energized, water or coolant must be drained from the pipelines.
During dismantling, a large amount of dust is generated, so all furniture, equipment, household appliances, windows and all horizontal surfaces remaining in the apartment must be securely covered with polyethylene sheets or special non-woven covering material.
Next, you need to completely clean the disassembled screed from all objects standing on it, and remove the old floor covering.
At this stage, the condition of the screed is assessed and the final decision is made - to repair it or replace it.
Stages of dismantling work
Actually, disassembling the screed is divided into several stages:
- Open a small piece of the covering, evaluate the actual thickness of the screed, the presence and quality of the reinforcing mesh, the presence and direction of communications (and the compliance of their location with the existing plans). The measurement will make it possible to estimate the volume and duration of work and the amount of construction waste generated.
- Bypassing the communication routes, destroy the screed in several places with a jackhammer. You should start removing the coating from the far corner of the room.
- Connect the starting points with strips of the removed screed; when the wall is clean, move towards the exit in the same way with stripes. Care must be taken not to destroy the floor instead of the screed.
- In order to notice in time and not damage communications, you should often put broken pieces in bags.
- Periodically remove bags of garbage so as not to clutter the room and not to overload individual overlap points. It is not recommended to stack bags in several rows.
- After removing the waste bags, sweep and vacuum the exposed floor.
Screed dismantling stage
Now you can begin preparing for the installation of a new screed.
Removing a concrete floor
The concrete floor may be covered with tiles, so we will consider the option of removing them.
Removing tiles
If the tile is set on cement, it is impossible to remove it without damage. Using a jackhammer or chisel, hammer the tile until it is destroyed. In this case, the concrete floor will likely be damaged and will have to be leveled by pouring cement into the deformed areas. The work is quite dusty and noisy. Warn your neighbors that you are going to hammer the floor in your apartment, remove furniture and clean things, protect your eyes and respiratory organs.
Tile installed with glue is easier to remove. You will need a spatula, knife, chisel, hammer drill and water. Remove the seams between the tiles using any convenient method and moisten the resulting gap with water. Do not skimp on water; you need to pour as much of the coating under the tile as possible so that the glue dissolves.
Do-it-yourself tile removal
IMPORTANT: do not overdo it with too much water if you don’t want to flood your neighbors!
Carefully slide a spatula under the tile and remove the coating. If that doesn't work, use a chisel. By removing tile by tile, you will gradually clean the floor. Now proceed to remove the concrete screed. This is a complex job that can be entrusted to specialists, but we will consider the independent option.
Video - How to remove old tiles from the floor
Removing concrete screed
Removing concrete screed
To cope with a durable coating, you will have to spend time and put in effort. Concrete screed is an intermediate layer that is located between monolithic slabs and the floor covering. The screed performs the main function of leveling the floor surface. Over time, concrete also becomes unsatisfactory - it cracks, peels off, and therefore it must either be restored or removed.
Impact method
The impact method for removing screed is not only the most effective, but also the noisiest. Determine the thickness of the layer and use an electric jackhammer. There are other ways, such as drilling and cutting, but they require professional tools and workers.
Electric jackhammer
IMPORTANT: use this method, knowing for sure that the screed does not contain reinforcement! Otherwise, dismantling the concrete floor yourself is dangerous.
A jackhammer is by no means an ordinary tool that you use every day. Carefully follow all requirements and operating procedures listed below.
How to use a jackhammer when removing concrete screed
How to use a jackhammer when removing concrete screed
Nuances of partial dismantling
In a number of cases, there is no need to completely dismantle the old screed.
For example, if it is necessary to install a heated floor on a limited surface, or to reduce the overall level. Apply the following sequence of actions:
- A grinder or circular saw with a diamond wheel for stone work makes a large number of parallel cuts. It is more convenient to work with a saw because it has a mechanism for limiting the depth of cut, so they all come out the same.
- It is better to connect a construction vacuum cleaner to the saw to remove the resulting dust.
- Using a puncher with a spatula attachment, carefully chop off the cut strips.
- Remove the resulting waste with a dustpan and a hard plastic broom
- Vacuum the cleaned area of the floor.
- To level the surface, fill it with a solution like “Vetonit”
If it is necessary to remove a part of the screed that is very thick, you can use a construction router - a diamond-coated core drill. Holes are drilled across the entire area to be cleaned with a slight indentation, then the remaining partitions are broken using a hammer drill with a spatula attachment.
Dismantling an old screed is quite a labor-intensive and dusty undertaking. In order for it not to create problems, it must be agreed upon with neighbors and carefully planned. For complete dismantling, pneumatic jackhammers are used; for partial dismantling, you can use a circular saw and a hammer drill.
Dismantling the concrete covering
There are many ways to dismantle a concrete coating, the most popular and most effective are: impact, concrete removal with slabs and cutting. We will tell you a little further about the features of the impact method, but now you will find out by what principle all concrete dismantling occurs.
The process can be divided into the following stages:
- Beginning - at this stage it is necessary to make an initial hole, from which further dismantling will take place. To do this, you can use any of the possible methods.
- After the beginning has been made, the entire screed is divided into individual elements by impact or by cutting.
- Finally, large parts are torn off from the supporting base and taken out of the room.
If the old screed is laid on a layer of crushed stone, then it must be removed together with the layer of crushed stone, this will make it much easier for you to tear it off from the base. Most often, broken concrete is collected with a shovel, and placing a shovel through the rubble will be very difficult. It is much easier to do this by sliding along the base.
Features of various methods
This option involves an impact force that is applied to the concrete surface, due to which the concrete begins to crack and break into small pieces, which can then be easily collected and thrown away or used for other purposes. Dismantling a self-leveling floor or concrete with a topping layer is best done using this method, since it is best suited for high-strength coatings and helps to easily clean more areas.
The power of electric jackhammers must be correctly calculated and selected depending on the thickness of the layer to be removed.
Next, we will tell you how to do the work correctly using:
- Impact devices: hammer drill and jackhammer.
- Cut concrete using a diamond blade.
- Dismantling the screed - drilling with a diamond drill.
Working with impact devices
We start from the door or any corner convenient for you. First, punch a hole all the way to the base and clean it completely. After this, you begin to chip five to ten centimeters from the edge, gradually expanding the hole and moving across the entire area. It is better to carry out the work in sections of three to five square meters. They crushed the intended area, cleared it and continued work.
Dismantling, during which the mortar is removed from concrete and cement, regardless of the method in which it is done, consists of breaking the floor into pieces.
A jackhammer is best suited for such purposes, since it is designed for this type of work. Many craftsmen use a simple hammer drill, equipped with a special pick or chisel. In this case, the drilling mode must be turned off and only the impact function must be left.
Often the power of a standard hammer drill will be quite enough to get the job done quickly and efficiently, but of course there will be a lot of noise and dust. Tool manufacturers recommend working for fifteen to twenty minutes and then allowing the device to cool for the same period of time.
Dismantling concrete with a simple circle on metal is impossible. You will need to purchase a special diamond-coated wheel that is designed for concrete and stone.
When working with a circular saw, determine the level to the base so as not to touch it when cutting. This is about 10 cm, on the first floors it can be up to 25 cm.
The entire area is cut into small sections of half a square meter, then they are carefully undermined and removed entirely. In this case, it is necessary to work in safety glasses and a respirator, as there will be an incredible amount of fragments and dust, it is better to open all the windows and create a strong draft.
Working with a drill
If your hammer drill cannot dismantle a concrete floor, you can make the task easier. To do this, take a diamond drill and make a large number of holes in the concrete. After that, we use a lance to beat off the areas that are drilled on all sides. Try to maintain a right angle when drilling, as the drill can easily break.