In old houses where the floors were made of wood, the problem of squeaks and fragility of the coating arises very often. The board wears out, rots and dries out. Replacing a wooden floor with a concrete one in an apartment looks rational. This can be done, including in old houses. Concrete floors have excellent strength and service life, and can be covered with laminate if the technical requirements for this process are fully met.
Replacing a wooden base
Removing old flooring
Dismantling the old covering is the first step in replacing a wooden floor with a concrete one in an apartment. For this, standard tools are used: sledgehammer, crowbar, crowbar.
- Linoleum floor coverings are removed.
- Using a tool, the coating is disassembled.
- In areas where pipes and other communications enter, you should be especially careful.
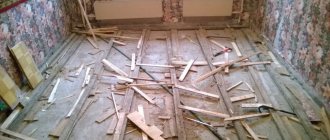
After removing the old boards, access to the base opens. In apartments, logs are laid on reinforced concrete slabs, often they are not even secured. The space between them is filled with the remains of construction waste for sound insulation.
Everything needs to be removed. To collect garbage you will need bags and a place for their temporary storage.
After construction debris and dirt have been removed, the joists are assessed. If the wood is in good condition, you can create a base for pouring screed over plywood or chipboard, which will be placed on the existing substrate. But this will cause the floor level to rise, so it is worth deciding what is better: to make a new coating on the joists, without insulation, or to remove the joists and form a layer of concrete over the floor slabs.
In practice, most apartment owners act according to the second option. The logs are dismantled. After this, you need to carefully evaluate the condition of the pipes - cold and hot water, sewerage. If there is damage or signs of poor condition, the interfloor section should be replaced immediately. Later, after the concrete floor has been created, repairs will cause much more problems and time.
Removing a wooden floor
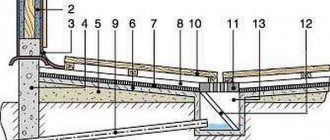
Construction of waterproofing and insulation
After the rough base for the screed is ready, they begin to create a waterproofing layer. For this you can use:
- roofing felt or glassine;
- bitumen roll insulators based on fiberglass or fiberglass;
- polymer film;
- one-sided vapor-permeable membrane.
Before spreading the rolled waterproofing material, it is necessary to carry out preparatory work. To do this, the entire perimeter of the room is taped with a special construction tape. Afterwards the coating is coated with bituminous mastic of a cold type. Some compositions will require time to dry, so it is worth warning your neighbors in advance about the need to tolerate the unpleasant odor.
After the mastic has hardened, the perimeter is glued with damper construction tape 20 mm thick and the roll waterproofing can be spread. The strips of material are placed with an overlap of 10-15 cm, each subsequent strip overlaps the previous one. Along the perimeter of the room, the waterproofing agent should extend 10-15 cm onto the walls.
The seams are processed as follows:
- when using a polymer film, the area of the edge of the strip located on the previous one is glued with wide tape;
- roofing felt and other bitumen-containing materials are thoroughly heated with a construction hair dryer over the joint area and rolled over it with a gluing roller.
It is not recommended to use floating class materials in an apartment. They require processing with a kerosene burner, which can be a problem in conditions of limited space and ventilation.
Rolled waterproofing insulators on a self-adhesive basis will speed up the work. They cost more, but will speed up the flooring significantly.
After the waterproofing is laid, insulation is placed on it. This stage of work is carried out if a heated floor heating system is being built. In other cases, it is not necessary to use thermal insulation.
Waterproofing concrete floor
This work is complex and painstaking. It is performed according to the following principle:
- Flooring film for waterproofing. It should be placed directly on the base.
- Putting up damper tape.
- Placing reinforcement on the material to protect it from water.
- Installation of beacons on top of the grid. Beacons are located at the appropriate level of the plane.
- Pour concrete solution. It needs to be positioned 1.5 - 2 cm higher than the landmark on the far wall. This is the distance by which the fill will sag. When laying the mixture, you need to move only along the guidelines.
- After leveling the entire floor surface, the screed must be left to dry. This takes from 3.5 to 4 weeks. It all depends on the substances used to make the screed. Temperature and humidity levels are also important.
- Laying lags.
- Placement of insulation.
- Laying floorboards.
READ MORE: DIY candlesticks, photo selection
Evaluation of the work list
The slab, freed from the floor, joists, construction debris and other dirt, is inspected. Level measurements are taken. A laser level is useful, which can be used to determine height differences and their nature.
Several situations may arise:
- the base is formed by several narrow slabs forming a “step”;
- there is a trough-like appearance or there is a bulge in the center of the room with a drop in height towards the perimeter;
- there is a uniform slope of the base in one direction or the other.
It is necessary not only to evaluate the work according to the level of investment of funds, but also to plan for the smallest possible mass of the screed. To do this, the concrete layer is made to a minimum thickness, placing it on backfill or lightweight mortar.
Creating a new screed
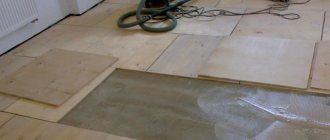
There are several ways to make a new screed. When there are slight differences in height on the rough base and it is planned to lay a wooden floor on it, then its surface can be made ideal using a self-leveling coating such as in the photo. It is able to level out minor defects and flaws existing on the base.
The technology for using dry mixture for self-leveling floors is as follows:
- The solution is made according to the instructions on the package.
- The finished mixture is poured and then leveled over the surface using a wide spatula or squeegee. In order to remove air bubbles from the solution, the coating material is pierced using a needle roller.
- The leveled floor surface is left for a while to dry and gain strength.
All materials have their own maturation period, which depends on the components included in the dry building mixture.
Then on a flat floor you can:
- lay a thin layer of insulation and lay the finish on top of it;
- lay sheets of plywood and install infrared heated floors;
- fix the wooden covering on the joists.
We recommend: Do-it-yourself installation of heated floors
A little about very old houses
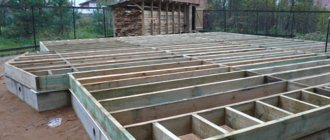
In houses where there is no reinforced concrete floor slab, there is one way to replace a wooden floor with a concrete screed: build a subfloor from plywood or chipboard. Some people recommend repairing the existing wood floor or adding additional covering.
However, in practice, such work takes a lot of time, money, and requires replacing damaged areas, removing old paint and other coatings to assess the condition of the boards.
Therefore proceed as follows:
- all flooring boards are removed;
- in houses with ceilings on beams or a metal profile, construction waste is poured between the floor and ceiling of the lower floor for sound insulation. All this needs to be removed;
- the state of the lag is assessed. If bad, they are deleted. If good, the logs are cleaned, treated with anti-mold and antibacterial agents and secured in such a way as to ensure the evenness of the plywood or chipboard flooring.
Preparation of the base for the screed begins with filling expanded clay into the interfloor ceiling on beams or I-beams. This layer will have low mass and have good sound insulation. Backfilling is carried out to the upper level of the lag. After this, they lay plywood or chipboard and operate in the same way as in an apartment.
Screed base
Laying reinforcement
Reinforcing the apartment screed is recommended, but with a layer thickness of 40-50 mm you can use the following methods:
- classic, laying a 10 mm steel mesh with a mesh size of 5 cm on the floor with a gap to the insulation or waterproofing insulation;
- using plastic reinforcing mesh;
- adding special fibers to the solution.
You can also place an aluminum mesh inside the screed. But the method using fibers is the leader in terms of convenience and rationality. This will allow:
- do not worry about the presence of an expansion gap to the waterproofing or insulation;
- lay a heated floor heating system inside the screed;
- work at high speed.
Fibers for screed reinforcement are affordable, and their use can ensure uniform strength of the concrete layer. But when constructing a floor not on a reinforced concrete floor slab, it is recommended to proceed in the classical way, using reinforcing mesh.
Mesh reinforcement
Laying insulation
We use extruded polystyrene foam with a thickness of at least 50 mm as insulation. The sheet sizes are standard 1.2 x 0.6 m.
The sheets have a “locking” device in the form of a “step”, this is clearly visible in the photograph. When laying the sheets, the locks are connected, and the surface is continuous, without cracks.
Since extruded polystyrene foam (extrusion) is completely indifferent to moisture, you can do without waterproofing. We lay the sheets, checking with a level that they lie level. Add sand in the right places and check again.
An excellent material that can be used as insulation is polystyrene foam. In this case, close attention should be paid to its thickness. For greater effect, it should be at least 60 mm.
READ MORE: How to waterproof a bathroom floor and how to do it
The insulation sheets have special locks, which, due to the tight connection, give the surface a perfectly flat state without any cracks.
Installation of beacons
Beacons on the floor on the prepared surface are installed simply: special profiles or a corner for decorating corners during plastering are placed on small mounds of gypsum putty. The evenness of the surface formed by the upper points is checked using a long building level.
If the base is poorly prepared and there is a difference in levels in certain areas of the area, the height of the putty mounds varies. The beacons must be placed at a distance of 40-50 cm, directing them along a line from the window to the door. Parts cannot be moved until the putty has completely hardened and the beacons are securely fixed.
Preparation of the solution
If you want to replace a wooden floor with a concrete screed and worry less about the pressure on the floor, you can use ready-made building mixtures. For example, KREISEL 440, 441, MZ150, which allow you to create a layer of up to 70 mm with a minimum of 35 mm. In this case, there is no need to stir the dry mixture - the composition is immediately ready to add water.
The standard approach is to use a classic cement-sand screed. To prepare it you will need:
- 1 part of cement grade M400;
- 3 parts sifted construction sand;
- 0.1 parts of lime paste, acting as a plasticizer;
- fibers for reinforcement in the quantity recommended by the manufacturer.
Before mixing with water, the dry mixture must be thoroughly mixed until a uniformly colored composition is formed. After this, they begin to add liquid, continuing to stir until the consistency of thick sour cream is obtained.
Recommendation: for quick and high-quality work, you should prepare a large amount of dry mixture in advance. As needed, you can quickly dilute it with water. If you measure out equal parts of the composition, it is easy to figure out the amount of liquid required and prepare the solution extremely quickly.
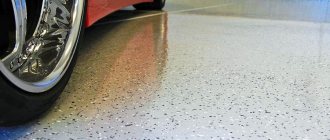
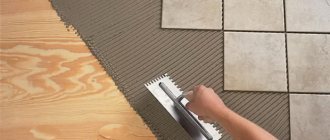
Creating a Finish Coat
In the apartment, I want to achieve maximum strength and at the same time the aesthetics of the concrete floor covering. There are several ways to do this:
- sand the floor with sandpaper;
- apply special polymer compounds or paint with paint for concrete;
- iron the surface of the screed after 3-4 days, when partial hardening occurs;
- form a thin layer of self-leveling floor.
If you plan to lay tiles on the floor, you can do without additional surface treatment. For laminate or linoleum coverings, it is recommended to carry out ironing. The most expensive version of self-leveling flooring allows you not only to obtain a smooth and even surface, but also to create an effective final coating. For example, a popular 3D floor or with graphic images.
Finishing option
The issue of creating the final coating should be considered in advance. The self-leveling floor will raise the overall level by about 30 mm, a similar situation with ceramic tiles. However, the final design can be considered as a secondary measure. As for the concrete floor itself, if you follow the given rules and methods, after complete drying in 2-3 weeks, you can create a very strong, durable coating at an acceptable cost of money and time.
Installation work
The degree of unusability of the old floor and what kind of coating you are going to use on top in the future will determine which method to choose. Let's look at them in more detail.
Restoring a wooden floor
If, when examining the boards, you come to the conclusion that the base is quite in order, and only the upper floorboards have fallen into disrepair, then you can limit yourself to only repairing or replacing the boards.
The following instructions will help you with this:
- Remove all traces of paint or varnish from the coating.
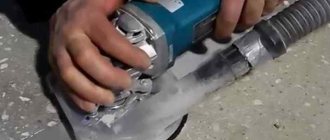
Tip: Use a sander to sand the boards. This will significantly improve the result and simplify the work.
- We examine the boards for signs of rotting, cracks and other deformations. All rejected products must be replaced with new ones.
External signs of rotting
- We inspect the fastening of the floorboards to the joists. Old fastenings with nails should be secured with self-tapping screws for reliability.
- We use wood putty to treat all possible small cracks and recesses, leveling the surface as much as possible.
- If the crack is more than five millimeters, we hammer a specially prepared wooden wedge into it.
- After finishing with putty, we go through it again with a sanding machine.
- We carry out dry and wet cleaning of the premises.
- We cover the floor with paint. varnish or any other desired coating.
Replacement of boards is completed
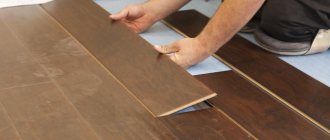
If more than 50% of the covering material is unusable, feel free to remove and discard the entire covering. It would be more profitable to completely replace the boards. Moreover, today the manufacturer offers special products with tongue and groove for such work, as shown in the figure:
Photo of a board with tongue and groove
This structure of the tongue and groove board allows the surface of the new floor to be made without through gaps, which, of course, will significantly improve functionality and durability.
Replacing a wooden floor in an apartment with your own hands is quite simple. The use of high-quality dry wood and the correct execution of the work give you a minimum ten-year guarantee on the new coating.
Complete replacement of wood with concrete
Two reasons may prompt you to decide to completely remove the tree and pour concrete yourself:
- Complete disrepair of the old covering, including the base of the floor.
- The desire to use expensive external coating materials such as tiles, parquet, laminate and others.
The most important thing about using this method is the ability to create a smooth and even surface. If you lack the skills, it may be worth considering inviting professionals to do this work. Although the cost of repairs will then be higher.
Filling can be done in three ways:
- Use prepared cement-sand mixture (CSM) for screeding.
- Use levelers – dry cement mixture.
- Make a “dry screed” using gypsum fiber sheets.
Let's carry out the preparatory work:
- We remove absolutely all the old coating.
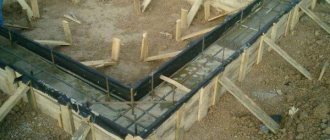
- We remove all construction debris, freeing the old screed or tiled floor.
- Lay down plastic film as moisture insulation.
Waterproofing before screed
- We glue damper tape around the perimeter. It compensates for shrinkage of the coating and increases reliability.
- We install beacons for direction.
- To level a particularly curved surface, it should be covered with expanded clay or sand.
Example of using expanded clay
- In case of increasing the reliability of the floor, we install a steel mesh.
Reinforced mesh will increase the strength of the concrete pavement
Next we pour the concrete. It’s simple and cheap to use a cement-sand mixture. The disadvantages in this case will be the long hardening time, at least 30 days, and the severity of the process itself.
Ready-made mixtures harden faster, up to 10 days, and even self-level. This greatly simplifies the work, but also increases the cost. Although if you do everything yourself and have already saved money on hired work, then this is quite a profitable option.
Dry screeding is done quickly, easily and cleanly. But it's expensive. The choice is yours.
The process of creating floors using dry screed
If the floors have not yet been changed since the purchase of the apartment, then this most likely needs to be done. However, the creaking boards are probably a reminder of this.
We recommend: DIY 3D floors step by step instructions
Depending on your budget, you can choose different ways to replace the wooden floor in your apartment. You can carry out a partial or complete replacement of boards, you can even replace wood with concrete and, again, using different methods. It all depends on your financial capabilities.
Everything is ready for applying the finishing coat.
The video in this article will introduce you to additional material.
One high-quality floor repair will save you from constant squeaking and the fear of one day failing for 10-20 years. Make up your mind!
The video in this article will introduce you to additional material.
One high-quality floor repair will save you from constant squeaking and the fear of one day failing for 10-20 years. Make up your mind!