Choosing a bathroom tray
A shower corner can be installed in any part of the bathroom. When choosing a shower tray, pay attention to the size of the area where the element will be installed.
If the bathroom area is small, pay attention to the corner elements for the shower stall. The corner option helps save space. If the area of the room is much larger than the usual dimensions, then you can install a shower element even in the center.
The design of the room itself plays an important role here. Non-standard design involves a change in layout and major renovations. Don't forget about comfort. The large area of the product increases the comfort of use. There is no need to choose a model with a size of less than 80 cm. Otherwise, taking a shower will take place at attention.
The depth of the bowl should also not be neglected. This parameter is chosen based on the physical capabilities of each resident. For example, children and older people will find it uncomfortable to get into a shower with a tray with a high side of the bowl. Nowadays, installing flat models of shower trays is in fashion. But such a fashionable innovation will be difficult to introduce in a simple bathroom, because the pipes are located slightly higher than the ceiling.
In this situation, there are two solutions:
- Purchasing a compact pump;
- Raising the floor level by 20 cm higher.
Also, when choosing a shower tray, pay attention to what material the element is made of.
Installing a sitz bath
Sitz baths are installed in the same way as regular baths, because in essence their designs do not differ much. It’s easiest with free-standing models: you just need to put them in the chosen place, align them and connect the communications. Typically, these are cast iron clawfoot bathtubs, acrylic bathtubs with doors, and sitz bathtubs made of stone and wood. But most often for small rooms they choose models with frame mounting, which are adjacent to the walls and take up minimal space.
For installation you will need:
- building level, tape measure and marker;
- metallic profile;
- metal scissors;
- drill and screwdriver;
- screws and dowels.
Step 1. The area where the bath will be located is freed from all unnecessary things, dust and dirt are removed. Check the integrity of the tiles, the evenness of the base, eliminate gaps and cracks, voids in the seams. If there are gaps between the tiles under the bathtub, moisture may seep in, and over time mold will appear, so it is better to immediately prepare the base properly.
Place prepared for bathtub installation
Advice. The bathtub can also be installed under tiles: in this case, the lining covers the joints from water and serves as an additional support for the sides. When choosing this option, the walls are finished after installing the bowl, or slots are made in advance in the tiles for the edges along the abutment line.
The photo shows the area prepared for installing the bathtub. Spaces left for mounting guides
Step 2. Place the bathtub bowl bottom up, placing sheets of cardboard or some kind of fabric under the sides so as not to leave scratches on the coating.
Freeing the bathtub from packaging
The bathtub is upside down
Now you need to attach the metal profile with legs that comes with the bowl to the bathtub. They start with the front profile: put a plastic plug on the leg, screw in a metal pin, put a nut on the pin and lower it along the thread to the very bottom. Next, put on the second nut, insert a fastening element with a hole into the guide profile, place a metal plate with the same hole on top and insert the free end of the pin. Tighten the nut until it stops, firmly fixing the leg in the profile. The remaining legs are attached in the same way.
Profiles, leg assembly
Very often, in sitz baths, the back legs rest against both the floor and the body of the bowl. If the model is asymmetrical, such a leg can only be on one side. All this must be indicated in the instructions that come with the bath. In this case, the profile is applied to the bowl at the place of fixation, then a fastening element is inserted into it, a pin is screwed in, 2 nuts and a leg with a plug are screwed onto the pin from below. On the other side, a metal plate and again 2 nuts and a leg are put on the stud. After this, the pin must be screwed in until its lower end rests against the body.
Step 3. Attach the guide profiles: lay them parallel to each other on the bottom so that there is a distance of 40-60 cm between them, depending on the length of the bowl. The distance from the edges of the bottom should be 20-30 mm. Fastening is carried out using self-tapping screws included in the kit, screwing them into the groove of the profile with a pitch of 50 mm. After the guides are fixed, take a wrench and tighten the upper nuts on the studs so that the legs do not wobble during operation.
Fastening profiles
The technician tightens the nuts on the bathtub leg
Step 4. Carefully turn the bathtub over and place it in the prepared place. They move it close to the wall, place a level on the side and set the bathtub, adjusting the height of the legs. When the bathtub is level, tighten the lower nuts on the studs with a wrench.
Installing a clawfoot bathtub
Step 5. Using a marker on the walls, mark the level of the sides around the entire perimeter, after which the bath is set aside. A metal profile is cut along the height of the bowl, from which the frame for the screen will be assembled.
The master makes markings on the wall
Step 6. Along the edges of the marking, where the side of the bathtub ends, vertical lines are drawn down on the walls along the level - this is where the outer racks of the frame will be located.
Frame posts
Performing markings for profiles
Advice. If you plan to use drywall as a screen, you need to make an indent from this line to the wall by the thickness of the drywall and finishing. This is necessary so that the screen fits completely under the side and is protected from water ingress.
Step 7. Mark the attachment points along vertical lines, drill holes in the walls and screw the profile with self-tapping screws and dowels.
Installation of frame posts
Step 8. Start connecting communications. Screw on the hoses of the mixer and shower head, install the drain pipe on the bowl, and carefully move the bathtub close to the wall. After this, the hot and cold water supply is connected through the adapters, the drain is connected and the operation of the tap and watering can is checked.
A siphon with overflow is connected, an on-board mixer is installed
Shower siphon and hose shown
Step 9. Make markings for the frame on the bathroom floor: apply the level vertically to the sides of the bowl every 15 cm, and place a mark with chalk where it rests on the floor. Then all marks are connected by a solid curved line. Take a long profile, cut the shelves on both sides with scissors to give it the desired shape. Fix the profile with liquid nails to the floor according to the markings.
Step 10. Screw the intermediate vertical posts with self-tapping screws in increments of 20-30 cm, after which they cut out the drywall and cover the frame with it. Now all that remains is to give the screen a presentable appearance, for example, by covering it with tiles or mosaics. You can immediately buy a decorative screen and save yourself some of the worries.
This installation method is considered the most convenient for acrylic and steel sitz baths, which themselves are quite unstable. You can lay the screen out of brick - this is also a very popular installation option, but it will require more time and effort. Study self-leveling acrylic for bathtubs at the link.
Gallery. Possible options for bath screens
Wooden screen for bathtub
Plastic sliding screen
Brick screen for bathtub
Tiled bath screen
Fabric curtain as a screen replacement
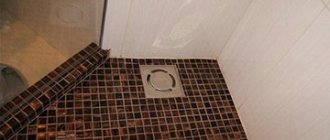
Shower tray material
Different materials are used for production. Materials affect the price of the finished product, safety, and ease of use. The characteristics of the material influence the product.
Cast iron
For shower models made of cast iron, the main advantage is the durability of the product. But this indicator is covered by disadvantages:
- Low ability to conduct heat;
- The enamel applied to the surface is quickly damaged and the element will not look beautiful after 6 months of active work;
- Heavy weight makes installation and relocation difficult.
Steel
Models of steel bathroom trays are much lighter than cast iron elements. They cost less. Models made of steel are mounted on legs that can be used to change the height.
Pallet height
This indicator can be of any size. The main thing is to choose the right option for your family. Pallets can be zero height, when they are built flush with the floor surface, or high 25-45 cm.
Regardless of the depth of the product, you should not put a plug in the drain hole while taking a shower. Tall products are not as comfortable as a shower stall. But they can even replace the bath in rare cases.
Often, trays with high sides are complemented by built-in seats. To prevent inconvenience of use, steps are made to them. Flat models come either without sides or with a small side of up to 4 cm. Such models are not very common. They were developed for people with disabilities.
Flat pallets are also used to organize original design solutions. An example of this would be an open shower without walls. The design is based only on a tray with a drain and a watering can, which simulates a continuous flow of water, as during heavy rain.
Products with an average depth are considered popular models. Basically, the height of the side is in the range of 5-20 cm. The feet will be completely in the water.
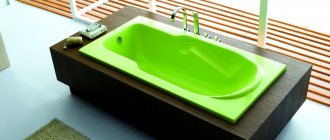
Characteristics of a sitz bath
Sitz baths cannot be a complete replacement for traditional baths, and yet, the demand for them is quite high. Manufacturers are constantly improving such products, increasing their ergonomics and adding new features, so they are very convenient to use. Bathtubs differ in shape, external design, size, materials of manufacture, and in order not to make a mistake in choosing, it is worth becoming more familiar with their main characteristics.
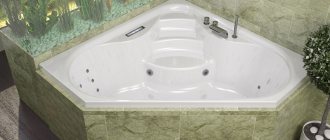
Shape and dimensions
Sitz bath - photo
The standard model is a square or rectangular bowl with a seat and low sides. This bathtub is light in weight and fits well into niches and corners because it has smooth walls. But oval and corner models, in the form of a triangle, as well as designer bathtubs, characterized by an original asymmetrical shape, are more popular. There are options with smooth and inclined sides, with a curved edge, high backs and doors.
Rectangular sitz bath
Dimensions of sitz baths:
- 70x100 cm;
- 70x120 cm;
- 70x150 cm;
- 110x120 cm.
Nowadays there are non-standard models of large sizes on sale - 135x135 cm, 140x140 cm and the largest 150x150 cm. The height of the products varies from 35 cm to 60, and models with a door have a height of 0.8 to 1.2 m. Despite their compactness, the bowls They have a good capacity - from 95 to 230 liters.
A sitz bath may have sufficient capacity for comfortable bathing
Sitz bath
Equipment
To make small bathtubs more convenient, plumbing manufacturers are expanding their standard capabilities with additional equipment:
- hydromassage systems with a control panel on the side;
- air massage installation;
- ozone sterilizer;
- special lamps for light therapy.
Acrylic sitting bathtub with door and hydromassage
Additionally, different models may have stainless steel handrails, headrests, a double flush system, a pump, and a water heating option.
Multifunctional sitz bath
The most convenient are bathtubs with a door, designed specifically for people with disabilities. Depending on the model, the doors can be located on the front or end side, opening inward or outward. The entrance height is only 15 cm, with a total height of the structure of up to 1.2 m. The internal surfaces are non-slip, there are always handrails, and the package usually includes a mixer with a thermostat and hydromassage nozzles. Such baths are ideal for older people, families with small children, pregnant women, and everyone else enjoys using them.
Sitz bath with door
Sitz bath with a door in the bathroom interior
Indications for taking a warm sitz bath
Manufacturing materials
A variety of materials are used to produce sitz baths, which significantly increases the range and allows you to choose a product to suit any style. The type of material affects not only the external data, but also the cost of the bath, as well as its strength and durability.
| Bath type | Main characteristics | Flaws |
Steel bath | The most affordable option. Steel products weigh little, are resistant to mechanical stress, and are easy to clean. With proper care, they serve for a long time without loss of external characteristics and can be restored. | The enamel coating is susceptible to chipping and microcracks, which causes corrosion of the steel case. Steel has high thermal conductivity, so this bath cools quickly |
Cast iron bath | Cast iron products are very stable, retain heat for a long time, and are not afraid of shocks and mechanical stress. They can be restored and are the most durable among all types of bathtubs | Cast iron bathtubs are very heavy, which complicates transportation and installation. A porous surface requires careful care and timely cleaning, otherwise difficult to remove stains will appear on the coating. The range of such bathtubs is quite limited |
Wooden bath | Such products belong to elite plumbing fixtures. For the production of bathtubs, valuable wood that has undergone special processing is used. They are pleasant to the touch, retain heat for a long time, look great in the interior, and are distinguished by a huge variety of shapes | High cost, the need for careful and regular care, as well as periodic treatment against fungi and mold |
Stone bath | Elite models of modern design. The most popular options are from natural and cast marble. They are distinguished by their stability, luxurious appearance, and resistance to stress. The material has low thermal conductivity, is easy to clean, can be restored, and is durable. | High price, heavy weight of products, especially those made of natural stone, susceptibility to chips and scratches. The material can absorb colored liquids and become stained, and is destroyed when in contact with acidic cleaners |
Acrylic bathtub | The most popular type. Lightweight, ergonomic, easy-to-install models of modern design. They have low thermal conductivity, are easy to clean from any contaminants, and are immune to the effects of fungi | Relatively high price, the need for a rigid frame for the bowl |
In addition to these types, there are sitz baths made of earthenware, tempered glass, plexiglass, as well as combined models.
Faience bathtub