Before starting work on laying a wooden floor, it is necessary to study the technology and methods of installing such flooring. In a house where wood was used as the main material for construction, the floors are most often made of wooden boards. This is due not only to the desire to give the home a harmonious appearance. Wood is a natural material. It gives and retains warmth, radiates comfort and fits perfectly into the interior of almost any style.
It may seem to a person without experience that the installation of boardwalks is simple and can be done independently without special preparation. Such a misconception leads to poor-quality installation of the coating, reducing operational and aesthetic characteristics.
Before you begin laying a wooden floor, you need to study the technology and methods of installing such flooring, learn some of the features and nuances.
Types of overlap and requirements for them
Overlappings can be divided into several types:
- basement;
- interfloor;
- attic;
- attic floors.
Each of the ceilings must meet a number of necessary criteria, regardless of the type and choice of material used.
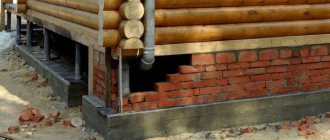
In wooden houses, the basement floor is usually arranged on wooden beams
Also read materials:
From the technical side:
- it should be as rigid as possible, while having minimal deflection;
- the design should be simple, and installation should comply with technology standards.
From the functional side:
- abrasion resistance;
- water resistance;
- hygiene;
- reliability and durability;
- equipped with hydro- and vapor barrier;
- have sound and heat insulation;
- load-bearing capacity to withstand heavy operating loads;
- compliance with fire safety requirements.
Don’t forget that each type of floor is subject to a certain load: be it the weight of people, plumbing fixtures or furniture, the floor itself or home appliances
From the aesthetic side:
- attractive appearance;
- harmonious combination with the developed room design.
Don’t forget that each type of floor is subject to a certain load: be it the weight of people, plumbing fixtures or furniture, the floor itself or home appliances. All the calculation data you are interested in are indicated in construction reference books. So, for example, for an attic floor the average load is 1500 N/sq.m, and for a basement floor it is already 2100 N/sq.m.
Floors can also be classified depending on the material used to create the floor. There are floors made of wooden beams and reinforced concrete.
A wooden floor can be made from parquet staves, boards or panel parquet. It is important to take into account that the humidity of the room where the work will be carried out should not exceed 60%.
Installation methods
There are several options for laying a wooden floor. But the three methods below are most popular among specialists and self-taught craftsmen.
- The floor is on pillars. This option is appropriate if, when making a wooden floor, there is no need to install load-bearing beams in the walls. In this case, the laid floor covering is in no way connected with the load-bearing walls. This is a kind of “floating” structure. Most often, this method is used in cases where the groundwater level is high.
- Single plank. Easy to make and use. An ideal option for country houses where you do not plan to live in the winter.
- Double plank. If you plan to live in the house all year round, then it is recommended to lay the floor in two layers: a rough layer (from a slab or uncut board) and a finishing layer from tongue-and-groove boards.
Wood floor repair
Repairing old wood floors begins with identifying creaking floorboards and joists, as well as those parts of the structure that are covered in mold. Defective parts found are replaced with new elements. The entire floor area is treated with an antifungal agent. If certain areas of the floor in the room are more often exposed to moisture than others, then they should be covered with waterproofing materials, since antifungal impregnation alone will not be enough.
Often, cracks form in wooden flooring due to drying out of the wood. You can eliminate them as follows:
- The floor is treated with a sanding machine.
- The cracks are sealed with a primer and another layer is removed with a sanding machine.
- The boards are primed with nitro varnish.
- After the nitro varnish dries, it is primed with a finishing coat (matte or glossy).
Floor on support pillars
First you need to remove some of the soil underground. To do this, remove the soil in the underground space at least half a meter deep. Fill the resulting cavity with gravel, crushed stone or river sand. Moisten each layer with water and compact thoroughly. As a result, the level of the filled material should exceed the ground level near the house by twenty centimeters.
We begin installing the support pillars only when the backfill is ready. Red brick is most suitable for this purpose. Please note that different sections are required for different design heights: the higher the support, the larger the section. A column up to 25 cm high should have a width of one and a half bricks, more than 25 cm - two bricks. If possible, install concrete pillars 40x40 or 50x50 centimeters.
We begin to place support pillars around the perimeter, controlling their height using a level. Afterwards the posts are installed inside the house. The installation step of brick supports along the axes varies from 70 to 90 cm. The distance between the rows is 100-120 cm.
In a small country house there is no need to install internal pillars. Sufficient strength of the floor will be provided by beams of the appropriate section.
We lay two layers of roofing felt or roofing felt on the ends of the brick pillars for waterproofing. Don’t forget about the wooden lining, the thickness of which should be at least three centimeters. Please note that logs made from pieces of wood or timber rest on a layer of waterproofing. If there is a need to connect beams, then position them so that their joints are on the support pillars.
Next, using wedges or wooden spacers, we level the joists using a level. We fix the spacers and wedges with nails only when the sheathing is ready. Do not forget that the distance between the logs should be 60-80 cm. This parameter depends on the thickness of the boards.
Now you can begin installing the floor. Place the boards in the direction of the light that falls from the window. Where there is no natural light, for example in corridors, boards are nailed in the direction of movement. Lay the first board on the joists, leaving a gap of 10-15 mm. Later you will cover it with a plinth. This must be done to ensure air circulation in the underground.
Installing a floor on support pillars is reasonable if the house is heated in the cold season
Use nails to secure the floor. Their length should be two and a half times the thickness of the board. They should be driven in at an angle. Having tightly joined the boards, install a nail at a 45° angle in the lower part of the groove and nail the beam. The nail head needs to be “sunk” into the wood. After puttying and painting, the nails will not be visible.
When the installation of the floor is completed, do not forget to nail temporary skirting boards at the opposite walls of the room, and at the other walls - regular ones. Temporary skirting boards help air circulate. Leave them for the logs and boards to dry completely. Afterwards, the temporary ones can be replaced with regular skirting boards.
Installing a floor on support pillars is reasonable if the house is heated during the cold season. Otherwise, the room remains without heating for a long time, the soil in the underground freezes, and this often leads to displacement of concrete or brick columns. To avoid this, fill the underground space with slag, leaving a small layer of 5 cm.
Wooden floor technology: load-bearing floor design
Wooden floors have many advantages: they are distinguished by elasticity, noiselessness, and warmth. They are attractive in appearance, non-slip and easy to repair, which is very important, since a considerable number of seams and the risk of cracks are their constant “fellow travelers”. The key to durability, strength and evenness is competent and high-quality preparation of the base.
The technology for installing a wooden floor is primarily determined by the supporting structure. With all their diversity, they can be classified into two types: by screeds (monolithic or prefabricated) or separate by joists.
Installation of floors on a concrete base
Installing a wooden floor on concrete involves performing a certain type of work.
Determination of screed moisture
The concrete base must be sufficiently dry - the standard humidity is less than 3%.
The boards can be installed on a fresh screed within three months at the earliest.
There are special portable devices for assessing the moisture content of concrete. However, you can check the condition of the screed, albeit with some error, in a very simple way. A polyethylene film (1x1 m) or a square of transparent plastic (30x30 cm) is hermetically glued with tape to its surface and after 24-48 hours, checked for the presence of condensation on the inside or a dark wet spot on the concrete. Minor or no condensation, as well as stains, allows you to begin laying the floor.
Leveling the base
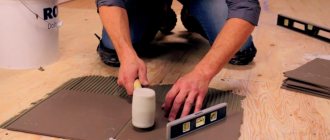
Uneven surfaces can cause floorboards to squeak or sag. To check the level of inclination and evenness, use a 2-meter strip and a building level, which are applied to the concrete surface in several places. The level will indicate the slope, and gaps under the rail will indicate low areas.
Small defects, elevations and depressions can be eliminated very simply:
- low - leveled with bulk mixtures;
- High areas are removed by grinding.
Vapor and waterproofing device
The finished screed is treated with a primer. It performs two functions simultaneously: it impregnates and envelops the surface, and creates a vapor and waterproofing barrier. If the cement-sand layer is well dried, then a one-component polyurethane primer mixture is used as a primer, and for new or insufficiently dried ones, a 2-component epoxy mixture is used, which is applied in several layers. Work continues after the primer has dried.
Some people prefer the more traditional method of waterproofing using roofing felt or polyethylene. The insulation sheets are laid on concrete with an overlap of at least 10-20 cm and glued together with construction tape or mastic. If rooms located below the floor have high humidity, it is better to lay the insulation in two layers, using bitumen mastic.
It is also recommended to install a wooden floor with insulation and sound insulation. Additional advantages are that they are pleasant to the touch, warm and prevent the spread of extraneous noise. Thermal insulation is quite simple:
- if the floor is laid on plywood, then materials such as foamed polyethylene are used;
- When installing logs, insulation is placed between them, say, mineral wool slabs.
What the next step will be is determined based on the chosen mounting option.
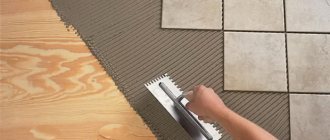
Floorboard gluing technology
It involves laying boards directly on the screed. Perhaps this is the simplest and most widespread technology in the world today. This technique is perfect for private sector buildings, new buildings or any others where there is no need to raise or level the base.
Among the advantages of this design it should be noted:
- this technology is much cheaper than any other method;
- there is no loss in the height of the room, since the floor rises only by the thickness of the wooden covering;
- Anyone can assemble it, its installation is so simple;
- This type of construction is ideal for installing “warm floors”.
An adhesive is applied to the concrete surface, for example, a one-component elastic polyurethane adhesive modified with silane.
The second layer is laid with polypropylene or polyethylene film, at least 10 mm thick. To ensure the required thickness in the case of a thin film, it is spread in several layers, which must overlap each other. Along the perimeter it is necessary to ensure that the film extends slightly onto the walls.
The film is covered with glue on top, on which the flooring material is laid. The wooden floor is exposed with varnish, oil, paint, etc.
What to pay attention to during installation
- the base should be smooth and durable, without cracks; the permissible deviation is 3 mm for every 2 square meters. m;
- It is not recommended to use leveling mixtures for leveling, since it is possible that they are incompatible with glue, which can undermine the reliability of the structure;
- for better fixation over the coverage area, use a load;
- Between the coating and doorways, walls, thresholds and columns, expansion gaps of 1.0–1.5 cm are required; they are filled with a cork compensator.
To ensure sound and heat insulation, it is necessary to lay an additional layer of insulation - most often it is technical cork or isolon. It is located directly under the floor covering on a polypropylene film coated with glue.
Laying on plywood
To level the base, use 12–18 mm moisture-resistant plywood or OSB boards. Standard sheets are cut into strips (40–80 cm wide) on the smaller side and laid diagonally to the future direction of the coating, leaving gaps of approximately 4 mm. The fragments are glued and then fixed to the screed: either using self-tapping screws or shooting with dowels. Before laying the wooden floor, the plywood sheet is roughly sanded and cleaned of dust.
Advantages and features of the technology
- used to equalize deviations in height up to 10 mm;
- this leveling method is much cheaper than using leveling mixtures;
- This way you can equalize the floor height in different rooms.
During installation, you must adhere to the following instructions:
- the thickness of the layer of plywood or OSB boards should be at least equal to the thickness of the boards laid on top;
- To increase adhesion, the surface of the sheets is sanded and primed.
Laying on joists
In cases where the horizontal deviation is more than 1 cm, a more complex technology is used - laying on logs, which are installed in increments of no less than 50–60 cm.
Attaching the log to the base can be done in several ways:
- using screws and dowels - their heads must be “recessed” lower than the surface level by 3-4 mm;
- gluing - for this purpose adhesive or bitumen-containing mastics are used.
- on soundproofing pads, preferably made of fiberboard.
Thanks to this design it becomes possible
- installation of additional thermal insulation with laying of insulation between the logs;
- leveling the base with a significant difference in height;
- avoid the process of leveling the concrete surface itself.
This design, however, reduces, and significantly, the height of the room.
A more advanced technology is the use of adjustable joists in the floor structure, in which the installation height is changed by simply rotating the bolt.
© 2021 prestigpol.ru
Single plank
You can make it in two ways:
- boards are nailed to the joists, installed on top of the beams;
- the boards are nailed onto the support beams.
The second option is possible if the plank floor is laid on support pillars, the distance between which is 80-100 centimeters. In this case, the ends of the pillars can be placed directly on the support beams and tongue and groove boards can be attached to them.
If you are going to embed beams into the walls, then leave more space between them. The laying of logs is required, for which beams are used, measuring 5 x 5 or 6 x 6 cm. The thickness of the tongue and groove board determines the pitch of the cladding. For example, if the flooring board is three centimeters thick, the logs are located at a distance of up to fifty centimeters from each other. With a thickness of 4 cm, this distance increases to 50-60 cm.
The surface of the sheathing, of course, must be flat. Otherwise, installation will be quite difficult. Use wooden spacers and wedges to level the joists. Fix the sheathing parts with nails.
In general, the installation of a single floor is performed on top of the logs. Tongue boards are used only if a finishing option is planned. An unedged board is also suitable for roughing.
It is worth saying that fastening a single floor is no different from fastening a floor on support posts: boards folded across the joists are fixed with nails.
The subfloor can be covered with laminate or linoleum. The final version must be scraped and varnished.
This method is considered the simplest, fastest and most accessible. But it has low thermal insulation characteristics. Therefore, for convenience, it is preferable to install a double floor.
The installation of a single floor is carried out on top of the logs
Material selection
The final result depends on how good the material you purchase. Traditionally, consumers prefer softwood floors. This is explained by the fact that price and quality are best correlated here.
But this does not mean at all that other material cannot be used. Floors are made from cedar, larch, fir, oak, and walnut. True, this is a completely different price range.
However, the aesthetics of such floors are also higher, since these types of wood have a unique color and a beautiful fiber structure, which appear in a special way after being coated with colorless natural varnish.
Therefore, what types of wood can be used largely depends on the consumer’s wallet. Almost any wood is suitable for installing subfloors.
When choosing a material, you need to pay attention not only to the type of wood. The wood must be prepared for installation, i.e. have a certain degree of humidity. Experts recommend focusing on 16%. If there are significant deviations in both one and the other direction, then deformation of the coating is inevitable.
Double floor
Consists of finishing and rough flooring.
- First, beams are placed on the cranial bars. Uncut boards are placed across them. The thickness of the lumber is 15-45 millimeters. To save money, you can use slabs or low-grade boards, pre-treating them with an antiseptic. In this case, it is preferable to use coniferous species.
- When we work on the rough layer, we fit the boards tightly together. Afterwards we lay the insulation. It can be a mixture of sawdust with clay, expanded clay. You can also use the “warm floor” system.
- After the thermal insulation materials, tongue and groove boards are laid. It should be taken into account that there should be a gap of 10-15 millimeters between the thermal insulation and the finishing layer.
- The tongue and groove boards are fixed to the joists and bars using nails. Use the same technology that was used in previous options.
- To ensure underground ventilation, make small holes (5-6 cm) in the corners of the room. They can be decorated with decorative grilles. It is advisable to raise the grates one or two centimeters above the floor level to avoid the entry of unwanted moisture.
Double flooring consists of finished and rough flooring
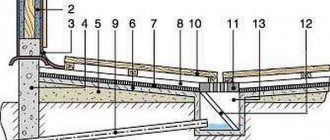
Remember that the installation of floors in the interfloor ceiling and above the basement floor is different.
Insulation
Once the logs are secured, it is necessary to carry out work that will subsequently help you save a lot of money and make living in your home much more comfortable. We are talking about insulation, hydro- and vapor barrier.
Waterproofing will extend the life of your flooring and help avoid conflicts with neighbors in the event of unexpected flooding. Insulating the floor will help maintain optimal temperature in the house and help save on heating costs.
A budget option for insulating floors on the ground is a mixture of sawdust and clay in a ratio of 3 to 1. For the same purpose, you can use expanded clay, which is poured in an even layer over the entire area and serves as a good heat insulator.
In addition, the modern market can offer other insulating materials. For example, basalt mineral wool slabs, extruded polystyrene, polystyrene foam. And on top all this can be covered with foil heat insulator.
Floor insulation is an important part of the device
Installation of floors on the first floor
This is done in several ways:
- warm floor with cold underground;
- cold floor without heating;
- cold floor with warm underground.
A cold floor without heating is often used with a high base and dry soil. In addition, the groundwater level must be low. In cross section, such a floor looks like this:
- the first layer is construction waste, which does not contain organic materials, or compacted sand;
- the second layer is compacted clay, dry calcined sand, slag, aged for three years;
- third layer – logs;
- fourth layer – plank flooring (recommended thickness – 30 mm).
A warm floor with a cold underground is appropriate when the groundwater level is high. Here, the support is provided by brick pillars with a height corresponding to the height of the base. We also advise you to read the material on how to install a wooden floor on joists.
Floors supported by floor beams
The algorithm for executing this option is as follows:
- The base in the form of logs is attached to the floor beams. The latter are mounted on a strip or columnar foundation. This method is acceptable when the size of the room in which the floor is laid does not exceed two and a half to three meters.
- If the width of the room exceeds three meters, then additional columns must be installed in the space between the walls to impart rigidity to the ceiling system. All surfaces used as supports for beams must be waterproofed to prevent the wood from rotting.
- The logs are fixed on the mounted floor beams.
To calculate the gap between them, you need to refer to the table:
| Width and height of the end part of the log (mm) | Distance from one support point to another (m) |
| 110 x 60 mm. | 2 m. |
| 150 x 80 mm. | 3m. |
| 180 x 100 mm. | 4 m. |
| 200 x 150 mm. | 5 m. |
| 220 x 180 mm. | 6 m. |
- If you have to use non-solid logs, then at the place where they are combined it is necessary to overlap in such a way that their overlap with each other is at least four hundred, and preferably five hundred millimeters. Moreover, the connection point must be located on the beam or the ends of the support posts. The upper plane of all logs is set strictly according to the level, which must be verified using special tools.
- After adjusting the joists and fixing them, it is recommended to install a subfloor from second-class raw materials. To install them, a tiled block measuring 30 by 50 mm is attached along the entire length of the log on both sides.
- Attaching the subfloor boards to the tile blocks is completely optional. They can simply be laid tightly, and a vapor barrier film is laid on their surface, which is fixed with a stapler.
- Insulation material is placed in the space between the joists, on top of the vapor barrier. It can be slag, expanded clay, or mineral wool. Moreover, the latter can be produced both in the form of mats and in a roll version.
- All this is again covered with a vapor barrier film, connected using tape and fixed to the joists using staples. This is necessary to prevent insulation particles from entering living spaces.
- Finally, either floorboards or sheets of thick plywood are laid.