Types of mosaic concrete floors
The product is produced both in a classical style and expresses the trends prevailing in a particular historical period. Ancient Roman or medieval motifs of the Renaissance - Empire, Baroque, Rococo - are considered classic. Modern trends reflect: • modern; • minimalism; • Art Deco; • liberty.
The most modern technologies have found their application in high-tech design, where fiberglass materials are introduced.
The note! Today, terrazzo mosaic concrete flooring is successfully used in the manufacture of staircases, countertops and shower trays.
In addition to design, surfaces differ in the type of origin of the material, the size of the additives used, and their color. The most ancient surviving technology for mosaic floors is considered to be laying using the “pastellone” method. It was introduced into use by Venetian builders in the 15th century. It is called so due to the use of warm colors - red and yellow. Sometimes you can find green pastellone coverings made from clay mass, which is mined in quarries near the city of Treviso.
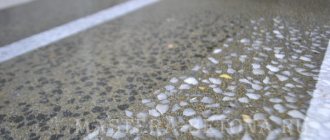
Classic style terrazzo has been produced for about 200 years. This is a mosaic floor made of marble chips of different fractions and shades. The principle of installation is to fill the base with coarse stones and the surface with small ones. The classics are decorated with plates of expensive marble, glass, mother-of-pearl mosaics and white pebbles. Huge patterns and ornaments reminiscent of carpets attract attention. This is directly self-leveling terrazzo mosaic floors .
Another type of flooring is palladin terrazzo, named after the Italian architect Palladio. A distinctive aspect of the method is the use of large fragments of stone, similar to Roman irregular masonry. This is how pavements were made in ancient Rome. Gradually, the type of laying mosaic floors adapted to interior spaces. Gained popularity in the 60s of the last century.
Sanding mosaic floor
You can grind the surface when there is no likelihood of potholes appearing. This time comes a week after pouring. First, the floor, previously moistened with water, is treated with coarse-grained diamond wheels to remove the cement layer and reveal the marble filler. The first stage is called stripping. Its task is to process the coating until sections of the mosaic floor covering appear.
The note! The grinding depth is 30% of the filler size.
Using synthetic diamond will cause scratches. They are removed in segments of abrasive materials. The shells still remain after sanding. Grouting is done with a cement mortar similar in color and composition to the main shade. Small pores are eliminated with dry painted or unpainted cement. Before polishing the marble mosaic floor, water is supplied to the equipment. It should cover the entire treated surface under the segments with a thin layer. As a result, the surface should be smooth and matte.
Polishing mosaic floor
Processing with abrasive materials still leaves behind small scratches and cracks. They are puttied to match the color of the floor. When the putty has dried and hardened, begin polishing. It is carried out using soft materials such as felt. The machines are equipped with mechanisms that, due to high rotation speed, create the required level of specularity. If it appears, it means that the scratches visible to the eye have disappeared. After polishing, remove the dust and sprinkle the floor with sawdust. They absorb the remaining sludge.
DIY mosaic floor
A concrete mosaic floor is quite easy to make with your own hands if you follow the technology for performing the work. In this regard, it is advisable to consider the sequence of laying the mosaic covering.
Preparatory work
The concrete slab needs to be put in order.
Before starting work, you need to carry out minor repairs to the slab: seal all the cracks, cracks, and depressions with cement mortar.
Surface preparation steps:
- To ensure high-quality adhesion of the solution to the concrete, clean the surface from dust and moisten it generously. We expand large cracks with a grinder, clean their edges, and seal them with cement-sand mortar prepared in a ratio of 1:3. Leave until completely dry.
- Using a metal manual or electric brush, we pass over the entire plane of the base to give it a rough structure. This will ensure better adhesion to the concrete mortar.
- We clean the base of the stove from dust using a vacuum cleaner.
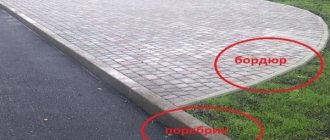
- We install guide beacons strictly along a horizontal plane to indicate the level of filling of the floor. When using a single-color solution without ornament, we install the beacons in increments of 1-1.5 m. If the project provides for the creation of a floor with a pattern, then we highlight the contours of the ornament with guides made of aluminum, glass, or plastic. We fix the beacons to the concrete mortar or bury them in the screed.
The upper boundary of the guide beacons must be in the same horizontal plane with the floor.
Preparation of the solution
Before preparing the solution, wash the stone chips. If you use a contaminated mosaic, it will not adhere well to the concrete and will fall out of the base during use. To learn how to apply an ornament to a concrete base, watch this video:
To lay the starting layer of screed we use hard cement mortar grade M 150.
To form the finishing layer, a solution is used, which includes:
- cement M 150 is used for crushing rocks of medium hardness, M 300 for mosaics from hard rocks and in the case of adding pigments;
- stone chips and flour;
- coloring pigments should make up no more than 10% of the cement mass.
The proportions for preparing a solution with stone chips are shown in the table:
| Components | |||||
| Coverage compression class | Cone draft | Stone chips | Cement | Sand | Water |
| At 60 | 2-4 cm | 1,7 | 1 | 1 | 0,4 |
| At 55 | 2-4 cm | 2,4 | 1 | 1,4 | 0,5 |
| At 35 | 2-4 cm | 3,4 | 1 | 2 | 0,65 |
The finishing solution should be hard, dense and poorly mobile.
We check the quality of the solution by holding it in a fist. In this case, the mixture should not seep between your fingers, but should crumble. The solution is prepared in one volume for the entire room. To do this, first mix the dry ingredients, and then add them to the water and mix well.
To ensure that the mosaic coating is evenly distributed, we pour mixed mosaics from fractions of different sizes into the concrete mixture.
We introduce enough crumbs into the solution so that, as a percentage, the stone chips occupy 75-85% of the area, and the cement - 15-25% of the base surface.
Filling the coating
To lay the bottom layer of the screed, prepare a regular cement mortar in a ratio of 1:3. Fill the screed, level it in a horizontal plane using a rule, remove air bubbles with a needle roller. Watch the master class on pouring the floor in this video:
Step-by-step instructions for installing the finishing layer:
- The finishing mosaic layer is poured after the screed has set a little, but has not completely hardened.
- According to the pattern, pour the finished mixture into the cells to the level of the guide beacons.
- We level the solution using a vibrating device or a rule; it must be well compacted so that there are no voids left in the coating. We remove the laitance with a rubber scraper to avoid the formation of a cement film on the mosaic base.
- We take out the guide beacons and fill their locations with solution.
To prevent cracking of the layer, until the surface is completely dry, cover the base with plastic film. Once a day, remove the film, wet the surface and cover again.
How to repair a mosaic floor?
After some time, the floor covering loses its appearance, and sometimes destruction processes are observed due to different strengths of the filler and the binder component. Chips, cracks, and cavities appear. Today, the industry proposes to reconstruct the surface using the “polished concrete” technology. This method is much more profitable than replacing it with porcelain stoneware or even linoleum.
Reconstruction involves re-grinding and polishing. After shine appears in areas where the mosaic has peeled off, the old layer is removed and a new mosaic mixture is applied. Cracks are also cut out or sealed with repair compounds. Often, dismantling mosaic floors and restoring them using modern repair materials is much more profitable than installing new ones.
Mosaic floor tiles
Today, the range of mosaic tiles is very diverse. It is made from: • natural and artificial stone; • ceramics; • smalts; • glass.
The most common one is made from ceramics. It is durable, beautiful and affordable. Prices for decorative mosaic tile floors are very affordable. Anyone can buy it. Stone or porcelain tiles are already more expensive. Marble tiles are used only for decorating public places.
Decorative elements are different and differ in shape, size, texture. The modules have a characteristic color. They are classified as follows: • plain; • color stretches – transitions with high contrast; • mixes – shades that differ from the base color; • panels – drawings, ornaments, compositions. Ceramics are used for laying mosaic tiles on the floor in bathrooms, swimming pools, and bathhouses. This is due, first of all, to the requirements of sanitary and epidemiological services. The beautiful images that can be created today with mosaics are now being carried from shower rooms into living rooms and bedrooms. The tiles are very suitable for insulated floors.
A serious advantage of the product is the relative simplicity of its installation. Anyone without special training who has the skills to work with solutions, levels, and beacons can install a tiled mosaic floor with their own hands. Installation is facilitated by factory fixing the modules in small blocks on mesh or paper.
Types and features of mosaic floors
Laying mosaic floors occurs only at the finishing stage. The base of the floor is a concrete floor. The main requirement is a perfectly flat and durable surface. What can you use to make a mosaic with your own hands? There are several types of mosaic floors:
- Natural stone: lapis lazuli, marble, slate, onyx, etc. are used for flooring. Due to the original pattern of the stone, the floor acquires a unique appearance. Often the material is sanded or polished to achieve a higher shine. The stone can be given different shapes: oval, square, circle, rectangle.
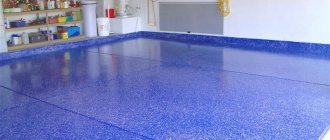
- Glass or mirror mosaic: quartz sand mixed with tint ingredients looks truly impressive after processing. The most common mosaic shape is the square. The area of application of glass coating is the bathroom, swimming pool, living room. Mirror mosaic is mainly used as wall decoration.
- Metal mosaic on the floor includes steel, pieces of aluminum, bronze, and copper. More luxurious decorative elements: gold, platinum, silver. Places for laying such a coating are not limited, since the level of strength is very high.
- Ceramic mosaic tiles: The most common type of mosaic flooring. The color palette is very wide, and due to the durability of the mosaic surface, you can select any texture: relief, cracks, stains, etc. Excellent for finishing swimming pools and living spaces.
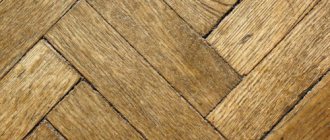
- Wooden mosaic: walnut, birch, cherry, ash are used to fill the floors. Wooden elements add a warm tone. The mosaic is coated with water-repellent impregnation, so it can be used in the kitchen and bathroom.
Cost of mosaic floors
The price of laying mosaic tiles on the floor includes: dismantling, preparing the base, pouring the layer and finishing coating. Prices per 1 m2 (in rubles): • dismantling of old covering – from 500; • screed device for the base – 385-650; • filling of the top layer – from 500; • laying mosaics without a pattern – 1200, with a pattern – 2200.
To order a contractor, you can find a company and make an agreement by phone, online or in person in the office. The master visits the address to assess the amount of work. After the conclusion of the contract, the tilers begin to perform their duties.
Mosaic floors made of marble chips technology
floor preparation
Do-it-yourself mosaic paintings are a long but interesting activity:
- On colored paper you need to draw any pattern for a mosaic with your own hands, which will later be made from tiles.
“The main thing here is to choose a simple image, since it is very difficult to cut out small, sinuous details from ceramic.”
The picture must be identical in size to the area of the floor on which the mosaic will be laid.
- Next, cut out the elements and attach them to white paper. You can get creative by arranging the details in a bizarre way. At the end of the experiment, you need to use felt-tip pens to supplement the drawing with decorative parts: a patterned edge, lines stretching towards the image, etc.
- Using a carving tool, draw a center line along each colored ceramic tile and break the pieces in half.
- Then you need to divide the tiles into small identical cubes so that their number completely covers the invented image. The same needs to be done with porcelain and several black tiles (for the outline of the design).
- After cutting out the tiles, you need to lay out a similar pattern on a thin, flat surface (“later it will become the back side of the mosaic, which will be attached to the concrete floor”). For volume of the image, pieces of tiles of a darker shade should be laid out on one side. The entire pattern should be outlined with a dark tile outline.
- For the background you need to cut white tiles. Any shape, the main thing is that they evenly fill the surrounding space.
- After laying out a small area of the drawing, you should fasten the cubes with contact paper. To do this, you need to remove the protective layer from one side and carefully apply it to the mosaic so that no bubbles form.
- If desired, you can make a boundary border from dark pieces of tile located along the edge of the image.
- Using a knife, you need to cut the mosaic coating into separate large parts. This is necessary for laying the resulting mosaic on a concrete floor. The fragments can be anything, as long as they are convenient for laying on the floor.
- Using a spreader, you need to evenly apply the adhesive to the concrete and immediately place the mosaic fragment on top. And so on until the entire image is transferred to the floor. Drying time – 12 hours. After this, remove the contact paper and rub the mosaic with adhesive, and remove excess composition with a damp sponge. After 2-3 days, you need to polish the surface of the mosaic floor with a cotton cloth.