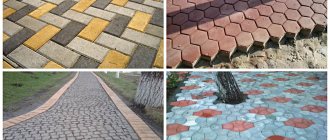
Types and recommendations for selection
The question of choice is most often based only on the financial capabilities of the owner of the site, since good paving slabs are expensive, and cheap ones are short-lived and not very beautiful. The modern building materials market offers a classification of its main types according to the raw materials, that is, made from:
- natural hard rock;
- natural stone of soft rocks such as sandstone or flagstone;
- artificial stone;
- ceramics and other firing materials;
- colored and monochrome concrete;
- polymer sand mixtures.
Most often, individual developers purchase tiles made from colored concrete mixtures. This material is affordable and sold in almost any hardware store.
High-quality colored concrete tiles are made by vibration casting or vibration pressing. Piece products made by vibration casting are distinguished by bright colors and a smoother surface. Vibration-pressed material is more durable and frost-resistant, but not as bright.
Stamped tiles are also sometimes offered. Be very careful when purchasing it, as it is most likely a low-quality material made in an artisanal way.
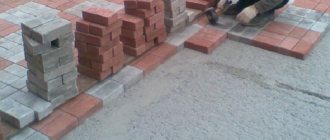
A very important issue is the thickness of the material, which you must decide on before laying paving slabs with your own hands. For pedestrian paths on a personal plot, a thickness of 40 mm is recommended, and for a car park - at least 60 mm.
If you decide to pave the sidewalk on the street along your site, then use 60 mm tiles, and for the road (but this will be too noble on your part) you need to take 80 mm thick products.
Technology for laying paving slabs on a prepared base
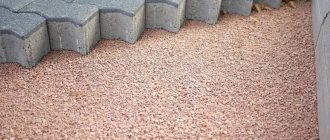
Laying tiles on a sand base is the simplest and most economical installation method . The boundaries of the paving are marked with beacons - boards or metal guides. A sand cushion is poured onto the geotextile and leveled. The base level should be 1-1.5 cm higher than the design level. After compacting with a vibrating plate, the sand is generously moistened with water, but so that it is not too wet, and the entire volume is leveled using the rule.
Lay the tiles exactly on the base and tap them lightly with a mallet. If the tile begins to collapse, then sand or dry mixture is added to this place.
Basic installation rules
- Laying is always done “on your own”, so as not to damage the leveled base and already laid tiles.
- The laying moves from the lower level of the path towards the elevation.
- If a circular pattern is laid out, then the beginning is taken from the center.
- Installation usually begins from a place that will immediately fall into the field of view of an entering person: from the entrance to the house, etc.
- The tiles are laid out not in even rows, but diagonally, in which case it is easy to level the horizon of the canvas. The horizontal line is checked periodically along the first line of the tile through several rows.
- Gaps 2-3 mm wide are left between the tiles to drain moisture.
- If trimming is planned, then first a whole tile is laid out, starting from the curb or storm drain (with the exception of clover-type tiles).
- If it is not possible to install a curb stone at the end of the paving, then the last two rows of tiles are laid out on a concrete mixture.
Back to Contents
Materials required for installation
Before laying paving slabs with your own hands, in addition to it, you need to purchase such materials as:
- stone or plastic border;
- cement grade PC400;
- crushed stone, fractions no more than 40 mm;
- sand, preferably river or washed;
- geotextiles.
The required amount of these building materials is determined separately and directly depends on the base design, type of soil and expected operating conditions.
Suitable materials
Not every tile is laid outdoors. If there are no special restrictions on the use of tiles in the interior decoration of the house, it is important to choose the appropriate material for the exterior. The best option is clinker and porcelain stoneware. If the load is insignificant, select a particularly durable type. For sidewalks and parking lots, it is better to give preference to stone or standard street tiles.
In order not to make a mistake with your choice, check that the product you like meets the following criteria:
- moisture resistance;
- low porosity;
- resistance to temperature changes;
- immunity to frost;
- resistance to abrasion, pollution, shock;
- high degree of strength and maximum permissible load;
- no negative interaction with ultraviolet radiation.
Moisture and frost resistance are the main selection criteria
Tiles are laid in different ways. The further acquisition of auxiliary materials depends on the chosen technique. For sidewalks, cement and sand are sufficient. If we are talking, for example, about porcelain stoneware, make sure you have a strong and high-quality adhesive mixture. The basic requirements are based on almost the same parameters:
- immunity to frost;
- resistance to thermal fluctuations;
- moisture resistance;
- strength;
- withstands exposure to ultraviolet radiation.
Pay attention to ductility, adhesion and other properties that are important for tile mortar.
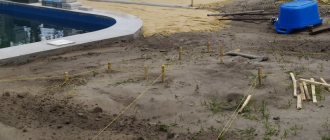
Marking future paths
It is recommended to take a copy of the site plan with buildings, trees, flower beds and other landscaping elements marked on it. Draw a diagram on it. This will be the instructions for laying paving slabs, which you will continue to work on. When drawing up such a scheme, the direction of the slopes should be taken into account for the free flow of water from the paths.
When deciding on the width of the paths, it is necessary to ensure that 2 people can easily separate on it. Typically this value is 1.0 - 1.2 meters.
In the case of a car passing, the possibility of a person being present is also taken into account, who should not be forced to leave the paved surface.
Marking and excavation of soil.
The marking is carried out according to the drawn up plan using a tape measure and a cord, which is pulled along the pegs hammered along the planned path. When pulling the cord, it is necessary to add 10 cm to the width of the path on each side, with a gap for the subsequent installation of curbs.
Excavation and protective layer
The volume of work performed depends on the density of the top layer.
If the surface is dense clay or any other similar soil, and therefore it is planned to import bulk soil, then preparing the path for laying tiles comes down to simply leveling the surface. In all other cases, it is necessary to remove 30-35 cm of the surface layer along the entire marked perimeter.
It is necessary to add a thin leveling layer of sand to the bottom of the trench and compact it well along with the soil. This underlying layer will then need to be covered with geotextiles, which will prevent the germination of weeds, allow water to be drained from the drainage layer and prevent the penetration of groundwater rising in the spring.
The geotextile strips are laid out in such a way that adjacent sheets overlap by 15-20 cm, and at the edges of the trench there is an upturn of at least 20 cm. In this case, the technology for laying paving slabs with your own hands will be fully followed, and the result of your work will be incomparably better quality .
Features of laying paving slabs
The most important thing before laying tiles is preparing the soil for installation of the coating.
Features when forming the base
- If the soil is soft in structure (clay, fine sand) or mobile (periodically washed away by sewage or melt water), then before laying it will be necessary to concrete the area to avoid deformation during operation and grass germination.
- On terrain consisting of black soil, loam, gravel or stones, you need to remove the top layer and replace it with coarse sand (for paths) or crushed stone (for parking).
- To prevent mixing with other materials, it is necessary to cover the base with geotextiles, the edges of which should extend onto the side walls of the pit.
- Layers of sand or crushed stone must be applied sequentially with a thickness of 10 cm to 15 cm each, compacting the previous one using a vibrating plate.
- Never carry out work during or immediately after rain! The soil should dry and absorb excess moisture.
- Even on flat areas it is necessary to make a slight slope to drain the wastewater. It is also recommended to install storm gutters between the curb and the main part of the paving and storm water inlets.
Necessary for the work
- Base materials (cement, water, sand, crushed stone), tiles, curbs, storm drains.
- Tools: string, pegs, rubber mallet, plastering rule, level (preferably laser), vibrating plate, trowel, shovel, stiff brush.
- For cutting tiles - a grinding machine.
Back to Contents
Drainage device
A layer of crushed stone 15-18 cm thick is poured onto the compacted bottom of the trench, lined with geotextile. It will serve as drainage for collecting and discharging melt and surface water. The presence of a drainage layer will prevent possible accumulation of moisture at the base of the path and subsequent swelling if the soil freezes.
The crushed stone should be compacted well and sprinkled with a thin layer of sand. A second layer of geotextile should be laid over the drainage. It will allow moisture to pass down, preventing it from returning.
Stone products are fixed with mortar, and plastic ones are fixed using the wedges included in their delivery.
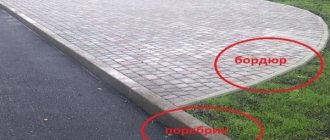
Placement of boundary borders
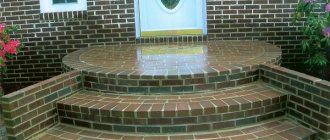
At the next stage of work, curbs are installed. For this you can use almost any materials. External fencing of paths is made of stone, concrete, plastic, brick, wood, slate and any other flat materials.
The traditional option is a ready-made concrete curb. Recently, manufacturers have offered several types of plastic borders on the market, which are characterized by durability, low cost and ease of installation.
The border is installed after the installation of the drainage layer.
Types of bases used
To install pedestrian paths on the site, one of three possible types of support base is used:
- concrete;
- cement-sand;
- from compacted sand.
Concrete foundation is the most expensive, and therefore it is advisable to use it only in case of expected large loads on the surface. The cement-sand base is the most common and versatile. A sandy base can be used with low surface loads and the absence of heaving soils and their movements.
Schematic illustration of a concrete base.
Pouring the concrete base
Work on concreting the base, before laying paving slabs, begins with reinforcement. To do this, it is best to use a ready-made welded metal mesh with a cell size of 100x100 mm. If you have remnants of old metal pipes, wire, rods more than 5 mm thick or other similar metal remnants, then reinforcement can be done using them.
To do this, lay out the metal in the form of a lattice and tie its individual parts at the intersections with wire. It is advisable to raise the reinforcing mesh above the surface by 3-5 cm, placing it on metal or stone stands.
The concrete layer should be 10-12 cm thick, and its surface should be below the surface of the earth by the thickness of the tile minus 3 cm, since we will then have to lay the paving slabs here with our own hands.
If after installing the drainage layer the depth of the working trench remains quite large, then the excess is covered with sand, which is then compacted. Concrete mixture using PC400 cement is prepared in a volumetric ratio of cement, sand and crushed stone as 1:3:5.
Installing a curb
The main purpose of the curb stone is to maintain the shape of the paving slabs and mark its boundaries . The border is laid along a stretched cord on a cement-sand composition in a ratio of 1:4.
Installation stages
- Using a trowel, the solution is placed in the trench.
- The border is installed in the middle of the mortar layer, the level of the border along the cord is adjusted with a mallet. The minimum border level above the tiles is 5 cm.
- Along the entire length of the border outside and inside, for greater rigidity, small slides of mortar are made slightly below the level of the base for the tiles.
- The border is left until the solution dries for 24 hours, after which you can begin paving the canvas.
- Storm gutters are installed simultaneously with the curb stone along its inner surface.
Back to Contents
Treating tiles before laying
Before laying paving slabs yourself, it is recommended to treat them with a hydrophobic compound, which will further protect the material from moisture and increase its frost resistance and durability. In addition, water repellents give the tiles a more attractive appearance and prevent the appearance of fungus, mold and salt stains on the surface.
To process the tile, it is dipped into a hydrophobic solution, dried and this operation is repeated. During pre-processing, the tiles must be carefully inspected and all products containing defects must be put aside, since we will then lay them out in other, inconspicuous areas.
Rules for installation with glue
Let's consider the first method of attaching the outer cladding. Since porcelain tiles are being laid with adhesive, make sure the surface is clean before starting. It is degreased, dust particles are removed, treated with an antiseptic and thoroughly primed. After this, they begin to apply the solution.
Substrate preparation is important
To distribute the mass evenly, use a notched trowel. The technology for fixing elements does not differ from standard interior work. Apply adhesive to the surface or back of the material and place the tile in the intended place. Then adjust the position, align the seams if necessary and tap with a mallet, checking the overall level.
Please note that in cold weather the glue dries more slowly, but in hot weather, on the contrary, it hardens much faster. Dilute the solution in small portions. It is better to perform installation in several stages.