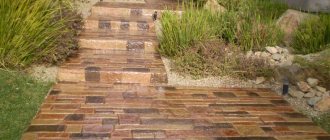
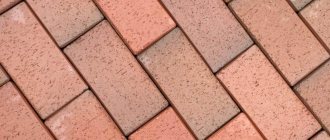
To make the paving look complete, sidewalk curbs are used to delimit the pedestrian and garden areas. In addition to aesthetics, road curbs also perform an auxiliary function. A stormwater system is built along the paths, directing wastewater from the road surface. Therefore, it is important to choose a high-quality edge stone that has a long service life.
Using curbs and curbs to delimit pedestrian and garden areas.
Types of road curbs
Road curbs are divided according to the method of manufacture and use. Depending on the method of production of the border element, there are:
chopped; sawn; burnt; polished.
All of them have a natural base and aesthetic appearance, decorating any type of road surface, and the quality of the material allows you to install borders for almost any construction project - from sidewalks to highways. The disadvantages include the heavy weight and high price of the products.
Side stone is available in the following types:
- Road. It is the most popular because it is used to design all road surfaces. Mainline. Used when laying highways. Sidewalk. Used for arranging paths in park areas, pedestrian paths and sidewalks. Garden. Refers to sidewalk borders, intended for decorating garden paths and limiting the lawn area.
In addition to the above, there are other subtypes of edge stone, differing in their size and appearance:
- Curb. Used in the design of lawns, paths and pedestrian areas. Lawn block. It is a type of curb and is intended for laying on lawns to prevent soil from spreading. Side stone with a beveled side. Installed in places designated for entry into parking lots. Radial border. With its help, sections of roadways and flower beds of round and oval shapes are built.
Radius border
Lawn block
Side stone with beveled side
In addition, curb fences are classified according to the type of raw materials used:
- Vibropressed. Possessing great strength, such fences have a long service life at high temperature changes. The moisture resistance of the material allows you to install the sides in almost any climate zone. Reinforced concrete. For their production, fine-grained reinforced concrete is used, which is distinguished by its durability and resistance to mechanical damage. Granite. Products made from this material are the most durable, but also the most expensive. Withstands large temperature changes and has increased abrasion resistance.
Laying a road curb
The technology is no different from laying a sidewalk curb. The difference lies in the scale of the work.
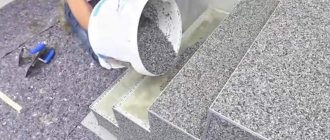
- A site is prepared for laying curb stones, followed by digging a trench 40 cm wide and one third deeper than the height of the curb stones. Crushed stone and sand are poured onto the compacted bottom of the trench with a total layer height of 15 cm. A solution is prepared for coupling the products with the base in the proportions 2.5: 1: 2: 2 (sand, cement, fine crushed stone, water). A solution is applied to the base. The curb element is installed. Using a rubber hammer, the product is tapped until it is immersed in the solution to a third of its height. The joints are fastened together with mortar on both sides, then the remaining gaps in the trench are filled.
Video about cutting a road curb at an angle
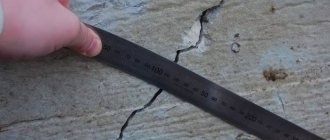
Road blocks are sawn at an angle to ensure a tighter fit of the individual elements to each other. The road curb is cut using a concrete grinder. This procedure is performed when it is necessary to adjust the length of the fence.
The beveled edges are sanded so that the surfaces adhere to each other faster and better during installation.
PVC borders
Plastic borders for garden paths are available in two versions - flexible rolled tape and individual blocks.
Popular plastic models:
- “Country” (ribbon) - easily recognized by the thickening of the upper end of the wall. Available in green and black colors.
- “Labyrinth” (segments) - stylized as stone or brickwork. The blocks are attached to each other and the ground using plastic nail pegs.
- “Garden board” is a tape with a flat or corrugated profile, which is in demand for decorating children's playgrounds, beds, and sandboxes.
sidewalk curb
When choosing a sidewalk curb, you need to pay attention to technical indicators.
physical characteristics
These include:
- Durability brand. Concrete must have a grade strength of M400 and higher. Concrete class. Concrete class B30 is recommended (concrete strength 39.29 MPa). Frost resistance. The curb stone should withstand 200 to 300 cycles. Lifetime. Manufacturers guarantee product durability and service life of up to 20 years.
Advantages of sidewalk curbs
Advantages of concrete curb fencing:
durability; frost resistance; moisture resistance; wear resistance; resistance to mechanical damage; aesthetics; ease of installation.
How does a curb differ from a curb?
This is the same side stone, which differs from the curb fence in the installation method: the curb is installed flush with the pedestrian path, and the curb protrudes above it by 2/3 of its height. Otherwise, the manufacturing and installation technology is the same.
The difference between a curb and a curb
Border for paving slabs
A fence for paving slabs will help maintain the integrity of the coating, preventing the base from spreading.
How to properly install a border for paving slabs with your own hands?
Having decided on the location of the garden paths, you can begin installing the border. The work process itself is simple, you just need to follow the following procedure:
- Prepare the site for construction: remove debris from the area, level the surface. Conduct markings for future paths. Drive pegs along the edges of the paths and stretch a cord between them. The height of the cord should be measured with a building level, since this will be the upper limit of the border made independently. Dig a trench along the entire length of the marking into which the curb sections will be laid. It should be remembered that the depth of the trench should be one third of the highest point of the side, and the width should be 10 cm greater than the curb. At the bottom of the trench, previously compacted and compacted, pour a solution of sand and cement in proportions 3:1 (sand-cement). The solution should have the consistency of viscous sour cream for easier pouring. Lay the border elements, adhering to the level of the cord. In this case, the stones must be leveled in height, adding solution to the bottom where it is needed. Fill the butt joints with mortar and leave the structure to harden for a day. Fill the remaining gap with soil, compacting it thoroughly.
It must be remembered that laying the tiles themselves should be done only after installing the curb.
Installing a border with your own hands.
What is needed for the solution, in what ratio to mix
Border stones can be purchased at the store or made by yourself. To make the sides, you can use ready-made molds, but it’s better to build them yourself. In the second case, you will need to install a formwork system.
The block size can be any. The only thing that needs to be taken into account is the length of the section for piece borders - it should not exceed 2 m. Otherwise, the border structure will be inconvenient during installation and will quickly collapse.
The manufacturing technology for borders is as follows:
- A mold is being prepared for pouring the fences. A dry mixture is prepared at a ratio of 3:1 (sand-cement); the components are thoroughly mixed. Then fine-grained crushed stone is added there at a ratio of 3:1 (crushed stone-dry cement-sand mixture), after which everything is filled with water and mixed. The appearance of lumps in the solution and the formation of air bubbles should be avoided.
In order for the installation of the sides to be convenient, one side of the element must be made with a small chamfer after being released from the formwork system. This can be achieved by cutting off the excess.
Decorative borders and moldings made of concrete
It is possible to make curbs of almost any profile from concrete. You just need to select the appropriate forming element. Plastic skirting boards and moldings are well suited for the latter.
Before work, decide on the desired number of elements to be produced. For personal use and if you have enough time, several forms are quite suitable; to speed up the process and expand production, it is better to prepare several dozen containers.
It is better to use the previously mentioned wood materials as a material. Give preference to those that have a durable glossy finish - this will facilitate the process of removing finished products.
Saw the required number of parts using templates.
Then assemble the molds to the desired size using screws.
Attach pieces of floor plinth of the desired profile to the bottom of wooden containers. For this, it is better to use small nails, since self-tapping screws or staples can irreparably damage the profiling elements.
If necessary, carefully treat the inner surface of the mold with liquid wax or silicone.
When preparing a concrete mixture for such products, it is necessary to purchase natural stone screenings with small fraction sizes. This will give the mixture a more uniform structure and improve the quality of the outer layer. Filled forms also need to be compacted and removed from excess air. In mass production, an indispensable device for this is a simple vibrating table. For small volumes, a percussion instrument or lightly tapping the bottom of the mold on a table or solid base is suitable.
Any spatula will help remove irregularities formed when air escapes.
We remove the frozen product by partially disassembling the mold - disconnecting the end and side walls.
If necessary, the surface of the finished product can be puttied and coated with dye on any basis.
We recommend other articles on the topic
Making a hanging swing for a summer house - step-by-step instructions
Finnish peat toilet for a summer residence - design, installation, operation
Porch made of polycarbonate and metal in a private house: photos, examples
Do-it-yourself bench made of wood or profile pipe for the garden
Types of sidewalk curbs
These include concrete curbs and side stones made using vibrocasting and vibrocompression.
Concrete curbs
Curbs are widely used in the construction of highways: they separate the roadway from the pedestrian one. Curbs are made in accordance with GOST, by pressing or casting.
Vibro-molded curbs
Manufactured by casting, such products have a curved geometry due to the use of liquid concrete mortar. The air remaining in the solution is not expelled, as a result of which the finished product has a porous structure and is easily destroyed. Such side stones are cheaper than curb stones made by vibration pressing, but have no other colors except gray, and the reinforcing frame makes it difficult to install fences if they are cut.
Currently reading: Application of plasticizer: purpose, varieties, advantages
Vibropressed curb
Manufacturing technology allows you to get a smooth surface. According to technical indicators, vibration-pressed side stones have reduced moisture absorption, strength and wear resistance. The stamping method allows you to obtain a large number of finished products with different colors.
Vibropressed curbs
Vibro-molded curbs
Concrete curbs
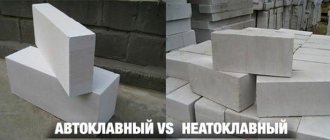
What is the difference between vibration-pressed and vibration-cast curbs?
First of all, products differ in the production method. Vibrocompression involves the production of products on a large scale and therefore uses vibration installations. And vibro-cast curbs are made manually.
| Type of border | Specifications | Appearance |
| Vibrocast | Heavy weight, low frost resistance and performance indicators. As a result of the pores, cracks and chips quickly form, which leads to rapid destruction of the side. | The surface is porous, unaesthetic gray in color, and rough joints remain after installation. Difficulty in installation when making turns - the reinforcement is difficult to cut without damaging the overall appearance of the product. |
| Vibropressed | Compact and relatively light weight, smooth surface, absence of pores, good performance due to high strength and frost resistance. | Smooth surface without pores, aesthetic appearance, wide range of colors, can be used for decorating corners. |
Curb or border?
The curb and curb are one and the same product, which has the construction name “edge stone”. They received different names due to different ways of laying the material.
In fact, all side stones are designed to separate roadways, pedestrians and other areas. The technology for installing these stones will determine what the fence will be called.
The curb is always placed with the largest side down and is used to separate the roadway from the sidewalk. Thus, he is in a supine position. This type of side stone masonry is used only in places where the sidewalk is at the same level with the roadway.
Garden borders
They are intended for decorating a garden plot. Flowerbeds and beds, artificial ponds and alpine slides cannot be imagined without border fences.
What are the advantages of garden borders?
In addition to the decorative function, side stones:
- Reduces the growth of weeds in cultivated areas. They hold the soil back, preventing it from spreading when watered. Contribute to more rational care of cultivated plants.
Garden borders add aesthetics and a well-groomed appearance to beds and flower beds. They can be made of wood, plastic, stone, concrete and available materials.
plastic garden border
Plastic sidewalk curb
It is used mainly for decorating garden areas in summer cottages and has the following advantages:
low cost; ease of installation; large selection of products; easy to replace; aesthetics.
Since plastic is light in weight and can be processed, it can be used to build a border of almost any shape - from straight to winding. If we consider a plastic border as a repairable material, then individual sections of the fence can be easily replaced in case of damage, which cannot be said about stone borders.
An example of using a plastic sidewalk curb.
The disadvantages include the following:
poor fire resistance; low resistance to weathering; instability to mechanical damage.
Over time, a plastic border, unlike a stone one, will fade in the sun and crack from sudden temperature changes, which will shorten the service life of the product.
Installing a plastic border
If we compare the installation of plastic fences with concrete ones, the former win due to their simplicity. Installing a plastic curb is more convenient, and its light weight makes it quick and easy.
- A trench is dug along the sidewalk path. The depth of the groove should be up to 10 cm. Pegs located at the base of the plastic fence are driven into the trench. The individual elements of the border are connected to each other “in a lock”, forming a continuous row. The fence is leveled using a building level, and the trench is backfilled.
The peculiarity of installing a plastic border is that no preliminary preparation of the construction site is required. Such fences will be good when framing flower beds in garden plots.
Plastic border
Plastic borders are one of the most popular and budget options today, which is easily explained by the wide range of advantages of this material:
- ease of installation and disassembly;
- possibility of combination with almost any other materials;
- budget cost;
- presentable appearance;
- resistance to weather conditions;
- long service life;
- does not deform due to soil displacement;
- you can make paths of any shape;
- the material and soil do not require preliminary preparation.
Plastic is inferior in strength to structures made of concrete and metal, but they do not lose their position in the TOP of sales due to the mass of color options and a large assortment.
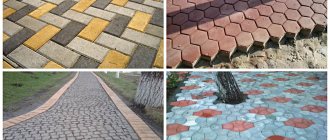
Plastic borders can be divided into 3 types:
- ready-made fences that are easy to install and imitate natural materials;
- sectional fencing assembled according to the principle of a designer. Great for winding paths;
- strip fencing. This type of border prevents weeds from growing along the perimeter of paths and flower beds.
Weight and size chart of sidewalk curb
The ready-made sidewalk curb is produced in accordance with GOST, in different weight categories and size range. In factory conditions, side stones made of reinforced concrete are produced in accordance with GOST 6665-81, they have the classification BR (ordinary), BU (ordinary widened), BUP (ordinary widened intermittent), BL (straight with a tray), BV (drive-in), BK (radial, radius of curvature 5-15 m).
1000x200x80
Sidewalk curb, brand BR100.20.8, weight 40 kg. Garden curb used for fencing lawns and sidewalks.
500x200x30
Small garden border thin, weight 6.65 kg. Used to delimit the garden plot and the local area.
500x200x70
Vibro-cast garden border BR 50.20.7, weight 15 kg. It is made by vibration casting and is used in the design of park areas and pedestrian paths.
500x200x80
Garden border brand BR 50.20.8, weight 18 kg. It is used in the design of pedestrian areas and playgrounds.
500x200x60
Sidewalk curb brand BR 50.20.6, weight 16 kg. It is used for fencing sidewalk paths in park areas.
What and how to make a border with your own hands
Not all summer residents use ready-made forms - many prefer to create borders for their garden plots with their own hands. The advantage of a self-made fence is cost-effectiveness and the creation of an original design.
They can be made from various materials and available materials:
- Plastic. This includes plastic bottles and polycarbonate sheets. Tree. Fences can be designed in the form of a picket fence, a small fence or a fence. Profiled sheets. After repairs, there are always excess building materials left on the site, which include trimmings of corrugated sheets. Using them, you can delimit the beds on the site. Brick. The simplest option for decorating flower beds is to lay them out with sand-lime bricks. Rubber. Old tires can be used as a mini lawn fence by painting them in bright colors.
However, instead of improvised materials, you can use forms for pouring concrete curbs.
DIY forms for borders
Edges for flower beds and lawns, and design of paving stone paths are sold ready-made, but you can create them yourself. Summer residents use forms for pouring concrete mortar, which are also made by hand.
There are 2 main methods: using a formwork structure and making a frame-mold. The simplest and most affordable option is removable formwork. To do this you will need edged boards or metal sheets. The work is carried out directly at the site where the curbs are installed.
The work order is as follows:
- Preparing the area. Marking for future fencing using rope and pegs. Digging trenches. The depth of the trench is 5-7 cm greater than the height of the future border; the width should be 20 cm, taking into account the thickness of the boards. Installation of formwork. The boards are installed on both sides of the trench and secured for stability. Preparing the base for the curb. A crushed stone cushion is poured onto the compacted bottom of the trench, which should also be well compacted. Reinforcement. Rods are laid on the crushed stone to strengthen the future border.
After the preparatory work, a concrete solution is prepared, which is used to fill the trenches. After the concrete has hardened, the formwork can be removed.
The second method is to make forms for borders. It differs from the first one in that the fence is not monolithic, but sectional. For this purpose, an edged board of the required length is used, from which a frame is created for pouring concrete, and the resulting elements are cut at an angle on one side for standardization according to GOST.
To create a border fence of an unusual shape and color, you can also use a special device that resembles an auger receiver. A mixture of sand and cement with the addition of pigment dye is poured inside, which, mixed, is squeezed onto the ground.
The advantages of this method are as follows:
high performance; ease of solution processing and installation; no need to prepare the base for laying the fence.
A concrete structure that has not completely hardened can be decorated with various patterns and carved elements.
Wooden borders
Making garden borders with your own hands is very easy if you have a few wooden pegs on hand:
- They are preparing the site. To do this, mark the contours of the future fence on the ground and dig a small ditch.
- The pegs are sharpened at one end and deepened into the groove by a third of the length. The distance between adjacent stakes is 5-7 cm.
- Level the height of the fence from above by tapping the protruding parts with a mallet.
- Alternately pass willow twigs, cleared of bark, between the pegs, creating a semblance of weaving.
Making borders with your own hands: preparing concrete and pouring forms
To create your own fences from concrete mortar you will need:
river sand; cement; plasticizer; pigment additive (for colored fencing); used machine oil.
The cooking technology consists of the following steps:
- Cement, sand and crushed stone are mixed in a concrete mixer in proportions 1:3:4, respectively. First, half a portion of sand and crushed stone is poured into the concrete mixer, mixed, then cement and the remaining crushed stone and sand are loaded completely. The dry mixture is transferred in a concrete mixer for at least 5 minutes. The plasticizer is dissolved in water according to the instructions and poured into a concrete mixer, then water is gradually poured in. Adjust the amount of water until the mixture reaches the consistency of a viscous mass. Add the pigment dye diluted in water to the solution and stir it for another 5 minutes. The form for borders is greased with oil - subsequently the finished product will be easier to remove. The resulting solution is poured into the mold and removed from it when it sets - after at least 2 days.
To increase the density and strength of products, it is recommended to use a vibrating table - in molds with a solution, all air will be removed from the pouring. For concrete mortar, it is recommended to use cement grades M400 or M500, this will make the structure much stronger. It is advisable to sift river sand before mixing to remove clay impurities, which can reduce the strength of concrete.
For additional strength, reinforcement is placed in molds half filled with mortar, which is then filled with the remaining mortar. The concrete product will finally gain its original strength only after a month, so it is not recommended to install concrete blocks earlier.
Preparing the mixture
To prepare the mixture with your own hands and cast a concrete block, you need to prepare:
- cement;
- sand;
- reinforcement with a thickness of 4 mm;
- welding machine or rigid wire;
- crushed stone;
- water;
- elements for decoration;
- construction mixer;
- building level;
- casting mold;
- construction trowel.
The first step is to fill the crushed stone with water; saturation with moisture will increase its adhesion to the solution. Sand and cement are mixed in a ratio of 1:3 or 1:4 (depending on the brand of cement). The composition is mixed until a homogeneous mass is formed using a construction mixer. After this, you can add crushed stone (2-3 parts per 1 part dry mixture of cement and sand). Next, everything needs to be mixed well. The presence of lumps of sand in the solution is unacceptable. The form for pouring concrete should be placed on a flat surface, using a level.
You can put decorative stones or shells on the bottom of the mold, pre-greased with oil. After that, fill it halfway with the solution. A frame made of reinforcement is placed inside. It's quite easy to make it with your own hands. It should be made according to the principle of rails, that is, have two long guides and many small cross beams.
The connection points of the reinforcement are tied with wire or secured with a welding machine. The overall dimensions of the reinforcement cage should be smaller than the casting mold: then the metal elements will not protrude from the concrete block, which will prevent their direct contact with the environment, preventing them from rusting.
Next, you can fill the remaining space of the mold with the prepared solution. The surface of the concrete block must be leveled with a trowel. It will take about 3-4 days for the solution to harden; during this period the form should be placed in the shade. The concrete parts of the curb that are ready and removed by hand should be left in the shade for another 5 or 7 days to dry completely. After this, you can proceed directly to the installation.