Purpose of ebb tides, need for installation
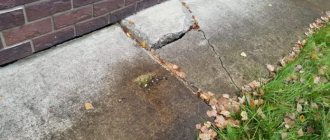
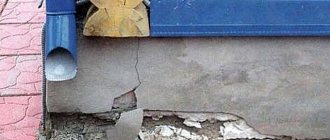
Water falling on the surface of the base gradually destroys the concrete surface.
These deformations are especially noticeable when the temperature fluctuates: at low temperatures, the moisture absorbed into the concrete hardens, and in the summer deep cracks begin to appear on such a structure, the plaster peels off and falls off in layers, and sometimes even entire bricks fall out. Thus, the structure quickly collapses and falls into disrepair. To prevent the building from becoming unusable, flashings were introduced for the foundation plinth, which today are the most optimal solution to this problem.
The negative impact of moisture manifests itself in the form of cracks and chips
Purpose and need for installation
Water that gets onto the base surface begins to gradually destroy it. Deformation changes are most noticeable during temperature changes - in cold weather, water freezes, in the summer, cracks form on the structure, the plaster peels off and falls off, sometimes even entire bricks fall out. The foundation is destroyed and becomes unsafe. To prevent such negative manifestations, ebb tides are installed on the base of the foundation.
The ebb on the base of the house protects the foundation from the destructive effects of water
Design Features
Externally, base ebbs resemble plates. The designs of plinth ebbs are distinguished by the presence of well-thought-out elements that increase their functionality and facilitate installation work. The most important components are the folds and shelves. The structures are fixed to the surface of the walls with special fasteners, while the shelves are mounted at a certain angle relative to the foundation to ensure water drainage.
The sizes of the shelves vary; you can find options from five to forty centimeters in width. The color range is so varied that there is always a choice for any façade.
Base drip device
Where is it installed?
Another name for ebb tides is parapets. In their standard form they consist of a shelf and drips on the sides. Fastening is carried out using bends that are perpendicular to the shelf.
Depending on the design, they are fixed on top of the fence sections or base.
On the foundation
The product resembles a plinth canopy, which is laid close to the wall with one of the cuts, and covers the base with the other curved edge.
If the fence will be faced with tiles or stone, then the ebbs for the foundation must be installed with hidden screws with an O-ring.
And cladding should be carried out upon completion of finishing work.
On top of a brick fence
They are mounted together with caps, giving the structure a neat appearance. In color, both types of elements should be the same or contrastingly complement each other.
But the main function is to protect the masonry from moisture getting inside.
If you do not immediately attach the ebbs to the brick fence, then over time microcracks will appear on the material and it will begin to crumble.
Kinds
Ready-made base sills are divided into several types depending on the material from which they are made:
- PVC or plastic;
- metal – steel, aluminum, copper;
- clinker (ceramics);
- concrete.
Before making a choice, it is worth studying the properties and advantages of each type of protective shelf for the plinth.
Plastic
Plastic moldings made for foundation plinths are in great demand due to their undeniable advantages. First of all, these are high performance characteristics - resistance to external influences, low cost, service life, variety of sizes and colors. PVC products will look great in combination with vinyl siding.
The disadvantage of this material is that if its integrity is damaged, the product cannot be repaired. And because of its fragility, it is quite easy to damage the surface.
Clinker
Flashings made with clinker tiles are more expensive than their plastic and metal counterparts. This material is usually used in conjunction with finishing the foundation and the entire structure with clinker tiles. It will reliably protect the base from external factors and mechanical damage. But the installation of such a product should be planned even before construction begins, and experienced craftsmen are involved in its installation.
Flashings can be made from various materials
Metal
Metal castings are also popular. They are reliable, strong and durable. But the cost of such a protective element is much higher than that of PVC products. Copper shelves are especially expensive. In addition, they require constant care, so aluminum products are most in demand. This metal is very light and will allow you to easily install the plank on a foundation or ventilated façade.
Metal flashings coated with a polymer coating are much more expensive than unpainted ones, but their appearance and durability are much superior to ordinary strips that are not coated with anything.
Important! When installing metal ebbs, you should avoid cutting the metal, as this can damage the coating and cause corrosion.
Steel castings
Steel products are affordable and have sufficient durability. There are options made of galvanized alloy and having an additional polymer coating. They have one color or another and high weather resistance. If you use metal tiles or corrugated sheets on the roof, you can choose a similar shade for finishing the base of the house’s foundation.
Steel ebbs
Steel elements are quite widespread and can be purchased at any construction base or in a specialized store. In addition, it is easy to install such flashings on the foundation of a house with your own hands without the use of hired labor, which allows you to reduce the overall costs of this type of work.
Aluminum ebbs
Aluminum castings
This type has the same advantages as the previous one. In addition, aluminum has higher weather resistance and significantly lower weight, which ultimately allows reducing the load on the foundation of the house. These products also differ in price, which is slightly higher than the cost of steel castings.
Copper tides
Copper tides
Another type of metal ebb is made from copper sheets, which gives the base protection a noble appearance. When used with the appropriate finish, these products retain their reddish hue without the green copper oxide deposit. The limiting factor in the distribution of copper castings is the maximum price of the entire group of metal castings.
Galvanized
As already mentioned, galvanized steel ebbs are the most budget-friendly options for metal products. In addition to cost, the advantages of such structures are: versatility, durability and ease of installation.
In the modern construction market there are many color variations - if desired, you can even find wood finishes. In addition, there are products with a polymer coating that protects the cast from impacts and scratches. The most common options for such coverage are:
- polyester (service life 10 years);
- matte polyester (service life 15 years);
- polyurethane (service life 50 years);
- plastisol (service life 30 years).
We install ebb sills on the base ourselves
Purchasing ready-made ebb tides is not difficult. A more important undertaking is the installation of ebb tides on the foundation. In order for the work to bring you satisfaction and help you save money, you can do the installation yourself. To do this, you must meet a number of important requirements:
- The fastening of the tides must be sufficiently rigid to avoid vibrations due to wind or contact. This is especially true for lightweight plastic products and metal sheets.
- The connection of individual parts along the length and especially in the outer and inner corners must be done most carefully.
- It is recommended to place a small amount of weather-resistant polyurethane foam under low tides to reduce their noise.
- When working with parts coated with a polymer layer, you must try to avoid damaging it. Touching metal objects may cause scratches. Currently, aerosol paints have appeared in construction stores that match the colors of the polymer coating of the drips, which makes it possible to eliminate the resulting defects.
To work with the most accessible metal and plastic castings, you should prepare the following tool:
- plumber's scissors with bent jaws or
- a grinder with a cutting disc for metal, as well as
- screwdriver;
- level.
- Before making castings for the foundation plinth with your own hands, you should carefully mark the installation sites. To do this, you will need a building level at least a meter long, preferably one and a half to two. Using these assistants, the lowest points are determined and, focusing on them, horizontal lines are drawn at the required distance from the base. The markings can be made using a marker or marked with a cord rubbed with chalk, since it is necessary to correctly install the ebbs on the base of a wooden house at the same level.
- The next stage is installation on the walls. It does not present any particular difficulties, since it is convenient to attach the ebbs to the foundation using special roofing wood screws. They have a hex head with a diameter of 8 or 10 mm. For ease of screwing, purchase an appropriate head, which is installed in the chuck of a drill or screwdriver, since it will be inconvenient to place the ebbs on the foundation, for example, with a wrench.
- Installation of ebb tides on a wooden wall is quite simple. A more complicated process occurs when installing ebb tides on the foundation of a building made of concrete blocks or bricks. In this case, through holes with a diameter of 6 mm are pre-drilled in the upper flange of the tides with a distance of 0.5 meters between them. Next, having installed the parts on the wall level, mark the mounting points on the wall.
- At the resulting points, holes are drilled with a carbide drill to a depth of 40-50 mm. Plastic dowels are installed in the resulting recesses. Next, galvanized or painted self-tapping screws with a press washer are screwed through the holes in the castings into the dowels. This is how the concrete foundation of a house is protected.
- The greatest difficulty is the process of installing flashings in the outer and inner corners of the house. It is advisable to cut the parts so that the connection is high-quality and airtight. To do this, you need to carefully make the markings using a template or using a square and a ruler, since not everyone can make the corner on the foundation cast correctly the first time.
- Since the main part of the flashings are made of thin sheet steel or sheet plastic, they have sufficient mobility and in strong winds can cause inconvenience to home owners. In this regard, together with how to install the ebbs on the foundation, a small amount of polyurethane foam is sprayed under them. As it expands, it will fill the free space and create support for the profiles.
Thus, we talked in detail about how to correctly make a casting from the foundation of a house made of various materials, and revealed the features of installation and cutting of parts. By protecting the foundation of your home yourself, you can save on hiring third-party labor and get the job done efficiently.
Color spectrum
Metal and plastic models of ebb tides have a wide selection of colors, which allows them to be used in combination with other finishes from the same materials, forming a unique set. For example, a base molding made of steel coated with a protective polymer layer and blue paint will look harmonious on a house where the roof is finished with blue corrugated sheets or metal tiles of the same color. In this case, the facade itself can be finished in any way: plaster, siding or composite panels.
An example of finishing a house with harmoniously selected protective elements
Aluminum and copper shimmers are produced in the same natural color. Concrete structures can be adapted to any exterior by painting. Protective elements made of natural stone have the colors of the rock from which they were made.
Low tide for a plinth made of natural granite in the exterior of a house
Criterias of choice
The casting for the foundation plinth is the final stage of façade finishing. With its help, the boundary separating the ground part of the foundation from the load-bearing walls is conditionally determined. It follows that it is necessary to choose ebb tides according to the following conditions:
- protective function;
- aesthetic appearance.
The ebb is chosen to match the tone of the façade finishing, and the material used to finish the walls and base must be taken into account.
For structures built from timber, it is recommended to use ebbs from any metal; for buildings made of brick or block, it is allowed to install ebbs from any materials.
You should pay attention to the thickness, weight, uniformity of structure and shades, the quality of the coating (if any), and the specifics of the installation work. Low-cost products have a short service life, so saving in this case is not recommended.
Correctly selected ebbs must completely coincide with the base forms, corner areas, niches, rounded areas, and bay windows. When laying strips, a mandatory overlap is provided, which should be taken into account when performing calculations on the requirements for materials and all necessary components.
There is one more factor that must be taken into account when choosing ebbs - the possibility of their coloring and suitability for repair in case of damage.
Design and operational properties of ebb tides depending on the material of manufacture
The structure includes the following elements:
- a shelf mounted at a certain angle to ensure water drainage. Its width is 5-40 cm;
- fastening bend, thanks to which the product is attached to the wall;
- frontal bend, with the help of which water flows are directed downwards.
To make flashings for the foundation plinth, various materials are used, which largely determine the performance characteristics of the product. We invite you to get acquainted with the main types and their distinctive features.
Each part of the tide performs a specific function
Concrete - a high-quality and traditional solution
For the construction of the building, brick or natural stone was used; for finishing the foundation, it is better to use cast concrete. Having a solid appearance, such products reliably protect the base from negative influences.
They are made from M450 cement, which has sufficient strength characteristics and frost resistance. The introduction of a small amount of plasticizer makes it possible to increase plasticity and water resistance, and a certain amount of dye helps to obtain the desired color. It is possible to paint with façade paint if the required color scheme is not available.
During the production process, the prepared solution is poured into special silicone molds, the length of which is usually 3.9 or 6 m. The width of the cast depends on the geometric parameters of the base.
A comment
Mikhail Starostin
Head of the repair and construction team
Ask a Question
“Concrete castings are heavy, and therefore their installation must be provided for at the design stage.”
The large weight of concrete products limits their possible scope of use
Polyvinyl chloride - a budget solution
If vinyl siding was used to decorate the facade, plastic products will be the best option. Polyvinyl chloride ebbs have a similar texture and color.
They have a long service life. They are not afraid of exposure to natural factors. The waterproof structure allows you to reliably protect the base from external moisture. Moreover, they have an affordable price.
Wall decoration must be appropriate
Metal – strength and reliability
Metal products are highly durable and have a long service life. Can be steel, copper and aluminum. The latter are in particular demand, as they have less weight compared to steel products. Copper ones are of limited use due to their high cost.
Metal castings have a presentable appearance, are easy to install and are not afraid of impact. Their length is about 2 m and can have a width of 5-30 cm. Sheets 1 mm thick are used for production. May have different colors.
The colors of metal products are chosen taking into account the overall design of the house
Clinker is a clear demonstration of status
If expensive clinker tiles are used to decorate the facade, the ebb should be made of the same material. You can purchase it together with the main material.
Clinker finishing will not be cheap
What to consider when designing
Base ebbs acquire decorative value when they are correlated with other decorative elements.
The protective surface should be in harmony with the texture of the house walls, metal elements of the building (platbands and drainpipes) or form a single stylistic whole with the cladding of the facade or foundation.
The decorative component should not be at the expense of service life, and you should choose a durable material that can last quite a long time.
When choosing a long service life, ease of installation and the allocated budget are of considerable importance.
To avoid hassle with installation, you can order the finishing from the manufacturer.
Beauty can be achieved using polymer materials selected according to the style and the remains of tiles or stone from wall cladding. If the building is being erected with your own hands, then, when considering how to make ebbs for the foundation, you need to take care not only of the availability of building material, but also of reliable fastening elements.
Sometimes the main criterion is the skills acquired while working with certain forms of protective shelves or profile elements.
Of particular importance is how durable and functional the external and internal corners can be assembled from the selected raw materials. This is one of the most vulnerable places due to the presence of complex joints.
A convenient and simple solution can be a protective shelf from the manufacturer, custom-made taking into account the required parameters, shape, width, corner joints and with fasteners included.
How to finish the basement of a house
How to make a corner on the base ebb
Not everyone knows how to cut the ebb in order to bend it, making an outer corner. If you simply attach 2 flashings to each other on the corner part of the base of the house, an unsightly gap will remain, and you can also get caught and cut by the iron. You can't do that. But you can’t do the inner corner any other way.
External and internal ebb angles
How to bend the ebb 90 degrees
My husband has been working with metal for a very long time; he knows how to cut a casting corner and bend it correctly. Of course, when working with metal it is difficult to achieve perfect accuracy, and in this case it is not necessary. The photo shows the cast without trimming, then with trimming, in the next photo the corner is bent. It is necessary to bend it using pliers. And take care of your hands, wear gloves.
- Galvanized iron casting 5 cm wide
- Trimming the ebb before bending
- Installation of lower ebb with an angle on profiles
How to connect ebb tides at 90 degree angles
After the ebb with the corner is installed, you need to use a riveter to secure the iron cut at 45 degrees to the corner in order to stiffen the corner and remove the large gap. Rivets look neater than self-tapping screws and also do not unscrew. But if you don’t have a riveter, you can fasten it with a self-tapping screw.
Tide angle 90 degrees
Installation of ebb tides
Depending on the material from which the additional element is made, fastening is done with hardware or the ebb is glued and installed on the surface of the base using mortar. Individual developers usually install drip sills from sheet materials, so this particular technology will be considered. First of all, you need to consider:
- the dimensions of the plank are limited by the length of the bending machine; the additional element will not be enough for the entire wall;
- first of all, the corners and façade elements protruding outward (pilasters, figured masonry) are designed;
- then the planks are laid overlapping on the straight sections of the base.
Important! The foundation of a house most often has a flat surface at the top; the ebb should be located at an angle. The supporting plane for the middle shelf of the additional element is created with a solution or the voids are filled with polyurethane foam at the time of installation.
Low tide material
Since the base is a transitional part from the foundation to the facade of the cottage, you should choose the ebb taking into account the following factors:
- decorative value - the texture, pattern and color of the planks are usually selected in the same style as the cladding of the base, facade or roof drainage pipes;
- resource - maximum for concrete, copper, aluminum, minimum for vinyl additional elements, steel (painted, galvanized) has average characteristics;
- installation - aluminum and copper ebbs can be fastened with special brackets, steel strips with self-tapping screws and dowels, concrete clinker elements are installed on mortar or glued.
The cladding of the foundation of a house is often made of stone, brick, or sheet materials that copy its texture. Therefore, an individual developer does not have problems with the exterior when choosing any shimmer material.
Advice! Clinker and copper are the most expensive; vinyl planks are a budget option. Concrete slabs are rarely used in private cottages; they are usually used to decorate the facades of administrative buildings.
The standard form of ebb moldings made from sheet materials is:
- wide middle shelf;
- upper narrow shelf, bent at an obtuse angle for fastening to a wall or frame
- narrow bottom shelf, curved at 90 - 120 degrees.
To ensure stable spatial geometry and the possibility of attaching the plank with brackets, the lower shelf is often supplemented with a stiffening rib. To order, manufacturers produce ebbs of any width, external and internal corners, fastened with a rebate, a lock or an overlap.
Clinker and concrete casting strips are much smaller in size. Their installation is similar to laying along a cord, only instead of a spoon row it turns out to be a butcher row, since each product is oriented with its long side perpendicular to the wall. These materials are used mainly on brick facades.
Fasteners for installing ebb tides
Before starting installation work, you should check the horizontalness of the surface. If there are deviations or distortions, the surface must be leveled with cement mortar. To ensure that the mixture adheres well, the surface layer is shaped like a slope. At the corner of the walls, a painting cord is attached in a horizontal position, which will serve as a guide for constructing the slope. Proportions of working solution: 1 part cement to 3 parts sand. Water is added in such proportions that the finished mixture does not drain from the painting tool. In order for the moisture to evaporate properly and the solution to consolidate, it should be kept for two days. The ebb tides are attached to the plinth to the wall surface or to the guide elements.
How are the sills attached to the plinth?
You need to attach the ebbs after completing the finishing of the base, before starting to finish the wall. To work, you must have a supply of tools and materials:
- pliers;
- building level;
- hammer;
- mallet;
- Master OK;
- hacksaw for metal;
- perforator;
- screwdriver;
- self-tapping screws;
- screws with dowels;
- construction cord;
- sheets of metal or finished moldings;
- cement;
- sand;
- frost-resistant sealant.
Before installation, it is necessary to check the horizontal position. If there are deviations and distortions, leveling is necessary using cement-sand mortar. For a normal fit, it is better to make the surface for installing the low tide in the form of a slope. A cord installed horizontally is attached to the corners of the wall. A slope is made along the cord using a trowel. The solution for the slope is prepared from one part cement and three parts sand. Add enough water so that the finished solution does not drain from the trowel. To allow the moisture to evaporate and the solution to set, it is allowed to stand for several days. The drip strip is attached directly to the wall or to guides installed to finish the wall.
The color of the drip strip is selected to match the tone of the main wall decoration or in contrast to this tone. Contrasting or metallic finishes emphasize the austerity of the overall appearance of the building. The plank is attached to the guides with self-tapping screws, and the dowel is attached to the wall with nails. The ebb usually consists of two parts: the starting strip and the ebb itself. If the surface of the plank is wide, then additional fastening is made to the base. This installation will keep the plate from exposure to wind. The overlap of the starting strip is sealed with frost-resistant sealant. If the metal casting is covered with plastic, then you cannot hit it with a hammer to avoid chipping off part of the coating. Flashings should not be installed until the main construction is complete. They can be damaged during other work: falling objects, tools, bricks.
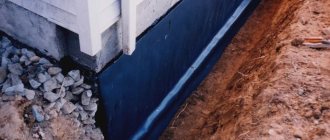
When installing the ebb on a wooden wall, you can make a cut in the wall with a grinder to secure the upper part of the structure in the resulting gap. The resulting connection should be sealed with sealant. If there is a void under the drip strip, then you need to put a board under the strip. If everything is done carefully, the waterproofing of the foundation will improve significantly. Without a flashing installed on the plinth, the building looks careless and unfinished.
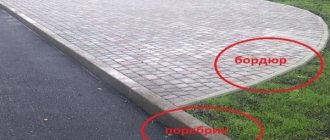
Base flashings are used to protect protruding areas on the facade of a building. One of these areas is the basement of the building. Basically, the base of the facade is located outside the general plane of the facade and the cladding is mounted on adhesive bases. The installed base flashing covers the open end areas, protecting the base from destruction by moisture. Also, the basement drain allows water flows to be diverted beyond the edge of the cladding, which helps keep the walls clean.
The configuration of the base flashing is determined individually, based on the parameters of your building foundations, types of cladding, etc. The color of the products is given by applying powder paint or a standard polymer coating according to.
When and how to attach the ebb
The ebb is attached to the wall after finishing the plinth, before cladding or insulating the walls of the house. Before installing the drip tides, check the level of the horizontal edge of the base and make a slope along it from a cement-sand mortar. To obtain an even line along the facade, secure with dowels a tape stretched from corner to corner, verified by the building level.
Using a prepared cement-sand mortar with a composition of 1:3, a slope with an angle of 15% is formed with a trowel on a tape. Next, wait for the solution to set. As an option, it is possible to make a slope from frost-resistant polyurethane foam. The joint between the fastening bend and the wall is sealed with silicone.
If the plinth is one line with the wall, the thickness of the insulation on the plinth will be greater; the installation of ebb and flow on the plinth is carried out in the same sequence.
The castings for the base of the foundation of a wooden house are performed in a similar sequence. In this case, there is no need to bend the bend - just cut a groove in the log for the ebb strip.
The plinth ebbs are attached to the wall or cladding guide profiles; in this case, it is necessary to pre-mount the curtain wall frame.
Flashings on the base of a pile-type foundation lined with siding are also installed before cladding the house, so that the finishing protects the junction of the wall and the fastening bend.
The ebb is attached to the wall surface with self-tapping screws to the wood, the dowel - with nails to the brick, and the dowel - with screws to blocks of lightweight concrete, every 300 mm. The planks are laid on top of each other with a 30 mm overlap, all joints are sealed with frost-resistant materials.
IMPORTANT: Large width ebbs are mounted on a plinth using a T-shaped spike to reduce windage.
Installing parapets in a simple way
The metal apron is installed using self-tapping screws or dowel nails. The mounting connection is screwed into the overhang of the U-shaped ebb. If the protection is installed on a fence made of facing bricks, which is hollow inside, screws are screwed into the seam. This is done to ensure that the connection is tight. A span of more than 2 m is fixed by 4 pieces. self-tapping screws on each side.
Example of U-shaped plank placement
Installation using fasteners
The second method is to install ebb tides using strips, which come in two types: straight and T-shaped. The planks are attached to the upper part of the foundation with self-tapping screws or dowels. Install them at a distance of 50 cm from each other. Then the parapet is put on the slats. This method is used for structural rigidity or when it is not possible to screw screws into the side of the fence.
Only after fixing the strips do they begin to place the caps
Installation of concrete parapets
Installation of concrete parapets begins with preparing the top of the fence. The surface for installing the ebb tide is cleared of construction debris. If the surface is too uneven, make a screed to level it. Then they are treated with a special primer for better adhesion.
Parapet location rules
Check the plane with a level. For accuracy, pull the thread in the place where the bottom of the parapet will lie. This will allow you to lay the slabs on the same level without differences. Then measure the distance between the pillars and try on the slabs. If the slab does not become complete, it is cut with a grinder with a concrete disc. The gaps are sealed with sealant.
Features and rules for installing ebb tides
How to install flashings for a foundation plinth with your own hands? Let's consider the algorithm of actions in individual stages.
Tools and materials
In order for the installation work to be successful, you will have to prepare everything you need in advance:
- additional elements;
- polyurethane foam;
- sealant or putty material with a moisture-repellent effect;
- grinder, tile cutter, metal cutting scissors, small hacksaw;
- hammer, rubber mallet, pliers;
- building level;
- impact drill or hammer drill;
- dowels, screws;
- brackets for fastening;
- screwdriver
Preparatory work
All imperfections on the base surface are eliminated, cracks and joints are sealed. For this, water-repellent mastic or construction sealant is used. Walls made of wood are treated with an antiseptic.
Now you can make horizontal markings using a laser level. The highest plinth point is located, a line is drawn or twine is pulled along the wall. Using this marking, the upper part of the ebb will be attached. Protruding foundation part. On which it is planned to rest the ebb, it is necessary to level it by arranging a screed made of cement material. The recommended tilt angle is ten to fifteen degrees; for this reason, markings along the wall are made slightly higher than the protruding base plane.
Instructions for installing drip tides
Installation diagrams
The width of the ebb is determined after the design of the base, because the trim may bring the front of the base forward. The angle of inclination of the frontal plane is assumed to be 10 - 15°, so the tape measure is applied to the wall at the appropriate height and measured to the edge of the horizontal surface, taking into account the offset.
The length is calculated along the perimeter of the fastening, while the measurement is taken along the outer edge of the intended ebb. The resulting length is multiplied by a factor of 1.1 to take into account trimming corner joints and overlapping joints.
Installation procedure:
- installation begins from the first corner of the building;
- the second is to install the profile at the next corner;
- then the elements are connected using a straight section;
- then the ebb is attached to the third corner, connected to the second by installing the ebb on a straight section, and so on.
The tides are connected by soldering into a lock. The second method is used for metal drains that are bent at the installation site. Soldering is rarely used, because violates the outer protective layer of the profile.
Outside corner
External corner
The external joint of the turn is made from the main strip, the connection line is coated with sealant. A support element is placed under them so that the corner joints do not move vertically.
Methods for making an outer corner:
- There are two straight stripes. Straight sections are selected, the end of one is cut at an angle of 45°. For marking, a miter box is used or a special template is made. The end of the second piece is cut off in the same way, but an allowance of 20 mm is made along the length. The allowance remains inside the joint, and the strips at the corner are fixed with rivets to each other.
- From one straight profile. On a straight section, an angle of 90° is marked so that its apex is on the bottom shelf, and an allowance of 20 mm is given on the plane. The drain is cut according to the markings without entering the bottom shelf. The casting profile is bent so that the parts form a right angle, and the tolerance is at the bottom of the joint. The parts are connected by soldering or rivets.
The joint does not always turn out beautifully, so a decorative strip made from a profile is used. The width of the element ranges from 4 to 8 cm and is fixed with self-tapping screws or rivets.
Internal corner
Internal corner
The principle of joining the flashings at the corners inside the protective trim is similar to the connection of the outer corner, but has some differences. Each line in such a place is finished individually and before the profiles are placed on straight plots.
Making an internal joint:
- From two straight sections. The ends of the straight strips are shaped at an angle of 45°, as when making an external corner, but in the opposite direction. The second piece is cut 20 mm longer than the required size; when joining, this outlet passes from the bottom of the joint.
- From one profile. A 90° angle is marked on a straight piece, but the top of the angle is located not on the bottom, but on the top shelf. Further, the technology for manufacturing internal and external corners is no different.
To support the wide internal joint, support bars are used, on which the profile is placed. On wooden purlins, an internal joint is also formed so that the ebb is firmly attached to them without gaps.
Straight joint
Direct joint
Profiles are joined together with an overlap or a lock is made. In the first method, rivets are placed for strength. Such a connection has the advantage that during thermal expansion there will be no deformation of the castings due to shear. The sealant between the connecting areas acts as a thermal seam. The overlap connection method is simple and is used in the case of installing basement drainage systems with a large scope of work.
The lock option requires a lot of labor, but is reliable and durable. This connection does not allow water to pass through, even if the joint is not treated with silicone.
Types of gearing used:
- single recumbent;
- single standing;
- double recumbent;
- double standing.
The decorative strip is installed when joining with an overlap; when joining with a lock, it is rarely used. Such inserts increase the cost of installing the base.