What is infrared film heated floor
Infrared film coating is a roll material. This is a carbonate paste that is sealed in polyester or polypropylene film. Special conductive busbars are installed along the edges. Most often these are strips of silver and copper. It is through them that electric current is transmitted. Once it passes through the carbon, heat is generated.
Conductive strips are collected in sections, with a dividing strip between each of them. It is convenient to cut material using it. The advantage of such a system is that if one lane fails, all the others will continue to work.
REFERENCE. The width of one roll of a set of film heated floors can vary from 50 cm to 1 m. The thickness of the film is from 0.2 to 2 mm.
Film types of flooring are safe for human health. Infrared heated floors do not generate electromagnetic waves. By heating the furniture, the air temperature in the room is lower, but at the same time it is quite comfortable. When objects are heated, there is no air movement, so dust does not rise. This minimizes the risk of developing an allergic reaction. This type of flooring is completely neutral. It does not create any noise, chemical or mechanical effects.
Installation
Is it difficult to install an infrared electric floor heating with your own hands? Let us divide the description of the work into several stages.
The video attached to the article will help you learn more about the rules for installing them.
Connecting film to wires
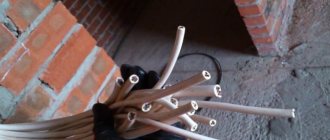
To attach the film heater section to the thermostat, you will need an installation kit containing:
- Studded contact terminals. The spikes pierce the current-carrying conductors, providing electrical contact between the IR film and the power wire;
- Twin-core copper wire with a cross-section of 1.5 mm2;
- 6 bitumen insulating strips.
The photo shows an installation kit for one heating section
Here are step-by-step instructions for connecting the heater to the wires:
- Bend the terminals and crimp them with special pliers or ordinary pliers on the current-carrying paths;
Installing a terminal on a live path
- Strip the ends of the power wires;
- Crimp the stripped ends with terminal sleeves;
- Stick bitumen insulators (two on each terminal and one on the sections of the current-carrying paths);
- Check the heating of the IR film by plugging the power cords into an outlet.
Attention: low-power (150-220 W/m2) film heats up slowly and to a low temperature. The hand will feel the heat only after a few minutes; in this case, the film heater should not touch the floor surface or other objects with high thermal conductivity.
Installation under flooring
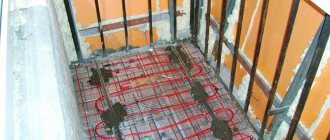
Laying the film heater
The following are laid sequentially on the floor:
- Foil or, which is much better, penofol (foiled polyethylene foam) 2-3 mm thick. Its task is to minimize heat loss through the ceiling;
- Thermal sensor. For it, a recess is made in the floor or thermal insulation, allowing the sensor to be laid flush with the main surface;
- Film heaters. It is advisable to secure them with tape;
- Waterproofing (dense polyethylene). If the film is laid not in one piece, but in separate sheets, the 10-centimeter overlaps between them are taped;
- Finish coating. Let us remember that it must have a sufficiently high thermal conductivity.
Structure of film heated floor
Attention: IR film does not fit under furniture covering the floor. The absence of a heat sink will lead to its overheating and failure.
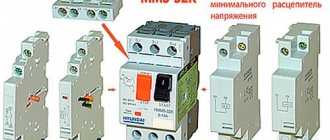
Connecting the thermostat
When connecting the thermostat to the power wires of the IR film to the wiring and temperature sensor, just follow the manufacturer's instructions.
Here's what a typical pinout looks like:
Heated floor thermostat connection diagram
Attention: when installing several underfloor heating circuits, the wiring to each thermostat is laid with a wire with a cross-section of at least 1.5 mm2.
Types of films and their characteristics
Most infrared films operate on the same principle. However, different types of film coating are intended for different types of premises. Depending on the maximum heating temperature, the following types of flooring are distinguished:
- high temperature IR film;
- low temperature;
- universal.
High-temperature types of infrared heated floors are excellent for laying under tiles. The maximum heating temperature is 50°C.
Low-temperature infrared floors can be combined with laminate, linoleum and other heat-sensitive coatings. In this case, the system warms up to 27 °C.
There are also a number of universal systems that can be combined with any floor covering. They are the most popular, since the buyer does not need to worry about the compatibility of coatings.
The second classification option is based on the type of heating element. There are several types:
- carbon;
- bimetallic.
When choosing a heated floor, you must also pay attention to the power density indicator. According to this characteristic, there are 3 main types of infrared films:
- weak - 130–160 W/m²;
- average - 170 and up to 220 W/m²;
- high - above 220 W/m².
Low power film is used in small spaces. It is best combined with light floor coverings. Medium-power coatings are installed in medium-sized rooms. An excellent option for tiles and porcelain stoneware. High power films are installed in large rooms. For example, this could be a sauna or a workshop.
Installation of infrared heated floors under tiles
Laying an infrared floor under ceramic tiles can be done in two ways: “dry” and “wet”. In the first case, the heating elements of the film do not come into contact with the cement screed. In turn, the “wet” method of installing IR film is done by pouring cement mortar over the system.
Two schemes for connecting film heated floors under tiles
Let's consider the algorithm of the method:
- Installation of the film sheet, which is carried out according to the same rules as in the case of organizing infrared heating under the laminate.
- Next, a protective layer is installed, which is often used as a polyethylene film.
- At this stage, it is necessary to install a base under the screed on top of the film. Plasterboard sheets (GKL) are excellent for such purposes. When fixing the sheets, special care must be taken, as there is a risk of damage to the heating elements of the infrared floor.
- Then a thin layer of screed is poured over the substrate.
- The last step is to lay the tiles. For this, standard tile adhesive is used.
In turn, laying infrared heated floors using the “wet” method is more profitable from a financial point of view. It includes the following steps:
- First of all, it is necessary to install the heating elements of the IR floor;
Laying the infrared film sheet under the tiles is carried out according to the same rules as under other coatings
- Next, a protective polyethylene film is laid. This stage is the most important in the entire procedure of the “wet” method of installing IR. Experts recommend laying protective polyethylene film in 2-3 layers;
- At the third stage, reinforcement is installed. As a rule, a metal masonry mark is used for these purposes;
- then the screed is poured;
- Finally, ceramic tiles must be laid.
Note! The thickness of the screed should not be more than 10 mm, otherwise the efficiency of such heating will be significantly reduced.
Thus, the installation of film heated floors under tiles can be done by hand. The only thing that is necessary for this is strict adherence to the sequence of work.
Two methods of laying infrared film under ceramic tiles: “dry” and “wet” methods
Benefits of infrared floor
The main advantage of infrared flooring is its long service life. Other benefits include the following:
- no need to create a concrete screed for installation;
- installation in a few hours;
- compatibility with almost all types of flooring;
- minimum film thickness, which does not affect the calculated thickness of the floor finish;
- low heating inertia;
- Can be used in offices, gyms and public places;
- uniform heating of the room;
- ability to connect to the “smart home” system;
- minimal energy consumption;
- no negative impact on human health.
In a room with such heating, the air does not dry out and maintains a comfortable level of humidity. The installation and dismantling process is simple. If necessary, the floor can be dismantled and the film used in another room.
Disadvantages of infrared floor
Film floors have a large number of hidden contacts. Before laying the floor covering, it is necessary to check the functionality of the installed system.
Other disadvantages of infrared flooring include the following characteristics:
- work from 220V network;
- the inappropriateness of using such a heating system as the main one;
- the locations of infrared heaters should not be blocked by equipment or furniture;
- the need to create an intermediate layer with high strength when installing soft floor coverings.
Working from the network is a potentially dangerous factor. Despite the fact that there is grounding, as well as an automatic shutdown system, there is a risk of electric shock.
REFERENCE . Infrared flooring is not as economical as water flooring.
A particularly large gap in the cost of heating occurs if natural gas is used to operate the water floor. It is recommended to use such a heating source as an additional one.
Before laying soft flooring, it is necessary to create an additional durable layer. For this, plywood, fiberboard and chipboard can be used. Creating an additional coating not only improves strength, but also increases financial costs.