One of the main points of performing high-quality renovations in the bathroom with laying tiles or porcelain tiles on the walls and floor is sealing the seams.
If you regret and use a low-quality composition, perform the work in bad faith, then the quality of the entire finish will go down the drain, so let’s look at what types of tile grouts in the bathroom generally exist and how to work with them. It is important to understand that only strict compliance with all requirements and technology will allow you to achieve the expected result.
Types of grout based on material of manufacture
Depending on the material used as the main component in the manufacture of grout, inter-tile fillers are divided into the following types.
Cement
According to EN 13888, cement-based grouts are designated CG and, depending on their water absorption and abrasion characteristics, are divided into two classes.
Cement grouts are intended for filling joints on non-deformable monolithic bases (brick or block masonry, cement plasters and screeds). Suitable for use indoors and outdoors, on walls or floors. In addition to cement and fine sand, the aggregates contain mineral or chemical pigments and polymer modifiers that increase the plasticity of the finished mixtures. Depending on the plasticity (amount of modifiers and sand fractionation), the product is intended for filling narrow (up to 6 mm) as well as wide (up to 40 mm) joints.
The advantages of cement-based grouts include their versatility, the ability to be tinted in any shade, and their low cost. In addition, cement grouts, with a well-chosen shade, can hide minor defects and unevenness in tile laying, which, combined with the ease of preparation and application, makes this type of grout the most widely used. The disadvantages of cement compositions include their lack of resistance to moisture and their tendency to accumulate contaminants that literally eat into the coating.
Epoxy
Epoxy resin-based grouts are classified as reactive grouts and are designated RG according to EN 13888. Such grouts are almost completely waterproof. Their main area of application is swimming pool bowls and various tanks, where it is necessary to ensure maximum impermeability of the facing carpet, as well as industrial and laboratory complexes with special requirements for the strength and acid resistance of the floor covering. In domestic premises, using two-component grout is very problematic: the resulting mass has a high viscosity and does not fit well into narrow joints. The minimum application thickness is 3–4 mm.
But thanks to the high strength, durability and ease of cleaning the surface, the cost of filling joints with epoxy is completely worth it. In addition, hardened epoxy resin is resistant to any household chemicals and has a rich color that practically does not change throughout the entire life of the material.
Another advantage of using epoxy joint filler is the possibility of decorating with metal powder, which is added to the composition during its preparation. Such seams in the bathroom look original and attractive.
The main disadvantage of epoxy grouts is the price; on average, they are five times more expensive than cement grouts.
Polyurethane
Polyurethane grouts are made on the basis of aqueous dispersions of polyurethane resins. This product is a one-component composition, supplied in a sealed container (plastic bucket) and is completely ready for use. Polyurethane has high mechanical resistance, does not wash out, and forms a durable waterproof coating.
The recommended application width is from 1 to 6 mm.
Note! During long-term storage, the mixture may lose some of its moisture and appear dry. You just need to sprinkle a little water from a spray bottle and mix.
Polyurethane grouts are even more expensive than epoxy grouts, and this is their main drawback.
Silicone
Silicone grout (sealant) is sold in plastic tubes and is squeezed out with a syringe gun through a thin spout, which allows you to seal even the narrowest seams and crevices. Silicone grout has high adhesion to all types of tiles and most building materials, including those with a smooth and glossy surface. In conditions of high humidity, it is better to use moisture-resistant sanitary sealants, which are less susceptible to the formation of fungi, mold and other microorganisms on their surface. Available in a wide range of colors, which allows you to choose the composition for any shade of tile.
Silicone joint filler is designed for sealing corner joints, wall and floor tile junctions, as well as sanitary equipment to wall cladding (sinks, bathtubs, showers and trays). It is not used for grouting tile joints.
Note! The optimal ratio of the thickness of the sealant layer to its width is 1:2. If it is necessary to seal a deep seam or joint, it is recommended to place a tubular sealant made of foamed polyethylene into it, and apply a small layer of silicone sealant on top.
Correct technology for sealing deep expansion joints.
Latex
The term “latex grout” most often refers to latex additives added to cement mortars, tile adhesives and grouts to increase their ductility and other characteristics.
Latex additive for cement mixtures.
Additives are made from aqueous dispersions of synthetic resins and are used to add to solutions and adhesives instead of or together with water. In addition to increasing the plasticity and workability of cement compositions, additives increase the following indicators:
- Elasticity, which allows the use of solutions and grouts for heated floors and deformable bases.
- Abrasion resistance.
- Adhesion of compounds to smooth surfaces (stickiness).
- Reduce porosity, water saturation and tendency to contamination of cement mortars.
When introduced into colored grout, the additive does not affect the shade, but prevents it from discoloring and being washed out from the surface during use.
Furanic
Grouts made from furan resins have a dark, often black color. After curing, the grout practically does not absorb moisture, is resistant to acids and some chemical compounds, and ultraviolet radiation. During the manufacturing process, latex additives are introduced into the raw materials, which makes the hardened coating sufficiently elastic and resistant to mechanical, vibration and deformation loads.
The compositions are difficult to work with and toxic, so they are not used in residential premises; their main area of application is industrial and production facilities.
Cement products: classic traditions
Even the most ordinary fugues can help achieve good results when it comes to cement-based mixtures.
They consist of finely ground cement, softeners, various fillers and colors. When sealed with water or latex, these substances become elastic, resembling putty. According to content and application, they can be for wide or narrow seams. Grouts created for joints up to 5 mm have a basic content. For wide joints, cement mixtures with sand are used, which prevent cracking of the cement and fix it in a special form. The wider the seams, the coarser the sand should be. Cement mixtures are presented in ready-made or dry form. Finished products are used immediately after purchase. This is convenient, but not very practical, since after opening the mass may dry out. Therefore, use this material immediately. Dry powder is in great demand. First you need to dilute it with water or latex, and then apply it to the desired area. Dry mixes are an ideal option if you have a small job to do, as you can take a certain amount of powder from the bag and store the rest in a dry place until needed, since these products are not resistant to moisture.
Features of cement fugue:
- Comfort and ease of use;
- Combination;
- Rich color palette;
- Reliability;
- Affordable price.
Minuses:
- Under the influence of chemicals it becomes deformed;
- Not resistant to stains.
Tips for choosing a composition
Knowing the purpose and main characteristics of various types of grout, it is quite easy to decide on the required composition:
- For relatively dry areas of the bathroom, where splashes only occasionally reach, a regular cement composition is suitable.
- To fill joints in wet areas, for example, in a shower, it is better to use waterproof mixtures: epoxy, polyurethane or cement with additives.
Also, when choosing the type of filler for joints, the type of base: stone wall or sheet cladding is taken into account in order to select a material with the required degree of elasticity.
In addition, when choosing a grout, you should pay attention to the structure of the tile itself:
- If the surface of the ceramic is glossy, you should not use coarse-grained grouts, but rather fill the seams with finely dispersed cement grout.
- The shiny "glass" joint created by using epoxy aggregates works well with mosaics and colored glass tiles.
- It is best to fill the joints between porous and relief tiles with coarse-grained cement or polyurethane fugue.
Sealing the joint between the bathtub and the wall using polyurethane foam
Filling the seam between the bathtub and the wall with foam is one of the easiest ways to solve the problem. Especially compared to the outdated solution method. And one-component polyurethane foam, which has excellent water-resistant qualities, is best suited for these purposes. You just need to work very carefully, since polyurethane foam that gets on tiles, painted surfaces, or even hands is extremely difficult to clean off later.
The “foam” process of sealing seams is simple:
- first the seam is cleaned, degreased and thoroughly dried;
- the foam in the container is shaken properly and poured into the cavity of the leaking joint;
- 40 minutes are allotted for complete foam drying in a room with high humidity;
- excess foam along the edge of the bathtub is carefully removed with a painting knife;
- Then the sealed joint is designed at the discretion of the master.
Important: during the drying process, the polyurethane foam increases in volume several (up to 30) times. Therefore, it is necessary to clearly measure the amount of composition to be laid.
You will see a detailed description of the process of sealing a joint using foam by viewing this review:
Nuances of choosing a shade
The universal rule for choosing the color of the grout is to match or slightly darker/lighter than the shade of the tile. Another universal option is to use a white fugue, which matches most shades of ceramic cladding, visually slightly expands the bathroom, and also hides minor unevenness in the edges of the tiles and errors made during its installation better than other shades.
For the floor, it is recommended to select dark shades to fill the joints: this will make accumulated dirt and dust less noticeable. White grout on the floor will turn gray in just a few months.
For finishes with a rich pattern or made of multi-colored tiles, a transparent aggregate or a special “chameleon” mixture, which has a different shade from different angles, is suitable.
Another interesting option is to add metallic powder of golden or silver color to the fugue, which makes the seams original and provocative. But it is worth remembering that this method of highlighting seams is suitable for certain design styles.
Advice! If you want to use a contrasting color to fill the seams, you should be guided not only by your taste, but also by the compatibility of shades so that the cladding does not look tacky.
A detailed article about how to choose grout is here.
How to calculate the amount of grout
As a rule, manufacturers indicate on the packaging the approximate consumption of grout per 1 m² of cladding. The easiest way to calculate the amount of grout required is to use a special table that shows the consumption depending on the width of the joint and the size of the tile.
Another option is to do the calculation yourself. The following tile parameters are taken into account:
- length (A);
- width (B);
- thickness (h);
- planned seam width (d).
The density of the ready-to-use mixture (P) is also required for the calculation. The average density of cement grout is 1.7–1.8 kg/dm³. Next, the flow rate (R) is calculated using the following formula:
R=(A+B)/(A×B)×h×d×P (kg/m²)
For comfort. You can use a calculator that calculates using this formula.
*Grout density:
- Ceresit CE33, CE40, CE43 — 1.75
- KERAKOLL Fugalite Eco - 1.55
- KESTO Kiilto - 1.6
- LITOKOL Litochrom — 1.9
- LITOKOL Litochrom Luxury — 1.9
- LITOKOL Starlike - 1.55
- MAPEI Ultracolor Plus - 1.6
- MAPEI Kerapoxy Design - 1.6
Note! Regardless of the method for calculating the required amount of grout (tabular or obtained using a formula), add 10% to the value and purchase grout with a reserve.
Manufacturer
The leading countries producing grout are Russia, Italy, Poland and Germany. But if you carefully read the contents and features of the grout, you can choose any option. Inexpensive mixtures may vary in color and be difficult to apply. You can choose grout in our network of branded stores. The most popular brand is MAPEI. It represents Ultracolor Plus grout, which is created on the basis of modern technologies. The products of this brand have earned the trust of qualified specialists and ordinary users due to their high quality and durability. They are designed for sealing tile joints, stone and glass cladding. They are used for floors, walls, for external and internal work. Attention!
The fugue is sometimes based on silicone sealant, which is supplied in special cans or cassettes. But fugu cannot be replaced with anything. This product has a different direction - it isolates the cladding from other materials. It is wrong to completely seal seams with silicone sealant.
Grouting technology
Let's look at how to grout tiles in a bathroom with your own hands using the example of using a cement-based composition.
Necessary tool
To fill the seams you will need the following tool:
- Rubber spatula or grater.
A variety of shapes of rubber spatulas for working with grout mixtures.
- Knife and small brush for pre-cleaning seams.
- A metal spatula or a mixing attachment on a drill for mixing the fugue.
- Sponge or rags for cleaning tiles.
- A container for mixing the composition and a bucket of clean water for washing tools and tiles.
Advice! It is recommended to work with rubberized gloves, as some components of the grout penetrate deeply into the pores and can cause irritation of the skin.
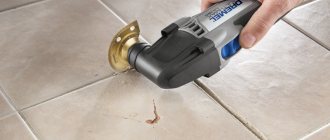
Cleaning seams
The preliminary stage before grouting is cleaning the seams from excess and residual glue. This is done mechanically using a special knife. You can also use a multitool with a reciprocating cutting edge. After grinding the tile adhesive and cleaning the ends of the tiles, dust and small particles are swept out of the seams with a small brush; you can use an old vacuum cleaner. After dry cleaning, go over the seams with a damp sponge to remove any remaining dust, but there is no need to wet the seams too much.
Note! It is not recommended to clean the seams with a grinder, since a cutting wheel rotating at high speeds can easily damage or cut off the edge of the tile, which will be noticeable after filling the seams with grout.
Preparing the mixture
An important step is preparing the mixture. Here it is necessary to follow the manufacturer's instructions and strictly observe the proportions of the ratio of water to dry mixture. The process of mixing the cement-based mixture itself is carried out in the following sequence:
- A measured amount of clean water is poured into a small container.
- The amount of dry mixture corresponding to the volume of water is poured into the water. If you have a helper, it is best to do this with constant stirring.
- Using a mixer, mix the mixture for 2-3 minutes; manual mixing will take longer and may result in lumps.
- After obtaining a homogeneous paste, a technological break is taken (2–3 minutes), after which the mass is mixed again.
Advice! After preparing the composition, it is recommended to immediately rinse the tool used, since after hardening the cement mixture is very difficult to remove.
A properly prepared mixture turns out to be quite plastic and a little “thin”, which should not frighten novice craftsmen. If you do not follow the proportions, it will be more difficult to fill narrow joints with a thick mixture, and besides, it will harden very quickly and become unsuitable for use.
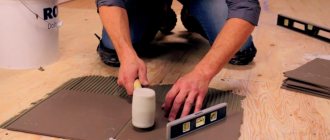
Filling and shaping seams
Having prepared the solution, they immediately begin to fill the joints. The mixture is applied with perpendicular movements, and the final shaping is done along the seam - this helps to more completely fill the space between the tiles. Having worked out a certain amount of grout (depending on the experience of the master and the speed of the work), until the grout remaining on the front side of the tile has dried, it is carefully removed. If you don’t have enough experience, it’s better to do this with a dry cloth or a special grater with a microfiber attachment. More experienced craftsmen do this with a damp sponge, while slightly “trimming” the seam.
When the tiles are cleared of fugue residues, they begin to form and seal the seam. To do this, use a special spatula. If you don’t have such a spatula, you can use a piece of wire in a double round braid with a diameter of 10–12 mm.
Using this spatula, they make wiring along the seam, pressing it tightly against the grout, as a result of which a neat, evenly recessed seam is formed. The protruding fugue should not be removed immediately, so as not to disturb the seam: let the solution dry a little.
After all the seams are formed and compacted, manual rubbing of the lintel seams formed at the “crossroads” is done. The final stage of filling the joints is to clean the tiles from the remains of the fugue. Immediately after finishing the work, this is done with a dry cloth, and if you give the solution time to dry (about 3 hours), use a damp cloth or sponge for cleaning.
Sealing the joint between plumbing fixtures and the wall
After installing the plumbing in the bathroom, the junction of the bathtub, shower tray and sink to the wall is sealed. The optimal material for this is silicone sanitary sealant. Let's look at the technology using the example of sealing the junction of a bathtub to a wall:
- The bathtub is filled with water so that it shrinks after installation.
- Then the edges of the bathtub adjacent to the wall are sealed with masking tape. The adhesive tape is also glued to the tiles so that there is a gap of approximately 10 mm wide.
- The resulting seam is filled with silicone sealant.
- After filling, the seam is leveled with a rubber or plastic spatula. If you don’t have this tool at hand, you can do this with your finger moistened with soapy water or wrapped in plastic wrap.
- While the sealant has not dried, carefully peel off the masking tape and leave the seam for 24 hours. After the silicone has completely dried, a neat and tight connection is obtained.
Mechanical cleaning
If it is impossible to remove contaminants, or if fungus penetrates into the deep layers of tile joints, it is necessary to completely or partially update it. Mechanical methods are used to remove used grout, as well as restore the coating with special compounds.
First, the entire surface is washed well with cleaning agents, after which the areas of maximum contamination are cut off with a stitcher or a stationery knife.
When removing the old coating, it must be taken into account that a layer of new grout is applied at least 2 mm thick.
After all areas of contamination and the spread of fungus have been removed, it is also necessary to use a cleaning agent, rinse the surface, and dry it well before starting work.
Is it possible to grout tiles with tile adhesive?
This is a frequently asked question, especially since most often the glue remains, and the grout must be purchased separately. Most craftsmen agree that for rooms lined with ordinary tiles, it is best to use grout, since it performs protective and decorative functions and is available in a large palette of shades, while the glue is gray.
Filling the joints with tile adhesive may be justified in the case when facades or other surfaces exposed to weathering are used with porcelain tiles. In this case, if there is no reliable waterproof grout, the seams can be filled with glue, since the unreliable grout will fall out of the seams over time, and the tiles will move away from the base under the influence of moisture. In this case, it is better to grout the seams immediately during installation so that the adhesive layer is completely monolithic.
We recommend watching a video on this topic and drawing your own conclusions about the advisability of this method.
Acid cleaner
In some cases, especially in old buildings where Soviet-era repairs still remain, the seams between the tiles were grouted with a cement-based compound. In this case, it is quite difficult to get rid of a layer of old grout material without preliminary preparation.
Using an acid softener
For this operation, you need to purchase an acid-based cleaner and several brushes, and do not forget about rubber gloves. To remove cement grout, apply a layer of cleaner to the seams and wait until the product softens the grout. The waiting time is indicated on the packaging of the consumables. After some time, the product should be absorbed, and the grout should be very easy to remove.
It is important to know! Modern acid-based cleaning products are absolutely harmless to tiles, so you don’t have to bother with arranging protection for them. It is much more important to worry about protecting the skin and mucous membranes from substances getting into them.
Return to content