You may not be a perfectionist, but you must hide the cracks in the bathroom. Let us allow ourselves to paraphrase Nekrasov’s well-known “verses” to clearly illustrate a simple but practical idea: at the junction of the bathtub and the wall, ugly cracks often form, which not only spoil the overall appearance, but also allow water to flow down, thereby causing much more serious troubles . How to seal the gap between the bathtub and the wall? In today’s material we will analyze in detail 5 options for solving the problem and visualize each of them with photographic examples from life.
- Why is joint sealing necessary?
- We use cement mortar;
- We use polyurethane foam;
- Another option is silicone sealant;
- Ceramic skirting boards are a beautiful solution;
- Border tape is the final touch;
- Useful materials. 3 video instructions;
- Conclusion.
Where does the gap come from?
Before deciding how to close the gap between the bathtub and the wall, you need to understand how big the gap is and how it appeared in the first place.
- The bathtub is small compared to the size of the opening under it. If the length of the container does not match the dimensions of the niche, you will either have to select a larger model or do something with the dimensions of the opening.
- The walls are not level. This problem often occurs in houses where internal partitions are made of blocks or bricks. However, ready-made plumbing booths in high-rise buildings are also often “pleased” with littered corners and curved surfaces. Everything is simple here - you have to level the wall. This is necessary not only to eliminate the gap, but also for subsequent normal wall cladding.
- Uneven edge of the bathtub itself. It is rare, but it happens in cast iron or steel cheap models. Unfortunately, this defect cannot be corrected; you will have to fill the gap with something.
- It is not possible to move the bathtub close to the wall. If the width of the gap is too large, conventional sealing methods are not suitable; an insert must be made.
In any case, the size of the gap and its shape - flat or with expansions/constrictions - greatly influence the choice of sealing method. A gap of 2…3 mm can easily be eliminated with sealant or cement mortar, 3…10 mm will require the use of mounting foam or a small spacer, and wide “dips” can only be eliminated with the help of inserts and sealing.
Tile grout
One of the easiest ways to seal the joint between the tub and the tile is to use what you already have at home. Surely, after grouting the joints between the tiles, you have some mixture left. But be careful: this method is used only at joints no larger than 0.5 cm.
Tip: For an aesthetically pleasing overall look, use the same shade of grout as on the tiles. Most often it is contrasting classic white or any other color of the tile.
The only drawback of tile joints with grout is the appearance of rust, mold and dirt after some time. To avoid this, use Fugue-Shine impregnation for tile joints. It glazes the surface, makes it smooth, and protects it from moisture and stains.
The list of work for grouting gaps near the wall is the same as for the joints between tiles. Prepare the mixture itself, water, a container, a rubber spatula and a sponge. Correct procedure:
- Clean the gap from dirt and dust.
- Wet the surfaces with water.
- Dilute a small amount of grout.
- Fill any gaps using a rubber putty knife. Hold it at a 45-degree angle and press as hard as possible to ensure the joint is sealed.
- Wipe off excess mixture with a damp sponge no later than an hour after completion of work.
If you are going to treat the gap with Fugue Gloss, wait 72 hours until it hardens completely and apply the composition with a brush. Remove excess with a dry cloth.
In the photo, covering the joint with grout
Preparing to install a bathtub
To reduce the size of the problem and make it easier to seal the seam, you must perform the following procedures:
- Be sure to level the walls and floor of the bathroom. A horizontal skew of the bathtub (one edge or corner is higher than the others) will in any case create difficulties during operation, but in addition it can lead to the appearance of a gap after installation. This is due to the fact that under the weight of the collected water and the person in the container, the bath may settle and the sealing of the joints will be broken;
- check that the dimensions of the bathtub and the opening/niche under it match. If necessary, you can adjust the dimensions of the niche by chipping the walls. This is done when the dimensions of the bathtub along the edges are slightly, literally 2...10 mm, larger than the size of the opening. With this installation method, the bathtub “fits” its sides into the body of the wall;
- waterproof the walls above and below the sides of the bathtub, and better yet, on the floor.
After such measures, the width of the gap between the bathtub and the wall can be reduced to 1...5 mm.
Choosing the composition of the grout mixture
It is wrong to base your choice of grout for bathroom tile joints on advertising. You need to decide on the following parameters:
- Purpose. Grout can be intended for thick or thin joints, or it can be universal. A seam is considered thick if its size exceeds 5 mm. If there is a small distance between the tiles, almost any composition will be suitable for sealing it. But large cracks are covered with fugues containing coarse sand;
- Compound. Construction grouts are produced on the basis of cement, epoxy and furan resins. If you are going to work with your own hands, it is recommended to seal the tile seams in the bathroom using cement compounds;
- Release form. Grout intended for bathroom tiles is available in the form of dry mixtures or ready-to-use formulations packaged in plastic buckets. Dry mixtures are packaged in paper or plastic bags; dilution requires water or water-based silicone;
- Color. Manufacturers add various pigments to the grout to give it color. The color palette of fugues is extensive; if you want to get a shade that is not in it, you can create it by mixing a white composition with a special color.
How to seal the gap between the bathtub and the wall
The most popular methods of closing a gap are:
- cement mortar, in pure form or with inserts from other materials;
- polyurethane foam (similar);
- sealant - only for narrow cracks (up to 5...8 mm) or in combination with other materials;
- borders and inserts made of metal or plastic;
- self-adhesive curb tape;
- panels made of plastic or other materials, with additional sealing of joints (with wide gaps, more than 20 mm);
- cladding with tiles, mosaics, and other materials according to the design of the bathroom with a pre-installed support insert and sealing of joints (gap 20...30 mm or more).
The choice of a specific method depends on the skills of the repairman, his budget, as well as the time of work and the required duration of operation of the protection. So, if you need to seal a gap in a rented apartment or temporarily seal a bathtub in your own before major repairs, options 1, 3, 5 are suitable.
Below are more detailed instructions on how to eliminate the gap in general and seal the joints.
How to fix a joint between a bathtub and tiles using cement
When choosing this method, you need to remember that cement gradually breaks down under the influence of water, so you either need to protect the material from water with something on top, or use this method as a temporary solution.
Sequence of work:
- the surface of the walls and bathtub is cleaned of dirt, grease, debris, and moistened for better adhesion to cement;
- the width of the gap is checked - if the gap is more than 2...3 mm, the solution will flow (fall out) down. Filler is inserted into wide slots. This could be an elastic tube of suitable diameter (slightly larger than the width of the gap), cut strips of porous rubber, or even just a rag soaked in cement mortar;
- a cement mortar of the thickness of sour cream is mixed (the proportions can be found in the article);
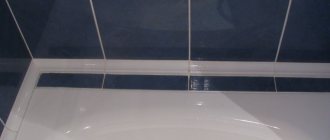
- The prepared solution is first placed in the gap, after which it is removed as much as possible from the surface of the bathtub rim. Ideally, the seam should not protrude beyond the level of the upper plane of the bathtub - this will help to better disguise it during further finishing. A good option is to make a smooth transition from the side to the wall, as shown in the illustration.
Below is shown the WRONG way to seal a gap with cement - the side is made very massive, extends beyond the boundaries of the upper plane of the bathtub, and has a loose connection with the side and walls. This happens if a very dense solution is used and the rules for gradual hardening of the mixture are not followed.
Such a “seal” requires additional sealing.
Important: in order not to subsequently wash the bathtub and the wall from particles of cement mortar, it does not hurt to seal the surfaces next to the place where the seam is created with masking tape. This method of surface protection is suitable for almost all sealing methods. If you are installing a new bathtub, you can partially leave the packaging film on it, securing it with masking tape or tape so that it does not move during operation.
After the solution has completely cured (depending on humidity and temperature, as well as the amount of solution, the process may take 2...10 days), sealing with moisture-resistant material and finishing are performed.
Cement mortar
Cement grouts still have not lost their relevance. It is necessary to clean the area being treated, regardless of the type of substance used.
Using cement to treat the surface of a tile allows you to resort to cement. This type of substance requires special skills, accuracy, and careful subsequent finishing. Compounds for installing tiles are famous for their higher levels of tenacity. They are much less susceptible to moisture and gain strength very quickly.
If the seams are large enough, use a special tape. Be sure to ensure contact with the surface of the tile.
The composition has the ability to absorb water. You will have to work a little magic on its impenetrability. Polymers and latex will solve this problem without difficulty. You can pour epoxy resin on top, then no water treatments will harm such a barrier.
The material has both its advantages and disadvantages. The main plus is strength and budget.
In direct contact with water, it can deteriorate very quickly. The surface must be treated. A good option for this modification to ensure safety is to impregnate it with mastic. Can be coated with a layer of epoxy glue.
It is important to carry out high-quality decor. You can use moisture-resistant paint, tiles, and ready-made borders. You can show an element of fantasy: lay out a pattern, fill it with a transparent, moisture-resistant composition.
Sealing with cement using inserts (for large gaps)
If the empty space between the edge of the bathtub and the wall is too large, you will have to use auxiliary measures - for example, special supporting elements.
Among such elements are:
- brick or concrete blocks, whole or in fragments. They are either inserted into the gap by surprise (in small pieces), followed by sealing the gaps with cement mortar, or laid out in the form of a wall using the same mortar;
- metal brackets and beams. Typically, in this case, moisture-resistant sheet material is laid on top of them.
Next, the resulting flat surfaces are finished with tiles, and the joints between the tiles and the side are sealed with other materials.
Causes of a gap at the wall
The main reason for the appearance of space is the imperfection of the geometry of the room
Most often, cracks in joints appear as a result of:
- poorly poured screed on the floor;
- curvature of walls caused by errors in brick laying or non-standard room configuration;
- non-compliance of corners with established standards (may be due to poor-quality wall plaster);
- defects in plumbing elements (for example, an uneven side).
The main reason for gaps is crooked floors or walls.
Drywall and other panels
This method of solving the problem is only suitable if the surface of the panels is carefully protected from water, because even moisture-resistant drywall cannot withstand direct contact with water and constant high humidity.
GKL requires good waterproofing at the ends of the sheets and painting with waterproof paint on the reverse side; OSB panels, chipboard, fiberboard, wood - high-quality waterproof impregnation. The panels are laid on a prepared frame, wooden (also impregnated) or metal. Typically, this method of closing the gap is used in conjunction with installing a protective screen under the bathtub.
The panels are also finished with tiles, waterproof paint or high-quality plastic.
Ribbon
A simple, convenient, expensive way. This option can only be used in combination with other types of surface protection. It is only suitable for short distances. The application site must be treated with a cement composition or foam for installation.
Modern industry offers a wider or narrower option. The use of such decor eliminates the need for additional work.
To increase adhesion to the surface, you can use sealant, liquid nails, and glue. It is important to pre-degrease, wash, and completely treat the surface.
An additional advantage is speed of installation. Such work will only take a few minutes, but will last a long time.
Polyurethane foam
A very quick and popular way to eliminate a gap, including one of irregular configuration and quite large width. The installation is very simple:
- the edge of the bathtub and the wall nearby are cleaned of dirt and debris, protected from foam with masking tape (it is better to cover the entire bathtub with film);
- after shaking the container, the spout is inserted into the slot and the required amount of foam is blown out;
- The finally frozen foam is carefully cut with a knife to the level of the side of the bathtub.
Important: foam does not completely prevent water seepage between the side and the wall! The seam sealed in this way must be finished on top and additionally sealed!
How to seal a seam between a bathtub and a wall using a ceramic border
This method will not work if there is a large gap between the bathtub and the wall. It is acceptable for a gap of 15...40 mm. Ceramic borders are usually purchased complete with facing tiles. It can also be purchased separately, based on roughly similar color and design.
In addition to the border itself, manufacturers offer connecting corners, and often finishing (end) elements.
The advantage of using such a ceramic plinth is that you can seal not only the joint between the wall and the bathroom, but also the corner between the walls. It is important that the surfaces are perfectly smooth.
You can also use frieze tiles or border tiles.
They are installed in the same way as regular wall tiles, using cement mortar or glue. Addition – mandatory seam sealing.
What happens if you don't seal the joint?
The bathroom is a special room, a special microclimate. High levels of humidity, increased evaporation, stuffiness, poor-quality repairs and waterproofing carried out with errors - all these are the reasons for the appearance of not only cracks and leaks, but also fungus, mold, harmful microorganisms, and a disgusting odor.
Do not delay in eliminating these phenomena, otherwise all this will lead to the destruction of the walls and have a detrimental effect on the well-being of the residents. If it happens that a gap appears near metal structures, they will rust. The main thing is to prevent serious leaks, otherwise you will not avoid problems with your neighbors.
If the joints are not sealed, fungus and an unpleasant odor may appear in the bathroom.
Metal corner corners for cladding
This method is applicable at the stage of creating the cladding. The metal corner is attached to the wall so that its bottom shelf fits snugly against the side of the bathtub. Next, the bottom row of tiles is inserted into the groove of the corner or directly onto it (depending on the design).
Sealing is necessary, because otherwise dampness will penetrate under the tiles and gradually destroy the adhesive composition.
Plastic borders
This method is one of the simplest and is possible even with a fully installed bathtub and a tiled wall. In fact, it is a relatively flexible plastic profile that is glued to the joint between the side and the wall using sealant.
There are two main types - overhead (left) and insert (right) profiles. They are used depending on the width of the gap and the location of the bathtub in relation to the wall. If the joint is tight, you can refuse to use sealant, simply insert the profile “with tension” into the cleaned gap, but it is still better to attach the plastic plinth to the sealant.
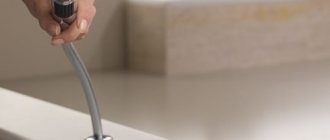
Silicone sealant
To seal a small gap between the tiles and the bathtub, silicone sealant is used as the main installation material. Gaps reaching sizes up to 3 cm require pre-treatment of the joint with polyurethane foam. Purchase a sanitary sealant that will prevent future mold from appearing in the bathroom . The sequence of work to seal the gap is as follows:
- The surfaces of the tiles and bathtubs adjacent to the joint are treated with a solvent for the purpose of degreasing.
- Paper tape pasted along the joint will prevent contamination of the bathroom and tiles.
- After making a hole in the tube, attach the supplied tip to it.
- Having secured the tube in a special gun, silicone-based sealant is carefully distributed over the joint.
- The designated area between the tiles and the bathtub is filled in a single movement. It is impossible to apply an additional layer to the frozen mass.
- Prepare a soap solution and a brush of suitable width.
- A brush dipped in a soapy solution is passed over the silicone joint to give it a smooth surface. Movements must have a strict direction. Chaotic strokes will lead to the formation of an uneven surface.
A rubber spatula can be used to notice the brush. As a last resort, you can smooth the seam between the tiles and the bathtub with your finger or spatula. After the silicone joint has dried, the paper tape is removed. If it is missing, remove excess installation material from the bathtub and tiles using a damp cloth.
Important! When working in the bathroom, take care to follow safety precautions.
Working with solvents requires that the room be well ventilated. A mask and gloves will protect against the negative effects of chemical fumes and prevent skin damage in case of contact with a caustic substance.
Sealing
In all of the methods described above for sealing a gap, there was advice to cover the gap with sealant. This is almost always special silicone or similar materials.
Narrow gaps can be sealed with silicone without additional measures to eliminate the gap; if there is a large free space, it will only be an addition to the main measures to eliminate the problem.
Important: before filling the seam with sealant, it is necessary to protect the surfaces from contamination, since it can be difficult to wash off silicone even from enamel and glazed ceramics.
A strip of silicone inserted into the seam is smeared, rubbing into the gap so that water has no opportunity to penetrate where it is not supposed to.
The excess is cut off with a knife or a special tool.
The sealant is selected to match the color of the facing tile or bathtub; most often a white or transparent version is used.
Temporary measures
If a gap appears unexpectedly, and there are no plans to carry out repairs in the near future, you can use a budget-friendly and quick, but, unfortunately, not very durable method of sealing the seam - using self-adhesive tape.
The tape is simply glued over the joint so that the fold falls on the line separating the two surfaces. The procedure is very quick and does not require much effort or skill.
The surface, of course, must first be cleaned and degreased - this will improve adhesion and help the tape last not 8...12 months, but at least two years. However, the duration of use also depends on how actively the bathroom is used.
You can watch the installation process in the video.