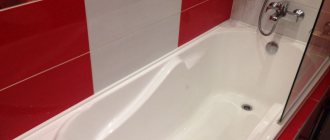
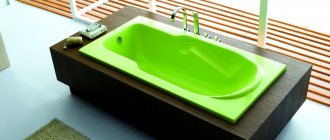
Liquid acrylic allows you to restore the coating of an enamel bathtub. There is a special method for this, called “filling”. The use of liquid acrylic has replaced the renovation of bathtubs using the cold enameling method, the main disadvantage of which is the creation of a fragile and short-lived enamel coating.
An old bathtub can be inexpensively restored using acrylic.
Enameling bathtubs with liquid acrylic, which appeared later, gained the greatest popularity due to the absence of these disadvantages that are inherent in cold enamel. In general, competent application of acrylic requires a certain skill. Restoration using this method is carried out in two stages. At the first stage, the surface of the bath is prepared, and at the second, acrylic is directly applied to it.
How to seal a bathtub: choosing a method
Depending on the material of the wall decor and the size of the gap between the bathtub and the wall, you can use the following to seal it:
- self-adhesive curb tape;
- silicone sealant;
- tiled fugue (grout);
- decorative border made of plastic or ceramics.
All options are quite simple to implement independently. But the final decision on how best to seal the bathtub can only be made by the owner. After all, the question is not only about reliability, but also about aesthetics.
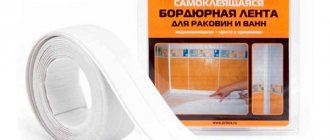
Assortment of border tape
There is no standard size for products. They are available in different sizes and colors, allowing you to choose the best option for your bathroom. Otherwise, there is practically no difference between the products. True, some manufacturers may not add phytonicidal additives to the composition, which leads to a lower cost of production.
Now let's look at two obvious differences:
- Bathroom border sizes. As for the length, it is standard. One roll contains 30 m of tape. The width varies. On the shelves you can find products in 30, 40 and 60 mm. It is rare to see narrow or wide products. The choice of width depends on the size of the gap formed between the bathtub and the wall. The tape should cover it completely, it’s good if there is still a small margin left. However, there is no need to make it big either, as the appearance will deteriorate.
- Color spectrum. White is the standard color for border strips. However, he is not the only one. Depending on the design of your bathroom, you can choose a border strip that will harmoniously fit into the interior. For example, it can be beige, cream, blue. There are other light shades on sale.
Therefore, before gluing the border tape in the bathroom, you need to decide on the width and choose the color of the product. The installation process itself consists of several stages that should be followed.
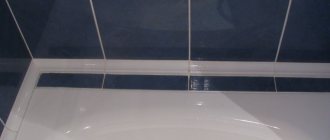
Sealing the bathtub with self-adhesive tape
Border tape is designed specifically for decoration in wet bathrooms. It is made of polyethylene, one side of which is coated with waterproof glue.
Before gluing the bathtub to the wall, it should be cleaned and degreased. Then cut the border to the required length. The protective strip from the adhesive layer should be torn off gradually, and not all at once from the cut piece.
Important! The shelf life of the adhesive is strictly limited; if the packaging is improperly stored or damaged, the adhesive layer begins to deteriorate. Such tape will not last long in the bathroom.
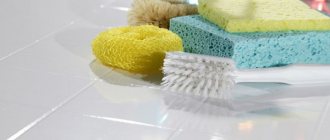
Daily bath care
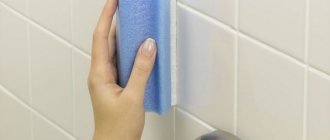
As mentioned above, in order to avoid lengthy procedures for cleaning complex stubborn stains and stains, it is advisable to at least lightly wash the bathtub after each water treatment. This process will not take much time, as it consists of very simple manipulations:
- The sponge can be soaped with any soap, but to speed up the procedure, it is better to use liquid types of soap.
- Then rub all surfaces of the bath with this sponge.
- After this, the container is rinsed generously with warm water.
- The final mandatory action is to wipe the bathtub dry with a cloth that absorbs moisture well.
Such actions will prevent the appearance of stains and plaque, and, most likely, will completely eliminate the need to use chemical detergents. Thanks to this, the bath will last much longer without losing its original fresh appearance.
Find out how to remove fungus in the bathroom, and also check out ready-made formulations and folk remedies from our new article on our portal.
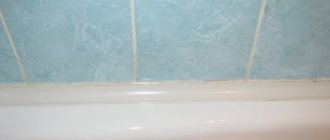
Sealing seams in the bathroom with grout
Tile grout, also known as fugue, is a dry mixture of white cement with additives of polymers and antiseptics. It can not only grout tile joints, but also easily seal the bathtub, but only gaps of no more than 5 mm.
It is applied to the seam between the bathtub and the wall with a small rubber spatula. To prevent the side and tiles from getting dirty with the mixture, you should glue them with masking tape.
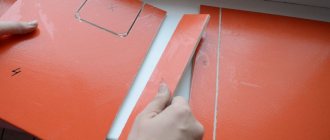
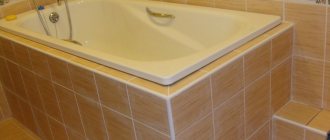
Closing the gap between the wall and the bathroom with a decorative border
The bathtub can be sealed using a plastic or ceramic border. Depending on the thickness of the gap, its size is selected, and conventional adhesives for ceramics and plastic are suitable for gluing.
When choosing how to seal a bathtub, which method to prefer, you need to think carefully. Of course, a lot depends on the width of the gap. But silicone sealant will provide optimal protection, and a ceramic border is more aesthetically pleasing. It is best to combine both of these options, and in order for everything to work out the first time, you need to watch video instructions for working with various sealants.
Sealing joints and seams of all surfaces is an important stage in bathroom renovation. If moisture constantly seeps into the walls and onto the floor, this will lead to the appearance of harmful microorganisms on them. In addition, leaks to the lower floors will become possible.
In our article we will look at all the methods by which you can seal a bathtub with your own hands.
Note! First of all, the sealing method depends on the distance between the wall and the bathtub, as well as on what finishing coating you used on a particular surface.
Characteristics of border tape
Modern manufacturers offer a wide range of different decorative disguises for such gaps. Among them, bathroom border tape has become quite popular. It is an adhesive-based strip made of polymers. This material is highly resistant to various persistent chemicals and acids. In addition, such decor is hydrophobic and does not contribute to the emergence of harmful microorganisms on its surface.
This sealant is affordable and easy to install and dismantle if necessary. In addition, the material has a rich color palette and looks very attractive throughout its entire service life.
The scope of application of polymer strips is very wide. They can be used in almost any room with different functional purposes. Therefore, when purchasing a product, check where you plan to use it. In the bathroom, border decors can be used to decorate the seams between the walls and any plumbing fixtures, including shower boxes and washbasins.
The product is released in bundles. The length of one such roll is about three meters. In this case, the thickness and width of the decor may vary. The entire back surface of the strip is impregnated with butyl adhesive, which will allow it to be hermetically installed on the problem area. The material itself is quite hygienic, although for reliability it is impregnated with antifungal additives, which prevent the occurrence of mold at the joint seams.
Among the polymer analogues presented for these purposes, decorative borders will be the best choice. Other plastic skirting boards will not be able to resist the proliferation of fungal microorganisms as effectively. As for the complete sealing of the joint with tiles or porcelain stoneware, such an undertaking will require lengthy work and certain skills in cladding. In addition, this material will cost significantly more, and will require additional measures to seal the seam.
Grouting joints with tiled fugue
If the joints around the perimeter of the bathtub are small - up to 0.5 cm, you can seal them with a special tile grout - fugue. You can use either a white composition or add a color to it to match the color of the facing materials of the room.
In addition, ready-made colored grouts are also available for sale. It is worth noting that in the bathroom it is necessary to use a special fugue designed for swimming pools and wet rooms, that is, waterproof. To prevent the composition from changing color due to dirt and rust, you can additionally treat the joints with a special gloss.
Using the same principle, the bathroom floor can be sealed if its topcoat is ceramic tiles.
Varieties
Manufacturers offer a fairly large assortment of seals for the bathroom, because the quality of sealing depends to a large extent on the correct selection of the tape for specific conditions. The following classifications of borders for sealing joints are distinguished:
- By width. The width of the sealing tape can range from 1 to 6 cm. Narrower models do not close the gap well, so they are effective only with a small gap width. Wide tapes insulate the seam well, but do not look as aesthetically pleasing.
More experienced craftsmen recommend choosing a sealing tape so that its width is 0.5 cm greater than the width of the seam. This selection principle allows you to correctly determine the curb needed to fill the gap.
Application of moisture-resistant sealant
If the gaps between the wall and the bathtub, as well as the sink, are up to 1.5 cm, you can use a sanitary moisture-resistant bathroom sealant to seal them.
It will be best if you purchase a silicone or silicone-acrylic composition intended for wet rooms.
It can be transparent, white or colored according to your taste.
The packaging of the material can be a tube or cartridge.
For the latter you will have to purchase a special pistol.
It should be noted that it will cost very little, and at the same time, gun sealants are of higher quality than those in tubes.
- “Moment”, German company Henkel;
- "Titan", Polish company Selena;
- “Delta” and “Tiger”, German concern Den Braven;
- "Wepost", the Russian company Sazi.
It is worth mentioning separately that if it is necessary to seal an acrylic bathtub, then this will require a special composition for polymer surfaces.
- Clean the sides of the bathtub from traces of dirt and dampness. After this, thoroughly dry them, as well as the walls adjacent to them.
- Next, the joints to be treated must be degreased with a solvent.
- To ensure that the seam is even, define its boundaries by gluing paper masking tape, which can then be removed.
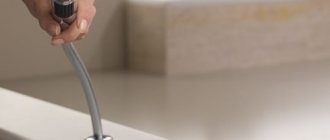
- Next, cut off the tip of the spout from the tube or cartridge to the required depth. The diameter of the resulting hole, as well as the cutting angle, will determine the width of the seam. For example, by making an acute angle, you will get a neat and thin joint.
- Next comes the direct sealing of the seam between the bathtub and the wall. Insert the cartridge into the gun (in the case of a tube, no preliminary actions are required) and get to work. Press the tube or gun handle smoothly and evenly to create a continuous and even seam around the perimeter.
- To distribute and smooth the silicone, soak your finger in soapy water and run it along the joints.
Calculator for calculating sealant
A simple calculator looks like this:
Tools and materials for work
To get the job done quickly and efficiently, you should make sure you have the following tools and materials in advance:
- bath border tape self-adhesive;
- tape measure, knife;
- a product or liquid that can be used to degrease the surface. Often, ordinary ammonia, acetone or solvent are used for this purpose. And to apply the product, use a cotton wool or cloth;
The good news is that the only tool used is a mounting gun, which even those who picked it up for the first time can handle. And the cost of all components of the list is low. When everything is ready, you can start working.
Ceramic tile plinth
If the gap is large enough - 2/3 cm, then sealing the bathroom can be done using ceramic skirting boards.
There are three options on how to do this.
- For this purpose, you can purchase special ceramic borders used as skirting boards.
- A good option is to use friezes from the same tile set that was used for wall cladding.
- And finally, the cheapest, but also the most labor-intensive and complex method is to cut tile baseboards.
If the gap is very large, so that the mortar does not fall through when laying tiles in the bathroom, you can blow it out before starting work with polyurethane construction foam. Glue the tiles onto a regular cement-sand mortar, placing them at an angle of 45.
By the way, in a similar way you can seal the joints between the walls and the floor in the bathroom.
Some useful tips for caring for acrylic bathtubs
In conclusion of the publication, summing up all of the above, we can repeat ourselves somewhat, highlighting the key points that are important to consider when caring for acrylic plumbing fixtures:
- In order not to have to deal with the very laborious, time-consuming and effort-consuming work of cleaning a heavily soiled bathtub, it is recommended to wash it regularly, after each water treatment.
- It is necessary to monitor the serviceability of water taps and showers - there should not even be signs of water leaks anywhere. All faucets should be tightly closed after each use. This way you can avoid the appearance of hard-to-remove yellow rust stains on the surface of the bowl.
- It is recommended to rinse the bathtub with hot water, which will add shine to the acrylic.
- Before choosing and using a new detergent, you should carefully study its composition and method of use. It is better to test it on an inconspicuous small area of the surface.
- It is necessary to protect acrylic surfaces from mechanical influences, from contact with sharp objects, as well as from animal claws.
- You cannot place a stool on the bottom of the bathtub, using it, for example, as a support for the basin during hand washing. Point pressure from its legs will certainly lead to damage to the acrylic surface.
- If coloring substances get on the surface, they should be removed immediately, not allowing them to be absorbed into the pores of the polymer. Stubborn stains will be very difficult to remove.
- It is recommended to keep the bathtub dry, so it is advisable to wipe it with a soft, moisture-absorbing cloth each time after use and cleaning.
* * * * * * *
If you thoroughly understand all the nuances of caring for acrylic bathtubs and their minor repairs, it will be easier to cope with both prevention and cleaning. The main thing is not to make difficult-to-correct mistakes in this matter. In addition, who knows, it is possible that, after reading the information, some homeowners who are thinking of replacing their steel or cast iron bathtub with a fashionable acrylic model will abandon this idea altogether.
In conclusion, an educational video about caring for an acrylic bathtub.
Plastic corners, skirting boards and borders
Bathtubs can also be sealed using plastic corners used when installing PVC panels or plastic skirting boards with rubberized edges. You can glue them on “liquid nails”.
Note!
This option is convenient because it can be used both for wall cladding and for subsequent renovations of the premises.
Another plus is that the plastic is elastic, and as a result, compensates for all movements of the bathtub that are inevitable during its operation.
It is best to use corners or baseboards over joints that have been pre-treated with sealant. If the plastic comes off, the silicone will prevent water from leaking inside.
Special plastic curbs for bathtubs are also available for sale. They are installed in the same way as baseboards.
What products can harm the surface of the bathtub?
Before removing silicone and buying expensive preparations, determine the degree and duration of surface contamination. Small stains can be removed with weak solutions and gentle household chemicals. Old sealant is removed by strong acids that damage the enamel.
An important rule is to wait a while and wash off the liquid with plenty of water.
Metal brushes cause great harm to ceramic, cast iron, and acrylic products. Cracks and deformations appear. Damage to the top layer of the surface leads to large contaminations.
Products prohibited for cleaning acrylic bathtubs
- Organic solvents. Abrasive powders.
- Hard metal brushes, blades, knives.
- Gasoline, ammonia, and chlorine-containing substances can destroy the structure of the product.
Cast iron products are afraid of:
- Rough brushes, fiberglass sponges.
- Hydrochloric, oxalic acid, alkali, formaldehyde.
Enameled products are resistant to acids and alkalis. Metal objects have a negative effect on their condition.
Sealing self-adhesive tape
Another option for sealing an acrylic or metal bathtub is to use a special tape. The material has different widths and is designed for different sizes of the gap between the walls and the plumbing fixture.
The tape must be glued strictly according to the attached instructions, otherwise it may quickly come off. To prevent this from happening, you can play it safe and glue it to a sealant or “liquid nails.”
Apply silicone or glue to the joint and immediately press the tape to it. Next, remove excess adhesive.
Which sealant is best for the bathroom?
A special sanitary sealant is better suited for the bathroom. These sealants contain special additives that prevent mold from appearing. They are also very moisture resistant and will withstand cleaning with household chemicals.
Among the professional ones, we recommend silicone acid sealant for the bathroom of the Tytan Professional brand - “Sanitary”.
Of the cheaper, but no less bad, an excellent alternative would be the trademark “Tytan Euro Line” - “Sanitary” - or “Soudal” - “Sanitary silicone”. If this seam needs to be painted, then “Tytan Professional” - “Rainbow Silicone” is perfect.
Sealants that are suitable for acrylic bathtubs: “Tytan Professional” - “For acrylic and PVC bathtubs” - or “Soudal” - “Neutral silicone”. They will not damage or stain the surface of the bathtub.
What to do if the bathroom floor is wooden
If you need to seal seams in a bathroom with wooden floors, use a special wood joint sealant. It has a high stretch coefficient, so it compensates for compression and expansion of the coating. In addition, such sealants allow the wood to “breathe”.
Such materials are available in a wide range of colors, so you can easily find the one you need specifically for your type of wood.
As you can see, when renovating a bathtub, sealing can be done in a variety of ways. All you have to do is choose the method that suits your case, purchase the necessary materials and feel free to get to work.
Excess humidity is the main negative factor that affects the appearance and durability of finishes and plumbing fixtures in the bathroom. Despite the fact that for repairs in this room, special sustainable materials are used, developed taking into account the characteristics of its microclimate, moisture seeping into the slightest gaps leads to accelerated wear of the finish, the appearance of fungus, and an unpleasant odor.
To minimize the impact of water, completely seal the seams between the bathtub and the wall using silicone sealants, ceramic or plastic corners. A special bathtub curb tape equipped with an adhesive layer can significantly simplify the process of sealing cracks.
Types of curb stripes
Despite the not very rich assortment of this material, there is still a choice. Firstly, this is the width of the tape and the number of stripes on it. There are borders that can be bent in half or into three parts. Accordingly, this will give a different geometry to the closed gap.
As for the width of the product, the optimal solution would be to buy a tape with a small margin, for example, 5 mm more than the gap that needs to be closed. Stripes that are too wide will not look very aesthetically pleasing, and narrow stripes will not disguise the gap. Therefore, before making a purchase, measure the dimensions of the seam.
It must be said that the standard size of the decor varies from three to six centimeters, and its thickness reaches two millimeters. For openings up to five centimeters, one roll of tape is usually enough to fill the gaps on three sides of the installed bathtub.
Secondly, you can choose a decor that matches the color scheme of the bathroom interior. Of course, there are differences in the palette of shades of border strips. Most often you can find white or bluish products on sale. However, you always have the opportunity to purchase material in other tones by ordering the desired color in the catalog. Typically available in black, green, pinkish, cream and other popular shades.
Reasons for use
The main condition for the absence of excess moisture is the careful sealing of all seams and gaps into which water can seep. Often, gaps remain when installing a bathtub close to the walls of the room due to a mismatch between the size of the model and the room. To seal this seam, depending on its width, use silicone sealant, curb tape, ceramic or plastic corner, and moisture-resistant solution. If you leave the seams unspecified, the following unpleasant consequences will occur in the bathroom:
Note! Mold on the seams and wall cladding in the bathroom is not just a cosmetic defect that spoils the appearance of the room, it is a serious violation of sanitary standards. Spores spread by the fungus enter the human lungs, making breathing difficult and causing allergic reactions.
How to effectively remove traces of sealant from a bathtub
Silicone sealant has high adhesion and chemical inertness. If the master glued it recently, you can easily wash off the remaining silicone. But over time, it dries out and eats into the surface. It is possible to clean silicone in the bathroom using a combination of various methods. There are mechanical, chemical, and home methods for removing sealant from surfaces.
The main condition for use is not to damage the coating.
How to degrease a bathtub before restoration with liquid acrylic.
There are many opinions from different craftsmen regarding the proper preparation of a bathtub for restoration. There are a lot of discussions.
Mechanical methods
- Take a knife with a thin, sharp blade, a scraper, a spatula, and a nail file. Household chemical stores sell sealant remover spatulas and Kimtech wipes.
- Remove dried areas of silicone. Start with large areas, and for small ones use an eraser or pumice stone.
- Apply a mildly acidic chemical.
- Rub the surface with a dishwashing sponge or washcloth.
- Alternatively, use sandpaper.
- Rinse off at the end.
It is possible to remove silicone from a bathtub by mechanical intervention when you are sure that scratches will not appear on expensive equipment. Tile is a fragile material. The method is not suitable for ceramic tiles; defects cannot be avoided.
Device
Border tape is a special means for sealing seams, which is a long strip of polymer base, impregnated on one side with a butyl adhesive. It is sold in rolls up to 3 meters long. One package of this sealant is enough to seal the seams between the bathroom and the walls. Self-adhesive border tape has the following properties:
Important! Self-adhesive tape for sealing joints between the bathtub and the wall is used only if the width of the seam does not exceed 5-6 cm. If the gap between the surfaces is larger, then it makes sense to seal it with a moisture-resistant gap or a ceramic corner.
Features of cleaning bathtubs from silicone
To avoid damaging the bathtub coating, you need to choose a cleaning method suitable for acrylic, cast iron or enamel.
Acrylic
Acrylic requires delicate, regular care. A simple way to avoid damaging the product is to test on a small area whether the cleaning agent is suitable or not. Apply the cleaner for half an hour.
If roughness and other defects do not appear, the product is suitable.
Mechanical and chemical cleaning methods are suitable for acrylic Jacuzzis. Use a knife, pumice stone, or blade to remove the top layer of material, then scrub with a rough washcloth or soft brush.
Liquids that are highly effective are SanClean, PaniVanna, Triton, White - Spirit.
Cast iron
At the end of the procedure, yellow marks remain. They are easily washed with powder, dishwashing detergent, liquid and laundry soap. Acetic, citric, carboxylic acid, and baking soda remove stains forever.
Pour the granules onto a cloth, moisten it with water and rub the surface until the marks disappear.
Products made of cast iron are not afraid of damage. Can I use acrylic primer over old paint? During processing they are exposed to high temperatures, ensuring their durability.
Popular cleaning products are ideal for combating silicone.
Enameled
The enamel must not be cleaned with powders or metal brushes. They damage the coating, leaving huge scratches and dirty streaks. Cleaning products in the form of pastes and creams (Penta, Mellerud, Silicon-Entferner) will help you get rid of sealant.
Advantages
Bath border tape has become a cheaper and more practical alternative to ceramic corners, which are used to seal the seams between the wall and the side of the bath. The polymer seal is perfectly adapted to the conditions of the bathroom; it effectively combats the penetration of water into the smallest gaps. The advantages of this method of sealing joints are:
Please note that this method of sealing joints in the bathroom has its drawbacks, the main one of which is considered to be low resistance to acid-containing cleaning products for plumbing fixtures. In addition, the sealing tape has a fairly short service life. Manufacturers only provide a one-year warranty for this category of product, but with careful use it can last up to 5 years.
Positive and negative aspects of the material
Self-adhesive curb tape for the bathroom leaves mostly positive reviews from users. After all, such decor has many advantages. The main advantages of this material are:
- affordable price;
- speed and ease of installation;
- versatility;
- good resistance to loads and mechanical damage;
- sufficient strength and hygiene;
- attractive appearance.
All of the above properties are not an exhaustive description of this decor, but explain its popularity. In addition, polymer sealing strips are resistant to moisture and high temperatures, which is so important for their use in the bathroom. They are very flexible, so they can be used not only on rectangular, but also round bathtub configurations. At the same time, the joint line looks impressive and neat.
An important nuance will be the possibility of installing the tape yourself. This does not require special knowledge or experience of similar work. Even an ignorant person in construction who does not have a professional set of tools can reliably seal the joint.
The resistance of this product to chemicals so often used to clean bathtubs has also received excellent reviews. The top layer of coating does not react with aggressive elements. Accordingly, it does not lose its aesthetic appearance and functionality throughout its entire service life. In addition, even with minor damage to the surface, the tape will remain firmly attached and will not delaminate.
Technology of use
Using a tape border to waterproof seams in a bathroom is quite simple. Even a person without construction experience can cope with this task. In addition, provided that self-adhesive models are used, no additional tools or materials are required for installation. The seal is glued using the following technology:
Please note that after gluing the tape to waterproof joints in the bathroom, it is better not to use water for 24 hours so that the glue adheres properly to the surface of the tile and the fixation becomes reliable.
Enameling stages
Surface degreasing
When the old coating is removed, it is necessary to thoroughly wash off all the dirt that formed during sanding. Then the bath is completely rinsed with water. Next, degrease the coating using a solvent or regular baking soda.
Before applying acrylic, the old bathtub must be sanded and degreased.
It dissolves to a paste consistency. Then it is applied to the walls of the bath and its bottom. Next, the entire tank is rinsed with hot water to wash off the slurry. To degrease cracks and chips, the surface should be treated with auto putty, which is quick-drying.
You can get a smooth acrylic surface if the pre-prepared base is warm. Therefore, the bath is filled with hot water, the temperature level of which is as high as possible. After this, the water is left in the bath for 5-10 minutes. When the water is drained, the surface should be quickly wiped with a cloth that does not leave small lint. Next, dismantle the overflow and drain grille by placing a container under the drain hole. All excess acrylic should be collected there.
When the equipment is completely ready, they proceed directly to applying liquid acrylic using the pouring method. This technology is used not only when restoring acrylic containers, but also when restoring cast iron bathtubs.
Pre-prepare the mixture to be worked with. All ingredients of the composition should be mixed in the required proportions for subsequent mixing. The prepared composition is partially poured into a small reservoir, from where it should be poured into the bath in a thin stream.
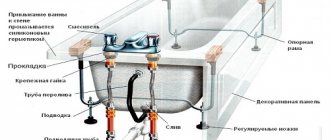
Legs
6. Assembling the legs. To do this, screw a set consisting of several nuts, washers, and a plastic support (the leg itself) onto the steel studs in a certain order. If the acrylic bathtub comes with a screen, then do not forget to put spring latches on the rods to secure it and support the casing. This entire structure is fixed and “controlled” on the steel beams that we installed in point No. 5. Often the studs should expand to the indicated points under the side of the bathtub and under the seat, where there is also reinforcement in the form of a plate; then you need to not overdo it with stretching, so as not to deform the edge of the product. When all the support points are not in place, they need to be set “to rough” - usually this is about 600-650 mm of the total height of the bath (if there is a casing, adjust it to it).
7. We bring the bathtub into the bathroom and put it in the designed position. We use plastic legs to level the bathtub, taking the total height based on the size of the casing. We fix the legs with locknuts. Along the top and, where possible, along the bottom of the side on the cladding, we draw lines for the top and bottom edges of the product.
Often at this stage, miscalculations in the preparatory work appear; as a rule, they consist in the fact that the legs/frame rest against some kind of communications (many allow open installation under the bathroom). There are problems with connecting the siphon (something is in the way, or the drain hole was made clearly under the neck of the bathtub). The solution may be to re-drill the hole in the beam, or reinstall it with some offset.
8. We clean the bathtub, mark on the walls where the grips will be installed. To do this, measure the width of the side and take this size into account when marking. Please note that the edges of the bath should not rest firmly against the “bottom” of the hooks, leave minus 3-5 mm. Using dowels we mount wall grips.
9. We assemble the siphon (in point No. 7 we had to make sure that it is working properly) and connect it to a sewer pipe with a diameter of 40 or 50 mm. We don’t connect it to the bathtub yet.
Removing limescale from an acrylic bathtub
The bath has constant contact with tap water. Over time, salts can settle on its surface, forming a gray coating. In the same form, particles of fat are deposited, which we wash off from the skin during bathing, if after bathing the bath was poorly washed off. Because of such deposits, the bathtub loses its shine and whiteness, and the surface becomes rough.
It is necessary to select products that will effectively remove plaque without damaging its surface. These liquids and creams include: Sanfor, Gel WC 5+, RAVAK Turbocleaner
. They act gently on the surface without damaging it.
The advantage of these products is that there is no need to rub the surface, you just need to treat it, wait a few minutes and rinse with running water.
Installation of an acrylic bathtub
Installing an acrylic bathtub is not the most difficult plumbing operation, but it also has its own nuances. If you have purchased a branded product from a European manufacturer, then the basic information can be gleaned from the instructions that come with the product, but even here there is something to add.
But if you are the happy owner of a bathtub from the Middle Kingdom, then do not despair at the lack of proper guidance, such plumbing can also be installed correctly, the main thing is to adhere to the technology, and it is approximately the same for all “acrylic”.
The sequence of installing an acrylic bathtub with your own hands
1. Contrary to all instructions, we recommend immediately removing the protective film and checking the integrity of the front covering. Under the film we can expect chips, scratches, unevenness, uneven color - it is easier to make a claim to the seller before the product has been installed/dismantled. In addition, polyethylene is just an illusion of security. At this stage, check the completeness of the product, if this was not done in the store.
2. On a flat area of the floor (preferably outside the bathroom), cover the area with cardboard or other soft sheet material and turn the bathtub upside down.
3. We mark the bottom of the acrylic bathtub. As a rule, here it is necessary to draw a center line along the installation board and at least two - perpendicular to it (there are exceptions, especially for corner models). There are two main points here: the fastening fittings should not block the neck for installing the siphon, and it is good if the outer beams are located at the maximum distance from each other.
4. Now we apply the fastening fittings along the lines (it should not protrude beyond the projection of the edge of the bathtub, otherwise the leg will interfere with the installation of the screen). These can be sections of a square pipe, a special “rack-channel” profile, or even a full-fledged welded frame. On the bottom we mark holes for screwing in screws. In some cases directly through the profile, sometimes through mounting brackets.
5. Next we must make holes for screws with a diameter of about 3 mm and a depth of approximately 6-10 mm. Often, manufacturers even include a drill in the kit, but... Acrylic is very easy to drill, so we recommend using a short “Ranilov” (roofing) self-tapping screw with a drill at the end and one or two washers for these purposes - a 100% guarantee against through damage.