If you need to tile the bathtub, you must first create the surfaces on which it will be attached with tile adhesive. Screens made of plasterboard, brick, and aerated concrete blocks are most suitable for these purposes.
In addition to the screen, wide sides for soap accessories and shelves can be used to mask the wide gap between the end side of the bathtub and the wall. Less commonly, the inside of the bowl itself is also covered with mosaics.
Characteristics of ceramic tiles
Ceramic tiles for the bathroom have the following characteristics:
- Has a high wear resistance. This means that if you cover surfaces with it using all technologies, you can get repairs that won’t have to be redone for decades. At the same time, bathroom tiles do not fade or lose their pattern.
- It is resistant to water and moisture. It will not suffer from drops of water falling on it or from the vapors that are inherent in bathrooms.
- Ceramic tiles can always be washed or wiped down. If you do not use harsh abrasive substances, the risk of damaging it is minimal.
- Ceramic tiles come in a ton of variations in color, pattern, style, size and even shape. Everyone can find a tile for themselves. Creating a unique bathroom decor becomes easier with ceramic tiles.
Tools
To achieve good results, you should use the following set of tools:
- a hammer drill with an impact hammer function to remove obvious surface irregularities;
- drill with mixer attachment;
- roller for applying primer;
- two spatulas: regular and with teeth;
- rubber spatula for applying grout;
- sponge;
- container for mixing glue;
- building level and plumb line;
- tile cutter or grinder;
- pencil.
Methods for laying tiles in the bathroom
A novice master or anyone who encounters ceramic tiles for the first time is unlikely to know many ways to lay tiles. Most likely, his knowledge is limited to laying in even rows and cutting off the last tile in the row if it does not fit. But there are many more ways than you might imagine.
- Direct masonry, which was mentioned earlier, is a way to save both your strength and resources. This method of installation requires the least amount of tiles. The first tile is laid from the corner of the longest wall. Further, horizontal and vertical rows diverge from this tile. It is worth keeping an eye on the space between the tiles, and otherwise navigate by level;
- Another method is diagonal laying. It is no less common than the first, but is more complex. The name speaks for itself. Using this method, you can visually expand the space in the room and hide minor surface defects;
- Checkerboard laying is one of the most interesting ways of laying tiles. This method is applicable for multi-colored tiles (2 colors). The main task is to maintain the parity of tiles of different colors in a row. So that the work is not burdened with constant adjustment of the tiles along the edges, it is worth calculating in advance what size tile will fit ideally. On the wall, even placement of tiles can be achieved by changing the width of the joints;
- A more complicated method is offset laying. This method is very labor-intensive, requiring extreme concentration and perseverance. The tile must look good when offset, and finding the optimal offset length is not easy;
- The most difficult way to lay tiles is mosaic. This option is beyond the capabilities of beginners; it is better to entrust it to professionals.
The chosen installation method determines how much material to purchase, how much effort it will take to install the tiles yourself, and how much the bathroom will change visually.
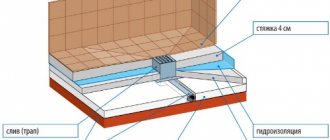
Installation of cast iron models
Installation of such a bathtub is carried out after leveling the floor and laying floor tiles. Please note that the tiles on the floor must withstand significant loads, so be sure to check this point with the seller.
USEFUL INFORMATION: Expert advice: how to choose the best acrylic bathtub?
Installation of the product is carried out as follows:
- The bathtub is brought into the bathroom and placed on its side, the drain hole is located in the direction of the sewer. Before this procedure, experts advise covering the tiles with fabric to avoid scratches and mechanical damage.
- The siphon and supports are installed.
- The bathtub is turned over to its normal position and leveled in a horizontal plane.
- The font is installed in place, leaving approximately 1 millimeter between the side and the rough finish of the wall. Please note that tile is a rather slippery surface, so despite its weight, the bathtub may move during use. To avoid this, the supports are fixed to the tile surface with waterproof glue.
- The walls of the room are tiled. The contact points between the tiles and the side of the bathtub are protected from leaks by ceramic baseboards.
Please note that when installing cast iron and steel bathtubs, grounding must be done. To do this, it is better to invite a qualified electrician.
Small bathrooms
Small bathrooms are almost impossible to change. The plumbing equipment cannot be moved there, and the walls cannot be moved either. This also applies to bathrooms combined with a toilet, as is often the case in Khrushchev-era buildings.
With the right tiles you can increase the space at least visually. To do this, you will need light-colored tiles, such as beige or blue.
If the use of dark tiles is important for some reason, then you can make an insert of dark tiles to concentrate attention, or decorate the floor with it.
The size of the tile also plays an important role. Large tiles will visually reduce the space, but this is not what we need. In a small room, it is recommended to use tiles measuring 10 by 10, 20 by 20, 20 by 40 or 20 by 50 centimeters. These are the best options.
Square tiles can be placed on the wall very easily. As for rectangular tiles, in a small space they are placed strictly horizontally. Only in this position will it not reduce the space.
Calculation of facing material
Calculation of the required amount of material
Knowing the area of the cladding and the parameters of the tiles, it is easy to calculate the required amount of material, and this will allow you to understand how much it costs to cover the bathtub with tiles. What should be done:
Tile texture - wallpaper, brick, what to choose?
- divide the surface area by the area of the proposed tile;
- It is better to increase the number obtained after calculations slightly and add approximately 3-10% of the required amount of tiles. It all depends on the layout option and the fragility of the material.
Right now you will have to plan and decide how the finishing will be placed: over the entire surface of the wall or just tiling the cast-iron bathtub. If funds are limited, then reducing the material by abandoning expensive panels or mosaic fragments would be the right decision.
Important! Even if you refuse to cover the wall and floor under the bathroom, you need to carefully waterproof the surfaces. Sealing is a prerequisite for finishing.
We also recommend using our tile calculator.
Tiling step by step
Step 1: Calculate the required number of tiles and purchase them
Calculating the number of tiles needed for work is a very important step. Tiles need to be purchased with a reserve, so that in case of force majeure you don’t have to travel around the city looking for exactly the same tile.
To calculate, you need to calculate the area of the room. To calculate the area of the walls, take the total length of the walls and multiply them by their width. Gender is calculated according to the same scheme.
When purchasing tiles, you should make sure that all tiles are from the same batch. The batch number is indicated by the marking on the packaging. If you purchase the same tile, but from different batches, you can get significant color deviations.
Step 2: Lay the tiles
2.1 Preparation for work
For work you will need the following tools and materials:
- Selected ceramic tiles;
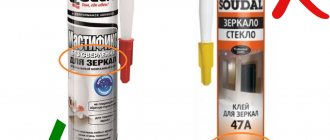
- Special adhesive for ceramic tiles;
- Grout for joints;
- Rags, sponge or napkin;
- Building level;
- Notched trowel and beacons;
- Tile cutter or tile nippers (you may need both);
- Products with antiseptic and antifungal properties;
- Waterproof primer and putty.
At the surface preparation stage, old coatings are removed, completely removing them. The walls are treated with antiseptic agents that will prevent the development of fungus on them.
Walls are always checked using a level. If they have significant differences, then they will need to be leveled. This may take a long time, but this is the only way to achieve high-quality coverage.
If there is a need to level the walls, you should carefully read the instructions for the product that will be used to level them. After leveling, you need to wait the required amount of time and only then begin further work. Typically, it takes 2 weeks for leveling mixtures to dry completely.
After the walls have dried, I prime them. The primer makes the wall stronger and improves its adhesive properties.
The bathroom must be cleared of all unnecessary things, including plumbing equipment.
2.2 Choosing a tile laying option
How to lay tiles in the bathroom? When the time comes to work directly with the tiles, you need to decide where to start the work. There are only two options here:
- Carry out installation from the lower corner of the opposite wall from the entrance;
- Lay the tiles starting from the corner in the middle of the wall.
These options are fundamentally different and require different kinds of effort. Let's look at them in order.
First option
The first method is very convenient. It is suitable for any bathroom. To begin with, a fitting is performed, during which it is determined whether it is necessary to cut the last tile in the row, or whether there is no such need.
The first tile is marked on the wall with a pencil to make subsequent work easier.
Experts strongly recommend laying tiles in small batches - no more than 6-8 pieces at a time, or a row, as a last resort.
The adhesive composition is prepared immediately before starting work with the tiles. It is prepared strictly according to the instructions and in small portions so that it does not dry out before it is used.
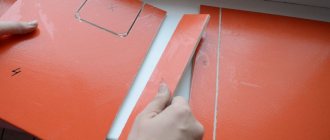
Apply the glue to the wall using a notched trowel. The layer thickness should be -5 mm. The spatula will leave grooves that improve the adhesion of the tiles to the adhesive base.
The tile is lightly pressed against the wall, but not so much that the glue is squeezed out. The level checks the correct location horizontally and vertically. Glue that gets on the tiles must be washed off immediately, otherwise it will harden and it will become impossible to wash it off.
Beacon crosses are installed to ensure that the space between the tiles is level everywhere. After the glue has dried, the beacons can be easily removed.
If there is a need to cut the tile, then first mark the cut location with a pencil. Then the tile is placed on the tile cutter so that the mark is clearly under the knife. The knife is lowered without sudden movements. The cut edge is ground with a corundum stone until smooth.
If the cutout is shaped (near a pipe, for example), then tile tongs are needed. They can cut a semicircle into parts without much difficulty.
After the adhesive has dried, you can begin grouting the joints. Modern grout can be matched to the color of the tile. It is very important that the grout is moisture resistant.
To apply the grout you will need a special rubber brush. With its help, the grout is applied precisely along the seams. After complete drying, the tiles are washed to remove any grout that accidentally gets on it. A good choice would be a grout based on “latex milk”. It is very high quality and ideal for the bathroom, but it is very difficult to remove. Therefore, it must be applied carefully.
Second option
The second method differs only in the location of the tiles. First, the length of the surface is measured and divided exactly in half. Appropriate markings are made on the surface. The middle is marked with a vertical line, which serves as a guide. The tiles are laid relative to this line. There is a possibility. That the extreme ones will have to be cut. Since everything will be symmetrical, everything will look much better.
Laying tiles on drywall
Installation work with tiles on drywall in the bathroom is also carried out using tile adhesive. It is diluted immediately before starting work.
How to properly glue tiles to drywall? All procedures are the same as laying tiles on a regular surface. The only significant difference is that after 4-5 rows you need to take a break. During the break, the glue should set and the drywall should adapt to the load.
A day after finishing the work, the glue dries completely and you can start grouting the joints. Otherwise the processes are absolutely similar.
Grout: final work
Grouting tile joints
Once you learn how to tile a bathroom, you can install tiles on any surface, not just around the bathtub. Do not forget that corner joints will require additional effort and cutting of tiles, so it is extremely important to stock up on enough material. If the corners of the room have a semicircular shape, you need to choose a layout from the corner or diagonally. It is not difficult to tile a bathtub with your own hands; after the installation is completed, you need to wait until the mortar has completely dried. And only then can you apply the grout, preferably with a soft spatula-trowel. Installed plastic crosses will help make the seams even, and therefore the grout will lie evenly and the pattern will not be spoiled. Excess grout mixture can be washed off with a soft sponge. It's very simple.
If you want to know how to lay tiles, just look at the tips and get started. Video lessons posted on portals will also provide excellent assistance. Detailed instructions and tips on how to lay tile around a bathtub will be useful for any novice DIYer.
Personal protective equipment
Separately, I would like to say about personal protective equipment. Don't neglect your health. Therefore, it is worth using:
- gloves;
- headdress;
- wear safety glasses when cutting tiles;
- protective clothing and footwear;
- respirator when performing dusty work.
Glue preparation
It is necessary to pour water into the prepared container, and then, stirring with a mixer, gradually add glue. The process continues until we get a consistency reminiscent of the density of thick sour cream.
You can do it differently, strictly observing the proportions indicated in the instructions. As a rule, this data is printed on the packaging of the mixture.