Principle of operation
To understand why a fluorescent lamp blinks, you need to understand the technical characteristics of the device. Electrical equipment is classified as gas-discharge type. For most models, the body is made in the shape of an elongated cylinder, although complex geometric designs are found. Tungsten electrodes, reminiscent of incandescent coils, were placed at the ends of the device. The elements are soldered from the outside to the pins to which current is supplied.
Daylight equipment Source 220.guru
A gas environment with negative resistance was created inside the glass flask. To connect to electricity, the circuit uses a ballast (choke). The part generates a voltage pulse, due to which the fluorescent lamp turns on. The design also includes a starter operating in an inert environment and a bimetallic plate.
In the inactive state, the electrodes are open. When the current is turned on, the energy moves along the spirals, gradually heating them up. Electricity enters the starter, in which a glow discharge appears. When the contacts heat up, the plate closes and the functions of the conductor are transferred to the metal.
Device operation diagram Source bigslide.ru
When the temperature in the network decreases, the contact opens. As a result of self-induction, the ballast creates a high voltage pulse. As a result, the fluorescent lamp lights up. Electricity flows through the device, which is reduced at the throttle and is halved. A capacitor protects the equipment from network interference.
Gas-discharge lamps are divided into different categories according to their parameters. For convenience, manufacturers classify devices according to four criteria:
- Power. The main characteristic, which is indicated in watts (W).
- Diameter. The larger the bulb, the brighter the light. The cross-section is indicated in millimeters; additionally, data on the length of the body is entered through a fraction.
- Start type. Models that work with a starter are marked with the abbreviation “PHs”; designs without a part are marked with “RS”.
- Form. In shaped devices, Latin letters are used to indicate the type of flask.
Standard lamps with single-layer phosphors emit different tones of white, so they are suitable for residential and industrial premises. Models with improved light transmission use up to 5 tiers of spraying. The devices are 12% brighter than traditional types, which allows them to be used in shop windows and exhibition halls.
Luminescent models in the interior Source masterpotoku.ru
Why does a switched off energy saving lamp blink?
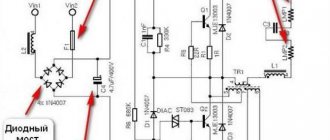
There were no problems until energy-saving compact fluorescent lamps (CFLs) with an electronic ignition circuit appeared in large quantities. In such lamps, the power circuit is designed in such a way that even if one wire (usually a phase wire) is broken by a backlit switch, a charge can accumulate on the filter capacitor.
As a result, the voltage will increase so much that it is enough to start the circuit, and the lamp will light up for a moment. This manifests itself as periodic blinking of the energy-saving lamp after switching off . The same effect can occur in LED lamps.
I’ll immediately make a reservation that blinking can occur not only due to the backlight, but also due to other reasons - poor wiring insulation, lamp malfunction, a very long wire from the switch to the lamp.
For example, when a phase wire is open, along its entire length from the lamp to the switch contact, this wire represents an antenna. And if the wire is long (20-30 or more meters), and another wire passes nearby, on which there is a phase, then a phase is induced on the hanging wire, the power of which is enough to flash a fluorescent or LED lamp.
Looking ahead, I will say that the recommended method of getting rid of flashes will work perfectly in this case, since its nature is the same - a weak potential comes to the phase wire, which slowly accumulates on the filter capacitor, and after some time the voltage on the capacitor (tens of volts) becomes sufficient to run the electronic ballast circuit.
An energy-saving lamp may also blink or not blink, depending on the specific type of lamp and manufacturer. Recently, manufacturers have been refining the lamp circuit to solve the problem described here.
Main causes of malfunctions
The equipment provides a soft, diffused and constant glow during operation. If there is a malfunction, the beam twitches. To understand why the fluorescent lamp blinks, you need to understand the main types of breakdowns.
Low voltage
Most often, equipment shaking occurs when there is a lack of energy. A decrease in network performance by more than 10% leads to problems. Electricity flows into the device circuit, causing it to turn on. If the mains voltage is low, the device cannot start correctly. The amount of current is not enough, so the fluorescent lamps flicker.
Low voltage in the network Source exmart.com.ua
Regular surges and fluctuations in energy reduce the service life of equipment by 20%. If the device blinks frequently when turned on, you need to check the voltage in the network. The culprit of the problem may be either a malfunction or worn-out wiring.
Impact of current
The flicker of light from fluorescent light bulbs is often caused by electromagnetic waves. If the device flickers when several devices are turned on at the same time, we advise you to locate the source of interference. The reason may be household appliances in the apartment (microwave, smartphone) or equipment on the street:
- cell phone tower;
- Power lines;
- radio station
If the lamp switch has a backlight, then there is not enough electricity to operate the lamp. Professionals recommend screwing the device into a regular device. In the absence of flicker, it is better to give preference to traditional designs without additional light.
Exposure to electromagnetic waves Source heraldnet.com
Cold
Fluorescent lamps operate at a temperature not lower than +5C, and a microclimate within +10C is considered favorable. Trembling and flickering are observed in devices located outdoors or in unheated rooms. If the degree often decreases beyond the limit, then the equipment cannot function properly.
Breaking
Failure is a common problem with fluorescent lamp blinking. The cause of the breakdown can be either an exhausted resource or a defect. Professionals recommend replacing the light source. A properly functioning device will give a uniform, constant glow.
Failure of fluorescent lamps Source esr-energy.ru
Often fluorescent lamps burn normally, then slowly begin to fade. The problem arises due to mechanical damage when the flask depressurizes and air gets inside. Only replacing the equipment will help in the situation.
How to get rid of flicker
Fluorescent lamps are designed to last a certain number of times on and off. If the device blinks, the service life is reduced. Often, the shaking of the device negatively affects the psyche and vision of people who are in the room.
To fix the problem, you need to disconnect the cable powering the lamp from the network. If there is an installation error, the wires must be installed correctly. If a person is not confident in his own abilities, it is better not to experiment and turn to professionals.
Equipment in design Source uz.tierient.com
How to extend service life
The longevity of lamps depends on proper use. Do not use the equipment at low temperatures, otherwise it will quickly fail. When working in wet conditions, preference is given to models with an increased degree of protection against water (IP). Elements that are too powerful should not be screwed into a home chandelier. The manufacturer indicates on the packaging the purpose of the devices.
The soft-on function will extend the life of the light bulbs. Ignition cycles have a greater impact on the longevity of devices than operating time. You should not install fluorescent models in rooms where the lights are constantly turned on.
Rules for operating lamps Source businessman.ru
Professionals recommend sticking to the 10-minute rule. Switching on or off again can only be done after this period has ended. Over time, the discharge between the electrodes improves and the mercury is transformed into a gaseous state. The device switches to glowing with maximum efficiency.
The durability of a fluorescent lamp depends on the installation method. When positioned with the base up, the device heats up, which leads to damage to the electronic unit. It is better to screw the devices in with the base down.
Extend service life Source buildoman.ru
Overheating often occurs due to the technical characteristics of the lamp. Professionals do not recommend installing compact fluorescent lamps in a model with a closed shade. When switched on, the equipment generates heat, which does not escape from the internal space of the structure. With regular use, the device quickly breaks down.
Repairing a 220 V LED lamp with your own hands: nuances of the work
Before you repair an LED lamp with your own hands, pay attention to some details that require less labor. Checking the cartridge and the voltage in it is the first thing to do.
Important! Repairing LED lamps requires a multimeter - without it you will not be able to ring the driver elements. You will also need a soldering station.
A soldering station is necessary for repairing LED chandeliers and lamps. After all, overheating of their elements leads to failure. The heating temperature when soldering should be no higher than 2600, while the soldering iron heats up more. But there is a way out. We use a piece of copper wire with a cross-section of 4 mm, which is wound onto the soldering iron tip in a tight spiral. The more you lengthen the tip, the lower its temperature. It is convenient if the multimeter has a thermometer function. In this case, it can be adjusted more accurately.
This is what a soldering station looks like. Its cost is quite high
But before you repair LED spotlights, chandeliers or lamps, you need to determine the cause of the failure.
How to disassemble an LED light bulb
One of the problems that a novice home DIYer faces is how to disassemble an LED light bulb. To do this you will need an awl, solvent and a syringe with a needle. The LED lamp diffuser is glued to the body with sealant, which needs to be removed. Carefully running an awl along the edge of the diffuser, inject the solvent with a syringe. After 2-3 minutes, easily twisting, the diffuser is removed.
Some lighting fixtures are made without sealant. In this case, it is enough to rotate the diffuser and remove it from the body.
Determining the cause of failure of an LED light bulb
After disassembling the lighting fixture, pay attention to the LED elements. Burnt is often identified visually: it has scorch marks or black dots. Then we replace the faulty part and check its functionality. We will tell you in detail about the replacement in step-by-step instructions.
If the LED elements are in order, move on to the driver. To check the functionality of its parts, you need to remove them from the printed circuit board. The value of resistors (resistance) is indicated on the board, and the parameters of the capacitor are indicated on the case. When testing with a multimeter in the appropriate modes, there should be no deviations. However, often failed capacitors are identified visually - they swell or burst. The solution is to replace it with suitable technical parameters.
The LED can be measured with a multimeter without desoldering it from the printed circuit board
Replacing capacitors and resistances, unlike LEDs, is often done with a regular soldering iron. In this case, care should be taken not to overheat nearby contacts and elements.
Read also: What is the essence of electroslag welding answer
Replacing light bulb LEDs: how difficult is it?
If you have a soldering station or hair dryer, this work is simple. It is more difficult to work with a soldering iron, but it is also possible.
Good to know! If you don’t have working LED elements at hand, you can install a jumper instead of the burnt one. Such a lamp will not work for a long time, but it will be possible to gain some time. However, such repairs are carried out only if the number of elements is more than six. Otherwise, a day is the maximum work of the repair product.
Modern lamps operate on SMD LED elements, which can be desoldered from the LED strip. But it is worth choosing the ones that are suitable according to technical characteristics. If there are none, it is better to change everything.
Related article:
To choose the right LED devices, you need to know not only the general characteristics of LEDs . Information about modern models and electrical diagrams of working devices will be useful. In this article you will find answers to these and other practical questions.
Repairing an LED lamp driver if you have an electrical diagram of the device
If the driver consists of SMD components that are smaller in size, we will use a soldering iron with copper wire on the tip. A visual inspection revealed a burnt element - unsolder it and select the appropriate one according to the markings. There are no visible damages - this is more difficult. You will have to solder all the parts and ring them separately. Having found a burnt one, we replace it with a functional one and install the elements in place. It is convenient to use tweezers for this.
Helpful advice! You should not remove all elements from the printed circuit board at the same time. They are similar in appearance, you can later confuse the location. It is better to unsolder the elements one by one and, after checking, mount them in place.
How to check and replace the power supply of LED lamps
When installing lighting in rooms with high humidity (bathroom or kitchen), stabilizing power supplies are used, which reduce the voltage to a safe one (12 or 24 volts). The stabilizer can fail for several reasons. The main ones are excessive load (power consumption of luminaires) or incorrect selection of the unit’s degree of protection. Such devices are repaired in specialized services. At home, this is unrealistic without equipment and knowledge in the field of radio electronics. In this case, the power supply will have to be replaced.
The power supply for the LEDs looks like this
Very important! All work to replace the stabilizing LED power supply is carried out with the voltage removed. Don't rely on the switch - it may not be connected correctly. The voltage is turned off in the apartment's distribution panel. Remember that touching live parts with your hand is dangerous.
You need to pay attention to the technical characteristics of the device - the power must exceed the parameters of the lamps that are powered from it. Having disconnected the failed unit, we connect a new one according to the diagram. It is located in the technical documentation of the device. This does not present any difficulties - all wires are color-coded, and the contacts are labeled with letters.
Decoding IP protection levels for electrical appliances
The degree of protection of the device (IP) also plays a role. For a bathroom, the device must be marked at least IP45.
Related article:
In order for the lighting to be stable and the installed products to last as long as possible, you should choose the right 12 V power supply for the LED strip . In this publication we will look at the types of devices, how to calculate them correctly, how to make them yourself, how to connect, popular models.
Causes of blinking LED lamps: methods of elimination
If the reason for the flickering of the LED lamp is the failure of the capacitor (it needs to be replaced), then periodic blinking when the light is off is easier to solve. The reason for this “behavior” of the lamp is the indicator light on the switch key.
A capacitor located in the driver circuit accumulates voltage, and when the limit is reached, it discharges. The key backlight transmits a small amount of electricity, which has no effect on incandescent or halogen light bulbs, but this voltage is enough for the capacitor to begin to accumulate it. At a certain point, it discharges a discharge to the LEDs, after which it again switches to accumulation. There are two ways to solve this problem:
- We remove the key from the switch and turn off the backlight. The method is simple, but the indication that increases the cost of the switch is now useless.
- We disassemble the chandelier and change the phase wire with zero points on each socket. The method is more complicated, but it retains the functionality of the switch. It can be seen well in the dark, which is a plus.
Such a switch may cause the light diodes in the device to blink.
Not only LED lamps, but also CFLs are susceptible to flickering. The device of their PRU (start-regulatory device) works on a similar principle, which allows the capacitor to accumulate energy.