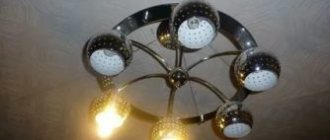
How the housekeeper works
Compact fluorescent ESLs cannot be connected directly to a 220 V network, so an electronic ballast circuit is located in their housing. The operating principle of this circuit is as follows:
The voltage from the 220 V network is supplied through a fuse to the diode bridge, after which it becomes rectified with a ripple of 100 Hz.
Further along the circuit there is an electrolytic capacitor that smoothes out ripples. Its capacity can vary depending on the power, it should be approximately equal to 1 µF per 1 W of lamp power. Next, the voltage is supplied to the self-oscillator circuit using two transistors, which contains:
- Dinistor DB3 with a switching voltage of about 30 V.
- A transformer with three windings (primary - with the largest number of turns and two base - a pair of turns each). It is wound on a ferrite ring with an internal diameter of about 3–5 mm.
- Two transistors type MJE13001–13003.
This circuit operates at a frequency of several tens of kilohertz.
The output part consists of a pair of capacitors and a power choke, usually wound on an W-shaped ferrite core.
The output circuits of the circuit are connected to the lamp coils.
The light-emitting bulb itself is a glass tube. It is filled with mercury vapor and coated on the inside with a phosphor.
Scheme of operation of an energy-saving lamp
Operation of an energy-saving light bulb
Both fluorescent and energy-saving lamps have the same operating principle:
- A glow discharge occurs between two electrodes placed in a flask into which inert gas and mercury vapor are pumped.
- The invisible ultraviolet radiation of mercury atoms, while passing through the walls of the flask, coated on the inside with a phosphor, turns into the light that we see. At the same time, the color of the light is different, it all depends on what composition was used to coat the inside of the lamp.
Interesting: Despite the fact that the voltage in our networks is alternating, the energy-saving lamp operates at constant voltage. The conversion of DC to AC voltage occurs in an electronic ballast using a diode bridge.
List of possible causes
The power supply circuit for an energy-saving lamp is quite complex, which is why the blinking occurs. However, fixing this problem is very simple. But first, I propose to understand the reasons.
Backlight on the switch
Some switches are equipped with backlighting, usually a neon indicator or LED. It is needed so that you can more easily find the switch in the dark, and it only lights up when the lamp is turned off. To light the indicator in the switch, a small current is needed; when incandescent lamps were used, this current passed through the circuit: phase wire - indicator - lamp - neutral wire. This current did not affect the lamp, no one asked this question. When they started using energy-efficient light sources, the problem of flickering arose.
The current flows through the indicator to the input of the electronic ballast, through the diode bridge it charges the smoothing capacitor, when the voltage on its plates reaches the required value - the circuit turns on and the light bulb begins to glow, this period is very short, and you only see a flash.
A similar situation occurs with LED devices.
The backlight on the switch is a useful feature, but can lead to malfunction of energy-saving bulbs
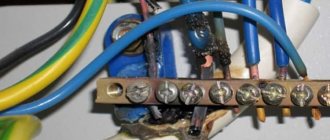
Electrical wiring problems
The condition of the electrical wiring also affects the flickering of energy-saving lamps. Old wiring is likely to have poor insulation, allowing small currents to flow between the wires and to the switch. As a result, current flows “past” the switch. Next, the process of charging the capacitor and flashing the light occurs as described above. This is called current leakage. In addition, the flow of unnecessary currents can be affected by the humidity of the walls; through wet walls, the phase flows through the lamp to zero or ground. And the third reason may be the large length of the cable, due to which parasitic capacitance occurs. A capacitor is two conductive plates separated by a dielectric; in this case, the role of the dielectric is played by insulation. In alternating voltage, unlike direct voltage, currents flow constantly through the capacitor.
Poor quality lamp
The reason may lie not only in the external components, but also inside the lamp itself. In high-quality luminaires, the circuit has filters and other means of reducing the influence of various interference on their operation. Do not buy cheap Chinese lamps, they not only have a lot of disadvantages (pulsation, low color rendering index, etc.), but are also generally dangerous. In any case, for normal wiring, use a switch without backlight.
Make sure to choose a quality lamp
Reason No. 1 for blinking LED and energy-saving lamps
If you have switches with LED or neon backlighting, when installing economy lamps (they are also called energy-saving or compact fluorescent), they begin to blink when the light is turned off. The same situation occurs with some (cheap Chinese) LED lamps. They turn on briefly - for a fraction of a second - and turn off instantly. This repeats quite often - every couple of seconds.
The reason is simple. An LED or fluorescent light bulb blinks when the light is turned off due to the presence of the backlight LED power circuit and the design features of these lamps. Unlike incandescent lamps, energy-saving and LED lamps operate on 12 V DC. But they are connected to a 220 V network, and the conversion takes place in the lamp base, where a diode bridge and a capacitor are installed - a circuit that converts 220 V AC to 12 V DC .
The switch backlight power circuit creates the conditions for charging the lamp capacitor
When you turn the switch to the "off" position, there is still a circuit to power the LED/neon bulb, which is what causes them to glow. Microcurrents flow through this circuit - no longer needed for illumination. They are small, but they are enough for the capacitor in the lamp to accumulate a charge sufficient to start the lamp (which is installed in the lamp base). As a result, the lamp lights up. But, since the charge is still too small and there is no normal replenishment, the lamp quickly goes out. This is what happens when you blink.
Sometimes - with some switches - the lamps do not blink, but remain incandescent. This happens because the resistance in the backlight power circuit is low. As a result, the current is enough to maintain a small charge on the capacitor. That is why it turns out that the lamps burn when the lights are off. This most often affects LED lamps. The methods of dealing with this phenomenon are the same as with blinking.
The situation when the light blinks when the light is off is not only unpleasant for the eyes. There is one more consequence: each lamp is designed for a certain number of on-off switches. When you blink, this cycle occurs in a split second. There can be 10 or more of them per minute. It is clear that very soon the lamp will fail. So, it is necessary to deal with the fact that a light bulb is blinking when the light is turned off immediately after detection.
Eliminating the cause of the problem
The problem of lamp flickering can be solved without the involvement of specialists. To do this yourself you will need a small set of tools:
- Screwdriver.
- Voltage indicator (indicator screwdriver).
- Wire cutters.
- Heat shrink.
Removing the backlight
The most radical and reliable way to eliminate outbreaks is to remove the source of the problem completely. To do this, use a thin slotted screwdriver to remove the keys from the switch. After this, follow the instructions:
- Make sure that the lamp is de-energized using a voltmeter or phase indicator; it is better to turn off the circuit breaker.
- Unscrew the screws securing the switch.
- Remove it from its seat.
- On the back side there will be a small box in which the backlight is located.
- Remove the backlight.
- Otherwise, look at how the indicator is connected and break its power supply circuits.
- Ready!
Read also: Dividing device for a lathe
Leave the backlight on while changing the power circuit parameters
Another way is to solder a higher resistance resistor to power the indicator and a 1n4007 diode.
Soldering a resistor into the circuit is one of the options for solving the problem of flickering light bulbs
As already mentioned, there is either a neon bulb or an LED installed there. For an LED, the resistance is about 500 kOhm, for a neon - 200–300 kOhm. The diode will cut off one half-cycle of the supply voltage. This modification will generally eliminate flicker. The difficulty is that the backlit board is quite small, so you need to be able to handle a soldering iron and small components. If you are not satisfied with this option, move on to the next one.
We create a circuit with lower resistance parallel to the lamp
When you don’t want to remove the backlight because it’s convenient and you’re used to it, you can find another way out of the current situation. To do this, you need to give the current a path to bypass the lamp. Buy a resistor (another name is resistance) at any radio parts store with a power of 2 Watts and a nominal resistance of 50 kOhm (thousands of Ohms).
Now it needs to be connected in parallel with the lamp. You can do this either in the distribution box, connecting between the phase coming from the switch and zero, or in the body of the chandelier or sconce itself, where the flickering lamp is installed.
Conscientious manufacturers install this resistor on the electronic ballast board inside the ESL, and it does not blink with such a switch. Well, cheap Chinese brands rarely take their products so seriously.
Troubleshooting Methods
Based on the above, our goal is to ensure that no current flows through the lamps when the switch is open. Let's consider methods for solving this problem.
Removing the backlight in the switch
If the problem is due to the backlight, then the easiest option is to remove it. To do this, you need to disassemble the switch, having first turned off the voltage on this line or in the entire apartment. Before touching the terminals on the switch or its other working parts with your hands, it is better to additionally check the presence of voltage with an indicator screwdriver. It shouldn't be there while you're working.
Next, you need to pull the switch itself out of the wall and bite off the wires that go to the backlight, or remove the backlight unit (depending on the design). Put everything back together and check the result of the work.
Separate neutral wire
A more complicated option: if you have external wiring or are doing repairs, you can lay an additional neutral wire to the switch. As a result, the neutral wire and the phase wire will be connected to the backlight individually, but it will work and the lamp will not flicker.
Installing additional resistance (shunt resistor)
To leave the backlight on and not have to lay a new cable, you need to add a resistor in parallel with the LED lamp.
Installing additional resistance in the circuit will help remove flicker. The element that will be implemented is a 2 W resistor with a resistance of 50 kOhm. Using this method does not require removing the indicator light on the switch. The resistor can be installed either directly in the body of the lamp itself or in the junction box.
Resistor installed in junction box
The meaning of this action is that the lamp is shunted by a resistor, the indicator current now flows through it. Accordingly, it should no longer blink.
You can't connect a resistor this way.
Connecting an incandescent lamp
This option is suitable for a multi-arm chandelier; if it has several lamps installed, you can replace one of them with an incandescent lamp. Then the rest will not flicker. This is a questionable decision. You get a different type of light flux in terms of brightness, color rendering, and color temperature. In some lamps it will be clear that your lamps are screwed in and this looks, to put it mildly, ugly. Yes, and using energy-saving lamps and at the same time screwing in an incandescent lamp instead of one of them is a strange saving, because one incandescent lamp, which will produce the same luminous flux as LEDs, can consume more than all the others in the chandelier.
Capacitor connection
The resistance heats up, the incandescent lamp consumes a lot and is out of character. There is an option to install a capacitor in parallel with the lamp. If the backlight is LED, the capacitor should have a capacity of 0.5–1 µF, with a voltage of at least 400 V; if it is neon, then the capacitance can be smaller. The capacitor will bypass the lamp via alternating current, and the indication on the switch will remain operational. In addition, it will also perform a filtering role, slightly suppressing interference from the switching power supply in the lamp.
Why does the light blink when connected correctly?
If all connections are correct, check that the electrical wiring is installed correctly. The switch must open the phase wire. When your zero opens, the ESL may blink. In this case, you need to reconnect the lamp in the distribution box, connect the zero directly to it, and connect the phase to the switch; in some cases, you may need to re-lay the cable.
Incorrect wiring may cause lamp problems
It's another matter if the light bulb is located at a great distance from the switch and junction box. EMF can be induced on the supply wires. It often causes flickering. The source of interference can be nearby cables and various gadgets that use radio transmission and wireless technologies, as well as any other sources of alternating magnetic field.
Primary actions
When the light flashes when the light is off, the first thing to do is check the switch. If the connection was made by a novice master, then he could simply make a mistake. And instead of the phase, connect a neutral wire to the closing key. That is zero.
The test is very simple, and there is no need to call an electrician to carry it out. If there is an indicator screwdriver in the house, then any person, even those very far from working with electricity, can handle the situation on their own. True, you will have to disassemble the switch itself and get to the contacts. Therefore, if you are not confident in your abilities, then it is better to call a professional.
The keys at the switch are removed. Then use the tip of a screwdriver to touch the screw on the contact module. If the LED on the device lights up, then everything is fine with the connection. This indicates that a phase was used for contact.
When the screwdriver does not light up, you will have to make changes to the wiring. It is necessary to replace the neutral wire with the one that comes from the phase. When checking, you need to pay attention to the indicator screwdriver. Most of these devices have a special button to activate the LED. And without pressing it, the actions will be incomplete.
Voltage indicator Source zubr-russia.ru
Ideally, it is good to have a diagram of the electrical wiring in the house on hand for a complete comparison. Because it is advisable to check all switches on the line. They could also have the wires mixed up. Then the problem is solved by throwing lines on a common panel. If the error is only in one switch, then the replacement must be carried out in the distribution box.
Safety precautions
This is not so important for you in everyday life, so you need to adhere to the following rules:
- Turn off the voltage completely - open the circuit breaker at the entrance to the apartment.
- Do not work if the environment is humid, this means both water on the floor and wet walls.
- Use tools with handles insulated with dielectric material.
By following these three simple tips, you will save your health and life.
In the modern world, users are increasingly using their energy-saving “sisters” instead of conventional incandescent lamps. However, along with convenience and savings, unexpected problems arise during the operation of such electrical appliances. Among such “surprises”, the blinking of a lighting device after being turned off is often mentioned. Why do energy-saving light bulbs blink? Let's figure it out.
Independent search for the cause of the malfunction
If an energy-saving lamp used in a lamp or other product begins to blink, then you need to start fixing the problem immediately. Since each lighting device has resource limitations in terms of the number of starts.
That is, each such cycle reduces the operating time, and if they are repeated frequently, then in just a few days the service life will be reduced by many months, or even years. In addition, as mentioned above, if the wiring is faulty, there may be a threat to the health of the home owner, his family and friends, which should not be allowed.
Troubleshooting should only be carried out by a trained technician, using a special tool in compliance with all safety measures provided for in the governing documents.
The troubleshooting procedure should begin with the simplest methods that do not require costs. And if they don’t give results, then move on to more complex ones.
So, first of all, you need to check the functionality of the light bulb itself. Why can it be moved to another place, tested with neighbors and acquaintances. If the blinking continues, then you just need to replace the lighting fixture.
When, after installing the lamp in a new location, the malfunction does not appear, then the switch should be replaced. In order not to waste money, you can take it from another place for testing and, preferably, it should be without a backlight. When the cause is identified, you should simply buy and install a new switch.
If this does not produce results, then the owner of the premises should look for a problem in the wiring. But when performing any electrical work, it is important to remember that all of it is potentially dangerous. Therefore, you need to follow measures to prevent and avoid risky situations, have sufficient skills and have the appropriate tools.
The information in the following article will help you find out the reason why the LEDs glow after disconnecting from the power supply.
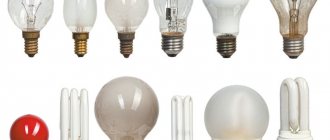
How it works? Difference between different types of lamps
As you know, manufacturers produce several types of lamps. Until recently, the most famous and widespread were ordinary incandescent lamps. Such a lighting accessory emits light due to very strong incandescence, heating of a special wire inside a glass bulb. It is called the "filament".
There are also fluorescent and energy-saving light bulbs. There is no filament in such lighting fixtures. The operation of such lamps is carried out due to the formation of a potential difference. In this case, electrons flying inside the device in the gas cause it to glow.
Before we begin to understand why energy-saving light bulbs blink, let’s determine what conditions they have.
- There is no power to the lamp and it is turned off.
- There is a slight voltage coming to the light bulb. Sometimes it may be a small amount of current, too small to start it. In this case, the capacitor is gradually charged. When sufficient voltage accumulates, the light bulb turns on briefly. However, the capacitor is instantly discharged, and the device immediately goes out. This process looks as if an energy-saving light bulb is blinking.
- When sufficient power is supplied for normal operation of the lighting fixture, the light bulb turns on. The device serves to perform its main function - illumination of a room, objects, area, etc.
Now that you have become a little familiar with the principle of operation of energy-saving light bulbs, you can begin to understand why energy-saving light bulbs blink.
High quality energy saving lamps
When buying energy-saving lamps, make it a rule to pay attention to who the manufacturer is. There is no doubt about the quality of the lamps, from such a well-known manufacturer as Philips. These lamps have good characteristics:
- heat generation is insignificant;
- lasts a long time;
- saves energy by 80%;
- turns on without blinking;
- provides luminous flux of 85%.
Another leader in the production of lighting equipment is the German company Osram. This brand is very popular, and lamps from the OSRAM DULUX SUPERSTAR and OSRAM DULUXSTAR series are distinguished by:
- warm, pleasant light, like incandescent light;
- almost instantaneous achievement of the planned luminous flux;
- excellent light output;
- long service life - 15 thousand hours;
- compact attractive design.
How to deal with blinking? Method one
We previously wrote about why a switched off energy-saving light bulb blinks. At the same time, the incandescent lamps screwed in instead of the housekeepers do not blink. Therefore, the simplest solution would be to replace energy-saving lamps with their “sisters” with filament. However, with this option you will have to forget about economical consumption of electricity.
Read also: Drawing of a tire changing machine with your own hands
Of course, you can pick up several low-power lamps. However, in some cases, such a solution is not very rational (for example, there is only one lamp horn in the lampshade, but you don’t want to use a lamp that is too powerful). Now that you understand why energy-saving light bulbs blink, you can add one more touch to them: solder a 10-20 kOhm resistor in parallel with the socket. This element will “pull back” the small current that caused the blinking.
Malfunctions of energy-saving lamps
Let's look at what malfunctions of energy-saving lamps happen and how to eliminate them using the example of PHILIPS 6yr 23W ECONOMY.
Disassembling energy-saving lamps
We disassemble the housing of the energy-saving lamp in the following sequence:
- take a flat-head screwdriver and, moving carefully around the perimeter, push back the latches;
- disconnect the lamp cylinder by unscrewing the 4 wires with which it is connected to the electronic unit;
- We unsolder the wires connecting the base and the board. The block will remain in your hands. It is now possible to determine the fault.
Common faults:
- If there is increased voltage in the network, the capacitor will swell and leak, and the lamp will stop lighting. Here it is necessary to replace the CD and test all semiconductors.
- For the same reason, a malfunction such as breakdown of capacitor C5 occurs. The lamp glows only where the filaments are located. We change the capacitor.
- The reason for the incomplete glow of the lamp may be a rather long operation. In this case, the sealing of the flask is partially broken, and thermionic emission is reduced. We throw away the lamp.
- When one of the filaments burns out, the lamp stops burning. In this case, we check the serviceability of capacitor C5. Where the filament is broken, we unsolder the diode, and in its place we insert a 10 Ohm resistor.
- Another reason for the failure of an energy-saving lamp is a faulty diode thyristor (dinistor). This reason is detected by eliminating the malfunction of semiconductors, capacitors, inductor windings, and filaments. The solution is to replace the faulty element.
- If, by calling resistors and semiconductors, you see that they are out of order, then the parts, of course, must be replaced. But think about whether it’s worth doing this, because such repairs will be expensive. It's easier to buy a new lamp.
The second way to deal with blinking
If you have exactly this situation, there is a need to reconnect the zero and phase on the lighting group in the panel if such phenomena occur throughout the house or apartment. The situation may turn out to be simpler - sometimes it is enough to restart the circuit, only in a certain junction box.
Before performing any actions, you need to make sure that your switch actually opens not the phase wire, but the neutral one. To carry out such manipulations, it is enough to use the indicator. You just need to touch each of the wires connected to the switch.
When your indicator does not show the presence of voltage (while the indicator itself is working), then in this case the real reason is a broken neutral wire. It is necessary to reconnect it in the distribution box or switchboard. Now you already know exactly what to do if the energy-saving light bulb blinks after being turned off.
Why is my desktop blinking?
Below I have given you a video that shows how the Windows 10 desktop is constantly updated. The spectacle is funny at first, but then depressing, since in most cases you will not be able to get a working desktop with shortcuts, they will just constantly jump and not clickable, and if you have the opportunity to launch something, it will be very difficult.
In most cases, the desktop is updated every second for a number of reasons, which we will discuss below:
- The most common option, also my favorite, is due to a new update, there are a lot of such problems, and they happen with every major Microsoft update, a recent example with Windows 1809, which has already been recalled, is a non-working Internet or missing sound, in a word fun.
- The second option is problems with Windows services
- Third point. this is a problem with device drivers
- System files and their dependent files are damaged
- Well, don’t forget about physical problems or equipment incompatibility
Another way to deal with blinking
Sometimes it is enough to swap incandescent light bulbs from one room with “housekeeper” lamps from another. As they say, “cheap and cheerful.” Screwing at least one regular incandescent lamp into a multi-arm chandelier along with energy-saving light bulbs can also help. It is important to place it in a cartridge that can be turned off using a backlit key.
Possible reasons
To consider the existing arsenal of reasons why an energy-saving lamp may blink, it is necessary to determine the circumstances under which an alternating glow occurs:
- flashes when the switch is off;
- flashes after the switch key is turned on;
- you cannot determine the flickering pattern.
Next, we will consider the principle of operation of energy-saving light bulbs, and how it differs from classic ones, the glow in which is provided only by incandescent filaments. Thus, in fluorescent light bulbs, mercury vapor is ionized due to heating of the filament inside the bulb. With the difference that the device glows on direct current, and not on alternating current.
Fluorescent lamps are connected directly to the AC network, therefore the converting element is contained neither in the chandelier nor in the switch, but in the lamp itself. An example of such a converter is shown in the figure below:
Rice. 1. Power supply for energy-saving lamp
This includes a rectifier bridge, a compensating and smoothing device, a starter, all of which are responsible for the usual glow of both energy-saving and LED lamps. Therefore, this problem is also inherent in LED lamps. In most cases, it is the presence of a capacitor in the lighting circuit that causes it to blink. Let's look at the reasons for the blinking of energy-saving lamps in more detail.
Backlight on the switch
This reason occurs when the switch in which the signaling LED is present is in the off state. The presence of LED backlighting is quite a convenient option, as it allows you to find the switch in pitch darkness. But, as practice has shown, because of this switching circuit, the energy-saving lamp blinks.
The reason is this:
Rice. 2. Illuminated switch connection diagram
As you can see in the figure above, the switch key operates in two possible positions - in the first it is a circuit of an energy-saving lamp, in the second it is a circuit of an LED indicating the location of the switch. Accordingly, when the switch is turned off, current will flow through the phase output to the contacts, the LED and through the neutral output back to the network.
Despite the fact that the energy-saving lamp is not used in the circuit, the flow of alternating current causes the presence of potential and the subsequent charge of the capacitor. When a sufficient charge is reached, the capacitor will discharge to light the lamp, but since the voltage is not sufficient to maintain constant burning, the lamp goes out.
Depending on the rate at which the flashing charge accumulates, the frequency of constant flickering will also depend. The reason in this case is the additional current path that is involved in the off position of the switch.
Electrical installation errors
If the switch you are using does not contain any backlight, and the light is still blinking, errors may have been made during electrical installation or during operation.
Among these reasons are:
- A zero is placed in the open circuit, and the phase connection to the socket contacts is made blindly, which is why potential is constantly present on the lamp elements. In this case, the reason why the light bulbs blink is identical to that described above - the capacitor is charged, which is discharged through the energy-saving lamp.
- Poor contact at the point where the wiring is connected to any of the circuit elements - because of this, the lamps also blink both in the on and off state. But finding a fault will require checking every detail.
- Leakage currents due to poor insulation also lead to the appearance of alternating potential on the capacitor plates, which is why energy-saving lighting devices may flicker.
Poor quality lamp
If you recently changed all the electrical wiring, replaced the chandelier and installed regular switches, the reason may be a low-quality energy-saving lamp. There are a number of manufacturers who save on components for lighting equipment, which is why various incidents can arise during operation, for example, when the lamp flashes.
The same reason may appear over time, when the warranty period has not yet expired, and the light bulb has already begun to act up. It should be noted that this reason is quite rare, but still occurs.
Why does the energy-saving light bulb blink? Is it harmful?
First, determine whether you are a nervous person. For many people, a flashing energy-saving light bulb gets on their nerves. In the dark, such blinking can scare not only younger family members, but also adults. Many users, when faced with this problem for the first time, are seriously scared, thinking that the problem is faulty wiring. Some are afraid of a short circuit and, as a result, a fire.
How to eliminate the cause of the indicator
1. Remove the indicator. To do this, you need to disconnect the indicator from the switch circuit according to the diagram. In the off state, the current that charges the capacitor in the energy-saving lamp does not flow into the lamp, since the circuit is broken.
2. Insert a low-power lamp with an incandescent filament, for example, 30 W, together with an energy-saving one. When installing this lamp, a small part of the current is spent on heating the filament and the capacitor, which acts as a voltage ripple filter, is not charged. If a chandelier is designed for only one light bulb, what to do in this case?
3. Install an additional resistor. It is necessary to install a 2 W 50 kOhm resistor parallel to the lamp in the electrical circuit, which acts as an incandescent lamp.
4. Buy a switch that does not have an indicator and install it.
Afterword
It is of great importance which manufacturer you prefer. Many people purchase cheap energy-saving light bulbs, guided by the principle “saving means saving on the purchase price.” You should know that well-known companies are trying to produce products not only of higher quality, but also more advanced ones. This also applies to energy-saving light bulbs.
Most cheap lighting products are made from low quality raw materials. As a result, the service life of such products is short. Energy-saving light bulbs made from higher quality and more expensive raw materials will not only be safe for you and your family. They will last much longer - the service life of products manufactured under well-known brands can last five to eight years. Now think about it: is it really more economical to buy several light bulbs during this period, or is it more profitable to buy one expensive, but high-quality one? The conclusion suggests itself.
Now that you know why the energy-saving light bulb blinks and what are the ways to solve this problem, all you have to do is start taking action!
Most users in their homes have already replaced conventional incandescent lamps with energy saving ones. However, when purchasing economical lamps, you have to deal with an unusual phenomenon.
It turns out that energy-saving and LED light bulbs in chandeliers and lamps begin to blink with weak flashes (even when the lighting is turned off). This is especially noticeable indoors at night. However, when replacing an economical lamp with the most common incandescent light bulbs, the phenomenon immediately disappears.
It all started when a neighbor came to me and started complaining that the store sold him defective energy-saving lamps. Yesterday he says he bought and installed five light bulbs in a five-arm chandelier. They work great, they shine well, but in the evening when I was getting ready to go to bed, I turned off the chandelier and I was sleeping, talking like I was at a disco, all these five lights blinking periodically.
What could be the reason? We came to his house, and indeed, when the chandelier is turned on, the lamps shine normally, but when the switch is off, they begin to blink, and that’s it. Well, I think there might be a bad contact somewhere in the chandelier or something else.
After examining all the contact connections of the chandelier, everything was in order, no questions arose at all. But there was one point - the switch was with LED backlight. So, why does the energy-saving lamp flicker after being turned off? Let's find out in this article.
Reasons why LED lamps blink when the lights are off
The main reason why LED lamps blink when the switch is open is the flow of current through the lamp. It sounds very absurd, because current cannot flow in an open circuit.
Read also: Tap for unscrewing broken bolts
But let's look at the example of the most common option. In the vast majority of cases, this problem occurs if you have a backlit switch installed. The backlight is most often a neon bulb or LED. In any case, for it to glow, a closed electrical circuit is needed so that the current flows from the phase wire to the neutral wire.
Main reason for blinking
In the classic connection diagram, the neon indicator is parallel to the switch; when it is open, current flows through the circuit:
Phase – backlight – lamp off – zero
When you install an incandescent lamp, no problems arise. Because The current that passes through the neon indicator is extremely small (a few milliamps), so much so that flowing through the cold coil of an incandescent lamp does not cause the slightest glow.
Problems with flickering lights when the lights are off can begin when switching from incandescent lamps to energy-saving lamps (compact fluorescent and LED). The design of compact fluorescent lamps is somewhat similar to LED lamps, there is a difference in the circuitry and light source, but the design itself is similar - both have a built-in converter to power the light source.
Conclusion: if you have a backlit switch installed, then current flows through any type of lamp. Let's say we have LEDs installed. Such a small current is not enough to start the converter into operation, or to light the LEDs if the lamp does not have a normal converter. But a rectifier, for example, a diode bridge, is installed on the input circuit of the power source (driver), and a filter capacitor is installed at its output. This current is enough to charge the capacitor. It gradually charges, accumulating energy. When the voltage on its plates becomes sufficient to start the converter (in circuits with a ballast capacitor - to open the diodes), then the LEDs turn on for a short period of time. The energy stored in the capacitor is dissipated into this flash and the process repeats.
Current may flow not through the backlight, but, for example, through the insulation of the wires leading to the switch (usually there are two, or more if several groups of lamps are controlled); if it is in poor condition, a small current may flow past the switch. But flickering in this case is the lesser of two evils. Poor insulation in electrical wiring leads to a number of problems, including fire.
There is another reason. If the switch opens the neutral wire and not the phase wire (as expected). Then the lamp may flicker even without backlighting in the switch, if, again, there is a leak to zero or to ground, this can happen if your wiring has poor insulation and the wires lie in damp walls.
We have also collected for you not always logical and not always understandable versions from the Internet. The authors didn't try to explain what they meant, but here they are:
- A source of strong electric field near the lamp (but how does this relate to HOME lighting?).
- Poor condition or old LED bulb (it may flicker due to aging, but only during operation, i.e. when it is turned on).
- Cable line capacity. Of course, such a reason is possible, but most users are looking for the causes of flickering in their apartment, and what line in the apartment can be so long that its capacitance has a significant impact on electrical appliances?
How modern energy-saving lamps work
We’ll look at the question of why a switched-off energy-saving lamp blinks a little later; now we’ll figure out how modern energy-saving lamps work.
Did you know that, unlike incandescent lamps, fluorescent and LED lamps operate from a constant power source, that is, they operate at a constant (rectified) voltage. How can you ask? After all, the lamp is supplied with an alternating voltage of 220 V; there are no rectifiers in the sockets or chandeliers. I assure you, there is, and this rectifier is located inside any modern lamp.
Read also: Russian machine for the production of self-tapping screws
Inside each energy-saving lamp, between the base and the tube, there is an electronic board (in professional language they are called electronic ballasts), thanks to which they work.
An alternating voltage is supplied to the input of a special rectifier (diode bridge), and at the output we have a constant or rectified voltage.
I will not go into all the details of the operation of these circuits, but in order to smooth out the ripples, a special smoothing capacitor is installed. It is precisely because of this capacitor that the energy-saving lamp blinks. And in what case this happens, and under what circumstances, let's look at it below.
Why does it blink when turned on?
An energy-saving light bulb is a rather complex design and may have some defects. Often these are malfunctions of its board, which is responsible for the normal functionality of the design.
Manufacturers are constantly struggling with this problem and improving their product, but there are still three most common problems that you should be aware of and understand the process of eliminating them.
Let's look at them in detail:
- The incoming network voltage level is too low. Because of this, the starting mechanism cannot normally activate the entire system and set the required voltage. The permissible deviation of the incoming current indicator is no more than five percent decrease or increase.
- It is necessary to carry out measurements; if the indicator goes beyond this limit, that is, 210 or 232 Volts, you should contact the energy supply company. Due to such differences, not only light bulbs can fail, but also other equipment, since often the fluctuation limit is within five percent.
- If the incoming voltage is higher or lower than the permissible limit, then the life of the incandescent lamp is usually reduced by about twenty percent. And for lamps of a more complex design, this value may be greater.
The next problem that affects the operation of the light bulb is a malfunction of the starting system. In most cases, it is impossible.
If an electromagnetic starting system is used for starting, it can be repaired and can be replaced.
The third reason is large voltage surges in the incoming network. This phenomenon also affects light bulbs and causes them to flicker. The reason for this may be the inclusion of powerful equipment, for example, a welding machine.
The reason may be a non-working capacitor
Often, lamps that blink during operation with the light on, while all the necessary conditions are fully met, then they have a manufacturing defect. Repair of such devices is impossible and they should be disposed of or returned to the manufacturers under warranty. Since some breakdowns simply cannot be repaired, or their repair will be expensive and very time-consuming, and such costs will be unjustified.
Why does a switched off energy saving lamp blink?
Let's return to the first section of the article, with a neighbor, a backlit switch and energy-saving lamps. I would like to draw your attention to the backlit switch, since the problem is why the switched-off energy-saving lamp blinks precisely in it.
What physical processes occur in illuminated switches? When the switch is turned on, its power contacts are closed. When the switch is in the off position, the lamp in the backlight lights up (because that’s why it’s installed there).
And if the lamp is lit, then an electric current flows through it, which moves along the following path: network - backlight lamp - chandelier with a lamp - network. This current is very small (about hundredths of an ampere) and does not affect the overall network load (the electric meter does not respond to it).
The current flowing through the backlight serves as a charge for the capacitor in the electronic circuit of the light bulb. As soon as it receives a sufficient level of recharging to turn on, the circuit starts up, which is why a flash is produced. Further, after a short flash, the capacitor is immediately discharged, and the process is repeated again.
When using a backlit switch, there is a flickering effect that bothers everyone so much. Therefore, when a backlit switch and a compact fluorescent lamp are used, this flashing effect occurs. You turn off the switch, the light in the key lights up and the lamp begins to flash periodically.
| The negative aspect of all this is that the circuit inside the lamp is designed for a strictly timed resource in terms of the number of starts. Thus, the internal reserve inside the lamp is used up within 1-2 months, after which it can be safely thrown into the trash. |
A similar situation is with low-power power supplies for LED strips. “At the input” of the source, exactly the same diode rectifier and capacitor are provided.
Accordingly, a small compensating current flows in the backlit switches, and the capacitor has time to recharge. In this regard, the switched off LED strip begins to work in smoldering mode with periodic flashes of light.
| PS Self-respecting manufacturers provide the consumer with the following information on the packaging: “not for use with backlit key switches, photocells, brightness controls, dimmers, timers, etc.” Remember, these devices force the energy-saving lamp to work in critical (abnormal) mode! |
How to eliminate the cause of blinking energy-saving lamps
- 1) Probably the simplest solution would be to remove the backlight. To do this, open the switch cover and disconnect the wires that power the backlight. Or you can simply cut this wire (do not confuse it with power wires).
In this case, when the switch is turned off, the current that recharges the capacitor will not flow accordingly - the lamp does not blink.
- 2) Do not use a backlit switch. Replace all backlit switches with regular ones where energy-saving lamps are used.
- 3) Connect a regular incandescent lamp in parallel with an energy-saving lamp. This method allows you to eliminate the blinking of energy-saving lamps, since the current that charged the capacitor will go to the filament.
But I believe that this method does not really have a place to exist, since the point of all this saving and modernization. Moreover, there is not always room in the lamp to install an incandescent lamp next to an energy-saving one. But that's my personal opinion.
- 4) There are switches in which the backlight is an integral part, for example, it works as a decorative element. What to do in this situation?
If an energy-saving lamp blinks after being turned off , one way to solve the problem is to connect an additional resistance (resistor) in parallel with the lamp.
The resistor should be 2 W with a nominal resistance of 50 kOhm. The cost of such a resistor is a penny, about 10 rubles. You can purchase it at any amateur radio store.
This resistor does not affect the normal operation of the lamps in any way, but when the switch is turned off, that is, when the backlight is on, this resistor will consume the current that recharges the capacitor in the lamp starting circuit.
For safety, we insulate the resistor using heat shrink tubing. The connection can be made in the ceiling lamp, junction box or at the lamp socket itself. To connect such a resistor, you can use special Wago terminal blocks.
After connecting, carefully place the resistor in the box. The entire reason for the flickering of the energy-saving lamp has been eliminated. See you in the next lessons. I hope this article helped you understand the question of why the energy-saving lamp blinks after being turned off. Subscribe to the YouTube channel.
How to eliminate the cause of an energy-saving lamp blinking
Let's figure out how to get rid of the blinking energy-saving lamp. You can try one of four ways:
- remove the switch backlight;
- replace the switch with a new one without backlight;
- install a regular one next to the energy-saving lamp;
- install a resistor.
Each of the methods is worth considering in more detail. For example, you can easily remove the backlight at home.
It is enough to remove the switch cover and disconnect or cut the wiring that powers the backlight. The main thing is not to confuse it with other wires. However, it is not difficult to distinguish them even without the appropriate knowledge.
Also, the backlit switch can be simply removed by installing a new one without backlight in its place. These are the simplest and most reliable options, but they are not suitable for people who have used backlit switches for a long time. It is quite difficult for a person accustomed to backlighting to find an unmarked key in the dark.
Some people simply screw a regular light bulb into the chandelier next to the energy-saving light bulb. The incandescent lamp takes the current that previously charged the capacitor and prevents it from flickering. This method allows you to avoid fraud with the switch, but it is bad because after installing the incandescent light bulb, the point of using the “housekeeper” is lost. In addition, some lamps simply do not have a second lamp socket.
Housekeeper and incandescent lamp
In some cases, illuminated switches are decorative elements. In addition, a person may simply not want to be left without lighting. In this case, you need to connect a resistor - an element of additional resistance - in parallel with the energy-saving lamp. The following must be taken into account:
- the resistor power should be 2 W, and the resistance should be 50 kOhm;
- installing a resistor is not the easiest operation;
- For this procedure it is better to call an electrician.
But if a person has certain skills in working with electricity, he can install the resistor with his own hands. It is necessary to insulate the device with heat-shrink tubing and connect the device using terminal blocks. It can be installed either in the lampshade, or near the lamp socket, or in the distribution box.
Housekeeper scheme
The resistor will draw current when the switch is off, but will not affect the operation of the lamp when it is on.
If, during the blinking or attempts to eliminate it, the lamp burns out, then under no circumstances should you throw it in the trash. Burnt-out fluorescent lamps are handed over for recycling as scheduled.