The development of an indoor electrical network can be planned both during its initial design and during the operation of ready-made wiring. In any case, you want to connect distribution boxes, mounted socket boxes, and switches with each other with minimal material costs. Disconnection of the power cable is not necessarily carried out exclusively in installation boxes, which are hub splitters. For example, there are many ways to connect a switch to an outlet, and vice versa. Some of the switching can be done in any box, the main thing is that there is no danger of shorting the contacts.
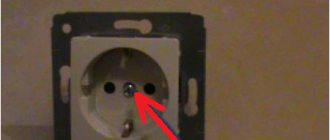
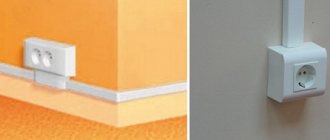
A typical example of combining a socket and a switch in one unit
Often in a corridor or hallway there is a need to combine a network connection point (socket) and a switch for several lighting groups. This method solves several problems:
- An extensive electrical outlet network in the corridor is usually not needed: there are no constantly used electrical appliances. However, there is a need to connect a vacuum cleaner or charger. In addition, a radiotelephone base unit can be installed in the hallway.
- There is little space on the walls in this room; there are wardrobes, a mirror, and a hanger. Part of the corridor is usually occupied by the input switchboard and metering device (meter). Therefore, compact placement of switching equipment is a key issue.
- By combining the socket and switch, wiring is saved and installation of an additional junction box is not required.
- If you additionally connect a second device: a switch to a socket, or vice versa, there is no need to damage the wall or organize a route for the power cable. The connection is made with minimal impact on the room.
As can be seen in the illustration, to implement the entire circuit you will need one circuit breaker (in the panel it can be called “corridor: lighting, socket”), and one distribution box.
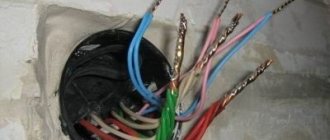
The zero bus N (blue color) passes through a kind of transit to the lighting groups and to the socket. The PE grounding is inserted into the socket body, and (if one of the lighting groups is in the bathroom) into the lamp body. The phase after the machine is connected to the socket through the distribution box. The disconnection occurs in the socket box. In this case, any terminal block is used: for example, WAGO.
A small section of wire connects the phase terminal in the socket and the input terminal of the two-key switch. Next, a phase is laid from the output terminals to each lighting group.
This scheme is usually used during design, since you still have to lay cables to different lighting groups. If such a solution is optional, you do not install additional boxes. The hole for the switch or socket box is made next to the already mounted device. All that remains is to install additional wiring.
If there is a need to connect the socket and lighting to different circuit breakers (for example, a power socket is used for a powerful electrical appliance), the phase is initiated along different power lines.
There is no need to use an additional distribution box; the phase wire passes through it in transit, without disconnection.
Tip: Leave a loop on each phase wire in the distribution box. With the future expansion of the network, you can cut the wiring and quickly organize the connection using the blocks.
In any case, this installation method saves both wiring and wall space. For example, let's look at the classic version of connecting a socket and switch to a distribution box.
Two cable routes were laid, the connection was in the junction box. Looking at the diagram, it becomes obvious that connecting the switch directly to the outlet is more efficient.
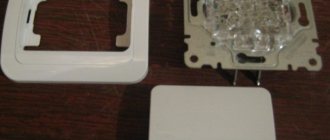
Switch
The switch consists of two contact groups (input and output). Its main task is to close or open a ready-made electrical circuit to supply voltage to the lighting device. Remember, this switching device always works only for phase interruption, it does not need zero. Only phase wires should be connected to the switch: one from the supply network (to the incoming contact), the second from the lamp (to the outgoing contact).
Screw the red wire connector onto the black wire from the outlet, the black power wire that goes back to the switch, and the black wire from the dangling cord, connecting all three together. Wrap the black pigtail wire around one of the screws on the right side of the existing light switch that you set aside earlier. Wrap the remaining black wire around the remaining screw on the right side of the light switch. Carefully insert two sets of both black and bare copper wire into the back of the electrical switch and reconnect the switch to the top and bottom of the box.
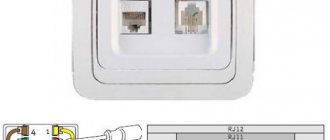
How to connect a single-key switch from an outlet
The classic option: a common zero bus from the distribution box is connected to a light point.
Grounding goes through the same cable channel (if used). But the phase wire does not go directly to the lighting fixture. A single-key switch (located in the same housing as the socket) breaks the circuit between the phase contact in the socket box and the light source. Quite a common scheme. Such a block can often be found in lighting stores.
Another application for such a module is a switchable socket. Let's say you have an electrical appliance that should be turned off at night or when leaving the room. This could be a router that distributes Wi-Fi. The unit itself is located high, so it is not always possible to use the standard power button. By clicking the switch key, you will de-energize the equipment without touching the circuit breaker in the distribution panel. Or, on the contrary: the device must be powered under certain conditions. For example, power supply for an alarm system.
In this case, the phase wire inside the block is simply opened by a switch, and the power wiring is connected as to a regular socket.
How to wire a socket from a switch: instructions and connection diagram
Most options for connecting one device to another will not require complex skills from the master, such as independently laying additional wires or installing grounding in an apartment where there is none. However, in this case, some restrictions are imposed on the operation of the connected sockets: certain types of electrical appliances cannot be connected to the network. To connect the outlet yourself, you need to understand the structure of the apartment's electrical wiring and be able to identify the functions of the wires located in the niche.
If the switch is being added to an existing outlet
Minimizing the consequences - replacing the socket with a block. The procedure itself is simple; we drill a hole nearby for the box and carefully install the new module.
There is no need to install a power incoming cable; it is already in the socket. But the output wiring, to the lighting device, will have to be extended. This is an individual decision, there is no universal way. The connection diagram is very simple: both the neutral and phase wires are laid not from the box, but from the socket box.
Naturally, you will have to install contact blocks. Although many connect the output wire directly to the socket contacts: some models allow such a connection.
If there are several sockets in a group, you can replace any of them with a common block (socket - switch). You simply choose a convenient location (from which you can run the wire to the lamp) and connect the switch to the outlet.
If you need to organize an additional light point in the hallway, you can use wall sconces. They are placed in close proximity to the outlet-switch block, and you do not have to destroy a large piece of the wall for wiring.
General safety rules
Of course, before starting such work (especially on a completed power supply system), you should de-energize the line and check that there is no voltage. Selecting a power cable will not cause any difficulties: a cross-section of 1.5 mm² is sufficient for organizing lighting. Since we are connecting the switch to the socket, and not vice versa, the primary (socket) cable will be more powerful: 2.5 mm².
Changing the purpose of an electrical point and connecting one to another
Knowing the features of connecting socket devices and lighting control boxes, you can replace one element with another or make a connection between them. When performing any connection work, it is first necessary to de-energize this line, as well as the cables of adjacent lines that may be unintentionally touched.
Replacing a socket with a switch
Of all the operations reviewed, this procedure is the most simple. After removing the old socket, a trinity of cables remains - phase, neutral and ground. It is necessary to identify each of the elements by the color of the protective winding. For reliability, you need to use a multimeter (it will be able to show the phase - the cable through which the current flows when connected to the probes of the device), since during installation work the regulation of wiring colors is sometimes ignored. In apartments with an old layout, where the electrical network has not been modernized, instead of three conductors, there will most likely be two (phase and zero), since grounding was almost never used before.
Having determined which wire performs which function, you need to connect the phase component to the input of the switch, and the zero to the output. Then work is carried out in the distribution box: the zero, which was previously drawn to the socket housing, is turned off and then connected to the lamp phase. Grounding is not involved in the operation, regardless of whether it was used in the previous outlet or not. After this, the neutral cable of the chandelier or sconce is connected to the network.
Replacing a switch with a socket
For proper operation, additional cables must be installed. To connect the socket, three wires are required, and after removing the switch housing, there are only a couple of them left. But it is quite acceptable to connect an outlet box to this place, and the socket will work, but during its operation you will have to come to terms with some restrictions.
Refrigerators, electric kettles, and heating appliances cannot be connected to an outlet without grounding. It is also necessary to take into account when choosing the rated current that thinner wires are usually used for lamps than for socket structures.
First, switches are made at the site of the future location of the outlet box. Two wires remaining from the switch need to be connected to its power contacts. One of them will have to be transformed from phase to zero: in the distribution box, turn off the cable that was going to the phase wire of the lamp before dismantling the lighting control device. It must be connected to the zero terminal of the group's power cable.
Is it possible to connect an outlet to the switch?
Imagine the situation: you have renovated your premises, all the electrical wiring is walled up in the walls, and there are no backup boxes or socket boxes. An outlet needs to be installed in one of the rooms. Placing it next to the distribution box is irrational, the location is too high. But I don’t want to lay open wiring (especially, ditch the wall).
There is a switch in a convenient location that clearly has voltage. How to make a socket from a switch if it is possible to aesthetically place them next to each other?
To answer this question, let’s remember: what types of lighting schemes with switches are there?
Classic connection: tap from the distribution box.
The neutral conductor is inserted into the lamp from the box. In the box itself, a break in the phase cable is organized (it is opened using a switch), then the phase enters the lamp along the same path as the zero.
With this scheme, only the phase conductor is present in the body (installation box) of the switch. It will not be possible to organize a closed electrical circuit to connect an additional electrical appliance (via an outlet). You can use the phase from the switch, but you still have to lead the zero from the distribution box, which makes the idea pointless.
Conclusion: With this type of lighting arrangement, it is impossible to connect the socket to the switch.
The switch is located between the power source and the lighting fixture.
This scheme is less common, but in some rooms it is used. If at the design stage it was decided not to use distribution boxes in the lighting network, you are in luck. The switch wiring box contains both neutral and phase wires.
The sequence of work is as follows:
- We dismantle the existing switch without touching the installation box.
- We determine the routes for laying the input and output cables. If you have a diagram and plan for the electrical supply of the room, this is not difficult to do.
- Carefully drill a hole for the socket box.
- We install terminal blocks in the switch box and connect the socket according to the following diagram:
Safety regulations:
Since the current wiring is intended for lighting, most likely the cable cross-section is no more than 1.5 mm². The maximum possible load for such a cable (provided that it is copper): 3.3 kW. That is, not very powerful electrical appliances can be plugged into this outlet. The maximum is a vacuum cleaner. Well, phone chargers, a power supply for a router or an antenna amplifier - no problem.
Types of switches
Manufacturers produce a large number of different switches; they differ from each other in many ways. In order to understand, we will look at them in more detail.
Table 1. Types of switches according to the method of connecting wires.
| View | Description |
| With clamp and screws | To connect the contacts in such a device, a clamp is installed, which is secured with screws. Installation of this connection is complicated, but high-quality contact is obtained. Of course, over time the connection will become loose, then you will have to tighten the screws. It is believed that this connection method is suitable when there are aluminum wires. |
| Mechanisms with springs | This is a modern version of the screw clamp. Here, under the spring, there is a special plate that fixes the exposed wire. This results in a high-quality connection. However, this is a rather primitive installation method. The disadvantage of the design is that the wire must be clamped in accordance with the rules. Otherwise the device will be faulty. These switches are compatible with copper wiring. |
Table 2. Types of switches by installation method.
| Type | Description |
| Invoices | This is the common name for devices that are first placed on the wall and then fixed. They look less aesthetically pleasing because they stick out. Often such devices are used in the presence of external wiring. At the same time, the devices are distinguished by their functionality and ease of installation. |
| Built-in | An opening in the wall is prepared in advance for such switches. Because of this feature, installation is complicated, but in the end the device will look aesthetically pleasing. Only the outer panel can protrude slightly from the wall. Such devices are suitable for hidden wiring. |
Table 3. Types of switches by management method.
| View, illustration | Description |
| With keys | These devices consist of contacts that are located inside and a swing mechanism with a spring. The first version of such a device is a mechanism with a ball that moves when pressed. The second option is a spring-loaded frame; it also rolls from side to side. Such switches can have one or several keys. They are distinguished by long-term operation with proper installation. |
| Cord type | Such devices were at the peak of their popularity in 1975. Moreover, they are also installed on modern lamps of various types. So, a strong cord comes out of the body of the switch, which just needs to be pulled to turn the device on or off. This lace is fixed on a special lever, which interacts with the rotation block. |
| Sensory | The operation of these devices occurs without mechanical impact. In order to turn the switch on or off, you need to touch the panel located on the outside with your finger. The sensor element responds to touch and sends a signal to the electrical circuit. This signal is converted into a special command. |
| With remote control | Such a device assumes the ability to control the lighting device from a distance. This happens thanks to the presence of a special remote control. The switch in this case acts as a receiver. The remote control is a small plastic keychain. The operating distance will also depend on the materials from which the ceilings are made. However, the signal is received even at a distance of 18 meters. |
| With built-in sensor | Typically, these devices respond to certain changes in their surroundings. Most often, this is the movement of a massive object, which causes a signal to be sent to the controller. These are programmable switches. Therefore, the user can independently decide under what circumstances the device will turn on. |
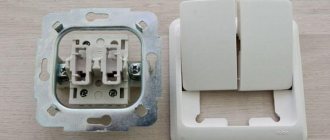
Connecting a two-gang switch
The next one will be a circuit that uses a two-key switch.
A feature of its design is the presence of two output pins, each of which can be connected to the input (phase) pin independently of each other.
This allows you to create two separate branches from one input wire, for which power control is provided with its own switch key.
Typically, a two-key switch is used to power two lamps, but there are situations when only one lighting element needs to be powered, that is, to create one branch.
In this case, the connection does not differ from that described above. The only thing is to decide which key will be working and connect a phase conductor to its output terminal.
With this connection, the second key will be disabled.
Now let's look at the features of connecting two light bulbs to such a breaker. That is, in essence, we create two branches from one phase core.
The difference from the circuit described above comes down to the fact that we will have two outputs from the box (each to its own lamp).
That is, the distribution box should include 4 wires - an input wire, two output wires and one from the switch.
Another important point is that you will have to lay a three-core wire from the breaker to the distribution box.
One of the wires will be connected to the input terminal of the switch, and the other two to the output terminal.
Next, all that remains is to connect everything correctly. Here, for convenience, you should also use the colors of the braids.
For example, the third color in a three-wire cable will be green.
The connection is made like this:
- We connect the neutral wire (blue) from the input to two output wires of the corresponding color (you should get a twist consisting of three wires);
- We connect the input phase wire (brown) with the same color leading to the switch;
- The remaining two wires of the cable leading to the switch must be connected to the phase wires of the terminals. That is, the blue one needs to be connected to the brown one of one branch, and the green one to the brown one of the other branch.
All this is more clearly presented in the diagram.
After connection, all twists should be insulated and only then checked for functionality.
Important to know: Wireless switches greatly simplify the connection of lampshades with one bulb or large chandeliers.
General provisions
Next, we will consider the most common schemes for powering the lighting elements of a room.
The features of creating such branches largely depend on the number of lamps connected to them, as well as their control using a switch.
But in any case, the created branch includes:
- Switch (one-, two-, three-key);
- Lamps with sockets;
- Junction box;
- Wires (two- and three-core).
A little about the features of the breaker.
Any switch has two outputs - input and output (there may be several of the latter).
Moreover, both of them belong to the same line, that is, if a phase is connected to the input terminal, then it will also be at the output.
By moving the key to a certain position, the contacts of these terminals are connected or disconnected, thereby closing or opening the circuit.
Before describing connection methods, let us immediately remind you of safety precautions when carrying out work.
To avoid electric shock, turn off the power supply and take steps to prevent accidental restoration of power before work is completed.
What do you need to connect?
Before we consider the option of connecting sockets and switches from one wire, let's dwell on the question of what you need to have for this? Here are the following stages:
- preparation and availability of necessary tools;
- acquisition of proper quality sockets, switches, and socket boxes for them;
- purchasing a cable of the required length for all wiring;
- purchasing a distribution box;
- development of a connection diagram;
- preparing walls for electrical installation;
- laying wires and installing socket boxes and boxes;
- installation of a switch with a socket;
- checking the correct connection.
Installation elements and tools
What you need to have to connect a socket, as well as a switch in one circuit and from one cable line. First let's look at the tools, you need to have:
- ruler or meter;
- building level;
- pencil or marker;
- a drill with an attachment, or, in extreme cases, with drills to create a socket for socket boxes and a block;
- a grinder or jigsaw (for drywall) when creating channels for wires;
- trowel for working with mortar;
- indicator screwdriver;
- knife or special tool for stripping cable cores.
Now let's look at what installation elements are required:
- plastic pipe for laying wires in the wall;
- the cable itself is two-phase or three-phase, three-phase should be used if the wiring in your house has a third core with a ground loop, otherwise you will only need to take the two-phase option;
- socket boxes for sockets and switches, as well as a distribution box;
- solution for fixing the socket boxes and the block in the wall;
- The switches and sockets themselves are included.
If you have all this, and you have cleared and marked out the place for laying the wires, then you can get to work.
What is needed to switch the circuit?
Electrical wiring can be open or hidden. In this article we will consider the connection of sockets and switches made according to the second option, when all electrical switching is hidden under a layer of plaster. Hidden design is the most common type of electrical wiring; open wiring is usually used as a temporary option.
Preparing the walls
Before connecting a socket and switch in the room, you need to prepare holes in the wall for their installation and grooves in which the wires will be laid. There should be three holes in total - for the junction box and for the connected switching devices.
It’s better to draw an approximate drawing on a piece of paper in advance, where exactly you plan to connect the switch and socket, and what route the wires will take to these places.
The hole for the distribution box is made, as a rule, under the ceiling, 10-15 cm lower. Holes for switching devices are made at the site of their planned installation. It is better to install the socket at a distance of 30 cm from the clean floor, where household appliances will be connected to it. It is advisable to install the switch at the entrance to the room at the level of an adult’s lowered hand - about 90 cm from the clean floor. These works are performed with an electric drill with a special bit for brick or concrete, a hammer drill with a Pobedit drill, an impact drill or an angle grinder.
Read also: Replacing cells in a laptop battery
When installing gates, consider several important rules:
- They can only be horizontal or vertical; no tilting is allowed.
- The entire path of the groove from the distribution box to the installation sites of the socket and switch must pass with a minimum number of turns.
- Vertical grooves cannot be brought closer to window and door openings less than 10 cm, and to gas pipes - less than 40 cm.
To install the grooves, you can use a hammer and chisel, a hammer drill, a grinder or a special tool - a wall cutter.
When all the holes and grooves are ready, thoroughly clean them of dust using a vacuum cleaner.
Installation elements and tools
To perform the electrical part of the work you will need the following materials and tools:
- distribution (socket) box, in which all wires are connected;
- two plastic or polypropylene mounting boxes (socket boxes), they are needed in order to securely fasten the switching devices in the wall openings;
- indoor socket;
- indoor switch with one key;
- lighting fixture;
- set of screwdrivers (flat and Phillips);
- knife or stripper for removing insulation from conductors;
- pliers with insulated handles;
- clamps or insulating tape;
- indicator screwdriver.
To switch the entire electrical circuit, you will also need a two-core wire. Nowadays, electrical goods stores offer a huge assortment of wires and cables, so immediately buy one so that each core has its own colored insulation, for example, red and blue. This will make it easier to switch the circuit; you won’t have to look for phase and zero with instruments, you’ll just need to connect wires of the same color.
In order to fix the wires laid in the grooves, you will also need alabaster and a spatula.
Connection diagram
The electrical circuit represents a parallel connection to the power source of a lighting fixture with a light bulb, a switch and a socket.
Preparatory work
After turning off the machine, you need to once again make sure that there is no voltage, now using an indicator screwdriver. First, check its working condition in an area that is known to be energized, for example, at the entrance to the machine. The indicator lights up after touching the phase, which means it is in good condition. Now touch the indicator screwdriver to the cores of the power wire, which is brought into the apartment from the machine; there should be no glow. This means that the tension has been relieved and work can begin.
Lay the wires in the grooves made, leading them to the wall holes. At the same time, leave the ends of 10-15 cm for cutting the cores, do not regret it, it is better to make a slightly larger reserve than to suffer later when connecting and connecting. Install a distribution box and socket boxes in the holes; use plaster or alabaster to securely fix them.
Electric installation work
Place a two-wire cable from the mains supply (phase and neutral) into the junction box. Three wires must be laid from the box: one to the switch, the second to the lamp, the third to the outlet.
For a wire whose cores have different insulation colors, red indicates phase, blue indicates zero.
The switch has an input and output contact; a phase conductor is connected to the input. Connect the second core to the output contact of the switch.
A two-wire wire must also be laid to the lamp. The lamp socket has two contacts. The central spring contact (phase) is used to directly supply voltage to the light bulb. The side contact in the socket is zero, the lamp will come into contact with it after screwing in with its base.
Another two-wire wire is laid from the junction box to the outlet. This switching device has a contact part consisting of two terminals to which phase and zero are connected.
The connection diagram for the switch, lamp and socket in the distribution box is as follows:
- Connect the neutral conductor from the supply wire with the neutral conductors going to the lamp and socket.
- Connect the phase conductor from the supply wire with the phase conductors going to the switch and socket.
- Connect the remaining core from the output contact of the switch to the phase core of the lamp.
Read also: Production of masonry mesh business plan
All connections must be made as firmly as possible to ensure reliable contact. This can be done the old fashioned way - by twisting, which it is also advisable to solder on top. There are also more modern devices: special blocks (in which the wire is clamped under a screw) or PPE (connecting insulating clamps).
For more information about connecting wires in a junction box, watch this video:
Checking the circuit and completing the work
Move all the twists in different directions so that they do not touch each other and check the operation of the assembled circuit. Turn on the input circuit breaker for the apartment, thereby supplying voltage from the power source to the newly mounted distribution box. The switch is in the “off” position, the lamp does not light, which means everything is correct, the phase is open. Now press the switch key to the “on” position, the electrical circuit is closed and voltage is supplied through it from the power source to the lamp, the light bulb lights up. There will be constant voltage at the outlet; you can check its operation by connecting any electrical appliance. Plug the hair dryer, radio or electric kettle into the outlet and check its operation.
Now turn off the input circuit breaker again and securely insulate the twisted areas with electrical tape; you can also put PVC pipes on top. Carefully place all the connected wires in the box so that it can then be closed with a lid.
All that remains is to securely place the switch and socket in the socket boxes, secure them, and put protective covers on top. The distribution box is also covered with a lid; during any repair work, never hide it under wallpaper or plaster. Remember, the distribution box should always be accessible, no matter how much it spoils the overall appearance of your room.
Also keep in mind that if the lighting fixture and socket are structurally grounded, then their electrical circuit will require a three-core wire. The same wire of three cores should also come to the junction box from the power source. Typically, the grounding conductor is indicated in green or yellow; in the same way, in the box you will need to connect three protective grounding conductors into one twist - from the power source, socket and lamp.
Installation and connection of electrical wiring elements
Let's start by installing the security device. For our circuit we use a two-pole circuit breaker rated at 25 Amps. The selection of the required amperage of the protection device is made after calculating the cross-section. We immediately decide on the color of the wire:
- blue, white with blue stripe - zero (neutral)
- yellow with green stripe - ground (grounding)
- the remaining wire will be the phase usually it can be black, white, brown, red, orange or white with a black or brown stripe
In our example, there are two types of phase wire colors: white and white with a brown stripe.
In order not to get confused in the colors of the wires, it is best to use wire from one manufacturer.
A power outage will be required before further work can be carried out. Turn it off. We check the absence using a voltage indicator. How to do this is discussed in detail in the article voltage indicators. We remove the outer layer of insulation of the wire, measure out the required amount for connection, remove the required amount of the second insulating layer from the copper core and connect the wires to the circuit breaker. For more details about the connection, read the article, instructions for connecting a two-pole circuit breaker.
We connect the yellow-green core to the ground wire through a contact clamp. This connection makes sense if you have a grounding loop in your apartment or house and your supply wire, namely its grounding conductor, is connected to it. You can find out more about whether your apartment has grounding by reading the article, grounding in an apartment.
Now we connect the outlet. We strip the wires, measure the required amount, insert the wires into the contact clamps, tighten the screws, and check the reliability of the fixation. For more details, see the article about connection; you can read the article on how to connect an outlet.
We install the socket mechanism in the socket box.
Next, we connect a single-key switch. We prepare the wires, remove the outer insulating layer, measure out the required amount and connect the stripped wires to the contact clamps. We isolate the unused ground wire.