How to make several from one socket: all methods
Calculate the cost of installing sockets!
Make a list of works and get a cost estimate in 10 minutes! Calculate>> When it is necessary to use several electrical consumers in a limited area of a room, having one outlet is not enough.
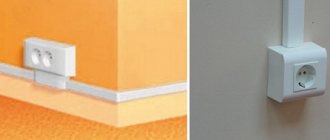
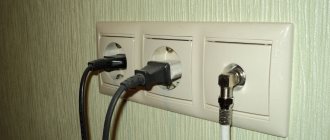
When temporarily connecting devices, the best way out of the situation is to use a household extension cord with a block of sockets equipped with an overload protection device. If additional equipment is placed permanently or is connected frequently, the extension cable on the floor is an inconvenience, and the tees inserted into the socket fall out of the plug connectors.
In some cases, the problem can be solved by reconstructing the existing connection point - installing several instead of one outlet. This operation is not technically difficult, but it is not always permitted, so we will consider in what cases such an upgrade is safe, and how to perform it correctly.
Methods for upgrading an outlet
There are two ways to install several sockets in place of one, which are often used in everyday life:
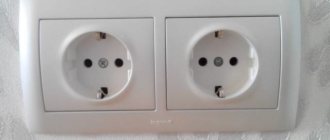
- installation of a double socket;
- installation of a block of several sockets.
The methods are not equivalent, so to make the right choice you need to know the features of the devices used.
Advantages of a double socket:
- the ability to select a model suitable for installation in an existing socket box - without causing damage to the finishing of the apartment by installing an additional mounting socket;
- lower cost than two single ones.
Disadvantages of a double socket:
- less rigidity of fastening on the base - the outer part is much larger than a standard socket box;
- the total permissible current for both pairs of plug connectors is 16 A (single sockets are designed for the same amount);
- plug connectors have a fixed orientation, limiting the ability to rotate the device by 90 o during installation.
Conclusion: replacing single sockets with double ones is economical, but is applicable for increasing the number of connection points only for low-power devices. When performing major home renovations, it is better to install blocks of several single sockets.
The installation of a double socket, both indoor and outdoor, is identical to the installation of a single socket:
- The built-in device can be selected according to the size of the existing socket box. If the double socket has a mounting box of individual dimensions, then a socket of the appropriate dimensions is made for it.
- The external socket is mounted according to the manufacturer's instructions, on a flat socket box.
For reference. In addition to ease of installation, overhead double sockets are convenient in that they can be connected both externally and hidden - by placing them over the point where the cable exits the wall.
Installation of sockets in a wooden house: ensuring fire safety
Dried wood burns well.
This property creates big problems in ensuring the safety of buildings made of wood: logs, timber or made using frame technology.
Installation of wiring in a wooden house requires strict adherence to the rules developed by many years of human experience, and the installation of sockets is a necessary part of this process.
The sad experience of fire victims and firefighters shows that when the fire is located inside a wooden wall, it is very difficult to extinguish it. You will have to initially dismantle part of the wall structure, and this will take a lot of time.
Legal requirements for hidden wiring
Russian regulations require that electrical wires and cables be isolated from wood with a sealed metal space.
If the insulation is damaged and it starts to ignite, it will not allow the fire to spread to the tree, and the limited volume of air will prevent the flow of oxygen, thereby preventing combustion.
Therefore, hidden wiring is placed in metal pipes or boxes of a certain thickness, and sockets and switches are built into special socket box designs made of non-combustible materials.
They have a hole on the side for a threaded connection with the electrical cable entry pipe, and the socket mechanism is inserted and secured on top with screws. Conventional plastic structures are prohibited here.
Installation of sockets in open wiring
I will give two methods permitted by the rules and the most fireproof:
- retro wiring;
- cable channels.
For these cases, plastic socket housings that are closed on all sides are made.
They are attached to the wall through special adapters - socket boxes made of non-combustible materials.
There are similar stands made from various layers of wood, which are additionally used for decorative purposes. They are protected from fire by impregnation with fire-fighting mixtures.
Such treatment does not exclude the complete development of the fire, but significantly delays the onset of the fire.
Methods for open wiring and installation of electrical points in it can be done not only in wooden houses, but also inside buildings made of any other building materials.
I suggest you watch the technical aspects of connecting and placing wiring in a retro style in the video by Vladislav Gusler.
Installation of a block of several sockets
Single sockets and industrially manufactured multi-socket units are available with a rating of 10 or 16 A. Consequently, self-assembled blocks of several sockets are designed for the same currents.
The power lines of the electrical wiring for the group of sockets are arranged from a conductor with a cross-section of 2.5 mm2 and are connected on the panel through a circuit breaker with a rating of no more than 16 A.
A single 10 A socket can be used to connect equipment with a power of up to 2.2 kW, and a 16 A socket with a power of 3.5 kW. The total power of devices connected to the socket blocks should also not exceed these values.
The number of sockets in a self-installed unit is determined based on reasonable needs, with reference to restrictions on the duration of permissible currents. The minimum required number of consumers connected to the unit and their total power are calculated. If the obtained value is outside the acceptable range for the existing wiring, it is necessary to reduce the number of sockets in the block and compensate for this by laying additional socket lines.
Having calculated the required number of sockets in the assembly, choose the design of the block:
- invoice - located on the wall surface with preliminary installation of a flat socket box;
- built-in - installed in a module made of mounting boxes, for which a mounting socket is made in the wall.
Installing a surface-mounted socket block
Outdoor units are a collapsible box made of flame-retardant PVC plastic, in which 4-6 sockets are arranged in standard seats.
The front part of the box is attached to its base using latches and does not require special tools for removal. On the base of the box there are holes with a diameter of 20-32 mm, equipped with easily removable plugs for introducing cables into the box.
The cables are run into the box, after which it is applied to the wall and aligned horizontally, after which markings are made for drilling holes for fastening with self-tapping screws.
Once the box is attached, the front covers are removed from the sockets, in which holes for the wires to enter are cut out on the desired side with a knife, and the contacts are connected with jumpers.
The cross-section of the jumper wires must be no less than the cross-section of the incoming cable.
The installation of the grounding line must be carried out in strict accordance with the requirements of the PUE - the PE cable must be solid and reach the most distant outlet, having branches along the way separately for each point.
The connection of each open conductive part of the electrical installation to the neutral protective or protective grounding conductor must be made using a separate branch.
The series connection of exposed conductive parts into the protective conductor is not permitted.
Depending on the model, such multi-outlet blocks provide 1-2 seats designed to install sockets for a wired Internet connection or a landline telephone. Before installation, special landing supports are additionally inserted into these sockets. Partitions are provided in the cover of the box to separate the power wiring from the data cable.
After completing the electrical installation, the front cover of the unit snaps onto the base. If the connectors for the Internet or telephone cable were not installed, standard plugs are inserted into the holes - in the future, additional sockets can be mounted on these seats.
Installation of an internal socket block
The most common replacement for a single built-in socket is a multi-socket unit of no more than 6 devices connected in parallel - a cable. The connection of adjacent sockets in a cable is made with wires secured in socket terminals. That is, two wires are attached to the terminals of each socket, except the last one - incoming and outgoing. In this regard, parallel connection of sockets in this case also has the properties of serial:
- when a conductor burns out on one of the terminals of any device except the last one, all sockets following it become inoperable;
- Each connection of another consumer to any outlet significantly increases the current in the wiring section from the unit to the distribution box.
Wiring and socket installation method
Depending on the material from which the bearing surface is made, the choice of method for laying lines and installing devices is made.
In accordance with the requirements of SNiP, the following installation options are possible:
Each method has its pros and cons. The choice is made based on an analysis of all factors regarding the regulatory framework and ease of use.
Components
The general arrangement of the electrical circuit in a building is the same for indoor and outdoor structures.
They include the following elements:
The meter can be installed inside the apartment, in the entrance or in a special box on the street.
Connection type
The choice of outlets for your home is determined by the type of wiring that is installed in it. In buildings of various series, cables with 2, 3 and 4 cores are laid. Labeling will help you figure out what they are intended for.
The color of the insulation corresponds to the following characteristics:
If all the wires are colored the same, you need to use an indicator to determine their identity.
Before connecting the outlet, you need to determine the locations for placing household appliances.
Switching can be done in the following ways:
Disconnection of sockets is carried out in cases where it is necessary to replace the product or carry out its maintenance - clean the contacts, tighten the bolts, secure it more tightly in the box.
At what height should sockets be installed?
Electrical points cannot be installed wherever you want, based on the aesthetic or practical side of the issue.
The following standards exist for the placement of devices:
| An object | Distance (cm) |
| Floor | 20-120 |
| Doorways | 100 |
| Corners between walls | 80 |
| Gas pipes | 50 |
| Water and sewer pipes | 60 |
| Heating devices | 100 |
| Gas and electric stoves | 30 |
| Water taps | 40 |
Failure to comply with these parameters may result in a fine from the inspector or a complete disconnection of the home from the network.
Schemes for connecting sockets to the electrical network
When conducting electricity into the house, the following schemes are used:
Regardless of the choice of circuit, you need to use wires whose cross-section corresponds to peak loads.
Installation and connection of sockets by professionals. Price
Installation and connection of sockets by professionals in Moscow and the Moscow region are carried out approximately at the following prices:
| Connecting and installing sockets | ||
| Installing an outdoor outlet | PC. | 300 rub. |
| Installing an indoor outlet | PC. | 250 rub. |
| Installing a RJ45 computer socket (Internet) | PC. | 250 rub. |
| Installation of a television outlet (TV) | PC. | 250 rub. |
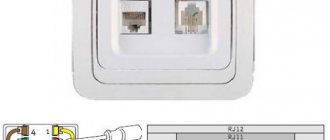
| Installation of telephone socket RJ11, RJ12, RJ45 | PC. | 250 rub. |
| Installing a dimmer (dimmer) | PC. | 300 rub. |
| Installing a rheostat for a heated floor (thermostat) | PC. | 600 rub. |
| Installing a socket for an electric stove | PC. | 600 rub. |
| Drilling holes for socket boxes | ||
| In plasterboard ⌀ 75mm | PC. | 150 rub. |
| In brick, wood ⌀ 75 mm | PC. | 200 rub. |
| In concrete ⌀ 75mm | PC. | 300 rub. |
| In plasterboard, recessed ⌀ 75mm | PC. | 150 rub. |
| In brick, recessed ⌀75mm | PC. | 220 rub. |
| In concrete, recessed up to ⌀ 75mm | PC. | 350 rub. |
| Installation of socket boxes, junction boxes | ||
| Installation in drywall | PC. | 100 rub. |
| Installation in concrete, brick, foam block, gas block | PC. | 150 rub. |
| Installation of external junction box 80x80x60 mm | PC. | 250 rub. |
| Installation of an internal junction box 100x100x60 mm | PC. | 300 rub. |
| Installation of an internal junction box ⌀ 80 mm | PC. | 150 rub. |
Combined wiring
This method is used when you need to connect additional ones from one electrical outlet, but you cannot drill into the walls. The procedure for installing and connecting wires in this case is as follows:
- Power outage. It is necessary to de-energize the entire apartment or room in which the work will be carried out. Using a tester, you need to make sure that there is no voltage.
- Removing the protective cover from the main power point.
- Removing the socket by loosening the retaining contacts.
- Connecting wires to the new power point.
- Next, it is checked whether the limiter will not squeeze the wires. If it interferes with the cables, you need to carefully break off a small piece from the socket box or wall to the size of the wire.
- Reinstalling the socket.
- Creating a hole in the decorative cover for the wire.
- Installing the cover.
Socket connection diagram: from a socket, with 3 or 4 wires
Connecting an outlet is a procedure that has to be performed during construction and major repairs of residential, administrative and commercial buildings. To carry out this activity, there is no need to call a professional electrician; everything can be done with your own hands. The main condition for carrying out work on the line is strict adherence to safety measures. Devices can only be connected after the apartment has been de-energized. You also need to familiarize yourself with the possible connection diagrams for sockets and the rules for their placement.
- Socket device
- Common types
- Wiring and socket installation method
- Components
- Connection type
- At what height should sockets be installed?
- Schemes for connecting sockets to the electrical network
- Installation process
- Preparatory work
- Connecting wires to the outlet
- Connecting the socket
- How to properly connect a socket from an outlet
- Features of connection in three- and four-wire networks
Basic mistakes
Brown wire - phase, blue - neutral, yellow-green - ground
Installing an additional outlet is usually not difficult. But beginners can make the following mistakes:
Wrong choice of wire cross-section. You need a cable of the same thickness as the main outlet. Using a wire made of a different material. Connecting two different wires causes additional difficulties, and the contact itself is less reliable. Violation of the order of connecting wires
Particular attention should be paid to the grounding conductor. If it is not available in the house (especially in old buildings), it is better to purchase sockets without ground. Unreliable contact
You need to familiarize yourself in advance with the existing methods of creating a contact and practice connecting on spare sections of wires. Installing wires diagonally. Standards only allow vertical cable routing.
There is also a risk of buying a model that is not suitable in design. This is not a critical error from a technical point of view, but can disrupt the overall concept of the room. Therefore, when purchasing, it is recommended to select the color of the product, its shape and size in advance. Manufacturers of electrical products offer a wide range of products; any buyer will find a product that suits the style.
Sockets in drywall
This is both hidden and open wiring - it belongs to the first category because the wires are not visible, and it falls into the second category because the wires are not walled into the wall and can be reached. In addition to standard tools (unless you are installing a socket block), you will need steel wire for installation. The procedure is as follows:
- The socket and socket box are removed from the wall. They are screwed to the drywall, so there is no need to break anything.
- The steel wire is inserted into the hole and pushed in the direction where the new socket is planned to be installed. At this stage, you just need to make sure that there is a gap between the plasterboard slabs, profiles and the wall into which the corrugation with wire will pass (wiring unprotected from mechanical damage cannot be left inside).
- If you can find the way with the wire, then a hole is drilled in the right place for a new socket box. A strong rope is screwed to the wire and it is pulled back.
- Then, using a rope, a corrugation is pulled between the sockets, the wires are inserted into it and connected.
Installation of socket block
When the solution hardens, then you will need to proceed to connecting the socket block to a 220 Volt network. You can connect sockets using a cable only if you do not connect powerful equipment. To connect the wire, you will need to turn off the power at the electrical panel. Now you need to install special jumpers. If you need to connect three or four sockets, then you can use the diagram below:
Once you have connected the wires to the terminals, you can install the blocks. Then you just need to install the decorative cover and secure the sockets.
We hope you find these socket block wiring options useful for your electrical work.
Household electrical appliances make life much easier, so a large number of them in the house is the rule, not the exception or a tribute to fashion. There are especially many devices in the kitchen and where the TV and computer “settle”: both types of smart technology often require a large army of “helpers” to provide comfort to the owners. Tees or extension cords are not the best solution to a pressing problem, so the best option is a block of sockets, which can have 2-4 electrical points. To avoid unpleasant situations in the future, you need to know about the nuances of their installation. For example, how to connect a 4-socket outlet.
Installing a block with two and three keys
Installation of such a block makes it possible to control two light sources in different rooms, or two in one room. In this case, not 4 wires are supplied from the distribution box, but five.
- The phase is connected to the jumper of the switching block.
- Only the neutral wire and the grounding conductor are attached to the socket contacts.
- Then the two remaining conductors are connected to the switch contacts.
- In the distribution box, twists are made of the cores that supply the core and those that go to the lighting fixtures.
Three-key combined devices are the best option for small apartments. They often have a bathtub, a toilet and a kitchen nearby, and the lighting is switched on on one wall. If there are three keys, then you will need a cable with six cores, three of which are also connected to the switch terminals.
Block assembly sequence
Before looking for a way to connect sockets to the network, you need to choose the correct location of the unit according to the PEU. For example, for a bathroom, the installation point must be at least 600 mm away from the water source. For an ordinary living room, the block should be located at a height of at least 300 mm above the floor level.
In addition, you will need:
- Drill a channel in the wall for laying electrical wiring from the junction box to the block;
- Place the wiring in a moisture-proof polyvinyl chloride sheath or corrugation;
- Output the wiring into the junction box in the form of a finished harness with markings that allow you to connect the sockets to the circuit breaker of the input panel without dialing.
Important! If a block of sockets is installed in the kitchen and is needed to connect equipment with a large current consumption, the phase and neutral wires will need to be connected, like the grounding, according to a star circuit.
To assemble a block of sockets, ready-made kits are usually used, which include a set of ready-made socket boxes, overlays, contact groups and an external panel. Usually, kits are sold for blocks of two, three and five sockets in one set. The kit may additionally include a switch and a connector that allows you to connect the carrier.
We install socket boxes for the socket block
It is most convenient to cut a niche for the socket block at the stage of laying rough plaster. Using a level, we mark the location for installing the unit and the direction of laying the wiring that we plan to connect to the sockets.
Using a hammer drill, we cut out a niche for the socket boxes; each socket is 72 mm wide and 42 mm deep. If you plan to install five sockets, you will need to cut a niche 75 mm high and 360 mm long.
We connect the undercutters into one block and install it in a niche. We bring the wiring cable out through the side hole in the body of the first socket box. We align the laid block along the plane of the wall, vertically and horizontally, after which we carefully fill the free space around the buildings with gypsum putty. Excess gypsum mass is removed.
After three to four hours, the plaster has dried, the socket boxes are cleared of any remaining plaster, and you can try to connect the cable and ground.
If you want to connect the block to a plasterboard wall, you will need to use the so-called side fastening in the form of two legs. When the mounting screw is screwed in, the metal plates diverge and tightly wedge the socket box into the niche.
How to properly connect grounding and power wires
In most cases, it is easier and more convenient to connect the contacts of the sockets to the input part of the electrical wiring using ready-made pieces of wire, 20 cm long. A PV3 stranded wire with sleeved ends is best suited. The phase can be connected with a brown wire, ground with a blue wire. The grounding of the outlet can be connected with a yellow or yellow-green wire. Stranded wire is much more convenient and softer than single-core wires; it can be easily folded, bent and even laid in the most inaccessible places of the electrical outlet.
The first step is to connect the ground. Before installation, a certain length of wire must be connected to the ground pin of each socket. For the last socket you need to cut a piece of 40 cm, for the first - 15 cm, the rest must be measured locally. All ground wires must be connected at one point to the “ground” of the input cable. To do this, you can use a Scotchlok connector, a mounting block, but most electricians prefer to connect the ground with a regular twist, insulated with heat-shrinkable tubing.
After the ground wire has been pulled through the plastic sockets, it's time to secure a phase and neutral to each socket. The assembly process begins with the first contact group. The socket has two plate contacts, to which you need to connect the phase wire separately and the neutral wire separately from the input cable. There are two screws on the front surface of the case. By tightening each screw, we force the contact plates to move closer together and press the sleeve tightly. The screw must be tightened with good force.
To transfer voltage to the next socket, simultaneously with the input contacts, you need to install one transit conductor or one jumper connecting the first group to the next one. These jumpers need to connect all contacts of the block.
Final operations
After you have managed to correctly connect all the contacts and transit jumpers in the block, you need to carefully lay the wires in the socket boxes so that the housing with the contacts also fits. We insert each group into the body of the socket box and fasten it without tightening it into the sockets using screws.
Each socket is leveled and secured with screws. All that remains is to connect the ground, install the pads and snap the front panel of the unit onto the latches. If you need to add a switch to the installed set, then you will have to sacrifice the first socket and install a keypad instead. We do not touch the grounding and zero conductors, but the input contact and jumper must be transferred to the switch terminals.
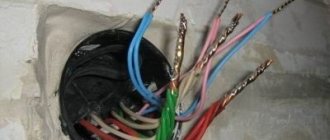
After assembly, all that remains is to connect the wires in the junction box. Most often this is done by twisting, but it is better to connect using a mounting block. All that remains is to check the presence of a phase in the contact using an indicator, and you can turn on the consumers.
Wire selection
The wire is selected according to this principle:
number of cores If you decide to install a socket with a grounding contact (see above), it is connected with a 3-wire wire. Otherwise, use 2-wire;
material. In general, when installing wiring, it is recommended to use copper cable - brand VVGng (in non-flammable insulation) or NYM (imported analogue). Copper is superior to aluminum in electrical conductivity and ductility (the aluminum core breaks off after several bends). But with a daisy chain connection, a wire made of the same material is used that is connected to the first outlet. If a copper conductor is directly connected to an aluminum conductor, when current flows, both materials are destroyed due to an electrochemical reaction. A special neutral alloy adapter is required. Aluminum wires (brand AVVG, etc.) are found in old houses
Therefore, before installation, it is important to open the existing outlet and see what it is powered by;
core section Also selected according to the wire connected to the first socket (when using cables of the same material)
There is no point in using a wire with a larger cross-section, since the throughput of the “chain” is still determined by the capabilities of its weakest link.
For household sockets, the minimum recommended core cross-section is 2.5 mm2 (for copper wire). Such cables, when laid hidden, can withstand a current of up to 16 A (when open, even more due to good heat dissipation), so you can safely plug in any device into the outlet, except for particularly powerful ones - an electric stove and an instantaneous water heater.
If the first socket of the loop is powered by a wire with 1.5 mm2 cores (mainly used in lighting networks), you should think about replacing it. Otherwise, only the lowest-power devices can be connected to the loop sockets.
Some tips
Since these units are still considered new, it is necessary to provide several recommendations regarding how to connect an outlet with a switch.
- If installation is planned in a wooden house, then the socket box should be metal.
- When the unit is mounted near a doorway, the part that is the switch is located closer to the door.
- If you don’t have enough knowledge in electrical engineering, no work experience and no confidence in the correctness of your actions, it is better to entrust the work to professionals.
- Often home craftsmen make various mistakes when connecting. The most “popular” mistake leads to the fact that the socket is in working condition, but the switch refuses to function. In this “severe” case, the incorrect distribution of wires is to blame - confusion with the phase and neutral on the socket. The solution is to connect the phase conductor to the jumper and return the neutral conductor to the socket.
Sometimes such designs become the only possible solution, and in this case the owners no longer have to think about the pros and cons of the blocks. Understanding how to connect an outlet with a switch will make it possible to cope with similar work in the future.
Installation of sockets
Before looking for how to wire a 4-socket outlet, it is better to become familiar with the requirements and installation process of a simple single device. The fact is that there is no difference in installing double, triple sockets, or devices with a large number of sockets.
Complete blackout is the first condition for any electrical work. When installing, be sure to pay attention to the color coding of the wires. Phase wires (L) can be:
But still, 3 colors are more often used - white, black or brown. Neutral (N) - zero working contact - blue or blue. Grounding (PE), which is often called “zero protection,” has a shell of yellow and green stripes (longitudinal, transverse), sometimes a yellow-green tint, and can also be purely yellow or only green.
The process of installing sockets looks like this:
Serial and parallel connection
The daisy chain method is otherwise called serial connection of sockets. In contrast, the parallel connection method provides for powering each outlet with a separate line from the distribution box (for the most powerful devices, a line is drawn from the distribution board).
Advantage of daisy chain connection:
- less dirt and dust is formed: the groove is made in a short area between the sockets;
- for the same reason, labor costs are reduced;
- cable costs are reduced.
But there are also important disadvantages:
- low reliability: if the wire burns out, all subsequent sockets of the loop become inoperable;
- limited power: the maximum permissible current, determined by the cross-section of the cable cores of the first socket (at 2.5 sq. mm 16 A), is divided by all devices included in the loop (with a parallel connection, each socket can consume the maximum current);
- startup and shutdown of the device are accompanied by more noticeable voltage drops in adjacent sockets than with a parallel connection.
How are sockets and switches connected?
We hope that the general part of the circuit structure is clear to everyone. Now let's see how the electrical points are connected to it.
Connection diagram for luminaires via a two-key switch
So, we have a group power wire that comes into the junction box. This wire can have two or three cores. According to modern standards, three-core wires are used for these purposes. It is worth saying that the connection diagram will not change much depending on the number of available wires.
- All three wires will have different color markings. White or pink is phase, blue is zero, and yellow-green is ground. Be careful and careful when making connections, as there is always a chance that the electrician connected the wires to the machine incorrectly. Pre-check the wires for voltage with a tester.
- Let's start the analysis by connecting the outlet. The phase and neutral are connected to its power contacts, while the “ground” is connected to the grounding contact. That is, to connect it to the network, all three wires are used.
Grounding is required to transfer charge from the device body to the ground loop, which avoids electric shock.
- With the switch, everything is a little more complicated, since this part of the circuit also includes a lighting device.
- So, we have three wires in the box - they are separated from each other and we can clearly see the color coding, which corresponds to the actual parameters of the circuit. A two-wire or three-wire wire is laid from the distribution box to the switch box - the first is taken for a single-key switch, and the second for a two-key switch. If there are even more keys, then the number of conductors increases proportionally.
- We screw the stripped ends of the wire to the switch terminals. Let us say right away that only phase wires will be suitable for this device, regardless of their number. The fact is that the task of the switch is to break the circuit and stop the supply of electricity to the lighting fixture. That is, the ends of the wire are input and output.
- Already in the distribution box, one core connects to the phase conductor of the group wire. The second core is connected to another wire, which is extended to the lamp as a phase. This wire also has two or three cores - the second is connected to zero according to the color marking, and the third is connected to ground. We do the same if the switch is two-key, but according to a slightly more complicated scheme. Here the task is to divide the lighting fixtures into groups and turn them on separately.
Source
Possible socket connection options
In this article we will look at issues related directly to connecting sockets; questions related to connecting other electrical receivers from sockets, and we will also touch upon situations related to checking the functionality of sockets.
Connecting a regular outlet
First of all, let's look at the question of how to connect the wires on a socket?
To do this, we need to connect the phase, neutral and protective wires to it. The connection is usually made from a distribution box, which is often located in the ceiling above the light switch at the entrance to the room. But let us immediately note that this is not the norm, but an unspoken rule.
Note! We recommend using a two-pole voltage indicator due to its greater reliability and functionality. At the same time, its price will not ruin even the most modest budget. And a set of functions, such as voltage indication, detection of the presence of a circuit and the ability to use it as a regular capacitive indicator, allow you to solve almost any problem.
Note! It is very important not to confuse the neutral and protective wires, otherwise you may have serious problems with energy supervision. And if you have a modern electronic meter, this will be detected during the first round.
Connecting several sockets in series
In some cases, in order to save money, it may be necessary to connect several outlets in series at once. This is also not difficult, and doing it yourself is quite simple.
Note! We stipulated that we only connect randomly if they power the outlet. If lighting is powered from them, then you need to determine the wire going to the switch and connect it to the phase terminal of the socket. But more on that below. To determine what is being powered by this outlet, check the functionality of nearby outlets and lighting. Moreover, this must be done not only in this room, but also in the room adjacent to the wall on which the outlet is installed.
Connection from a lighting socket
Although this scheme is used quite rarely, it can also be found. After all, it is not so complicated, but at the same time it can provide significant savings in money and time. Therefore, if you open the outlet and see three or four wires, do not be alarmed.
READ How to connect a font directly
Connecting several outlets in an apartment
If you plan to replace the electrical wiring in the apartment, then you should think about the rational organization of connecting sockets and switches. To do this, you should think in advance about the location and required number of connected sockets, and make a plan for how to connect three or more sockets.
Socket connection diagrams
There are 3 typical socket connection schemes: parallel; sequential; loop.
There are situations when you need to install several more next to an already installed outlet, for example, in an adjacent room on an adjacent wall. To do this you need to know how to connect 3 sockets. To avoid pulling new wires from the junction box, a parallel connection is used. With this connection, the ends of the wires of the new socket are connected to those wires that are suitable for the already installed socket - the phase is connected to the phase, and the zero is connected to zero. Often, the phase wire is connected to the right socket of the socket. When connecting several outlets, it is important to pay attention to the fact that the wires with which they are connected are made of the same material.
Parallel connection of several sockets
Electrical sockets that are in the same group can only be connected in parallel. There are two ways to connect multiple outlets in parallel: connect the wires in junction boxes in parallel; connect the sockets using a cable.
The double socket connection diagram using a cable allows you to connect groups of sockets that are in close proximity to each other.
After the sub-socket boxes have been pre-installed, and the wire from them has been laid to the distribution panel, you can start installing the electrical sockets themselves.
Connecting sockets (general diagram)
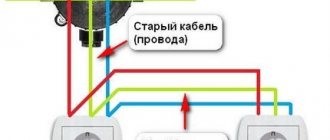
The wiring diagram for household electrical outlets is quite simple. Below is a typical diagram for connecting two sockets:
The power cable from the distribution panel (DP) enters the distribution box. From the distribution box there are separate cables for each outlet.
A distribution (junction) box allows you to divide one line into several. If only one socket is installed on one line, then a junction box is not needed. In the diagram we see the designations C1, C2, C3, these are the connections of the corresponding cable cores: phase, neutral and ground.
When connecting sockets, the cable cores are connected strictly by color (unlike switches), as shown in the photo below. In this case, sockets with grounding are connected, so a three-core cable is used:
This way you can connect not only two, but also three or more outlets. The main thing is to calculate the cable load to avoid damage to the electrical wiring as a result of heating.