Despite the rapid decline in the popularity of landline telephones, there are not so many people who are ready to refuse them outright. Admit it, it happens that it is sometimes extremely difficult or even impossible to do without a traditional connection.
To connect the device to the switching network, you need a low-current node, the installation of which can be done by yourself. We will tell you in detail how to connect a telephone socket without calling a technician.
There is absolutely nothing complicated in the schemes and methods, and the useful information we offer, as well as photos and videos, will help you understand the issue.
Connection instructions
Installing an open type socket
This is the simplest installation option and takes no more than 10 minutes.
Installation is carried out in the following order:
- socket terminals and securely clamped.
- The socket is installed at the bottom of the wall or on the floor using screws.
- In order to hide external wiring, electrical baseboards or panels are used, inside which telephone wiring is installed.
When installing telephone sockets, polarity must be observed. In a system for transmitting information via a telephone signal, the positive conductor is in green insulation, and the negative conductor is in red. But even if the conductors are positioned incorrectly during installation, nothing that could cause harm to the equipment will happen, the telephone simply will not work.
Installing a hidden socket
Installation in this case is more complicated and requires work to make a recess in the wall to install the socket box:
- To do this , using a hammer drill with a special attachment of a suitable diameter, a recess is made in the wall in the place where the telephone socket is supposed to be installed. If you don’t have a hammer drill, you can do the same job with a hammer and chisel, but it will take much more time.
- To the installation site, you should cut a channel in the wall for laying the telephone cable.
- The twisted pair is connected to the socket terminals, observing the polarity, then installed in the socket box, which is already built into the recesses of the wall.
- evenly tightened and securely fixed, using special claws, to the inside of the socket.
- The prepared gypsum solution eliminates the gaps between the socket box and the wall, and also seals the channel with the telephone cable.
- After completing the “gypsum” work , the outer, decorative part is installed on the socket.
Installing a Soviet-style outlet
If an old-style telephone is installed, then in order to duplicate it with the same device, you will need to install an RTShK-4 socket. This type belongs to the external category, so its installation is carried out in the manner described above.
The difference between modern samples of this type of sockets is that their design does not contain a capacitor, with which previously it was possible to check the functionality of the telephone line.
Today, for testing, a tester is used, which in a “resting” state should show the presence of a direct current of 60 V. If you do not have a tester or multimeter, you can connect a known working telephone to the line and try to make a call. If this cannot be done, then the telephone network is faulty.
How to connect a Legrand telephone socket?
The products of the French company “Legrand” are of the highest quality, as well as a feature that facilitates the process of installing a telephone socket. In order to attach the conductor to the contacts of the socket, it is not necessary to strip the wires of insulation.
The design of the socket includes special knives that cut the insulation when clamping the wire inside the terminal. To do this, just turn the special clamping mechanism a quarter turn.
After the connection of the wires to the Legrand socket is completed, the quality of the contact connections is checked using a multimeter. To do this, you should switch the device to direct current mode and measure the voltage at the socket terminals, which, in the absence of an incoming call, should be within 60 V.
If there is no voltage, turn the clamping mechanism in the opposite direction, completely releasing the conductor, then turn it clockwise again until it stops.
This is interesting: Socket box for concrete
Detailed instructions for installing a telephone socket
Let's look at the basic diagrams for correctly connecting common sockets:
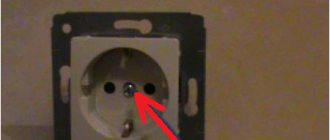
- The design has a pair of small contacts - 2 or 4. In the middle there is a hole for the power cable.
- The telephone device connects to two contacts in the center.
Installation, according to the rules, is usually carried out using a special cross-cutting knife. But if your activity is not related to the systematic repair and installation of these devices and you do not have one, you can use an ordinary sharp knife. It can be used for deepening cores to ensure contact after cutting the insulation layer.
If you use internal laying, experts advise choosing a KSPV cable, since it consists of copper wiring coated with white plastic compound. The TRP cable acts as a distributor.
To connect the wires to the telephone socket, use the following instructions:
- Just as during the installation of any outlet, you should turn off the power supply in the panel room. To be safe, use protective gloves because voltage is still present.
- Next, the outer layers of the contacts are cleaned; you can leave no more than 4 cm. When these manipulations are completed, straighten the wires.
- Use a tester to determine the polarity of the contacts.
- Connect the contacts to the conductors. It is convenient to distinguish them by color. The green wire is responsible for positive polarity, red for negative. It is not necessary to focus on polarity, but there is a possibility that the phone may experience slight interruptions in the future.
- After connecting the cables, secure them using the screws provided.
- In case of installation of a 2-4 contact type socket, 2 central contacts are connected.
- The socket is mounted to the wall using double-sided tape or self-tapping screws. The latter method will provide a more effective method of fixation.
- To complete the installation process, close the cover of the telephone socket.
A hidden socket is connected according to a similar principle, but there are a number of features. Select a location and mark it for further installation. You will need a recess for the socket box, so use a hammer drill and screws for fastening. The working part is fixed in the socket box with screws.
Useful tips
Following simple advice from experts will help you avoid mistakes in installation:
- It is better to use devices for hidden installation. They fit more harmoniously into the interior than others. But to install them, you will have to break the integrity of the walls and wall coverings.
- In the selection process, it is recommended to pay attention exclusively to proven companies with a good reputation. This is a guarantee of safety and reliability.
- Most outlets have numbered pins. If there are no markings, you should look at the colors. Green, orange or blue contacts in combination with white are positive, contacts of the same colors, but without white, are negative.
- When installing products of the old standard, it will not be superfluous to remember the color design of the contacts: orange, black and green are positive, red, yellow, blue are negative.
The types of sockets for connecting a telephone differ in design, installation method and other parameters. If you follow the instructions, installing these devices will be easy.
Old and modern device standards
As equipment has improved, the way phones connect to the communications network has undergone a number of changes. In the first models of telephones, connection to the communication line was carried out without the use of sockets at all. To create a closed current loop, the wires were simply twisted together or connected by any other available means.
In the 80s of the last century, connections between telephone exchange lines were made using two-core copper wires. And to ensure a quick-disconnect connection to the telephone, sockets and plugs of the RTShK-4 standard were used. This abbreviation stands for "four pin telephone socket."
The housings of such devices are equipped with a protective key - a plastic connection that helps prevent incorrect installation of the plug into the socket.
The RTShK-4 design includes a key and two pairs of contacts. The first pair ensures the phone operates in normal mode, the second pair allows you to connect an additional line, provided that both devices are on the same phone number.
As a result of the widespread dissemination of microprocessor technologies, Registered Jack equipment marked “RJ” began to be actively used to replace obsolete models of the RTShK-4 standard. It complies with the international standard IEC 60884-1 and 60669-1.
Modern standardized equipment for low-current circuits allows you to connect up to four pairs of working contacts to the circuit
Connection of modern landline telephone models for use at the household level is carried out through sockets equipped with one pair of contacts. The housings of such devices are mounted in the cavity of a plastic module and are marked with RJ-11 symbols. Between the two contacts, which are compact metal plugs, the cores of the supply wire are buried.
Models of the RJ-11 standard are recommended for connecting devices to linear telephone lines.
In the central part of the plastic module, called the manipulator, there are brass contacts through which an electrical network is created between the telephone and the telephone exchange
To connect two devices to separate lines and create office mini-PBXs, RJ-12 and RJ-14 standard devices are used. Universal four-wire connectors are suitable for most models of telephone equipment.
Required tools and materials
Depending on the type of telephone jack, as well as the standard used, different tools and materials may be required.
However, it is recommended to have all the necessary equipment available at once:
- Screwdriver , which in terms of the type of working surface and dimensions corresponds to the screws used to fasten the device. The screwdriver handle must be insulated to avoid electric shock.
- Socket box.
- Cable if the old device is not being replaced, but a completely new one is being installed.
- A hammer drill , as well as a cable, will be needed if a new outlet is being installed.
- The outlet itself.
- Knife with a sharp blade.
- Self-tapping screws.
- Wire cutters.
- Insulating tape.
- Universal multimeter or tester.
- Protective gloves.
- Single-sided and double-sided adhesive tape.
- Graphite pencil and marker with bright paint, which will be needed for marking.
Basic Standards
With the development of technology, outdated sockets are replaced with new ones. More and more consumers are replacing RTShK-4 with a modern RJ-11 socket, the latter is considered universal. Its connector is the same as that of other types, the difference lies in the number of wires running in the cable.
There are 5 standards for telephone sockets:
- RTShK-4. Now it is practically not used. Consists of a housing and 4 contacts. The fork has 4 plates made of metal. There is a plastic pin in the center that provides rigidity to the connection.
- RJ-11 and RJ-12. These connectors are the most common. Used to connect different types of phones. May have 2, 4, 6 contacts. Suitable for home use.
- RJ-14. The sockets are designed for installation in offices where you need to connect telephone-fax, modems for the Internet and similar devices. Sometimes the design has 4 contacts connected to four-wire wires. This makes it possible to use two different lines simultaneously.
- RJ-25. Similar to the previous species, it is found in office buildings. 6 connectors are used to connect local networks, modems, faxes and other necessary equipment.
- The last standard is called combined. The design of the socket is a combination of RTShK-4 and RJ-11.
Note! There is another standard not included in the list - RJ-45. Used to connect complex circuits in laptops, modems, etc.
Features and connection diagram
RJ-11 socket
Telephone sockets have their own individual connection features; if we talk about the modern and most common RJ-11 and RJ-12 standards, they have the following connection nuances:
- The design of the device may include 2-4 contacts, which are small metal plugs. Between these elements, the cores of the supply wire must be buried.
- The telephones themselves are connected exclusively through 2 central contacts.
- To install devices with the specified standard, professional craftsmen use a special type of working tool called a cross-cutting knife. However, if you do not plan to use it frequently in the future, then you can limit yourself to a very ordinary knife with a sharpened blade. Such a tool is used to deepen the cores; when cutting through the insulating layer, contact will be ensured.
- Before straightening the cores, it is necessary to remove the outer layers from the wire; 4 cm is enough to carry out such stripping.
- For internal installation, it is recommended to use a KSPV cable, which has a single wire core in its design, which is most often made of copper. The outer shell is usually made of white colored plastic. TRP cable is most often used as a distributor.
connection diagram
Review of well-known manufacturers of telephone sockets
When choosing a connector device for connecting a landline telephone, it is advisable to give preference to brands that have a positive, time-tested reputation in the electronic equipment market . Among such brands are Turkish companies Lezard, VIKO, as well as manufacturers from France - Schneider Electric, Legrand Valena. For comparison, average prices from online stores for the products of these manufacturers are shown in the table:
| Manufacturer | Product Description | Cost, rub. |
| Lezard | Telephone socket, double, mortise | 310 |
| VIKO | // | 248 |
| Schneider Electric | // | 496 |
| Legrand Valena | // | 700 |
The prices indicated are averages and cannot be used for planning or estimating.
How to connect a telephone socket: diagram and installation steps
Such blocks are concentrated in one place, convenient for maintenance and hidden from prying eyes.
And broken wires will only lead to equipment malfunction.
The rest can be cut off.
After this, the wires are connected to the outlet according to the diagram. Connection RJ 11 RJ 11 has two wires, so it is easy to connect it yourself at home. The second wire comes to another contact of the socket and leaves from it the same way, but only to the second contact of the next one. It is quite flexible and can be easily mounted in corners.
Required tools and materials
Miniature knives provided in each contact will cut through the insulation and ensure reliable contact. If you are going to install a socket at home, RJ will be a good solution. Some models may not have the numbering of contacts, which is usually printed on the body of the device. Phones are connected only through two central contacts.
This type is in great demand and involves the use of 2 conductors. In the event that there are neither marks nor instructions, then you can use the guide presented below. For comparison, average prices from online stores for the products of these manufacturers are shown in the table: Manufacturer.
How to connect a telephone socket to a telephone cable: diagram
With a closed installation method, for ease of connection, the wires are made to protrude beyond the wall plane by mm. Regardless of the type of telephone socket, you will need to install a special type of power cable inside this device.
If you manage to catch the moment of an incoming call, then a variable sine wave with an amplitude of up to volts passes through the network. The ends of the supplied telephone wire are connected to them. Connection diagram of a 2-core cable with the contacts of a telephone socket. If the design of the device provides terminals, then the ends of the wire do not need to be stripped. We will tell you how to do this below. Telephone connectors
Telephone socket design, communication cable arrangement
In terms of their internal structure, connectors for connecting telephones and wires for transmitting signals have little in common with electrical sockets and power lines. They differ not only structurally, but also in the installation method. To understand all the intricacies of connecting communication lines, you need to study the features of the device and the operating principle of switching devices. Read also the article: → “Connecting different types of telephone sockets.”
The telephone line current constantly changes depending on the position of the handset (off-hook or on-hook) and the state of the connector (connected or disconnected). If the device is not connected to the network, a direct current of 40-60 V flows through the line. A similar situation arises when the telephone is connected, but the handset is placed on the cradle. At the moment of the call, the voltage increases to 120 V, converting into alternating voltage. Removing the tube lowers it to a value of 6 to 12 volts.
All these processes occur in a flat wire that has two copper cores. It could be compared with the PPV wire used for electrical wiring, but the core cross-section is so small that it can only be used for the specified network loads: in telephone lines, as well as in automation circuits (burglar or fire alarms).
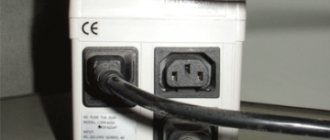
It is impossible to confuse a telephone cable-noodle with another product in appearance
There are several types of connectors for connecting phones:
- RTShK-4 – can only be used for old communication devices;
- RJ-11 – a modern version called “euro”;
- RJ -12 is a slang name for the RJ -25 connector, which has become so widespread that for the convenience of providing information, it is used more often than the real one. In fact, such sockets do not exist, so when faced with the term RJ -12, one should mean RJ -25 .
The RJ-11 telephone jack has a socket-style port for a matching plug. Outwardly, it looks like a computer socket, but upon closer examination, you will notice that their sockets differ in width (it is wider in the computer version).
The most common device options:
- invoices, also known as external ones;
- mortise, they are also internal.
There are also built-in products, but they are manufactured in the form of blocks that, as a rule, combine several types of switching devices - electrical, TV, computer and telephone.
The difference between a telephone socket and an electrical socket
Important conditions for its functioning:
- availability of a communication line from the telephone exchange;
- availability of wiring to turn on the telephone in the apartment.
The connection diagram for the telephone socket is simple; you should follow it and the mirror fastening of the wires in the motherboard and the removable part.
If the color of the four wires on the first one is: brown, green, yellow and red, then on the second - in the reverse order: red, yellow, green and brown. Then your phone will immediately work in the new mode.
The telephone socket box differs from others in design and methods of assembling the circuit into a single layout:
- the box is made of non-electrical material (ceramics, and more often and more inexpensively - plastic);
- Contacts are stainless brass, pressed by a spring. The current passing through them does not heat the elements;
- adapters-terminals for wiring.
Accidental short circuits in the socket are excluded, because metal fasteners with low-current electrics are enclosed in a housing. And there the fork contacts are firmly screwed to convenient sockets with bolts or clamps.
Sockets are sold complete with the same plastic boxes-inserts, or the latter to the same type are purchased separately.
Types of telephone sockets
When considering different types of such devices, one of the main classifications is their division according to the installation method:
- Devices for external installation.
- Devices with internal wiring.
A secondary classification, applicable to both types, is the division of these devices according to the number of available connectors:
- Single-connector models are designed to connect 1 device and are the most popular option for installation in private homes or residential apartments.
- Multi-connector models allow you to connect several different devices at once; they are most often found in offices and office premises.
Also, on the modern market there are sockets with different connectors.
RTShK-4
This parameter is determined by the type of standard used:
- RJ-11 is one of the most common options; it implies the presence of 2 conductors in the design. Such devices are most often found and are recommended for installation if there is a line-type telephone line to which the device is connected.
- RJ-12 is less common because it is rarely used for domestic purposes. The main purpose is to connect to office mini-PBXs or a number of types of network cards.
- RJ-14 has 4 conductors and the same number of contacts. It is a universal connector designed and suitable for most modern models of telephone equipment. To connect and ensure the operation of one line, contacts 2 and 3 are used; if for some reason several lines are required, then the connection occurs through contacts 1 and 4. Surface-mounted sockets must use a green and red conductor, which are usually located in the center of the fixture.
- RJ-25 includes 3 pairs of working contacts in its design. Devices of this type are extremely complex and unsuitable for installation on your own. To carry out this process, you will need to hire a qualified specialist who understands electrical and telephony issues.
- RJ-9 is a special type of connector, the main task of which is to connect the handset directly to the device.
- RTShK 4 is a technically outdated type of sockets that were common in the USSR in the past; the design includes 4 wide contacts and a key. Designed for a specific connection option in a permanent way; for its implementation, the presence of a branch-type box is required. The presence of several telephone sockets within one room contributes to the creation of a special electrical circuit; an additional capacitor is required to complete it.
Regardless of the type of telephone socket, you will need to install a special type of power cable inside this device. The different options have no design differences; all plugs have similar dimensions and connectors, but they may differ in the number of contacts available.
Features of connecting Legrand telephone sockets
Unlike conventional sockets for telephone lines, where it is necessary to strip the contacts at the ends of the wires from insulation, then a loop is made around the bolt, which is tightened on the contact terminal. Some French and German manufacturers have greatly simplified this process and come up with designs where this is not required. The twisted-pair wire is stripped at the end only of 2–3 cm from the outer sheath; the thin ends are not stripped, they are simply inserted into the terminal holes.
Diagram of the design of connecting the line to the Legrand socket
The clamping screw is turned with a screwdriver only a quarter turn clockwise. This mechanism ensures reliable contact and fixation of the wire; the knives of the contact group cut through the insulation, connecting to the metal conductor. This connection method greatly simplifies and speeds up installation work.
Technical characteristics of some Legrand telephone sockets:
| Degree of protection against moisture | IP 20 |
| Installation method | With hidden wiring |
| Colors | white, aluminum or ivory |
| Material | polycarbonate |
| Number of connector sockets | 1 |
The electrical characteristics of the socket evaluate the maximum possible parameters of the signals passed through the contacts.
Electrical characteristics of elements for Legrand brand telephone sockets:
| Operating current, A | 20 – 32 A |
| voltage | 250 V |
| CPU frequency | 4-2400 MHz |
| Fire resistance | 650° C for 0.5 minutes |
| Interval Operating temperature | 5 – 40 ̊ C |
There are many manufacturers of telephone sockets in the world, but in terms of electrical characteristics they do not differ significantly. When choosing, pay attention to:
- Number of connectors;
- Installation method, external or overhead;
- Method of fastening wires, with stripping of insulation or a simplified mechanism;
- Material of manufacture, color, shape and other elements to fit into the interior.
Quite good products of the REONE series are made by domestic manufacturers; their electrical parameters are practically no different from Legrand. the remaining characteristics are quite satisfactory for the domestic buyer in terms of price and quality.
Characteristics of Reone series telephone sockets:
| Weight | No more than 100 g |
| produced | Russia |
| Material | Polycarbonate, aluminum |
| Brand | Reone |
| Color | white |
| Installation method | invoice |
| Number of connectors | 1 |
| Degree of protection | IP 20 |
Cute home companion
Some mobile repeater cells, scattered on the roofs of buildings, towers between populated areas, may fail, and you need to call an ambulance, the Ministry of Emergency Situations or emergency services via any channel of utility networks. Run to look for a phone booth?
Many have probably already forgotten where they stood, they are so unaccustomed to them. At these moments, the usual home telephone will urgently help out.
Times are changing, and the home telephone network is becoming obsolete. The usual sockets, previously installed in almost all rooms and the corridor to transfer the device during conversation to a convenient place, have lost the strength of their contacts; they were oxidized, and some wires were frayed.
Electrical goods stores offer replacements not only with modern telephone sets, but also with low-current switching devices, new wires, contacts, and terminals. Without this instrument loop, the new device will not work. They will not fit older devices.
Therefore, our tips below are on how to figure out the circuit of a single and/or double socket on your own, and how to recess it into the wall. We also offer a photo of the new line of telephone sockets.
Step-by-step instruction
Initially, we will consider a simple way to connect a universal telephone socket. Today, the most common devices are those that comply with European standards RJ-11 and RJ-12. In order to connect them, you must adhere to the following algorithm of actions:
- Initially , you will need to turn off the power supply and put on protective gloves, since the voltage in the telephone network is 60V, and in working condition it can reach 110-120V.
- Using side cutters to remove the insulating layer from the conductors, it is important not to touch the conductors themselves. The length of the stripped cable should be about 4 cm.
- Using a tester, determine the polarity of the contacts.
- Connect the conductors to the contacts. In a telephone jack, the red wire has negative polarity, and the green wire has positive polarity. It is not necessary to follow the connection rules taking into account polarity, but there is a certain risk that in the future the telephone set will from time to time make its own during operation.
- Connect the cable cores , then tighten and ensure reliable fixation using special screws for clamping.
- Some models have 2-4 contacts in their design, which have a fork shape; these elements are made of steel. In such a situation, 2 central contacts are used.
- Fix and fasten the telephone socket on the wall surface. This can be done using double-sided tape, but the most effective way is to use self-tapping screws.
- Snap the cover of this device.
There are varieties of hidden telephone sockets. The connection process for them is no fundamentally different from connecting classic device options. Significant differences exist only in the installation process and are as follows:
- Mark the future location of the telephone socket on the wall surface.
- First , you will need to make a hole in the surface using a hammer drill; it will be needed for the subsequent installation of the socket box. Fixation and fastening of this element is achieved through the use of self-tapping screws.
- The device can be secured inside the mounting box using specially designed spacer screws.
- Put on the outer protective case , after which the voltage can be returned to the network and the installed device can be tested.
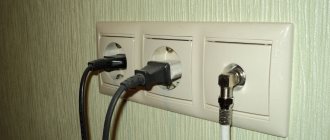
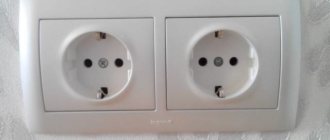
At the same time, you need to know that absolutely any type of telephone sockets can be not the usual single, but a double device. Such devices are usually installed in offices or other premises where there are several telephone sets with different numbers, but sometimes it may be necessary to install them at home.
The installation or connection process is not fundamentally different from the work carried out with a single structure. The only change is an increase in the number of conductors requiring connection.
Connection diagrams and methods
Features of connecting telephone cables vary depending on the type of sockets. For example, installation and connection of the most common of them - RJ-11 and RJ-12 - have several nuances:
- The socket design has 2 and 4 contacts, differing in small size. There must be a recess in the center for the cores of the supply cable.
- Phones are connected to two central contacts.
- To deepen the veins you will need a cross-cutting knife. If it is not available, you should use the usual one.
- Before straightening the wires, it is necessary to strip the wire by about 4 cm.
- During hidden installation, experts advise using KSPV cable with a copper core. The TRP cable is not suitable in this case - it is better to use it as a distributor.
Preparatory work
Before installing or replacing a telephone socket, you must prepare the following tools and materials:
- a screwdriver with a handle covered with insulating material;
- socket box;
- cable - useful if you need to install a new outlet, and not just replace the old one;
- perforator;
- directly socket;
- knife;
- several screws;
- wire cutters;
- insulating tape;
- multimeter;
- gloves to protect hands;
- Double-sided tape;
- pencil and bright marker.
The set of tools may vary depending on the installation method.
Step-by-step instruction
The action plan for open-type installation looks something like this:
Protect your hands by wearing rubber gloves
This is important: the voltage in the network sometimes reaches 110 - 120V. Using a side cutter, remove about 4 cm from the insulating layer of the wire. You need to act carefully, trying not to damage the wires. Using a multimeter, determine the polarity of the contacts
Although it is believed that observing polarity rules is not necessary. Connect the contacts to the conductors.
- Connect the cable cores. Secure with special screws.
- In designs with 4 contacts, 2 central ones should be used when connecting.
- Secure the socket to the wall using tape. For greater reliability of fastening, it is better to use self-tapping screws.
- Put on the lid.
Connecting a hidden outlet has no fundamental differences. But it has some features:
- Immediately mark the wiring and location of the outlet on the wall.
- Using a hammer drill, make a hole for the socket box. Self-tapping screws will be needed for fastening.
- The structure is secured in the socket box with spacer screws.
- After installation is complete, connect the electricity. If everything is done correctly, the outlet will work.
Devices come in double and single versions. Dual phones are usually installed in offices, provided that there is a need to use two phones at the same time. They connect the same way.
Connecting hidden sockets
- Make markings on the wall that will indicate the location of the product box.
- Use a hammer drill to make a hole in the wall.
- Install and fix the box in the wall.
- Use a ten-centimeter cable to connect the outlet.
- Strip and connect the cable to the wall.
- Start installing the trim and outer frame.
Preparing to connect
Before moving on to direct installation work regarding connecting Legrand brand devices, it is recommended to prepare a set of the following tools:
- A utility knife or other sharp object for stripping the insulating braid on the wires.
When installing the Legrand devices in question, the need to strip the wires was eliminated. The built-in mechanism in the products allows for self-cleaning.
- Phillips and flat head screwdriver.
- Tester for measuring network voltage.
- Latex gloves.
The voltage in telephone networks is minimal (when calling at 120V) and does not cause harm to the human body. However, it will be sensitive and unpleasant for your hands.
- Crimping Tools.
If you use even a double plug of Euro RJ11 connectors, as well as for plugs, you need a tool for crimping the contact plates. It is acceptable to ignore this requirement. The double design in the internal design, of course, will not have such an attractive appearance, but the contact plates can simply be pressed down using a flat-head screwdriver. It is worth pressing each contact sequentially.