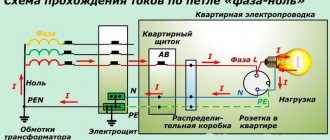
On the switch phase or zero: PUE rules
Whether the switch is phase or zero is correctly indicated not only by common sense and logic, but also by the Electrical Installation Rules in the latest 7th edition. Connecting the neutral wire to the switch contradicts the norms of this document specified in clause 6.6.28.
According to these rules, a single-pole light switch must break the phase wire; the neutral is turned off only when a two-pole switch is installed. Installing two single-pole switches instead of one double-pole switch is also prohibited due to the possible disconnection of only one neutral conductor.
Is there phase or zero going to the switch?
In modern homes it is impossible to do without electric lighting and a switch must be installed for each lamp. This device breaks one of the wires leading to the light source.
For the operation of the switch and lamp, it does not matter which of the wires will be disconnected, however, all competent electricians connect only the phase wire to it. This article tells you what difference it makes whether the switch goes to zero or phase.
Errors when connecting a two-key switch
The first mistake that an illiterate specialist can make is to connect not a phase to the switch, but a zero.
Remember: the switch must always break the phase conductor, and in no case the zero conductor.
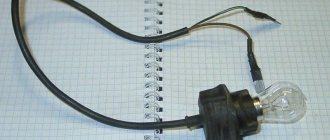
In the opposite situation, the phase will constantly be on duty on the base of the chandelier. And simply replacing a light bulb can end very tragically.
By the way, there is another nuance due to which even experienced electricians can break their heads. For example, you wanted to check directly at the contacts of a chandelier whether the phase arrives there through a switch or zero. You turn off the two-key switch, touch the contact on the chandelier with a Chinese sensitive indicator - and it lights up! Although you assembled the circuit correctly.
What can be wrong? And the reason lies in the backlight, which is increasingly included with switches.
A small current, even when turned off, still flows through the LED, applying potential to the lamp contacts.
By the way, this is one of the reasons why LED lamps blink when turned off. How to deal with this can be found in the article “6 ways to solve the problem of flashing LED lamps.” To avoid such a mistake, you need to use not a Chinese indicator, but a multimeter in voltage measurement mode.
The second error is when the phase supply conductor is connected not to the common contact of the switch, but to one of the outgoing ones. In this case, the circuit will not work as expected. All lights will light only if you press two keys at the same time. But if you press only the key to which the phase does not come initially, the chandelier will not light up at all.
If you moved into a new apartment, where you were not the one who connected the chandelier, and it behaves in such a strange way, that is, it does not react as expected to the two-key switches, then the problem is most likely due to such an erroneous installation of the supply wires. Feel free to disassemble the switch and check the common contact.
If you have an illuminated switch, an indirect sign of such an incorrect connection may be the neon bulb not working properly. Why indirect? Since here everything depends on which key you start the phase on.
The third common mistake is connecting the neutral wire on the chandelier not to the common zero in the junction box, but to one of the phase wires. To avoid this, use and follow the color coding of the wires, and even better, if you don’t trust the colors, check the voltage supply using a high-quality indicator or multimeter before turning on the lamp.
Installation of a two-button light switch and connecting wires
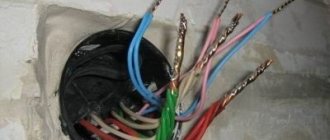
There is nothing complicated in the connection diagram and in the process of installation, installation and connection of wires to the switch contacts. First of all, the switch needs to be disassembled. To do this, remove the keys themselves. If you can’t do this manually by simply pulling them towards you, use an ordinary screwdriver, prying the keys off from the side.
Next comes the insulating decorative backing; it can either be snap-on or screwed on. Remove this frame.
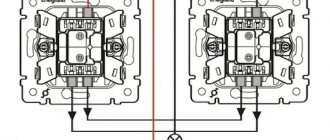
As a result, what you have in your hands is the body itself with the fastenings on the sides and the internal contact part. The main task is to supply voltage from the phase conductor to the common contact. Further, when two keys are closed, this phase will diverge into one or the other lighting circuit.
To find the central contact, look at the marking, since it may not always be located alone and in the center.
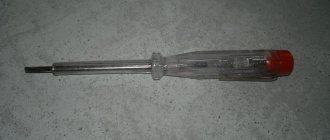
What to do if you don’t understand the inscriptions or they are erased and painted over? Then you need to use a contact screwdriver with a battery-powered tester with a continuity test function. Insert any metal object (nail, screw) into the supposed common contact. You wrap your fingers around it and touch the other two contacts with a screwdriver.
When you press the keys one by one, that is, turn on one - check, then turn off the first and turn on the second - check, the screwdriver LED should light up each time. If this does not happen, then this is not a common contact.
When you have dealt with the contact part of the switch, take the three-core cable VVGng 3*1.5. It is desirable that the colors of the cable cores correspond to the color markings according to GOST. How to determine by color which conductor should be phase and which should be neutral by reading the article “How to distinguish wires by color.”
To connect the common contact, use the gray conductor phase coming from the junction box. Strip the end of the core, insert it between the contact plates and tighten the screw with a screwdriver.
Next, connect the other two wires in the cable to the outgoing contact connectors.
Connecting the conductors directly to the two-key switch itself is now complete. Insert the housing into the mounting box and tighten the mounting screws.
Then you tighten two spacer screws, which help the mounting fork with teeth to rest as much as possible against the walls of the box and firmly hold the switch body inside it. After this, you can return all the decorative frames and the keys themselves to their place.
How to determine whether a switch is zero or phase
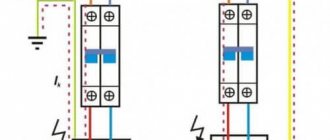
When repairing electrical wiring and in some other cases, it is necessary to check whether the switch is receiving zero or phase. This is done in the following sequence:
- 1. Turn off the line power. Open the cover of the switch or remove it from the mounting box so that it is possible to measure the voltage at the contacts.
- 2. Apply power to the network. Turn off the breaker.
- 3. Check the presence of voltage at both terminals of the device. The phase must be on only one of the contacts.
- 4. Turn on the switch and check for phase presence at the terminals. The indicator should show the same result on both contacts.
How to change a switch if you are not an electrician? - Home owner
To change a switch in an apartment or office, you don’t have to understand the electrical wiring at all, where the phase or neutral is located. With the switch everything is very simple, if you first turn off the voltage in the panel and know how to handle a screwdriver. We'll assume you can do it. So, how to change the switch yourself?
Where to start?
Put aside your fear of electricity (if you have one, of course) and boldly get down to business. In this case, you will receive three pluses. Firstly, save your time waiting for the master.
Secondly, save your money. And thirdly, you will gain experience working with electricity.
If it seems to you that this is not entirely easy, you can use our instructions and you will succeed, and making such a replacement is no more difficult than changing an outlet.
Important! Before you begin any action, you must be sure that the power to the outlet is turned off!
Tools and materials for work:
- Switch to replace the old one:
- Phillips or flathead screwdriver;
- Small pliers;
- Indicator screwdriver.
- For electrical safety purposes, we turn off the circuit breaker that supplies voltage to the switch, and after turning off we check that the switch has stopped turning on the light. This means that it is de-energized and you can start replacing it.
- Unscrew the screw that secures the decorative trim and remove it. Now we loosen the screws that hold the spacer tabs on the sides of the switch mechanism and remove the mechanism from the wall. Using a screwdriver, disconnect the electrical wires from the switch terminals, remembering their connection to the contacts.
- If the switch is a single-key switch, then two wires fit to it and they can be connected in any order, but it is better to determine where the phase wire is located. To do this, you need to separate the wires so that they do not touch each other and turn on the machine in the switchboard. Using an indicator screwdriver, we determine the phase. The indicator on this wire will light up. Turn off the machine. We connect the phase wire to terminal L on the mechanism, the remaining wire to the second terminal. We install the mechanism into the socket and secure it with spacer pads.
- If the switch is a two-key switch, first we find the phase wire with an indicator screwdriver, we also connect it to terminal L, and the remaining two to terminals 2 and 3 on the mechanism.
- We put on the decorative cover, secure it with a screw, turn on the machine and check the operation of the switch.
In addition, watch a short video about replacing a switch with your own hands without calling an electrician and remember, if the wiring is not completely old, then doing such work will not be difficult for you.