It has been scientifically proven that the light emitted by an incandescent lamp is considered to be the closest to daytime sunlight, and is the safest and most favorable for human vision. For many decades, incandescent lamp has been a pleasant neighbor to humanity, giving warmth and comfort to our homes.
The principle of its operation is based on the transformation of electrical energy supplied to its filament into the energy of visible radiation affecting the human organs of vision and creating in him a feeling of light close to white, daylight.
An incandescent light bulb consists of two main components, a pear-shaped glass transparent bulb and a base.
Glass flask.
Base.
Inside the flask there is a glass tube through which two contact wires rise. These wires are connected to a tungsten filament by soldering and are designed to supply phase and zero to it.
Under the influence of electric current, the thread instantly heats up to a very high temperature of 2600-2700 degrees Celsius and causes the glow we are familiar with.
The lamp filament is made of a special metal called tungsten. This metal has the world's highest melting point of 3000 degrees Celsius, but is very ductile. It is for these qualities that it is widely used in the manufacture of lighting lamps, as well as as heating elements in the manufacture of heat fans and various heaters.
The lamp base consists of two contacts, one of which is the screw thread of the lamp.
According to the rules, a zero is supposed to be applied to it, since when screwing the light bulb into the socket there is a possibility of accidentally touching the screw thread with your fingers. If a phase is applied to the base thread, the likelihood of accidental electric shock increases significantly. When connecting wires to the cartridge, zero and phase are often swapped, either unknowingly or accidentally.
The second contact is for the phase and is located in the center of the base.
The average service life of general purpose incandescent lamps is 1000-1200 hours (depending on operating conditions). Factors that cause premature failure of an incandescent lamp can be: frequent switching on and off of the lamp, ambient temperature, additional heating of the lamp (for example, when a chandelier is designed with a shade that tightly covers the incandescent lamp). During prolonged operation, the thread evaporates under the influence of high temperature, thereby decreasing in diameter and then burns out. The higher the heating temperature of the filament, the more light the lamp emits, but this reduces the life of the lamp.
Incandescent lamps are also gas-filled and vacuum. In gas-filled ones, the flask is filled with an inert gas (a mixture of nitrogen, argon or xenon). For incandescent vacuum lamps, air is removed from the internal volume of the bulb. Gas-filled lamps, under normal conditions, have a higher light output than vacuum lamps, since the gas in the bulb under pressure prevents the evaporation of the filament, which allows it to increase its operating temperature. The disadvantage of gas-filled lamps is some additional loss of heat from the filament through convection of the gas filling the internal volume of the bulb. In order to reduce heat losses, gas-filled lamps are filled with metal-heat-conducting gases, and the design of the filament is also changed to reduce heat losses. Lamp filaments are made in the form of a dense helical (minospiral) or double helix (bispiral).
The main disadvantage of incandescent lamps is low luminous efficiency, only 2-4% of the energy is converted into light radiation, and the rest turns into heat emitted by the lamp.
Source: elektrika-svoimi-rykami.com
Construction of household electrical networks
Household electrical networks at the entrance to the distribution panel have a linear voltage of 380V three-phase alternating current. Wiring in apartments, with rare exceptions, has a voltage of 220V, since it is connected to one of the phases and the neutral conductor. In addition, properly installed household wiring must be grounded. In older buildings there may not be a grounding conductor. Thus, when installing wiring and electrical appliances, it is necessary to know the purpose of each of the two or three wires.
You should also know the rules for connecting various devices. When installing a conventional socket, the phase and neutral conductors are connected to the terminals in any order, and the grounding wire, if available, is connected to a copper or brass bus. The switch is connected to a phase wire so that when it is turned off, there is no voltage in the lamp socket - this will ensure safety when changing lamps. Complex household appliances in a metal case must be connected in accordance with the markings of the wires, otherwise the safety of their use is not guaranteed.
Advantages and disadvantages
Advantages of this cartridge:
- ease of disassembly and assembly
- time-tested reliability
- contact pads are fixed with screws
Firstly, if necessary (burnout, melting), they can be replaced. Or simply tighten it when the contacts loosen and the connection heats up.
By the way, these screws need to be tightened initially, even before directly connecting the wires. This will extend the life of the socket and light bulb significantly.
In 90% of cases, the light bulb stops shining because the central contact heats up and its plate-shaped area begins to bend, gradually moving away from the lamp base.
Flaws:
- inconvenient connection to screw terminals
To ensure good contact, you will have to unscrew them entirely from their seat.
Moreover, if you have a non-Wera screwdriver with a bunch of additional “chips,” then this screw often falls out and rolls into the most inappropriate places.
Although experienced electricians do without completely unscrewing the screws and bending the neat rings on the copper conductors. The entire connection is made much easier.
The veins are stripped a little more than usual (2-3 centimeters), and the screws are only loosened. Next, place the vein under the washer with the screw and make a turn strictly in the direction of tightening the thread.
This is necessary so that when tightening the screw, the ring does not unbend, but rather tightens even better.
After this, bite off all the excess protruding behind the bolt with side cutters. You should end up with some kind of half ring.
All that remains is to squeeze it with platypuses to a full ring.
It is not yet possible to tighten such a connection. It should “play” in its seat.
Take the second wire and do the same procedure with it. Only then can the screws be tightened as far as possible. As a result of such a connection, there is no need to unscrew anything, make some rings in advance, guessing the diameter of the bolts.
All this is adjusted directly on the cartridge itself. Saving time and labor costs is obvious.
The only disadvantage of this method is that the wire consumption will be a couple of centimeters more than usual.
Devices and tools
Before you begin electrical installation work and determine the phase and zero in the wiring, you need to prepare the necessary instruments and tools:
- Pointer or digital multimeter;
- Indicator screwdriver or tester;
- Marker;
- Pliers;
- Knife for stripping insulation.
You also need to find out where the protective equipment is located: circuit breakers or plugs, RCDs. Usually they are installed in a distribution panel on the site or at the entrance to the apartment. All operations on connecting electrical equipment and stripping wires must be carried out with the circuit breakers turned off!
what happens if you confuse phase and zero when connecting a lamp socket?
no difference. On a single-phase alternator there is no polarity and other things.
nothing, it will just glow, for a light bulb there is no difference, but for a switch with an indication it makes a difference what is connected, with a zero it will not glow
The entire city will be without electricity
when the plug from the el. You plug the device into the socket, you don’t know where your phase is and where the zero is, in your case it’s the same.
there are no + and -.. but for safety reasons the phase is not made with a screw thread..
just tighten the bolts and don't worry, that's how it should be
It is impossible to confuse, no matter how these wires are attached.
I don’t know what will happen, but I had to change the cartridge in the small-family house where I live, I was surprised that the phase and zero were connected differently. Just in case, I installed it as needed.
The answer is simple: it can kill you with an electric shock! A long time ago, when I was little, my mother told me about a case where a woman was electrocuted while she was wiping a lampshade and a light bulb with a wet rag. At the same time, I think that the light bulb was previously turned off from the switch. Most likely, there were two installation errors. 1) the phase in the socket was connected to the base thread, and the neutral to the central contact, 2) the neutral was opened on the switch, and the phase was always supplied to the light bulb. The result is a wet rag, wet feet, metal stairs, freshly washed earthen floors. The phase through the person is closed to the ground... Diagonally, through the heart. Here is the answer to the question.
touch.otvet.mail.ru
Rules for working with a tester and multimeter
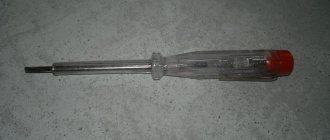
Checking the phase using an indicator screwdriver is carried out as follows: the screwdriver is clamped between the thumb and middle finger of the hand, without touching the uninsulated part of the tip. The index finger is placed on the metal patch at the end of the handle. The sting touches the bare ends of the wires; when it touches the phase conductor, the LED lights up.
A multimeter measures the voltage between the conductors. To do this, the device is set to the alternating current measurement limit with the symbol “~V” or “ACV” and a value greater than 250 V (usually for digital devices the limit of 600, 750 or 1000 V is selected). The probes simultaneously touch two conductors and determine the voltage between them. In household electrical networks it should be 220V±10%.
Sometimes, to determine the grounding conductor, it is necessary to measure resistance. To do this, set the measurement limit “Ω” on the multimeter or with a bell icon.
Attention! In resistance measurement mode, touching the phase wire and ground loop will cause a short circuit! This may result in electrical injuries and burns!
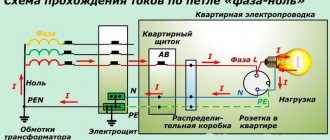
Connecting wires - phase and zero
The cable is connected in the following sequence.
First of all, before starting work, you need to find out which of the wires in the cable is a phase. This is the main point responsible for the safety of all further assembly.
This is done using an ordinary indicator screwdriver.
The phase in the cartridge should arrive only at the lower central part of the base, and nowhere else.
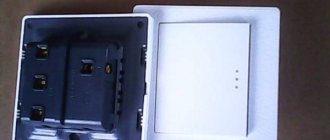
The connection contact is shown in the photo below.
Why is this so important? The point is that you should never have a live threaded part in a chuck. Not many people know, but when a light switch (one-key, two-key) is turned off, only one of the conductors is broken.
The second one continues to go directly to the cartridge. Now imagine that an electrician accidentally mixed up a phase with a zero and sent a neutral wire through the switch.
As a result, at one fine moment, the light bulb in the chandelier may not just burn out, but burst, destroying the glass bulb.
You will turn off the light to replace it, and with such a replacement, you will have to come into contact with the base anyway.
And if a phase comes to it, and not zero, then you are guaranteed to come under voltage.
There are generally lamps entirely with metal socket housings. If you mix up the connection of the wires here, and in an emergency, the entire lamp will be energized.
You can also often observe a situation where, when you wrap a light bulb in a socket, for some reason it does not light up. The reason here lies in the bending of the central contact. It just doesn't reach the base patch.
To correct this defect, it is enough to bend it back. Many people do this with non-insulated screwdrivers or a knife.
As a result of careless actions, you will definitely touch the side contacts, and they will be energized.
As a result, you are guaranteed an electric shock. In this case, experienced electricians advise not to use screwdrivers or foreign tools at all, but to use the cartridge itself.
Unscrew the cylindrical threaded body and insert its side edge between the two contact pads.
Next, grab the central patch with the edge and bend it towards the top. In this case, you will not create any short circuits, and you yourself will not come under voltage.
And it doesn’t matter whether this cartridge is on the wall or on the ceiling. Everything is done in the same way in both cases.
Therefore, remember - the neutral conductor should always come only to the threaded part of the base.
Visual method of determination
If the wiring is done according to all the rules, you can determine the phase, neutral and grounding conductor by the color of the insulation. The ground wire is a two-tone yellow-green color, the neutral wire insulation is blue or cyan, and the phase wire can be white, black or brown. You can verify the correct connection using a visual inspection; in this case, it is necessary to check the color matching of the insulation not only in the panel, but also in the distribution boxes.
Visual inspection sequence
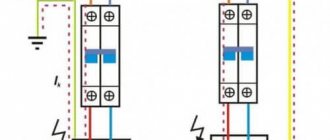
- Open the panel and inspect the circuit breakers. Depending on the design load, their number may vary. Only phase or phase and neutral wires can be connected through the machines. The grounding conductor is always connected directly to the bus. Check that all wires are color coded correctly.
- If the color of the insulation of the cable going into the apartment in the panel corresponds to the rules, open all the distribution boxes and inspect the twists. In them, the colors of the neutral insulation and the ground wire should also not be mixed up.
- Switches are connected to the phase in distribution boxes. Often installation is performed with a two-core wire having other insulation colors, for example, white and white-blue. This shouldn't bother you.
- If the installation is carried out in full compliance with the color of the insulation, it is enough to check the phase wire using an indicator screwdriver.
Where is the phase and zero of a light bulb - Apartment renovation
It has been scientifically proven that the light emitted by an incandescent lamp is considered to be the closest to daytime sunlight, and is the safest and most favorable for human vision. For many decades, incandescent lamp has been a pleasant neighbor to humanity, giving warmth and comfort to our homes.
The principle of its operation is based on the transformation of electrical energy supplied to its filament into the energy of visible radiation affecting the human organs of vision and creating in him a feeling of light close to white, daylight.
An incandescent light bulb consists of two main components, a pear-shaped glass transparent bulb and a base.
Glass flask.
Base.
Inside the flask there is a glass tube through which two contact wires rise. These wires are connected to a tungsten filament by soldering and are designed to supply phase and zero to it.
Under the influence of electric current, the thread instantly heats up to a very high temperature of 2600-2700 degrees Celsius and causes the glow we are familiar with.
The lamp filament is made of a special metal called tungsten. This metal has the world's highest melting point of 3000 degrees Celsius, but is very ductile. It is for these qualities that it is widely used in the manufacture of lighting lamps, as well as as heating elements in the manufacture of heat fans and various heaters.
The lamp base consists of two contacts, one of which is the screw thread of the lamp.
According to the rules, a zero is supposed to be applied to it, since when screwing the light bulb into the socket there is a possibility of accidentally touching the screw thread with your fingers. If a phase is applied to the base thread, the likelihood of accidental electric shock increases significantly. When connecting wires to the cartridge, zero and phase are often swapped, either unknowingly or accidentally.
The second contact is for the phase and is located in the center of the base.
givewhereyoulivehamptons.org
Determining phase and zero in a two-wire network
If your wiring is done without a grounding conductor, you only need to find the phase conductor. The easiest way to do this is with an indicator screwdriver.
- Turn off the circuit breaker and strip the insulation of the wires at a distance of 1-1.5 cm using a knife. Place them at a distance that prevents accidental contact of the wires.
- Turn on the circuit breaker. Using an indicator screwdriver, touch the stripped ends of the wires one at a time. A glowing diode will indicate the phase wire.
- Mark it with a marker or colored tape, turn off the circuit breaker and make the necessary connections.
- When connecting lighting fixtures, you must also make sure that the switch is connected to the phase wire, otherwise, when changing light bulbs, it will not be enough to turn off the switch; you will have to completely de-energize the apartment each time by turning off the machine.
Rules for working with an indicator screwdriver
In the absence of a grounding wire, solving the problem of how to determine the phase will be very easy. It is enough to use an ordinary indicator screwdriver.
In this case, the actions occur as follows:
- First, the network is de-energized by turning off the machine. After this, the insulation on the wires is stripped off by about 1-1.5 cm with a sharp knife. The cores must be separated from each other to prevent accidental contact.
- The machine turns on and voltage is supplied. The end of the indicator device must be touched in turn to the stripped areas of the conductors. When it hits a phase wire, the LED will light up.
- The detected phase should be noted, then turn off the machine again and make all the planned connections.
- When connecting lighting, the switch must be connected to a phase wire. It is he who will ensure that the contact is broken and the lighting devices are turned off and on.
When working with a three-wire network, all conductors may be the same color, so you must be sure to establish the purpose of each of them. The discovery process occurs in the following order:
- The problem of how to find the phase is solved in the same ways as in a two-wire network, after which the wire must be marked, separating it from other wires.
- Zero and ground are determined with a multimeter in voltage measurement mode. One probe touches the phase wire, and the other touches the neutral and ground wires, in turn. The neutral wire shows lower voltage.
- In the case of the same voltage, the resistance of the ground wire is measured. It should be no higher than 4 ohms, and the zero resistance will be noticeably higher.
How to determine phase and zero
Indicator screwdriver
What is a phase, how to determine phase and zero in electricity
Wire color phase, neutral, ground
Wiring diagram for a chandelier with 3 lamps
How to determine wire cross-section
Determination of phase, zero and ground wire
If the network is three-wire, but is made with wires of the same color, or you are not sure of the correct connection, you must determine the purpose of the conductors before installing each element of the network.
- Determine the phase wire using the method described above using an indicator screwdriver and mark it with a marker.
- To determine the neutral and ground wires, you will need a multimeter. As you know, due to phase imbalance, voltage may appear in the neutral wire. Its value usually does not exceed 30V. Set the multimeter to AC voltage mode. Touch the phase wire with one probe, and the other two wires in turn with the second. Where the voltage value is lower, the second wire will be the neutral conductor.
- If the voltage value is the same, it is necessary to measure the resistance of the ground wire. To do this, it is better to insulate the already defined phase wire to avoid accidental touching it. The multimeter is set to resistance measurement mode. Find a known grounded element, for example, a pipe or battery. If necessary, clean the paint and touch the metal with one multimeter probe, and the other one in turn to the conductors, the purpose of which is unclear. The resistance of the grounding wire in relation to grounded elements should not exceed 4 Ohms, the resistance of the neutral wire will be greater.
- The resistance measurement may also be unreliable if the neutral is grounded in the panel. In this case, you need to find the grounding conductor connected to the bus inside the panel and disconnect it. After this operation, you need to take a socket with a lamp and connected wires, strip their ends and connect one lamp wire to the phase wire, and the second - alternately to the other two. The lamp will light up when touching the neutral conductor.
If all of the above measures do not lead to the desired result, it is better to contact professional electricians who, using special devices, will call all circuits. Don't forget that this is primarily about safety.
Source: StroyVopros.net
In this article we will consider the question of how to find phase and zero using a probe and a multimeter.
If it is necessary to maintain apartment electrics, in particular replacing sockets, light switches or carrying out minor repairs, it becomes necessary to determine the phase and zero. If a person has some knowledge of the basics of electrical engineering, then it will not be difficult for him to find phase and zero. What if you don't have these skills? Finding phase and zero is not as complicated a process as it might seem. Let's look at several ways to determine phase and zero.
First, let's define what phase and zero are. Our entire energy system is three-phase, including the low-voltage lines that power residential buildings and apartments. As a rule, the voltage between any two phases is 380 volts - this is line voltage. Everyone knows that the household voltage is 220 volts. How to get this voltage?
For this purpose, a neutral wire is provided in electrical installations with an operating voltage of 380 volts. If you take one of the phases and the neutral wire, then between them there will be a potential difference of 220 volts, that is, this is the phase voltage.
For a person who does not have knowledge of electrical engineering, the above is not very clear. It is important for us to know that each apartment or house receives one phase and one zero. What phase and zero are is discussed in detail here.
Let's consider the first method of determining the phase using a probe (indicating screwdriver). You can read more about the design and operating principle of such screwdrivers here - Indicators and voltage indicators in electrical installations up to 1000 V.
So, you have two wires and you need to determine which one is phase and which is neutral. First, you need to de-energize them by turning off the circuit breaker that powers that line of electrical wiring.
Then you need to strip both wires, that is, remove 1-2 cm of insulation from it. The stripped conductors must be slightly separated so that when voltage is applied, a short circuit does not occur as a result of their contact.
The next step is to identify the phase wire. We turn on the machine, through which voltage is supplied to the conductors. We take the indicator screwdriver by the handle and touch the metal part at the base of the handle with one finger.
Remember that it is strictly forbidden to take the probe below the handle, that is, by the working part. We bring the probe to one of the wires and touch it with the working part. In this case, the finger remains on the metal part of the handle.
If the indicator lamp of the screwdriver lights up, then this wire is a phase wire, that is, a phase. The other wire is correspondingly zero.
If the probe lamp does not light up when you touch the wire, then this is a neutral wire. Accordingly, the other wire is a phase; you can check this by touching an indicator screwdriver.
What to do if the wiring in the apartment is made of three wires? In this case, you not only have phase and neutral, but also a ground wire. Using a probe, you can easily determine where the phase is located among the three wires.
But how to determine where is zero and where is the protective conductor, that is, the grounding conductor? In this case, one indicator screwdriver is not enough. Let's consider a method for determining zero in a three-wire household network.
You can determine where the zero is and where the protective (grounding) conductor is using a multimeter. So, we have already identified the phase wire using a probe. We take a multimeter and turn it on to the AC voltage measuring range of 220 volts and above.
We take two probes of the measuring device and touch one of them to the phase, and the other to one of the two remaining conductors. We fix the voltage value that the multimeter shows.
Then we leave one of the probes on the phase, and with the other we touch the other wire and again record the voltage value. When you touch the phase and zero at the same time, the value of the household voltage will be displayed, that is, approximately 220 volts. If you touch the phase and the protective conductor, the voltage value will be slightly less than the previous one.
If you don’t have a probe, you can also find the phase with a multimeter. To do this, select the alternating voltage measurement range above 220 volts. Two probes are connected to the multimeter into the “COM” and “V” sockets, respectively.
We take in our hands the probe that is included in the socket marked “V” and touch it to the conductors. If you touch a phase, the device will show a small value - 8-15 volts. When you touch the neutral wire, the device readings will remain at zero.
We advise you to read: What to do if there is a phase on both connectors of the socket?
Source: electric.info
Where is the phase and zero of a light bulb?
How to determine phase, zero and grounding yourself, using improvised means?
Let's try to figure out how at home, without having complex specialized measuring instruments and electronic devices, you can determine for yourself where the phase is, where the zero is, and where the ground is in the wiring.
Of all the known methods, the simplest determination of phase and zero, we have selected the most, in our opinion, accessible to implementation and at the same time safe. For this reason, in the article you will not see advice on how to find the phase using potatoes or calls for briefly touching the wires with various parts of the body.
In fact, there are not so many options for determining phase, zero or grounding, for example, in a socket, without the use of specialized equipment, and sometimes, depending on your goals and objectives, it is enough just to know the standard for color marking of electrical wires adopted by us to distinguish them.
Wire marking by color
Indeed, the easiest way to determine the phase, neutral and ground of an electrical wire is to look at the color marking and compare it with the accepted standard. Each core in modern wires used in electrical wiring and electrical equipment has an individual color. Knowing which color of cores corresponds to which function (phase, neutral or grounding), you can easily carry out further installation.
Quite often, this is quite sufficient, especially in cases where the installation is carried out in new buildings or places with fairly new electrical wiring, made by professional, competent electricians in accordance with all modern rules and standards.
In our country, as in Europe as a whole, the 2004 IEC 60446 standard applies, which strictly regulates the color marking of electrical wires.
According to this standard for residential electrical networks:
Working zero (neutral or zero) - Blue wire or blue-white
Protective zero (earth or grounding) - yellow-green wire
Phase – All other colors including black, white, brown, red, etc.
Now, knowing the standard for color marking of wires, you can easily determine which wire performs which function. This applies to most cases, the exception may be wires suitable for switches, switches, etc., due to the fundamentally different operating scheme of this electrical equipment.
If you are not sure that the colors of the wire cores exactly correspond to the IEC 60446 2004 standard, you have old wiring, you do not exclude the possibility of errors or even a negligent attitude of electricians to their work, or maybe the electricians laid wires of a different standard and, accordingly, a different color marking, then move on to a practical method for determining phase and zero (working and protective).
PHASE DETERMINATION
For greater convenience, it is always better to first determine which of the existing wires is phase. We have already written about how to find the phase with a digital multimeter, but what to do if you don’t have one, read below.
PHASE DETERMINATION WITH AN INDICATOR SCREWDRIVER
The easiest way to detect a phase wire is to search with an indicator screwdriver. Any home craftsman who does electrical work in an apartment should have this simple tool - be it full electrical installation, simple replacement of lamps or installation of lamps, sockets and switches.
The operating principle of an indicator screwdriver is simple - when the tip of the screwdriver touches a live conductor and at the same time touches the contact on the back of the screwdriver with your finger, the indicator lamp in the tool body lights up, which signals the presence of voltage. This way you can easily find out which wire is phase.
The operating principle of the indicator screwdriver is simple - inside the indicator screwdriver there is a lamp and a resistance (resistor), when the circuit is closed (we touch the rear contact) the lamp lights up. Resistance protects us from electric shock; it reduces the current to a minimum, safe level.
This option for determining the phase on your own is the most preferable and we recommend using it, especially since the cost of an indicator screwdriver is more than affordable. The main disadvantage of this method is the likelihood of an erroneous operation, when the indicator screwdriver, reacting to interference, detects the presence of voltage where there is none.
DETERMINATION OF PHASE, ZERO AND GROUNDING BY CONTROL LAMP
Another way in which you can determine the phase, neutral and ground wires in a modern three-wire electrical network is by using a test lamp. The method is ambiguous, but effective, requiring special care.
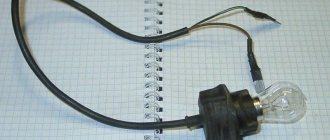
To begin the determination, you first need to assemble the control lamp device itself. The easiest way is to use a socket with a lamp screwed into it, and secure the wires with the insulation removed at the ends into the terminals of the socket. If you don’t have an electric socket at hand or don’t have time to make something, you can use a regular table lamp with an electric plug.
The technology for determining phase, zeros and ground using a test lamp is as simple as possible - alternately connecting the lamp wires to the wires requiring determination, each with each.
Determine the phase and zero of two wires
If the test lamp detects a phase wire among two wires, you will only be able to find out whether there is a phase or not, but which of the conductors is the phase wire cannot be determined. If, when connecting the wires of the test lamp to the identified wires, it lights up, then one of the wires is phase, and the second is most likely zero. If it doesn’t light up, then most likely there is no phase among them, or there is no zero, which also cannot be ruled out.
In this way, it is rather more convenient to check the functionality of the wiring and the correctness of its installation. It is better to determine the phase with an indicator screwdriver, but to find out the presence of zero this way.