Legrand: connection diagram for a two-key switch
A device with two keys is more common. It is used to control the lighting of different rooms from one point. Often installed in apartments to add accents with light.
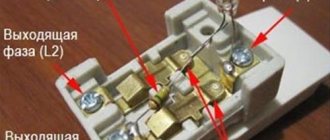
In fact, this equipment combines two independent devices in one housing. The phases are combined and function by switching among themselves. When the user presses one button, the second one breaks the circuit and automatically disconnects.
The Legrand switch, the operating diagram of which is shown below, has its own characteristics. It has independent groups of contacts, so the keys do not depend on each other in any way. When you press one of the buttons, you switch from the upper lines to the lower ones. Moreover, the former do not have a final output, but the latter are connected to exactly the same switch.
It turns out that the device is equipped with two groups of independent contacts - right and left. This point is typical for the entire Legrand Valena series - the schemes will also depend on it:
Before installation, study the Legrand switch - the installation diagram is often included with the electrical equipment. If it is not there, refer to this article.
Source
Comments:
Alexei
Well, I wouldn’t praise Legrand like that. Regular switches at an average price. ABB, for example, is much better in quality, and they last much longer and are more reliable.
DAN
They are not that average in cost. Expensive backlit series reach up to $15 apiece. Although, if compared with the same Viko, then there really is an advantage in terms of lifespan and reliability
Vasek
That's what I would never buy - outdoor switches from Legrand. If you install an external switch, then it won’t last long, therefore there is no reason to overpay. Lezard or Viko is better as an external switch - cheap and cheerful.
DAN
Vasek, I wouldn’t advise anyone to place Lezard anywhere. The steel terminals oxidize, the housing is made of flammable material, and the contacts cannot be clamped properly. In general, all the delights of cheap China in one package. Of the “democratic” ones, you can only use Viko, and even then check that it is not a fake
Leave a comment Cancel reply
Related Posts
A few simple rules for choosing sockets and switches
How to connect a three-key switch, diagram, instructions, tips.
Schneider Electric - high-quality sockets from the world leader
What is a Legrand pass-through switch, features of its connection diagram.
Connecting Legrand switches - diagram
Electrical installation products are used by consumers as functional devices and play an important role in interior design. Therefore, when developing such devices, manufacturers pay attention not only to the technical characteristics, but also to the appearance of the products, trying to ensure that the products meet the requirements of modern design. Among the world's manufacturers of electrical accessories, one of the first places is occupied by Legrand, whose products are distinguished by a variety of shapes and colors.
Popular series and classification
Legrand offers consumers a large number of different switches. All of them are divided into series, which differ from each other both in functionality and appearance. The most popular series among them are:
- Valena and Valena Life are one- and two-key switches and switches of a classic (square) shape, made in the colors “aluminium”, “white”, “ivory”. Some models are equipped with backlighting. Products from the Valena Life series are distinguished by the gracefully curved shape of the keys, which allows you to turn on the light with a light touch of your finger.
- Galea Life - waterproof models included in this series of one- and two-key products, are distinguished by a strict design and original colors (dark bronze, titanium, mother-of-pearl, etc.). Many of them are equipped with backlight or indication.
Legrand company
The international company Legrand, whose headquarters is located in Limoges (France), was founded in 1866 and was initially engaged in the production of table porcelain. However, the company subsequently switched to the production of porcelain insulators (1904), and then focused on the production of electrical accessories (1949). Since then, continuously developing, the small enterprise has turned into a large international company with branches located in more than 60 countries around the world. Its enterprises produce a wide range of electrical products, from sockets to the creation of complex technical solutions for electrical and information networks.
Legrand is the only company that offers Russian enterprises and trade organizations a full range of electrical equipment developed taking into account the latest scientific and technical achievements and meeting the requirements of international standards.
Legrand products are fully certified for compliance with regulatory and technical documentation in force in Russia.
Why do energy-saving lamps flicker when connected to backlit switches?
The backlight lamps are connected in series with the load, so a small current from the backlight lamp also flows through the energy-saving lamp, causing it to turn on periodically. When a backlit switch (switch) and a compact fluorescent lamp work together, a problem arises that manifests itself in its periodic flashing when turned off. This is because the current flowing through the backlight element (neon lamp or LED) charges the capacitor and causes the lamp converter to spontaneously cycle. This problem can be solved using switches art. 067001 and backlight lamp art. 067686 (Celiane series), connected according to the diagram shown.
Features and advantages of Legrand electrical accessories
Electrical installation products manufactured by Legrand are in steady demand all over the world. They differ from existing analogues in high quality manufacturing, advanced functionality, ease of installation and ease of operation. A distinctive feature of this brand is also its stylish and elegant design. At the same time, without exception, all electrical installation products produced at the company’s enterprises have a high level of:
In Russia, the Legrand company offers consumers electrical accessories that can easily give office and residential premises a modern and attractive look. For their production, only high-quality materials are used (porcelain, metal, glass, plastic, etc.) with a wide range of colors, which allows you to select the necessary installation products for the interior of any room.
Installation features
Now let's turn to the installation details. According to the instructions, the Legrand pass-through switch can be installed in open or closed mounting boxes. The fastenings in these boxes are done either with clamps or with screws.
Before installation, you need to remove the frame and key. They are attached using special mechanisms and have special grooves on the side. First, insert a flathead screwdriver into the key groove and lift it up.
Next, this same procedure is carried out relative to the frame. Now you know how to properly disassemble a Legrand pass-through switch.
After this, attach the base of the device for turning on the light to the installation box and connect the wires according to the presented diagrams. At the end, the frame and the upper part of the key are mounted.
The process of connecting the Legrand switch is also shown in this video:
Leave a comment Cancel reply
Related Posts
What do you need to know about a circuit breaker in order to choose a reliable and, most importantly, safe model?
Height and placement of sockets in the kitchen in a modern apartment DIY installation of an external socket, detailed instructions
Sockets built into the tabletop save desk space and do not spoil the appearance
Connecting Legrand switches/switches
Installation of Legrand switches/switches is carried out in accordance with the attached instructions. In addition, the connection diagram is duplicated on the back of the product.
How to connect Legrand switch
For a correctly connected Legrand switch (two- or single-key), the keys in the on state occupy the “up” position, and in the off state, the “down” position. To do this, the phase wires are connected to the input terminals, which are marked with the letter L or arrows indicating the path to the center of the switch. In this case, the conductors going to the load (lighting lamps) are connected to the output terminals, indicated by arrows indicating the direction from the center of the switch.
If you connect the phase wire to the output terminals, and the wires going to the load to the input of the switch, the key will be in an inverted position and there will be a danger of electric shock to the user when replacing the light bulb, which will be energized after turning off.
Connect the switch in the following order:
A two-key switch is assembled from two single-key switches, so the connection diagrams for each half are identical.
Connecting a Legrand switch with backlight and indication
An additional lamp in switches is used for the following purposes:
The load indication mode is activated only if not only the phase wire, but also the neutral wire is connected to the input contacts of the switch.
Source
Switch with two Legrand keys: how to connect
In multi-room apartments and cottages with a large number of lighting fixtures, single-key switches are practically not installed. Their place has been firmly taken by devices with two buttons, which provide lighting control even in several rooms at the same time. Having become the owner of such fittings, the user often wonders how to connect a switch with two Legrand keys.
Mounting and installation diagram
The most effective technology for connecting cables to the light controller is made using self-clamping terminals. Two-key devices consist of a pair of identical designs in one housing. The peculiarity of the work is that their phase rhythms are combined. The connection diagram for Legrand two-key switches assumes that when one supplies power to its group of electricity consumers, the second key can be pressed in order to autonomously turn off the phase supply from another group of users (lighting products, sockets).
For installation you will need:
- side cutters;
- screwdrivers (indicator, flat and Phillips);
- level.
Initially, the electricity in the working section of the network is turned off. Then you should check with an indicator that there is no voltage at the output ends of the wires connected to Legrand. Using pliers, the ends of the cable are stripped to the required length (the value is indicated on the Legrand stencil). Using a clamping structure, the phase and neutral wires are fixed in the switch.
It is inserted into the box and secured with expansion stops using a screwdriver. During connection, the level checks the leveling. Then the protective plates and decorative casing (if any) are installed. During installation, the consumer selects the “off” position - upper/lower.
For extended rooms
When you need to connect a couple of similar products to control light, for example, in a long corridor, gallery, etc., it is worth considering some features. So, the phase is supplied to one pass-through module. Using pre-installed wiring and its switching circuit, a mode is activated in which lighting in residential spaces:
- can be turned on by the first 2-key device by pressing one of them;
- turn off the device in the opposite part also by pressing one half.
The algorithm works reversibly. The above operations can be carried out in the same order, moving in the opposite direction.
Installing a Legrand Valena switch: choosing a location
It is convenient when the mechanisms are located within maximum accessibility. Traditionally, they are installed at the entrance to the room. If you have a walk-through model that allows you to control the light from different places, one copy can be installed next to the bed. Then you won't have to get out of bed to turn off the lights.
Installing a Legrand backlit switch is justified if you often lose your device in the dark. Such models are equipped with a light indicator. If there is little light in the room, the light on the panel begins to glow. The device consumes a minimal amount of electricity, so there is no need to worry about your electricity bills rising.
When choosing a model, think about how it will fit into the interior of the room. The French brand offers several series of electrical accessories. There are classic solutions and high-tech options. If it is not possible to achieve a harmonious design, the decorative frame can be changed. To do this, there are grooves on the top panel, and to remove it, just use a screwdriver.
Schematic diagram of the operation of a pass-through switch.
Let's immediately figure out how they work in principle.
Unlike conventional switches , which have a fixed position of the power key and simply break the circuit, pass-through switches can be switched on with any position of the key, because they switch from one of two lines to another, which is very similar to switching a railway track switch (see the diagram above ) and allows us to control the inclusion of artificial light from different places. The phase comes to the first pass-through switch, and from the second it goes to the lamp , and both of them must be connected to each other with a two-core electrical cable or wire. But, as a rule, no one connects them directly, but three separate wires from each are inserted into a junction box and two of them are simply connected in pairs to each other .
When connecting additionally, if necessary, a third, fourth, etc., the circuit essentially does not change, but their connection differs from the first two, which had one input contact and two output ones. They will need to have two input and 2 output wires connected, allowing them to be used to cross-switch between two lines.
The operating principle of the third pass-through switch (when purchasing, pay attention to whether it has the ability to work as a cross switch) is that when switching, it connects the first contact at the input to the second at the output, and the second contact at the input to the first at the output. To connect it, you actually need to connect it to two other pass-through switches with a 2-wire cable, but no one does this, but run the 4-wire cable into a junction box and make the connection there according to the diagram.
Similarly, you can add a fourth to the circuit, which will be located between the third and second or first switch.
We have looked at the theoretical part, let's now look at specific practical schemes.