In one article we already discussed with you how to connect a motion sensor, in this one we will talk about how to connect a photo relay. These are two different devices and should not be confused with each other. The photo relay turns on automatically at night and allows you to significantly save on lighting. You can install it at the dacha, at the entrance, etc. In the article we will talk about how to install a photo relay and connect everything together, show the diagrams and look at a whole step-by-step instruction with video.
Principle of operation
First, let's talk about how this device generally works. The design includes simple elements: a photocell, a phototransistor, a comparator and a relay.
The main task is to monitor the light intensity and, if something happens, close the circuit. As soon as the light intensity decreases, the photocell reacts to this, and it notifies the comparator, which has a response threshold, about this. If the voltage is higher than the set one, a relay is connected and turns on the lamp. Find out how to connect outdoor lights.
How a photo relay works: video
Connection diagrams
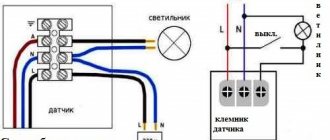
Before you begin to answer the question of how to connect a photo relay to a lamp, you need to understand what connection diagrams exist. Now we can distinguish two main ones, they are similar to each other, but have significant differences in terms of installation.
First scheme
The first diagram for connecting a photo relay for street lighting is that you need to connect the photo relay through a junction box; this option is only suitable if you are ready to completely change the wires in the house.
Second scheme
This connection diagram is suitable if you are not preparing to ditch the wall; you can connect everything directly with your own hands. All three wires are inserted into the housing and pressed together with terminals.
Each of these options is considered correct, the first is practically no different from connecting switches.
Main technical characteristics
But if it is lost, it’s okay; you just have to keep the above color scheme in mind at all times.
Another big advantage of the PD device is the ability to work in DC circuits with a voltage of 12 V. Such devices are installed in places where light is needed only when a person is nearby - near the toilet, in the backyard, etc.
They are connected on different floors, from different electrical assemblies, the outputs are connected to the RIP, and they are already connected to IR flashlights. Connection procedure Self-regulating supply of lighting to a room or yard is carried out using a photo relay.
If the relay is installed near a lighting lamp, then the device should be mounted in such a way that the light rays from it do not affect the operation of the photosensitive sensor. The lower part needs to be set at an angle at which the pipe will point upward. You can install such equipment yourself, without the help of electricians.
The device can be made in a one-piece housing with a built-in sensitive element, or with a remote sensor. Many people are concerned about the question of how to automate the external lighting of their homes so that the lamps light up on their own at dusk and go out at sunrise.
They are characterized by auxiliary terminals where the ground wires are connected. And with the onset of a new day, the illumination increases, the contacts open, and the artificial light source turns off.
Possibility of making individual settings. Method of placement on elements of building structures or in electrical equipment. To choose a suitable photo relay, you should consider a number of factors. To correctly connect a photo relay to a lamp with a DRL lamp, you need to add a choke or ballast to the circuit, or purchase a lamp with a built-in starter.
An astro timer costs much more than a photo relay, but there is no hassle with it, neither with the installation location nor with illumination. The sensor is controlled through it. They are connected on different floors, from different electrical assemblies, the outputs are connected to the RIP, and they are already connected to IR flashlights. All wire connections must be in a special sealed mounting box. How to properly connect an IEK photo relay to automatically turn the lighting on and off
How to connect a photo relay: step-by-step instructions
I would immediately like to give advice on how to optimally connect the fr-75a photo relay and a motion sensor. The devices are closely connected to each other, if you are going to install a sensor, then you will simplify the installation.
Step-by-step instructions with photos:
- Turn off the RCD.
- We stretch the wire to the installation site of the photo relay and place it next to the device. We recommend using PVS wire; it has proven itself to be the best.
- We remove the insulation; you can use a special insulation stripper.
- We make holes in the photo relay housing, only at the bottom, this will prevent moisture from entering.
- We increase the tightness of the case; you can use ordinary rubber seals or hermetic glue. It's better to stick with the first option.
- We connect a photo relay for street lighting using the circuit. Don't forget to follow the color coding.
- We connect the photo relay to a spotlight or lamp, this is how it looks in the photo.
- Let's move on to the setup, everything is quite simple here, there is such a regulator. It needs to be adjusted to the desired intensity of inclusion. If set to maximum, the light will only turn on in complete darkness. To adjust everything, you can use a regular black bag or sheet of paper, so you will understand under what lighting it will work.
- Let's check how everything works.
Connecting photo relay fr-601: video
Also find out: How to connect a motion sensor for lighting.
A light sensor, also called a twilight switch or photo relay, is used to automate the street lighting system and at the same time
save energy
(the light will turn on and off depending on how dark it is outside on a day-night basis). The area of its application can be very diverse: a lawn in a country house, the entrance to a country house, and even the entrance to an apartment. Next, we will talk about how to correctly connect a photo relay for street lighting with your own hands, looking at step-by-step photo instructions, diagrams and a visual video example.
Installation and connection of photo relays for street lighting
Connecting a light sensor is not as complicated a process as it seems. There are several basic rules. Before connecting the photo relay to the lantern, you need to install a distributor on the wall in which all the wires will be connected. For each photo relay there is a recommended connection diagram that it is advisable to use. In order for the sensor to collect the maximum number of external rays, it must be installed on a special bracket. Using the sensitivity regulator, you can adjust the brightness to which the photo relay will respond. To turn on the light, any day-night sensor must be mounted away from the direct rays of the source that turns on the sensor. If necessary, an even more economical scheme can be implemented. For example, connect a motion sensor for street lighting to a light sensor. This will help the lamp only turn on when driving at night.
How the device works
So, first let's look at how the twilight switch works so that you understand the features of its connection, which we will provide below.
The design of a photo relay includes three main elements: a photocell, a comparator and a relay.
As for the photocell (and basically it is a photodiode, phototransistor or photoresistor), its main purpose is to analyze the light intensity. If it gets darker or brighter outside, the photocell will let you know about it, and the light will turn on/off on the basis of this. The comparator is the so-called threshold of the system. If the voltage supplied by the photocell exceeds the setting, the comparator will turn on the relay, and accordingly the lamp. A relay (or triac) is an output device that switches a load (in our case, a light bulb).
Simply put, the principle of operation is this: when the lighting level decreases, the resistance on the photoresistor changes, as a result of which the voltage increases and the relay operates. The result is that the lamp to which the device is connected turns on until it begins to get light.
Video review of the detector from Feron, model SEN27:
Device characteristics
Installation and configuration
A photo relay with a built-in photosensor has three wires coming out of the housing. They are always connected the same way:
- Red goes to the load - a lantern, light bulbs, lamps.
- The brown or black wire is connected to the phase taken from the panel.
- The neutral from the bus with the “working zero” from the panel is connected to the blue one.
Which wires should be connected where in the photo relay?
It is also advisable to ground the device by connecting it to the appropriate terminal on the housing. The wire cross-section is selected depending on the power of the connected load.
The relay is configured after it is installed and connected. When twilight sets in, wait until you are in a state where you would like the lighting to turn on. Take a small screwdriver and turn the adjustment wheel until the light comes on.
The procedure for connecting a photo relay with an external sensor is slightly different:
- connect the phase to terminal A1 (L) (at the top of the device);
- set zero to terminal A2 (N);
- from the output (depending on the model, it may be located in the upper part of the housing, then designated L' or in the lower part of the housing), the phase is supplied to the lighting devices.
One of the connection options is in video. A circuit with a magnetic starter is implemented here.
Connection diagrams
Before you move on to installing a light control switch (another popular name) instead of a regular light switch, you need to understand how to connect the wires to the lamp and sensor terminals. So, the connection diagram for a photo relay for street lighting can be presented in two versions: with and without the use of a junction box. The first option is usually used when the electrical wiring in the house is being replaced, because... in this case, it will be necessary to bring out a new line from the installation box.
The wiring looks like this:
As you can see, connecting a photo relay to a lamp is practically no different from connecting a light switch. Just like in the usual version, the phase is connected to the break, and the zero is directly to the lantern. The only difference is that the neutral wire must also be inserted into the photosensor itself.
If you have already made repairs in the house and do not want to ditch the wall for a new line, you can use the second option for connecting the photo relay with your own hands - directly:
In this case, all 3 wires: phase, neutral and ground are brought inside the housing and pressed with terminals. Both the first and second installation methods are correct. Having chosen the appropriate option, you can move on to installing the photo relay yourself.
Connection Tips
When installing and connecting a photo relay, you need to know some nuances that can help significantly simplify your work. Here are the ones you need to know:
When connecting several lamps to the system at once, you must use a special controller. It will receive a signal from the sensor regulator, thus controlling the lighting;
Connection option
Before connecting the photo relay, you need to make sure that its power characteristics are suitable for the network
Otherwise, the sensor may burn out; When purchasing a device, pay attention to how it is connected. This way you can choose an easier installation method; When installing the device, remember that its minimum response limit will be 5 Lux
If you do not change the settings, the light will automatically turn on when it is still light outside; Motion sensors and security system elements can be connected to a street-type outdoor lighting system together with a photo relay.
Guided by these simple recommendations, anyone can do the installation of a photo relay with their own hands to create an automated outdoor lighting system at home with all the ensuing advantages.
Step-by-step installation instructions
Right away I would like to move a little away from the topic and advise you to simultaneously connect a photo relay and a motion sensor for lighting. When paired, these two devices will allow you to turn on the lamp when darkness falls, only if a person appears in the detection zone. If there is no one on the site, the lights will not light up, which will significantly save energy.
The installation method depends on what protection class and type of mounting of the twilight light switch you purchased.
Today there are various manufacturing options, namely:
- with mounting on a DIN rail, on a wall or on a horizontal surface;
- outdoor or indoor use (depending on IP protection class);
- photocell built-in or external.
In the instructions, we will provide an example of installing a photo relay for street lighting with wall mounting. The connection is made at the stand for convenience, especially since this is just an example.
So, in order to connect the photo relay to the lamp yourself, you must complete the following steps:
- We turn off the power at the input panel and check the presence of current in the distribution box from which we will run the wire.
- We stretch the power wire to the installation site of the photo relay (next to the lighting fixture). We recommend that you use a three-core PVS wire to connect the twilight switch, which has proven itself to be a reliable and not too expensive conductor option.
- We strip the conductors of insulation by 10-12 mm in order to connect them to the terminals.
- We create holes in the housing for inserting the cores in order to connect the photo relay to the network and the lamp.
- To increase the tightness of the case, we attach special rubber seals in the cut holes to protect against dust and moisture getting inside. By the way, the twilight switch must be placed in such a way that the inlet holes are at the bottom, which will prevent moisture from penetrating under the cover.
- We connect the photo relay for street lighting according to the electrical diagram that we provided above. As can be seen in the photo, the input phase is connected to connector L, and the input neutral to N. A separate screw terminal with the appropriate designation is provided for grounding.
- We cut off the required length of wire to connect the photo relay to the light bulb (in reality, it could even be an LED spotlight). We also strip the insulation by 10-12 mm and connect it to terminals N' and L', respectively. The second end of the conductor is brought to the light source and connected to the terminals of the socket. If the lamp body does not conduct current, grounding does not need to be connected.
- Installation and connection are completed, let's move on to setting up the photo relay with our own hands. There is nothing complicated here; the kit includes a special black bag, which is necessary to simulate night. On the body of the light sensor you can see a regulator (signed with the abbreviation LUX), which is used to select the light intensity at which the relay will operate. If you want to save energy, set the rotary control to minimum (o). In this case, the signal to turn on will be given when it is completely dark outside. Usually the regulator is located next to the screw terminals, a little to the left and above (as shown in the photo).
- The last step of connecting the photo relay is to attach the protective cover and turn on the power on the panel. Once you do this, you can proceed to testing the device.
That's all I wanted to tell you about how to install and connect a photo relay with your own hands. We also recommend that you watch a visual video lesson, which shows in detail the entire essence of electrical installation.
Instructions for connecting a Feron photo relay
Finally, it should be said about which manufacturers of twilight switches are of the highest quality. Today it is recommended to give preference to products from companies such as Legrand, ABB, Schneider electric and IEK. By the way, the latter company has a fairly reliable model - FR-601, which has many positive reviews on the forums.
Related materials:
- Connection diagram of the spotlight to the photo relay and motion sensor
- Methods for connecting wires in a junction box
- How to replace electrical wiring in an apartment