Where is the three switch system used?
Switch equipment with control from three different points ensures practicality. There is no need to walk across the entire room or long corridor to turn on or off the light.
An example of the location of switches in the bedroom
It is rational to use such a wiring system for a yard or personal plot. We left the house and turned on the light, approached the building and turned it off. We went out, turned it on again, and went to another object.
For example, a room has several beds. The first device will be at the door, the second near one side, the third near the second side of the bed. That is, there is no need to get up and turn off the lights.
Staircase lighting
Or illumination of the staircase opening, so as not to go up or down in the dark. One switch is installed first at the bottom, the next in the middle, and the third at the end, at the top of the stairs.
It is convenient to use the connection from 3 places in the entrances. On the first floor they turned on the lamp, on the second or third they turned it off. This significantly saves energy.
It is important to install three-point switches in oblong corridors and openings, with several entrances to different rooms. At the beginning of the corridor they turned it on in the middle or at the end they turned it off.
The lamp control circuit is used both in one room and for a large space.
You can use such a lighting system even in walk-through rooms. They turned it on in one room, walked through the room, and turned it off in another room. Convenient and economical.
How to connect a three-key switch with your own hands
Connecting a three-circuit device is extremely simple. To do this correctly, you need to follow many step-by-step steps. The entire connection process is divided into stages:
- connecting the cable to the three-key player;
- connection of wires in the box;
- checking the correct connection and eliminating errors.
Before carrying out the process, it is advisable to study the connection diagram. This measure will help minimize possible mistakes.
Triple switch connection diagram
There are several conductors in the box. Each performs its own function:
- The cable with 3 cores is located in the circuit breaker present in the switchboard.
- A four-wire wire runs down to a three-key switch connected to the bottom.
- The connection diagram for a triple switch for 3 lamps involves connection with a 4- or 5-core VVGnG-Ls wire. Its cross section is 1.5–2 mm. A chandelier with 6 or 9 bulbs requires the same connection.
- With 3 different lamps, you need to pull 3 different three-core cables. This method is common.
Now the number of requests for “triple switch with socket diagram” on the network has increased. It is easy to find detailed connection algorithms with photographs or drawings there.
Useful video on the topic:
Connecting wires to the switch
Often the device is installed in a block with an outlet. People are wondering how to connect a three-key switch. You need to take several sequential steps:
- You will need a copper wire with a cross section of 2.5 mm². Direct the cable from the common shield. When it goes from the box to the switch, it is an error.
- Run copper wire 5*2.5 mm² down the groove. Then it will be near the switch and socket box. Connect the common wire to the contact. This is due to the more powerful load on the sockets. It is not so pronounced on lamps.
- Using a jumper, connect the phase to the upper terminal of the device. Direct the zero to contact 2. Place the remaining conductors under the lower contacts.
The cable in the box is connected using the method described above. The difference lies in the connection of the auxiliary neutral core to the central point.
Wire connections in the distribution box
There are 5 conductors in the box. We must not confuse them and connect the wires correctly. It is worth starting with 2 cores: neutral and ground. The number of light bulbs does not matter. All zeros will end up at one point.
The rule of reduction to a common point applies to grounding conductors. On lamps they should be connected to the housing. Sometimes the wires are missing.
You can quickly connect the cores using clamps for Vago terminals. They are suitable for lighting loads. It is better to choose core colors based on existing standards. Blue wires are neutral. The grounding conductors are colored yellow-green.
We must not forget that the zero is not directed towards the switch. It goes directly to the lamps. By contacting the device with three keys, 1 phase is broken.
Then you need to connect the phase conductors. Start with the conductor coming from the input machine. Combine a phase with a common phase conductor. It goes to the common terminal of the three-key player. If the core is no longer directed anywhere, the phase is switched on to the switch.
Connect the 3 conductors coming out of the keys with 3 phases. They extend from the circuits onto the lamps using Vago clamps. Correct marking of the cores will help to quickly recognize them. Each one controls a light bulb in the room. There will be 6 connection points in the box.
Before switching on, you should re-check the triple switch circuit. Then turn on the machine and use the keys to turn on the lighting fixtures.
Modern trends in lighting control systems are developing not only in the direction of comfortable operation and varied design, but also increasing the level of efficiency. One such method is to use three-way switches that can control three groups of lighting fixtures from one access point.
The advantages of using a single three-circuit device are obvious. This is an aesthetic appearance, less labor-intensive installation of electrical cables to the connection point. Knocking out one technological niche in the wall to accommodate an installation box instead of several.
Such devices are used to illuminate rooms with complex configurations, long corridors, or control several rooms from one point: a bathroom, a bathroom and a hallway.
Lately, I have often been asked by mail and in the comments and asked for advice on such a seemingly ordinary device. Therefore, today we will examine in detail the topic of how to connect a three-key switch. PS in this example a three-gang switch from Schneider Electric
.
The three-key switch is subjected to more intensive use than other electrical switching equipment. The reliability of the device design should ensure an average service life of up to 10 years. Malfunctions that arise during operation can be divided into two categories:
- - mechanical - associated with the breakdown of the external and internal elements of the case, springs, fasteners, erasing keys, etc.;
- - electrical - loosening of the contact clamps in the electrical part of the mechanism, and, as a result, burning of the cables and the entire device as a whole.
Any breakdowns that lead to a violation of the integrity of the device or its individual elements require replacement of the entire product.
Repair or replacement of switches, like any other electrical equipment, must be carried out by a specialist with the appropriate level of clearance. The room where repair work is carried out must be de-energized.
You can purchase such switches at any electrical goods store. Three-key switch connection diagram
, quite complicated at first glance, will also not present any particular problems after carefully reading the provided article.
Installation diagram
To install a lighting device that can be turned on and off from three different places in the room, a connection diagram for 3 pass-through switches is required.
Connection diagram
The circuit consists of a connection box, a lamp, switches, and wires. The lighting source can be incandescent, energy-saving, or LED lighting fixtures. Installing lighting involves the use of switches. They come in several types: through and cross. The pass-through switch is also called changeover, backup, ladder. Installing such a switch is more difficult than installing a simple one.
To control lighting from 3 places, you need 2 pass-through switches and 1 cross switch.
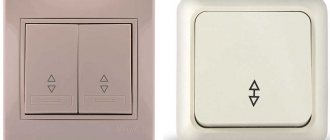
The appearance of the duplicating device resembles a single-key device. The switch in any position of the key does not stop the connection of the electrical circuit, but switches the contacts. The switching mechanism in a pass-through switch is located in the middle of the contacts.
There are one key and two key pass-through switches. A two-key switch is two one-key switches in one and has six contacts.
The main advantage of staircase switches is that the light can be adjusted from different points.
Different ways to connect wires
The diagram shows pass-through switches with one key. These devices are the same. They have three contacts. A phase is connected to them. The first one has 1 contact for phase wires, and 2 contacts for intermediate wires. For the third device, on the contrary, 1 contact is connected to the intermediate wire, and 2 for the output phase.
The structure in the middle is called a crossover switch. The rocker switches are connected by electrical wires, and between them is a cross switch, which has four contacts. Two wires for each changeover switch.
When any of the changeover switches closes the intermediate electrical wire, the light will turn on. The chain is closed and when the state of the key changes, the light goes out.
Important! Follow safety precautions. Check the absence of voltage with an indicator screwdriver! Be careful when working with power tools.
How to connect?
Terminals for connecting a three-gang switch
In fact, the indicated device looks like this from the back: Here you can see that it is drawn on the body where the phase fits and where the wires coming from the lamps need to be connected.
You need to connect a three-key switch in such a way that with different combinations you get a different effect from the lighting. For example, if you connect a chandelier with three lamps in such a way that one lamp lights up from one key, two from the second, and an additional lighting source, for example, a wall sconce, lights up from the third, then you will get 7 different lighting combinations for your room
Switch with socket in one housing
Separately, it is worth dwelling on such a point as connecting a three-key release with a socket in one housing.
In the case of such a connection, you significantly save your time on installation, because In this case, the wires are concentrated in one place.
Connecting a switch with a socket
The connection diagram itself differs slightly from the one given above.
As can be seen from Fig. 2, it is distinguished by the presence of an additional neutral wire, which comes from the junction box and goes directly to the outlet.
Such designs are often used where sockets are used infrequently, for example in the bathroom.
The use of a three-key switch combined with a socket in one housing is also justified in cases where there is open wiring.
In general, switches and sockets are usually located at different levels and their use in one place is convenient only in special cases.
The switch is usually placed on the wall at a height of 80-90 cm, while sockets are usually located directly above the baseboard.
How to choose the right one
When choosing a three-key switch, you should pay attention to the following details:
- There should be no burrs on the outside of such a three-key product, indicating that the product is defective
- The keys should operate easily and without jamming
- When turning on and off, clicks should be clearly audible, identical for all three keys
- On the back of the device there should be a diagram of its connection to the network.
- The terminals must be free of burrs and work properly
- It is advisable to choose devices with plug-in terminals - they facilitate installation and provide reliable and durable contact
Helpful advice: the use of the release in question in the same block with the socket is justified, in most cases, only when equipped with open wiring, because According to electrical safety rules, sockets and switches cannot be located below 1.5 m from the floor. Therefore, when choosing the location of such a unit, it is worth taking into account all the nuances of its use, so that it is convenient to turn on/off the light and use the socket.
Cross disconnect principle
A crossover switch is similar to a regular single-key switch, the only difference being the presence of four terminals inside. The crossover is named because the two electrical lines it switches are connected into a cross.
The cross disconnector simultaneously disconnects the first and second switches, then connects them synchronously. This movement of the contacts causes the light to turn on and off.
Advice! Pay special attention to the correct connection of the ends of the electrical cables, otherwise the entire system will not work.
The number of points may vary, but the more there are, the more difficult the switching in the distribution box. It is necessary to clearly mark the wires when conducting them so as not to confuse them.
Why do you need a 3-point pass-through switch with backlight: connection diagram and how it works
The three-position switch is popular due to the comfort it creates in the home, as well as the possible energy savings. All you need to do is choose the right model and install it.
- Switch from three places - a modern solution for light control
- When is a three-position switch used?
- Types of 3 point switch
- Passage
- Cross
- Connecting a 3-point switch
- Passage
- Cross
- Safety Tips
- Useful video
Example of lighting operation
- When you turn on key No. 1, the lamp lights up, electricity flows through the phase wire and is indicated by the letter L, and the flow of current is shown by the red line.
- Press the key back and the light goes out.
- We switch the adapter disconnector, the lamp lights up.
- Press the key again and the lamp turns off.
- When device No. 3 is turned on, the lamp lights up.
- Pressing again turns off the lamp.
Recommendation: if it is necessary to increase the number of control points for the luminaire, add the desired number of cross switches between the staircase switches.
Necessary equipment and materials
- Switches
- Mounting box
- Electrical insulating tape
- Terminals
- Phillips and regular screwdrivers
- Installation knife
- Side cutters
- Pliers
- Wrenches
- Electric cable
If the room has already been wired and you need to install redundant switches, then you need to make grooves or open installation of cables.
In order to make grooves you will need a hammer drill and a wall chaser. You also need alabaster. He will secure the corrugated pipe.
In case of open installation, a distribution box is required; it is attached to the wall using a corrugated pipe.
Step-by-step installation instructions
Disconnect power to the room.- Determine where the wires are so as not to damage them.
- Designate the future location of the junction box.
- Install the mounting box.
- Laying electrical cables. It is better to take a 3 or 4 core cable. For changeover devices, a three-wire cable is required. Using one core, a phase supply or a lamp will be connected. Two cores are connected to intermediate wires. For a crossover device, you need a four-core cable - two wires for each switch. Two will lead to the first, and the remaining two will lead to the second.
The ends of all cables are led into the installation box and connected with terminals. And the zero goes to the lamp.
To equip a pass-through switch with control from 3 places, you must have skills and an accurate connection diagram. Its presence makes it possible to install a correct and high-quality lighting system. And on its basis you can easily create more complex illumination schemes.
Comments:
Veda
Who used this scheme? Has it worked for anyone?
Vassa
From an electrical point of view, nothing can fail here. Everything is clearly and correctly described. Another thing is that I have not seen devices of this type on sale. It’s quite possible they will be made to order, but I haven’t seen them in the store.
Oleg
Are there any other uses for these switches other than in a long hallway?
Slavon
It seems to me that this scheme is of little use in the corridor. A person usually needs to walk to the end of the corridor and then turn off the light. Most likely, such a circuit for connecting a pass-through switch is best used in the bedroom, where each side of the bed has its own switch to turn on/off the main lighting and another one is located at the entrance. In this case, you can turn the light on/off from all three points
Alex
I once reworked the work of an electrician clown, who tried to fit all the connections from such a switch into an ordinary socket box. As a result, the switch mounted in it squeezed all the wires. In general, I do not advise anyone to repeat this experience. Wiring for pass-through switches should only be done in the distribution box!
Andrey
With the help of pass-through (limit switches, 3-pin) switches, you can solve the switching on and off for only two posts (places). And if you need more than two on/off points, then you need: cross or intermediate (at least 4-pin, switches) switches.
ANDREY
The electrician threw three-core wires, I don’t know that four wires will be needed... Is there really a way to connect it so that the switch works as expected or will I have to look for other models?
Leave a comment Cancel reply
Similar posts
Socket with a timer - an element of a smart home
How to assemble a convenient switchboard with your own hands
Correct and convenient installation of sockets in an apartment Do-it-yourself installation of an external socket, detailed instructions