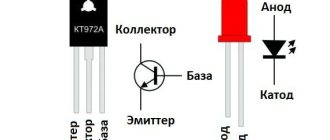
Why does the LED lamp blink and how to get rid of it
Illuminated switch. Connecting a backlit switch with your own hands
Probably, any person has more than once encountered such an everyday problem when, upon returning home in the evening, before entering an unlit room, we begin to search by touch for the switch in order to turn on the light.
Sometimes this procedure takes a lot of time, and is accompanied by falling objects along the way. In order to make it easier to find the switch, as well as to save nerves and time, an illuminated switch was invented at one time.
In its design and appearance, an illuminated switch is no different from a regular switch, only in that it is equipped with a light indication, which immediately catches the eye in a dark room and accurately indicates its location.
At the same time, the indicator light of the switch consumes little electricity and works only when the light is turned off. Therefore, you are worried that when using this device, the electricity consumption will no longer be worth it - the backlit switch practically does not consume it.
Let's take a closer look at the operating principle and illumination circuit of the key switches.
As a rule, the light source in the switch illumination system is a neon lamp or LED with a resistor, which are connected in parallel to the switch contacts. While the switch is in the off position, the luminous element is powered through the filament of the lighting lamp, which has low resistance.
Connecting an illuminated switch
Many consumers often have a question. Why don't the lighting lamps light up through the backlight? The answer is quite simple. The thing is that in order for a neon lamp to light up, a small voltage and current are enough. But for the full operation of an incandescent lamp, such voltage and current will not be enough.
To reduce the voltage, a current-limiting resistor is used in the backlight circuit.
The switch illumination circuit works according to the following principle.
When the switch contacts are in the open state, the current from the phase flows according to the following pattern. At the beginning, it goes through the resistance, then through the neon, and after it it goes to the filament of the incandescent lamp and to zero.
Since the resistance of the filament of an incandescent lighting lamp is much less compared to the resistance of the backlight of the switch, the entire 220V voltage is directed to the neon lamp and the resistance connected in series with it, which is why the neon lamp glows.
After the contacts of the switch close, the power supply circuit of the light bulb is closed and the resistance and neon are disconnected from the general circuit and go out. Electric current, as is known from the school physics curriculum, always flows through the circuit with the least resistance (Ohm's law).
In this case, this is the power circuit of the lighting lamp, the resistance of which is almost zero, and the resistance of the backlight circuit is quite high, and the current voltage that still flows through the neon light bulb is very small and is not enough for it to light up.
By the way, it should be noted that if the lamp is missing or the backlight fails, it will not work because the power circuit will be broken.
In order to better understand the principle of operation of backlit switches, it would not be superfluous to repeat the school physics course. Or rather, the part where Ohm’s law is studied and all the nuances of parallel and series connection of conductors are described in detail.
Installing an illuminated switch
Installing and connecting the illuminated switch is very simple. It can be installed in place of removed ordinary switches, while the wiring coming from the backlight bulb is connected in parallel to the switch contacts at the same time as the power wires.
If you decide to install an illuminated switch in your home, then before doing so you need to decide what types of lighting lamps you will use it with. The fact is that this device does not fit well with some of them.
For example, together with incandescent or halogen lamps, an illuminated switch works perfectly. But it is not recommended to use such switches together with fluorescent or LED lamps that are equipped with a ballast. Otherwise, they will flicker or continue to light after the switch is turned off.
Similar materials on the site:
electricvdome.ru
Illuminated switch - LED and neon light circuits
There are backlit switches on sale, but rarely does anyone get around to replacing one that is already installed without backlighting and is still in good working order.
Illuminated wall switches are structurally no different and are also connected to the electrical wiring, just like regular switches.
After spending half an hour, anyone who wants to improve the comfort of night life will be able to add lighting to the switches in their apartment on their own, even without the skills of an electrician.
You can install the backlight switch according to one of the proposed schemes. The circuits differ not only in configuration, but also in technical characteristics. For example, an LED circuit may not work if the luminaire contains LED lamps. And energy-saving lamps may flicker or glow faintly in the dark. Let us consider in detail the advantages and disadvantages of each of the schemes.
Switch illumination circuit based on LED and resistance
Currently, lighting switches are usually equipped with LEDs, which are included in the switch according to the electrical diagram below.
When the switch is in the “Off” position, the current passes through resistance R1, then through the LED VD2, which lights up. Diode VD1 protects VD2 from reverse voltage breakdown. R1 of any type with a power of more than 1 W, rated from 100 to 150 kOhm. With the R1 rating indicated on the diagram, the current flows about 3 mA, which is quite enough for a clearly visible glow in the dark. If the LED glow is insufficient, then the resistance value must be reduced. VD1 of any type, VD2 of any type and color of light. In order to understand the theory and independently calculate the size and power of the resistor, you need to read the article “The Law of Current Strength”.
An LED switch illumination circuit can be installed if the lamp uses incandescent light bulbs. If there are compact fluorescent (energy-saving) ones, then it is possible that in the dark you may notice their faint glow or blinking. If the luminaire has
szemp.ru
We study Legrand Valena products. Choosing the ideal sockets and switches
Sometimes it is difficult to find electrical installation equipment that will harmoniously fit into the interior and will not disrupt the integrity of the color palette. Products from the “Valena” series can easily cope with this task.
Unusual sockets and switches can be assembled into a single whole according to the principle of a designer and forget about template products with a catastrophically small set of “coloring” options.
Features of sockets and switches
A feature of products from French manufacturers is a collapsible type of construction, consisting of 3 elements :
Mechanism.
Front panel.
Outer frame.
The mechanism is the only permanent piece of equipment. Everything else in the sockets and switches can be easily replaced. Do you have a contrasting interior in dark and light colors? Select a white front panel and a Matte Black frame. The result is complete color harmony.
The official service from Legrand: the configurator will help you decide on the type of equipment and its color
Types of products
According to the form, the Valena product series is divided into the following types:
- Life . Strict lines and slightly rounded corners.
- Allure . Soft features and “oval” corners.
First type design . This is a choice for people who appreciate classics. The rational form will easily fit into any interior.
The second version is suitable for those who want to break out of the usual. Innovative and original equipment will decorate the room with soft lines.
Not only plastic , but also carbon, leather, and even wood are used as materials for making frames for products
Equipment advantages
The advantages of sockets and switches include:
Safety . Legrand Valena equipment complies with protection class IP44 , which means it can be installed even in bathrooms and rooms with high humidity levels.
Ease of installation . The products are equipped with metal supports with chamfers for easy centering and alignment into blocks. There is a clamping mechanism for wires.
High quality . The products are made from high-quality materials. The contacts securely fix the plug and do not become loose, and the switch keys work properly even several years after installation.
Rich choice . The manufacturer offers customers products in 2 versions . A wide color palette allows you to assemble equipment with a unique configuration.
Switches
The feature that makes consumers choose Legrand Valena switches is the reliability of the In`Matic . Built-in automatic terminals allow you to instantly fix the wires, and the support fastening at 4 points prevents the structure from loosening.
The depth of the mechanism is 21 mm , so it can be inserted into any standard socket box and there will still be room for a spare length of cable. Special slots simplify the process of aligning the position of the devices.
French manufacturers offer consumers the following categories of switches:
- Passing.
- Intermediate.
- Two-key.
- Three-key.
- Cross.
- Dimmers.
Most items have backlit .
The main advantage of Legrand Valena sockets, as in the case of switches, is the high quality of the In`Matic . In new versions of electrical installation equipment, the metal support is covered with a layer of insulation for increased safety.
Safety shutters covering the plug holes significantly reduce the risk of injury. There is no need to disassemble the entire mechanism in order to “ring” it with a tester. It is enough to remove the front panel and use two control points.
The socket catalog contains the following versions:
How to turn off the backlight on a switch with your own hands
A switch with LED or neon lighting is no longer uncommon in homes. The use of such switches is quite practical. In the dark, you don’t have to search along the wall with your hand to find the switch. With the advent of LED and CFL lamps, big problems began to arise. In particular, most modern LED lamps blink when the switch is off. Today we’ll figure out how to turn off the backlight on the switch.
This effect occurs due to a closed electrical circuit formed by a resistor with an LED (or neon lamp) and a power converter circuit for the LED and CFL lamp. In this article we will look at the simplest method on the question: how to turn off the backlight in a switch.
How to turn off the backlight on a switch: stage 1
How to turn off the backlight on a switch
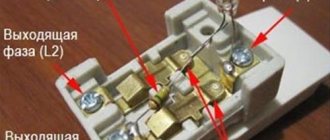
First we need to dismantle the switch. Disconnect from conductors by first disconnecting the switch from electricity. For those who have already done this more than once, it’s an easy task.
After the switch is removed, it is necessary to remove the casing where the LED (or neon) itself is located.
In our case, the backlight consists of a neon lamp and a 150 kOhm resistor. With an LED, nothing fundamentally changes, so the principle: how to turn off the backlight in a switch with an LED remains the same. The neon lamp is connected through a resistor to the switch terminals.
How to turn off the backlight in a switch
Illuminated switch connection diagram
If you quickly sketch out a diagram for connecting the backlight in the switch? then it will look like this:
How to turn off the backlight on a switch: step 2
To correct the situation with the blinking diode lamp, we need to replace the resistor. In our case, we take a 220 kOhm resistor and a 1 N 4007 diode. The diode can be removed from an energy-saving lamp, where it is used as a diode bridge. The circuit of the converted switch will look like this:
If we leave a neon lamp, then a 220 kOhm resistor will be enough. If we want to change the indicator to a 3 mm diode, then select a 680 kOhm resistor. This is guaranteed to save you from the blinking of the diode lamp in the chandelier.
How to turn off the video switch backlight
And finally, watch the video again on how to turn off the LED or neon lighting from the switch so that the lamps do not blink. This is a radical solution to the problem. We just bite off all the radio components and don’t worry anymore. However, this method of dealing with blinking does not satisfy me, so it is better to use the above example. And the switch does not need to be turned into a simple key and the functions remain.
leds-test.ru
LED switch illumination | Electrician in the house
Author: admin, March 12, 2013
LED backlight of the switch.
LED light switch
How to make your own LED backlight for a switch, how to make a neon backlight for a switch, what parts are best to use, we will look at in this article, as well as the types of electrical circuits for backlighting a switch, their advantages and disadvantages.
So, from an ordinary standard switch we make a backlit switch; for this we assemble a simple circuit and install it in your switch. In this case, it is not necessary to drill a hole for the LED; its glow will be visible through the switch key, especially in the dark.
The diagram shows:
L1 - incandescent lamp, S1 - switch, R1 - MLT-0.25 130 kOhm resistor, or any other with a dissipation power of at least 0.25 W and a similar rating, D1 - AL307BM LED, or any other small one, the brightness of the glow will depend from the nominal value of R1, D2 - diode KD522B, or any other small-sized one, with an allowable reverse voltage of at least 30V.
The principle of operation of the circuit.
When the switch contacts are open, current flows through the limiting resistor R1, LED D1 and the filament of the incandescent lamp L1, the current is very small, so the filament of the lamp does not heat up, and the resistance of the cold filament is almost zero. Only the LED is lit, diode D2 serves to protect LED D1 from breakdown by the reverse half-wave voltage, since the permissible reverse voltage of the LED is a few volts. The circuit without diode D2 will also work, but not for long.
When the light is turned on, the S1 contacts close and the entire circuit is simply short-circuited by the switch contacts and the LED does not light up.
This circuit is designed to work with any incandescent lamps; when using some (usually cheap) energy-saving lamps, periodic dim flashing of the lamps or a faint glow may be observed. Also, flashing can be observed if zero is applied to the switch, and not phase.
The circuit consumes 1-2 W/hour. In order to save a little energy, you can use a capacitor instead of a quenching resistor; in this case, the circuit will consume 0.5-1 W/hour, but there will be an inconvenience: an additional part is a capacitor, which may not fit into the switch.
Illumination circuit for a switch with a capacitor.
LED backlight with capacitor
The diagram indicates:
L1 - incandescent lamp, S1 - switch, C1 - capacitor 1 uF 400 V, R1 - resistor MLT-0.25 100 Ohm, D2 - diode KD522B.
The difference in the circuit is in the capacitor C1 and in the value of the resistor R1, which now serves to limit the charging current of the capacitor.
Neon light switch.
Neon light switch
You can also use a miniature neon bulb instead of an LED; it consumes very little electricity, but burns quite brightly.
The diagram indicates:
L1 - lamp, S1 - switch, R1 - resistor MLT-0.25 180 kOhm, L2 - neon lamp MH3.
This scheme is most preferable, since it can be used with any type of lamps, including energy-saving ones. The neon light bulb can be taken from a regular starter for 220V fluorescent lamps; there is a capacitor in the starter parallel to the light bulb, it needs to be unsoldered, we don’t need it. In this case, it is better to take resistor R1 at 500 kOhm.
It is best to not just twist the circuit parts together, but solder them with a soldering iron.
ATTENTION! When installing the circuit into a switch, it must be de-energized! Be sure to check the absence of voltage using an indicator screwdriver, as written here. Don't forget about your safety.
It will be interesting to read:
Headings: Electronic devices, Electrical circuits Tags: electricity, electronics, electrical circuit
elektricvdome.ru
Illuminated switch | Electrics in the house
How to connect an illuminated switch?
There is no difference in the appearance of a regular switch without backlight and a switch with backlight, except for the backlight window. The backlight only works when the lighting is turned off, and does not consume much electricity. The backlit switch circuit is assembled using a resistor with a neon lamp and a resistor with an LED.
When the switch is off, voltage is supplied to the indication through the filament of the lamp, which has low resistance. The indicator lights up because almost 220 V is applied to it. If the switch is turned on, the contacts of the indicator lamp are short-circuited, the current goes directly to the incandescent lamp, the backlight does not light up.
Connecting an illuminated switch
A question may arise. Why is the backlight on, but the lamp is not lit? The current through the backlight, whether neon or LED, is limited by high resistance, so it is not enough to light an incandescent lamp. An incandescent lamp requires a large current.
Connecting the backlight to the switch contacts
The backlit switch connection diagram can be assembled using a neon light bulb or LED with a resistor. Illuminated switches assembled on LEDs may not always work well with fluorescent and LED lamps; the glow of the indicator may be so small that it may not be noticed.
This is explained by the fact that the resistance of the power supply of energy-saving and LED lamps is greater than the filaments of incandescent lamps. The current is limited by this resistance, and the voltage on the indicator is not enough to illuminate the switch.
Schemes of backlit switches assembled on LEDs
Below is a simple diagram of a backlit switch, assembled on one LED and can be easily repeated.
The first diagram for connecting LED backlight to a switch
The purpose of the VD1 diode according to the circuit is protection against breakdown of the LED by reverse voltage. The reverse voltage of the LED is 20 V, and the reverse voltage in the network for it is equal to the value of the negative part of the sine wave, which is significantly higher than Urev of the LED. This LED switch circuit consumes up to 1 kW of electricity per month, which is quite a lot.
If you want to assemble this or another lighting circuit, the connections must be twisted and soldered. Exposed wires and resistors must be well insulated with electrical tape or heat shrink tubing. Another backlight circuit using a resistor and capacitor.
The second diagram for connecting the LED backlight to the switch
The capacitor here plays the role of a voltage divider. The resistor in this circuit is set to 100 - 500 ohms, it is designed to limit the charging current of the capacitor. Electricity consumption in this backlight scheme is less than 50 W per month. The disadvantages of LED circuits include their size. However, there is enough space in the switch body.
Neon light circuit using a resistor
The illumination on a neon lamp is small in size and consumes little electricity. A neon bulb requires very little current to light, making it suitable for energy-saving lamps and for illuminating LED switches.
The neon lighting circuit is suitable for energy-saving and LED lamps
The resistor is selected with a power greater than 0.25 W. A neon light bulb is not difficult to find in your home. They are used as voltage indicators in extension cords, electric kettles, irons and other household electrical appliances. Such indicators are already completely ready for installation in switches.
How to disassemble a legrand switch - All about electricity
Each of us clearly knows that there should be switches in every room of any house. They are a mandatory element of the electrical network, and must also be reliable, safe and easy to use and install. In fact, all switches produced by the French company Legrand are endowed with these features.
It is worth noting that the French manufacturer is trying to achieve perfection both in the switch mechanism itself and in its appearance. Thanks to this approach, any Legrand switch, which can be either single-key or double-key, is perceived as one of the best in its segment.
Peculiarities
Let's take a closer look at what each switch from this company can boast of. To do this, you should consider the structure of this equipment. Like all switches, the Legrand product includes such elements as:
- The base on which all the parts are located and thanks to which they are attached to the wall or mounting box.
- Contacts and keys.
- Frame.
- Frame.
- Terminal blocks.
In order for the switch to be securely attached to the wall, the manufacturer makes its base from galvanized steel. The peculiarity of this base is that it is not deformable and has four special elongated holes for fastening.
Fastening is carried out using screws. The shape of these holes makes it possible to adjust the position of the switch itself. That is, it can be tilted in different directions and centered.
This is very convenient when leveling it. Thanks to this base, the Legrand switch, which can be sold with a remote control, can be installed in any installation box. Depending on the model, the metal base may have some cutouts.
The main mechanism, the body of which is made of high-strength plastic, is attached to this plate. This plastic is polycarbonate. It is also used to create frames and keys.
A feature of most switches from this company is that the frames and key covers can be easily removed. To do this, the Legrand organization makes small grooves in them. A screwdriver is inserted into these grooves and used to remove the frame and key cover.
Helpful hint: mechanisms of the same series are the same and as a result, frames and keycaps with different colors can be used for the same mechanism.
This makes it possible not only to select the desired color at the connection stage, but also to change the color, as well as the appearance of the Legrand switch after a certain period of time.
Some series of switches provide for the use of frames that are made of porcelain, wood, and also covered with leather. As for the contacts, they are made of an element such as ArNi.
The advantage of this is that they do not contain cadmium. This element is known to cause contamination of contacts. As a result, their resistance increases and they begin to burn. Due to the absence of cadmium, Legrand switches are safer and last much longer.
We all clearly know that wires are connected to the switch. To make this connection very simple and, most importantly, reliable, the equipment is equipped with automatic terminals. All you have to do is strip the wire and insert it into these terminals.
It is noteworthy that in many models the terminals are placed at an angle of 35 degrees. And this simplifies the process of connecting wires. The terminals are quite durable and are designed for those copper and aluminum wires, the cross-section of which ranges from 1.5-4 square meters. millimeter.
Reverse side of the switch
It is worth noting that the professionalism of Legrand specialists did not stop there. On the back of the case they drew a special marker, which has a certain length and indicates how many millimeters of wire insulation need to be removed in order to make a quality connection.
In addition to the above-mentioned marker, Legrand specialists also put a connection diagram on the back of the switch, which also explains the principle of operation. Of course, this greatly simplifies the process of connecting the necessary wires.
Apparently, by applying such markings, the company takes care of those people who want to purchase, but do not know how to correctly install the Legrand switch; how to connect it is also a question to which they do not have an answer.
Another feature of many switch models from Legrand is that they can be equipped with a protection cover, backlight, dimmer, motion sensor, and also a microcircuit that can analyze remote control commands.
All the company's products are divided into series, they combine both one- and two-key switches. At the same time, many series have pass-through switches.