Today it is not difficult to buy an LED phytolamp through online stores. This could be a light bulb with an E27 socket for a standard lamp, a powerful spotlight assembled on a COB matrix, or a ready-made phytolight with several LEDs. But the cost of finished products of decent quality is too high. In addition, the size and parameters of standard lighting do not always meet the requirements of plant growers. You can overcome these obstacles by designing LED phytolamps for plants with your own hands.
Calculation of the required light
In order for a phytolight to really accelerate plant growth, it is necessary to correctly calculate its parameters. The main optical characteristic of any light source is the luminous flux, which indicates how much light power (lumens) the lamp produces. Its value is indicated on the packaging. In turn, for plants the main indicator is illumination, indicating the number of lumens in 1 m2.
The luminous flux required for effective illumination is calculated using the formula Ф = E×S/Ki, where:
F – luminous flux, lm; E – required illumination, the value of which is set individually for each type of plant, lux; S – area to be illuminated, m2; Ki is a coefficient that takes into account light loss due to scattering.
In lamp luminaires with a poor reflector, due to the lack of a strictly directional glow, the Ki value can reduce the efficiency of the lamp by more than half. The LED has a directional glow, the angle of propagation of which is determined by the lens. In this regard, in LED lamps the reflector does not have such a strong effect on the efficiency of the lighting system as a whole, and Ki reaches 0.8–0.9 units.
And yet, illuminating seedlings with LED lamps at home often requires a reflector. This is especially true for phytolights designed on the basis of LED strips, where the reflector helps concentrate the maximum amount of light on the usable area.
Do not forget about the power of the LED lamp and the half-brightness angle, often referred to as the dispersion angle. Sometimes, even a properly assembled phyto-lamp turns out to be ineffective. Excessive distance leads to loss of light power (inverse square law), and a small dispersion angle leads to underlighting at the edges.
LEDs emit heat in the opposite direction to the light output. Therefore, they can be brought as close as possible to the plants, leaving only a few centimeters in reserve.
Calculation of the required number of phytolamps
Before you start collecting phytolamps, you need to calculate what kind of lighting and color spectrum you need. A phytolamp must have a spectrum of at least two colors: red and blue. The wavelength of red should be 660 nanometers, and blue 445 nanometers. These values are indicated in the characteristics of the LEDs.
An adult plant that is ready to flower and bear fruit needs red color; a small amount of red color is also needed for seedlings that are just starting to hatch.
Blue color is responsible for cell growth. Plants that have an excess of blue light spectrum stop growing in length. You can use a combination of blue and purple.
Green and yellow colors benefit the plant, although they are not essential.
You need to vary the number of these colors in the phytolamp depending on the purpose. It is difficult to accurately count the number of LEDs due to the different energies of the quanta, but there is a rough color ratio. If you need the overall effect of light on plants, then take the ratio: 4-6 red to 1 blue. To stimulate growth, you need fewer red ones, only 4 and 1 blue, or get by with just one blue one. For fruiting, you need to take a ratio greater than 6:1, or only red LEDs.
The picture shows a graph of the dependence of plant growth activity on the wavelength of the spectrum.
To calculate the required number of phytolamps, you need to use the formula: P=L*H*B*K/S
- P – total lighting power of all lamps, V
- L – length of the area to be illuminated, m,
- H – width of the area to be illuminated, m,
- B – light requirement for the plant in lux or take the minimum value of 8000 Lux.
Thus, knowing the power of the phytolamp (the power is indicated on both LEDs and LED strips), measuring the illuminated area and knowing the light requirement for the plant in lux, you can calculate how many lamps are needed.
How to make a phytolamp and what is needed for this?
To make a phytolamp with your own hands you will need:
- LEDs with a special emission spectrum;
- power supply;
- cooling system;
- frame;
- auxiliary material and tools.
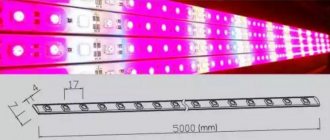
Chips of blue, red and purple phytoLEDs are found in different modifications: in the form of discrete SMD elements or COB matrices. All of them are suitable for making a lamp with your own hands. The easiest way to make lighting is from a ready-made LED strip for plants, cutting it into several pieces. More difficult ones are made from individual SMD chips or COB matrices, which will require correct calculation of the radiator.
The power source for LEDs and matrices is a driver with a stabilized direct current output, and for LED strips it is a +12V voltage source of appropriate power.
A passive cooling system is a must-have element of a plant light. It is responsible for ensuring the compliance of the optical characteristics of emitting diodes throughout their entire service life. The shape, dimensions and materials for making the radiator are described in a separate article. In most homemade lamps, the radiator is also the body.
In addition to the listed LEDs, phytodiodes made using USKI technology (universal blue-red radiation) can be used as light sources. They have a unique emission spectrum obtained due to the special composition of the phosphor. In this case, the phosphor acts as a selective filter, transmitting waves predominantly in the blue and red range, as well as a small part of yellow and green light. In this case, the blue region has a width of 380–480 nm with a slight transition to ultraviolet and a peak at a wavelength of 445 nm. The red region is much wider, covering the orange and infrared spectrum, the share of which reaches 50%. The total width of the red emission is approximately 570–770 nm with a maximum at 640–660 nm.
Thanks to their expanded spectral characteristics, USKI LEDs are ideal for creating DIY plant lamps. A lamp based on them will provide the plant with a full growth cycle: from vegetative development to fruit ripening and can be used to illuminate plants with an extremely low amount of solar exposure.
Application of phyto tape
To design a simple LED lamp for plants, you will need a phyto-tape with a power supply and inexpensive parts for the body, which can be used as improvised material. The lamp can have any shape and size, thanks to its flexibility and the ability to cut the tape into pieces that are multiples of 5 cm, and the adhesive base allows it to be mounted on any smooth surface.
The optimal material for the case will be a thin aluminum (in extreme cases, tin) plate, which will serve as an excellent heat sink for the light-emitting chips of the tape. You need to make mounting holes in the corners of the plate. The entire structure is suspended on two decorative chains that cling to self-tapping hooks screwed into the wall. You can adjust the height by rearranging the chain links.
Do-it-yourself powerful phytolamp with E27 base
You can make effective and economical lighting for seedlings with your own hands from several LED lamps, which are assembled from individual components.
To do this, you need to buy a DIY kit (for example on Aliexpress), which includes all the necessary parts for assembling the lamp, namely:
- plastic case and collapsible metal base E27;
- aluminum radiator with self-tapping screws;
- board for SMD LEDs;
- lenses with a dispersion angle of 90° and a holder for them.
Separately purchase blue and red smd leds, a driver of suitable power, low-melting solder and thermal paste. Assembly begins by mounting the LEDs on the board using a hair dryer and a soldering iron heated to a temperature of 280°C. After this, the wires from the driver are soldered to the board and the circuit is checked for functionality by briefly turning it on. After making sure that all the chips are glowing, they proceed to assembling the case.
A thin layer of thermal paste is applied to the contact points between the board and the heatsink and pressed with self-tapping screws. Lenses are installed above all LEDs, which are secured with a holder with screws. A driver is placed inside the plastic case, the output wires of which are soldered to the board, and the input wires are pressed against the central and side parts of the base.
One such phytolamp is capable of providing full additional light in the evening to several indoor flowers or seedlings planted on an area of up to 0.25 m2.
DIY lighting using LED strip
Tip: To connect two pieces of tape you need to use a special connector or simply solder them.
You will need:
- panel on which the tape will be attached. Better - aluminum;
- red and blue LED strips;
- power supply or driver that converts alternating current to direct current;
- switch, plug.
Attention! Try not to bend the LED strip, this may damage its conductive paths.
LED phyto-tape can be purchased or made by yourself by connecting strips of two different colors
Stages of work:
- Clean and degrease the base for the tapes.
- Cut two strips of the required length, and you need to cut without touching the soldering pads.
- Remove the film from the adhesive layer of the tape and press it to the aluminum base.
- Connect the driver, switch and plug.
There is only one downside to this design - two tapes will be turned on at the same time, which means it will not be possible to maintain the ratio of the red and blue spectrum.
Top 4 mistakes when assembling a phytolight yourself
Making an LED lamp for plants with your own hands is not difficult. But there are always nuances that should be kept in mind, starting from the design stage. Let us list the main mistakes that are common to novice plant growers:
Buying cheap LEDs. No matter how good a lamp is, if it has low quality LEDs, the resulting efficiency will be extremely low. A phytoLED has two main parameters: luminous flux and emission spectrum, which cannot be measured without special instruments. Chinese manufacturers actively take advantage of this, passing off ordinary blue and red LEDs as a high-quality product. It is very easy to fall for a fake, since sellers attract potential buyers with all sorts of tempting offers, discounts and promotions.
Incorrect calculation of the cooling system. This is a common mistake for many radio amateurs, including those who assemble LED lamps with their own hands. It doesn’t matter what type of cooling is chosen: passive or active, there should always be a radiator. However, in Chinese phytolamps with a power of more than 20 W you can often find a fan installed directly on the back of the board with LEDs. This solution does not dissipate heat properly. Any cooling system must consist of:
- a heatsink capable of evenly dissipating heat from the chips;
- thermal paste that improves contact between the radiator and the substrate;
- protection unit to turn off the phytolamp in the event of an emergency stop of the fan.
Low build quality and components. In order to reduce the cost of construction, many Chinese companies use low-quality parts when assembling LED phytolamps. You should not rely on their products and try to copy anything. All components must be securely fastened together and have a certain margin of safety. In addition, the lamp body should not interfere with natural air convection.
Instability of the output parameters of the power source. Supplying the LED with a rated and, most importantly, stable current means guaranteeing long-term operation of the entire lamp. Therefore, you cannot save on the driver. You can make a driver for a small LED phytolamp for plants with your own hands based on the LM317. In this case, the output power of the driver should be 1.2-1.5 times greater than the power consumption of the LED.
The effect of different color spectra on seedlings
Tip: The optimal ratio of red and blue spectra when illuminating seedlings should be 3:1 or 2:1.
Many experiments have been conducted in the field of the influence of various flowers on plant growth. Scientists have figured out exactly how different colors work:
- blue increases root growth, promotes the appearance of strong, stunted shoots;
- red stimulates seed germination, the formation of flowers and ovaries.
- yellow is reflected by the surface of the leaves. But this does not mean that plants do not need it, it’s just that this spectrum has its own task.
Only LED phytolamps allow you to experiment with light, which is actively used by plant growers. They claim that when comparing the effects of a fluorescent lamp and an LED lamp, the second one wins. Seedlings grown under red-blue color are much stronger and larger than their counterparts.
Installation of LED phytolamp
Plant growers have come up with several general recommendations for the rational placement of an LED lamp.
- A self-made phytolamp can be installed directly above the seedlings. There is no need to retreat 10 cm, since it practically does not heat the environment.
- Young seedlings love diffused light. To do this, it is better to hang a white sheet on the wall next to the seedlings or reinforce it with foil. In addition, you can buy some lamps with a socket directed slightly to the side. Then the light will fall not only from above, but also at an angle, which means it will fall on the stems and cotyledon leaves.
- The lighting fixture can be mounted on a chain or on wire loops. Place it on wooden supports made with your own hands.
The LED phytolamp can be placed directly above the plants, as it does not heat up
Using a phytolamp. How, when and how much.
Vegetable growers have noticed that seedlings do not just react to different spectral colors. At each period of development they need one or another spectrum. From the moment the seeds are sown until 2-3 leaves appear, they will benefit most from red and blue LEDs (2:1). A few days after the pick there is a lighting break. The plants should take root in their new location and will not need lighting for now. The rest of the period, right up to planting in a greenhouse or open ground, is best illuminated with red and blue in a 1:1 ratio.
LED phytolamp can be used for both seedlings and indoor plants
As for the duration of lighting, some turn on the lamps only in the morning and evening or, for example, only in cloudy weather. And some people use them all day long. It depends on whether you use only artificial lighting or mainly sunlight, with lamps only as a supplement. In general, vegetable and flower crops require 12 to 16 hours of light per day. And when exactly they are tired and you can press the switch button, the seedlings themselves will tell you. They will lift the leaves a little upward, as if closing. This will be the signal for the end of their daylight hours.
The choice of components for a lighting system must be approached slowly and wisely. The main thing is to learn to see how green pets will react to changes, and try to please them, then they will not be left in debt.
