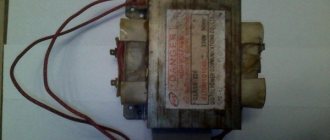
When welding stainless steel and non-ferrous metals with argon (or any other welding method), it is difficult for novice welders to maintain a stable arc. This problem occurs even among experienced craftsmen; this is due to the characteristics of the metal and the type of welding used in the work. To make the task easier, you can use a welding oscillator. This is an extremely useful device that is used by both home craftsmen and craftsmen. “660″ height=”418″[/img]You can buy this device in the store, but we suggest you make the oscillator yourself. It's not difficult, especially if you have minimal knowledge of electrical engineering. In this article we will tell you in detail how to make an oscillator for welding with your own hands.
Welding Oscillator Design
Welding oscillators are universal: they work with both alternating and direct current. The essence of the oscillator is to increase the voltage and increase the frequency of the electric current, both of these processes occur simultaneously.
Let's give a small example. Let's take a standard welding machine with a voltage of 220 V and an electrical frequency of 50 Hz. Many home welders have such machines. If such a device is used in conjunction with an oscillator, then at the output we will get approximately 2500 V and 15000 Hz, respectively. In this case, the oscillator creates pulses that last several tens of microseconds. The standard oscillator power is approximately 300 W, which is enough for the welding machine we gave as an example. It is thanks to the special design that the oscillator provides such a significant increase in voltage and current frequency. Let's take a closer look at the main components of a standard oscillator. So, the electrical circuit of the oscillator consists of an oscillatory circuit, which plays the role of a spark generator in damped oscillations. The circuit consists of a capacitor and an inductor (the coil has a moving winding), a spark gap, a step-up transformer and a high-frequency transformer. There are also throttle ignition coils, usually two of them. Additionally, manufacturers can integrate components that provide increased safety. So, in modern devices a special capacitor can be used, which will additionally protect you from electric shocks, as well as fuses that break the electrical circuit if the device is not working properly. For comparison, fuses in a household electrical panel operate on the same principle.
As you can see, there are not many components in the oscillator that are responsible for its operation. This means that you can easily find them in the store and assemble the device yourself. Next we will describe in detail how the oscillator works. You will need this information to fully understand the essence of the oscillator.
The principle of the design and operation of the oscillator
There are many schemes of such devices. But the set of fundamental blocks is the same.
How does argon welding with an oscillator work?
Here's what it includes:
- Transformer that increases the voltage: to convert the input mains voltage of 220 V and 60 Hz into higher frequency oscillations with a value of up to 250 kHz voltage of 5...6 kV.
- Output transformer for transmitting current of increased voltage and frequency to the output contacts of the welding machine.
- A spark-type generator with contacts in the form of tungsten electrodes, which is essentially a single-circuit spark gap.
- Control unit consisting of a gas valve, stabilizer, start button and current sensor.
- A special protective unit for monitoring excess current or voltage.
The device and circuit diagram of the device must be selected depending on the intensity of your work with its help. If your plans for welding work are dominated by aluminum, which needs to be welded at a constant current of reverse polarity, then we choose a series connection scheme - this will be an oscillator for welding aluminum.
If you are working with stainless steel, your circuit should be parallel connected.
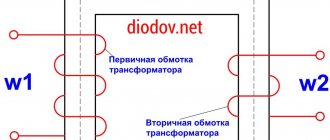
Oscillators for welding with serial and parallel connections are fundamentally different. The device with a serial connection includes only one transformer with two windings: a primary winding with a fuse and two capacitors, and a secondary winding with a spark gap and an oscillating circuit of an inductor and a capacitor.
The oscillator system for parallel welding is much more complex and requires two transformers. In the first of them, the primary winding consists of a double oscillating circuit, and the secondary winding includes a spark gap and is the primary winding of the second high-frequency type transformer.
It is from this that the electrical power of the arc is supplied. Such a circuit is not only difficult to assemble and regulate, it must be protected from voltages exceeding the maximum limits.
Operating principle
For a better understanding, we have divided the stages of operation of the oscillator into two stages:
- Stage 1. Voltage passes through the winding of the step-up transformer and then goes to the capacitor, thereby charging it. Each capacitor has its own current capacitance value, so it instantly supplies current to the spark gap when charged to the required value.
- Stage 2. The so-called breakdown occurs - a sharp increase in current strength. The oscillatory circuit becomes short-circuited, which leads to the appearance of those very damped oscillations or pulses. These oscillations form a high frequency current, which then passes from the coil and blocking capacitor to the welding arc.
This is interesting! Thanks to its design, the blocking capacitor freely passes through itself a high-frequency current with a high voltage. However, it does not pass low current due to high resistance. This is a very useful feature, it protects the oscillator from short circuits that may occur due to the welding machine.
That's all. There are no complex processes going on in the oscillator and there are no special components. All his work is based on the principles of elementary electrical engineering. Even if you are far from working with electricians, we recommend studying this area. This will expand your professional skills and better understand the principles of electric welding.
Principle of operation
The oscillator is designed for non-contact ignition of the welding electric arc and maintaining its stability during further work. The device is an addition to the electric arc welding machine used, and can be located in the same housing with it. You can make an oscillator for welding with your own hands and connect it separately, improving working conditions.
The main idea of using an oscillator is as follows. Pulses of increased voltage and frequency are applied to the electrode of a conventional welding machine over the rated welding voltage.
The pulse amplitude reaches 3000 - 6000 Volts, frequency - from 150 to 500 kHz. These high-frequency pulses have a very short duration, the signal power is 200 - 300 Watts.
This pulse power is too low for them to serve as a welding current generator; their role is to cause a short-term electrical breakdown of the air gap.
The oscillator works as follows. The welder brings the tip of the electrode closer to the workpiece to be welded at a distance of about 5 mm.
Presses a button, which is usually located in a convenient location on the electrode holder (or torch, as the electrode holder is called in argon arc machines), starting the oscillator.
High-frequency electrical pulses with a voltage of several kilovolts instantly ionize the air gap, which is then penetrated by a thin discharge. Since the ionized air becomes electrically conductive, the welding current of the main apparatus begins to flow through it, that is, a full-fledged welding arc lights up.
Further in the process of operation, the pulses generated by the oscillator support the burning of the main welding arc at moments when the prerequisites for its extinguishing arise.
For example, an erroneous movement of the welder's hand that accidentally increases the air gap does not immediately extinguish the arc, and the process can continue.
How to make your own oscillator
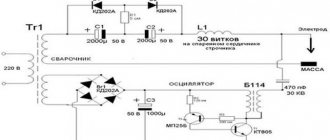
Below is a detailed diagram of an oscillator for welding aluminum or other metals. The main element of the circuit is the transformer, it is this that helps increase the voltage from 220 V to the required value.
There is also an oscillatory circuit; it is one of the most important components. There must be a blocking capacitor in the circuit. The oscillatory circuit also includes a spark gap and ignition coils. The circuit itself generates damped high-frequency pulses, which subsequently simplifies the ignition of the welding arc and maintains its stable combustion.
In our oscillator, the main control element will be a special button. It is responsible for turning on the spark gap and simultaneously supplying gas to the welding zone. The positive and negative contacts are output. The positive one is supplied to the torch of the welding machine, and the negative one is supplied to the part being welded.
Oscillators, made at a factory or at home with your own hands, can operate according to one of two principles: the continuous principle or the pulsed principle. The first principle is less effective, since such oscillators must be used with additional devices that protect against overvoltage. Impulse action is preferable. Such oscillators ensure good arc burning throughout the entire operation. If you often use a homemade oscillator in your work to weld aluminum with your own hands, then take safety precautions seriously. Sometimes the “homemade” products of novice welders may not work correctly, which leads to dire consequences. It doesn’t matter for what purpose you use the oscillator: for argon welding in production or minor home repairs. In any case, safety precautions must be observed. When assembling the oscillator, use only high-quality components and conduct a short test before starting serious welding work.
Rules for using a homemade oscillator
It is clear that the main requirements are the safety and reliability of the device.
Schematic diagram of the oscillator.
To comply with them you need:
- Check the operation of the blocking capacitor on a regular basis. If it is not in order, you may be injured by low frequency welding current.
- Make it a rule to adjust and configure the device only when it is disconnected from the network.
- Clean carbon deposits from the electrodes, do this constantly.
- The pulse frequency from the oscillator should not exceed 40 µs: keep an eye on this.
An oscillator for DIY welding is a very smart technological addition to your welding equipment if you are welding specific metals: stainless steel and aluminum. You can buy an oscillator, or you can make it yourself. This requires a clear head, good hands and our advice.
We wish you reliable capacitors, parallel electrodes and high-quality windings in your transformers. And good orders!
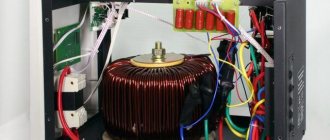
Assembly at home
To assemble a do-it-yourself argon welding device from an inverter, a common and simple circuit is most often used.
In this circuit, the main element is a step-up transformer. It is he who increases the standard voltage to three thousand volts. The most problematic component when assembling this device is the spark gap, which produces a strong spark. The spark gap and inductor provide the main thing - they generate damped high-frequency pulses that ignite the arc and maintain uniform combustion. The coil and spark gap together with the blocking capacitor form an oscillatory circuit unit.
Homemade devices can also be made according to two different schemes. They can be pulsed or continuous. Devices using the principle of continuous operation are less efficient and a voltage protection unit must be included in their design. Pulse devices are considered better, more convenient and more productive.
The main part of the control unit is the button. It performs two functions: turning on the spark gap and controlling the supply of shielding gas to the welding area. The primary data for self-assembly are detailed answers to the following questions:
- Application for aluminum or stainless steel.
- Type of electric current - alternating or direct.
- What voltage is provided?
- What power will the device be designed for?
- What is the value of the secondary voltage.
The parts are assembled on a rectangular board. On the left there is usually a high-frequency transformer, a control unit and a safety unit. In the central part it is logical to place a spark gap with an oscillating circuit capacitor and a blocking capacitor. The latter becomes an obstacle to low-frequency current on the way to welding. There is space on the right for the throttle.
The transformer is selected based on the current requirements in the secondary winding. In this case, it is better to make the inductor double. Then the voltage and current are more stable, and the protection of the device is more reliable. The contours are similar to each other and consist of:
- A capacitor, the voltage reserve of which in the first part should be at least 500V and 5–6 kV for the second. The capacitance of the first capacitor must be at least 0.3 mF, and the second up to 1 mF.
- Varistor with a voltage in the secondary winding of about 90–100 V (for the first stage) and up to 140–150 V in the second line.
- Inductors. Both coils have a ferrite rod with a copper wire wound on it with a cross-section of about 20 millimeters square with a gap of at least 0.8 millimeters. In the first cascade the number of turns is from seven, and in the second - less. The coil of the second stage is a filter and protection against current fluctuations. Current of different amplitudes can lead to unstable combustion.
For the spark gap, a board with heat sink fins is found. This board cools when the discharge is triggered. Tungsten electrodes are sometimes replaced with conventional ones. The main thing is that their diameter is at least two millimeters. The tips of the electrodes must be strictly parallel. Using a special screw, it is possible to adjust the distance between the electrodes.
To obtain maximum stability, a coil from any stun gun is connected to the second winding of the second stage. To do this, you have to connect a six-volt battery to the device circuit. It provides power to this coil.
The presence of a battery does not allow you to forget that from time to time the entire device needs to be inspected and routine maintenance carried out. The first stage is connected to the inverter, and the second is intended for the welding torch and the workpiece that needs to be welded. The device body must have ventilation holes and be waterproof.
Avoiding common mistakes
Compliance with the following recommendations helps to eliminate the occurrence of problems in the operation of a homemade device:
- When assembling simple circuits, it is not always possible to maintain a stable arc. The cause of the malfunction is low voltage in the electrical network. Installing an autotransformer helps eliminate the occurrence of malfunctions in the operation of the welding unit.
- Don't skimp on the throttle. The spark gap supplies a series of damped high-frequency oscillations with a voltage of 1000 V. The secondary winding, which does not have a choke, receives up to 50 V. Because of this, a short circuit occurs. The current coming from the network begins to heat the transformer. To prevent the welding machine from malfunctioning, install a choke.
- When forming the winding, insulating gaskets are used and the cores are impregnated with bakelite varnish.
- A current frequency of 150-300 kHz is considered safe. If a person becomes a conductor, the current does not affect the functioning of internal organs, but causes superficial burns. Proper grounding helps to avoid a traumatic situation.
- The oscillating circuit must be equipped with a blocking capacitor.
Before assembly, it is recommended to consult with a specialist who will find out whether the chosen scheme is safe.
We recommend reading Current regulator for a welding machine