We will tell you how to make a wireless charger for your phone with your own hands or buy a ready-made one.
Wireless phone chargers have recently appeared on the market. Nowadays many companies produce them, there is no shortage of them. This innovation has also become a new source of inspiration for those who like to design equipment with their own hands. Both schoolchildren and men over 40 are trying to make wireless phone charging with their own hands.
Why you might need wireless charging
We are all tired of a bunch of wires, which require several extension cords, which get tangled under our feet and gather dust, get tangled with each other, and get lost. Their wires fray and they stop charging. Or the problem may be in the smartphone socket. Either way, wireless charging can make life easier. True, it still cannot be called completely wireless. The device itself will still have to be connected to electricity. But you can simply put the phone itself on the charger and go about your business with a clear conscience.
The cost of such devices may vary. There are more expensive and cheaper charging cables for phones that we are used to. However, as we said, some people try to do their own exercises with their own hands. There may be several reasons for this. Perhaps someone prefers to make do with minimal funds. Or maybe the passion for creating something with your own hands plays a role here. We will describe here how to make wireless charging for your phone with your own hands, especially for such fans.
We talked about which phones support wireless charging in another article.
Charger for portable batteries
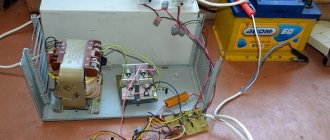
On one of the amateur radio sites I saw a circuit for charging portable Ni-Mn and Ni-Cd batteries with an operating voltage of 1.2-1.4 V from a USB port. Using this device, you can charge portable rechargeable batteries with a current of approximately 100 mA. The scheme is simple. It will not be difficult for even a novice radio amateur to assemble it.
Of course, you can buy a ready-made memory. There are a great variety of them on sale now and for every taste. But their price is unlikely to satisfy a novice radio amateur or someone who is able to make a charger with their own hands. I decided to repeat this scheme, but make a charger to charge two batteries at once. The output current of USB 2.0 is 500 mA. So you can safely connect two batteries. The modified diagram looked like this.
I also wanted it to be possible to connect an external 5 V power supply. The circuit contains only eight radio components.
The tools you will need are a minimum radio amateur set: soldering iron, solder, flux, tester, tweezers, screwdrivers, knife. Before soldering radio components, they must be checked for serviceability. For this we need a tester. Resistors are very easy to check. We measure their resistance and compare it with the nominal value. There are many articles on the Internet about how to check the diode and LED. For the case I used a plastic case measuring 65*45*20 mm. The battery compartment was cut out from a children's Tetris toy.
How to make a wireless phone charger with your own hands
DIY induction charger Materials and tools
First, let's see what materials we need to build a homemade wireless charger for a smartphone with our own hands:
- A piece of board. Not very large, but sufficient to place the rest of the elements on it;
- Film capacitor. Its minimum capacity should be 0.33 μF, maximum - 1 μF;
- Throttle. It should have from 5 to 10 turns. Wire diameter - approximately 1 mm;
- Two UF type diodes;
- 2 resistors with a rating of up to 1 Watt;
- Two field-effect high-voltage transistors. The voltage must be at least 10 Volts;
- Solder;
- Soldering iron.
What does a traditional charger consist of?
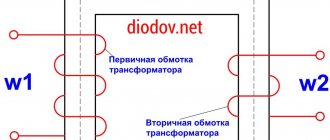
Before making a charger with your own hands, let's look at what it consists of and how it works. There is a box (board) on which we will make a generator. A transmission circuit is connected to it. It affects the receiving circuit. A high-frequency field appears on the primary circuit. This voltage is transmitted by induction to the secondary circuit. There it is straightened and smoothed by a capacitor, then stabilized to 5 Volts in the stabilization unit.
Making a transmitter (generator) with your own hands: description of the circuit
To begin with, here is a diagram of a wireless phone charger that we will make with our own hands.
The transmitting circuit has two half-windings, which are connected to the middle point. The middle point goes through the inductor to the power supply plus. Limiting resistors that go to the bases of the transistors are also connected to the power supply plus. The diode goes from the base of one transistor to the collector of the opposite transistor. The same with the second diode.
The collector goes to the ends of the winding. For DIY construction there is an option without a midpoint. To do this, you need to take two chokes, parallel one of the terminals of each inductor and connect it to the power supply positive. Disconnect the free leads to the collectors of each transistor. You can assemble this option with your own hands, but the elements will get very hot.
Power depends on the elements used. A device made according to this scheme can be made both weaker and stronger. Using this scheme, you can construct a 2-amp wireless charger with your own hands.
Making your own reel
First, let's wind the outline with our own hands. It doesn't have to be very neat. You can use a piece of plastic with a diameter of 5-10 cm or your fingers.
We take one long wire. Fold it in half. Straighten it.
We wrap 5 turns on fingers or plastic.
Now we secure the coils themselves around the entire circumference with glue or tape.
We are left with three tips. One with a fold. Cut off this fold. Now we have 4 tips. We clean them.
We will need to connect either the end of the first winding to the beginning of the second, or the beginning of the first winding to the end of the second. To check what is connected to what, we use a multimeter.
Set the multimeter to diode test mode. We connect the multimeter to each tip at both ends simultaneously. We see that when connected to some ends the multimeter reacts, but when connected to others it does not. These tips should be on different sides. We must twist them together and solder them. This is the middle point. The remaining tips are two collector windings that go to the transistors. Now we are ready to assemble the charger ourselves.
Putting it all together with our own hands
To assemble the device with your own hands, we take solder, a soldering iron and a circuit board. First we solder two transistors.
After this we solder the diodes.
These include resistors. One tip goes to the diodes, the other to the board.
Now we solder the circuit with our own hands. We wound it up earlier. Now you need to tin its two windings and connect them to the circuit.
Receiver
As a rule, people don’t dare to make a wireless charging receiver with their own hands, since here you already need to get into the phone. A rather crude separate receiver can be made with your own hands just to check if the transmitter works. In a DIY receiver, it is advisable to use a UF diode as well.
Capacitor with a capacity of 47-100 µF. Operating voltage: 25 volts. The second capacitor can be used for 10-16 Volts. Capacity - 47 µF. The circuit of the receiver, made by hand, is also 10 turns. Wire diameter - 0.75 mm.
It is more difficult to understand the written instructions than to follow the actions shown. We have attached a video on how to make a wireless phone charger with your own hands.
Manufacturing instructions
If this is your first time trying to make such a technically complex device, you shouldn’t try to modify an expensive phone. It's better to practice on a cheaper model first. Then, in case of an error, your losses will not be so great.
Making a charging base
First you need to assemble the base of the device, which will transfer the charge. This is done as follows:
- Fold the wire in half and wrap it around a piece of plastic in five turns. Secure each of them in a way convenient for you. You can use glue or tape.
Make a coil of copper wire with a diameter of about one millimeter
Trim the edges of the wire at the bend to create two ends on each. Clean up these ends. Connect the end of the first winding to the beginning of the second, and, conversely, the beginning of the first to the end of the second. Check the connection with a multimeter. You have assembled the induction coil. And then using a soldering iron you will need to solder two transistors and diodes. Also use a soldering iron to secure the resistors on one side of the board. Attach diodes to the other side. Both parts of the circuit must be secured to the device using a soldering iron. The base is ready.
The base consists of a coil that is connected to the board
Of course, for convenience, it is worth making some kind of housing for the base. It can be made using ordinary plastic.
Making acceptances
Assembling the receiver will be much more difficult, and besides, you will have to work directly with your phone. Let us remind you that if your phone supports wireless charging, you do not need to make a receiver. Follow these steps:
- First you need to make a flat coil. However, its parameters are different - twenty-five turns are required, and the thickness of the wire should be no more than 0.4 millimeters. To begin, just like last time, wrap it around plastic. Use glue to secure the coil shape.
The receiver needs a large coil that has at least twenty-five turns
Separate the coil from the base using a knife. This should be done extremely carefully so as not to damage the wire itself. Secure the diode. The coil is attached to the top of the battery. It is worth using a capacitor to neutralize voltage surges.
The receiver is attached to the top of the battery and connected to the charger connector
The assembled receiver should be connected to the charger connector on your phone. After this, you can close the lid and check the device's operation.
The receiver and transmitter circuit is very simple
Review of ready-made devices for those who do not want to assemble them with their own hands
Making your own phone charger is not that difficult, but few people will want to mess with it. It’s much easier to buy it than to design it yourself if you have the opportunity and don’t have a particular desire to make something. For that category of users who did not want to build everything with their own hands, we offer an overview of popular wireless chargers.
Before choosing a gadget, check whether there is a connection between it and your phone! Here you can find out which Samsungs support wireless charging.
RAVPower Wireless Charging Pad The battery of this device has a capacity of 5000 mAh, thanks to which it can charge two smartphones simultaneously. But they must support the Qi standard.
Anker Wireless Charger PowerPort Qi Wireless Charging Pad It has a temperature sensor to monitor overheating, overcharging protection. When this charger is not in use, it enters sleep mode. Costs about $17.
Woodpuck FAST Edition Bamboo Qi Wireless Charging Pad This charging pad is more powerful and more stylish. It is made of bamboo, which in itself is a big advantage. At the same time, it charges the phone 40% faster. Price about $40.
Samsung Fast Charge Qi Wireless Charging Pad This option has support for fast charging, but it costs about $50. Naturally, this is the best option for the same smartphones and tablets from Samsung, if you want to spend no more than an hour on charging.
Tylt Vü This wireless phone charger differs from others due to its unusual shape, which causes the phone to charge in an unusual position. It looks like a regular stand. The phone or tablet is placed on it in a semi-tilt, so it becomes much more convenient to use them while charging.
Nokia DT-903 Nokia phone charger has a backlight that changes color to match the body. Especially for the native Nokia Lumia, a missed call and SMS indicator is built-in.
Options for charging your phone battery without a charger
Charging the battery from a computer or laptop
The first thing that comes to mind when you don't have a charger is to charge your phone battery from the USB port of your desktop or laptop. Yes, indeed, this is the simplest and most affordable option. After all, you will probably have a USB ─ mini or micro USB adapter. Most often, such adapters are included with the phone.
What should be noted about this charging mode? The USB ports located on the front of your desktop computer should not be used to charge your phone's battery. The required charging current is not supplied through them. It is better to charge the battery from the rear USB ports. But even in this case, the charging current is limited to 500 mA. So, charging will take quite a long time. This should be attributed to the disadvantages of this method.
The advantage here is the safety of the process. When charging your phone battery from a computer or laptop, you will not damage it. A standard mains charger supplies a current of up to 2 amperes and, of course, in this case the process goes much faster.
We advise you to additionally read the material on how to charge a smartphone battery for the first time.
Charging the phone battery in the car
This option is quite common since many people today have cars. Modern people spend a lot of time traveling to work and back home. It would be a sin not to use this time to charge your phone. In a car, a phone charger will replace your cigarette lighter to USB adapter, which will allow you to charge the battery.
Charging a phone battery in a car
There are now a huge number of such devices in stores. There are adapters with USB output. Then you will need to connect a USB ─ mini USB cable to it, and then your phone. There are models that immediately come with mini and micro USB output.
Adapter for charging your phone in a car
If you don’t already have such an adapter, be sure to buy it. When choosing, pay attention to the length of the plug. Take the maximum length. Then it will fit all cigarette lighters. I had a situation where such an adapter in the cigarette lighter of a domestic car was not long enough. I had to redo it. What if you only have a battery without a phone? Then read how to charge your phone battery without a phone.
Charging your phone battery from an external power bank
If you are often on business trips or tourist trains, then a power bank is a must. It will help charge the battery, including when you don’t have a phone charger at hand.
Charging your phone battery from an external power bank
If you also have a tablet, then such an external battery is simply irreplaceable. Modern devices are very power hungry and may not last until the end of the working day if used actively. Therefore, even when you buy a standard network charger, the external power bank will not lie idle.
We also recommend reading about how to charge a smartphone battery for the first time.
Charging your phone battery directly with a frog
Frog – this is the popular name given to universal chargers that allow you to charge the battery directly without a phone.
Charging a phone battery directly with a “frog”
The charger got its name for its characteristic appearance.
This charger has a clamp, two width-adjustable contacts and several indicators. “Frog” allows you to charge many different batteries, regardless of their belonging to a particular gadget. In general, conveniently fast and versatile.
Additionally, you can also read about how to charge a laptop without charging.
DIY phone battery charger
If suddenly you cannot implement all other options, you can make a charger for your phone battery with your own hands from improvised materials. This way you can charge the battery if there are no other options.
What will you need?
- Power adapter 6─12 volts (router, microdrill, etc.);
- Two copper wires;
- Resistor;
- Electrical tape, plastic ties.
DIY phone battery charger
There are a number of recommendations on the Internet for making such homemade devices. To do this, the authors take an adapter, cut off its plug and strip the wires, which are then connected to the battery contacts. I see no reason for such vandalism. After all, the adapter is needed for use with your native device. Moreover, “+” and “-” can be taken using two wires.
DIY phone battery charger
- Strip two pieces of copper wire from both ends;
- Insert one into the plug and secure it with electrical tape. This is a plus;
- Tape the second one with electrical tape to the outer surface. This is a minus;
- Connect the remaining ends to the contact pads of the battery, observing polarity. To do this, you can use plastic ties or electrical tape.
DIY phone battery charger
The third contact is a temperature sensor.
You don't need him. To limit the charging current supplied to the battery, a resistor can be placed in the positive wire gap. Its resistance is calculated according to Ohm's law:
R = U/I,
U – rated voltage of the power adapter in volts,
I – required current. It's better to limit it to 1 amp. To speed up the process, you can raise it to two.
Trimmer resistor
The power of the resistor should be 0.5 watts or more. During charging, check the battery temperature by touch. If it gets too hot, stop charging and let it cool down. The voltage at the phone battery terminals can be monitored with a multimeter.
We recommend reading the article about what to do if your phone battery is swollen.
Advantages
- Always in one place.
- Don't get lost.
- The wires do not fray.
- They don't get tangled.
- Can be used for different devices. Some can charge multiple devices at once.
The previous advantage is used to equip public places with phone chargers. That is, soon you won’t have to carry a charger with you everywhere and look for a cafe with sockets (the tables next to which, as a rule, are always occupied; and for a long time). But now you have to look for a cafe with wireless chargers. Which will probably be busy too. That is life…
If your smartphone is not very new, some elements in the socket may be worn out. Because of this, problems can also arise: the contacts simply will not touch each other tightly.
Flaws
The minimum cost of such a charge is about 700 rubles. Quite inexpensive, you say. But keep in mind that the speed is much lower than that of the standard model. You have to pay extra for high speed. As a result, one wireless phone charger will cost at least 2.5 thousand.
In addition to the fact that energy efficiency is less, part of it will simply go away in the form of heat.
However, this method is not suitable for all phones. The same iPhones, for example, need additional devices.
FAQ
Above we told you how to do the exercises yourself and which one is better to buy. Now it remains to clarify some points. This technology is quite new, so not everyone knows what it is and how to use wireless charging. Here we answer the most popular questions.
What is the name of wireless phone charging?
Wireless charging is, of course, a name “for the masses.” Few people know what wireless phone charging is called. And its name is this: Qi standard induction coil. The name reflects the principle of its operation. Phone chargers of this type contain an inductive current transmitter, which charges the phone. And the little word Qi also has its own history, a very ancient one - it is the energy of Qi, so it is written in Latin. The concept is taken from traditional Chinese medicine.
How does wireless charging work?
The basic operating principle of wireless phone charging is magnetic induction. Electric current creates a magnetic field in the charger, which transfers voltage to the battery in the phone or tablet. The Wireless Electronic Energy Consortium has developed its own Qi standard specifically for such devices, which can be used to evaluate devices regardless of the manufacturer. The standard determines the current power supplied to the coil - 5 Watts.
How does wireless charging work? The magnetic field operates at a distance of 4 cm. It begins to form when a signal is sent - a compatible device has appeared in the coverage area. Most often, this signal is given by the smartphone itself. The NFC function helps them with this. It stands for Near Field Communication. Under the influence of the voltage of this field, a current also appears in the coil built into the phone, which is supplied to the battery.
Which phones support wireless charging?
In the previous paragraph, we described the principle of wireless phone charging. After reading it, we understand that according to the Qi standard, wireless charging will work if a receiver-receiver is built into the smartphone. This receiver will be able to receive energy from the magnetic field that is created in the charger coil. Which phones support wireless charging? Almost all modern smartphones and tablets are created taking into account this technology. These are companies such as Yota, Sony, Nokia, Samsung, Kyosera, Motorola, LG, Asus, Google, HTC and Blackerry.
How do you know if your phone supports wireless charging or not?
How do you know if your phone supports wireless charging? This depends on the specific model. For example, Samsung Galaxy Note Edge supports it, but Sasung Galaxy Note 3 does not. You can ask your sales consultant or look on the Consortium website. There is a form on this page. By entering the brand name in the Brand name line and the phone name in the Product name line, you will find out whether your device is on the list or not. If not, don't worry. For those models that are not equipped with the necessary technology, special adapters are produced. And it would be a good idea to buy them, because wireless chargers are gradually appearing in public places like coffee shops or airports. They are even going to build them into IKEA furniture.
How to charge wirelessly
How to charge wireless charger? Paradoxically, this must be done using a wire. If voltage is supplied to the phone through the air, then current flows into the charger itself in the standard way. First, assemble the power adapter and connect it to the device. Then we connect the adapter to the outlet. Some models have micro-USB cables, which allows you to charge them from laptops, for example.