The 220 volt touch light switch provides light on or off. The supply or shutdown occurs due to a sensory signal.
- Where else are touch switches and switches used?
- Operating principle
- How the device works
- Advantages of light switch sensors
- Video: making a touch switch
- Types of touch switches
- Capacitive
- Advantages of capacitive switches
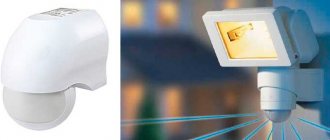
- Optical-acoustic switches
- With control panel
- With timer
- Device selection criteria
- How to connect a touch light switch
- Connection rules
- Connection diagrams
- Network connection diagram
- Activation project for pass-through touch switches
- Connection diagram for pulse touch switches
- Project for connecting touch switches with 12V current stabilizer
- Installation errors
- Homemade devices
- An elementary version using relays and transistors
- Application of infrared sensor
- Reliable manufacturers of touch switches
- Results
You can influence the sensor like this:
- pressing a button on the remote control;
- sound playback;
- weightless touch;
- slight movement.
The touch sensor has a key difference from a mechanical one: you do not need to press the switch button.
Where else are touch switches and switches used?
Sensors are used in a private house or apartment. They do a lot:
- create a lighting scheme;
- raise and lower curtains/blinds;
- open and close gates;
- turn off and turn on household appliances;
- control the heating system.
To perform an action, a person needs to make a minimum of effort.
Operating principle
The touch sensor sends an alert to the electronic board. Vibrations in it increase and change, creating an electrical surge. A short burst of electrical voltage causes a circuit to close or open. This reaction allows the device to connect and disconnect. The load can be applied in stages, this regulates the light intensity. This is possible with prolonged touching. Devices with similar functions have dimmers.
Good to know! Touch switches equipped with a dimmer imply the use of halogen, LED and standard lamps.
Varieties
The touch switch can be equipped with additional functions; its design is based on different operating principles. It is worth identifying 4 popular modifications:
- With remote control. Convenient to use for controlling sconces, LED strip, etc.
- Capacitive. Responsive to light touch. You can make such a device yourself; more on that below.
- With timer. Helps save on electricity by turning off the lights when there is no one in the apartment.
- Contactless. Reacts to certain features of the environment: sound, changes in light levels, temperature changes, movement.
Each of the varieties can be equipped with a dimmer. With its help, the brightness of the lighting in the room is adjusted.
How the device works
The switch has 4 main components:
- Frame.
- Electronic board.
- Protective panel.
- Touch sensor.
Ingredients may vary slightly. It all depends on the chosen model, functionality, manufacturer and cost.
Advantages of light switch sensors
Advantages of the devices:
- Safety. Not exposed to moisture or damage. They function when a command is given with wet hands. Children don't touch.
- Versatility. Adapted for many electronic devices.
- Simple installation, it can be done in place of the previous circuit breaker.
- Reliability and durability. Longer service life than standard switch.
- They do not create noise during operation.
- Energy is saved.
- Fills up little space.
- Can be controlled remotely.
- They look new.
The downside of the switch is its high cost. The price of one device starts from 900 rubles. You can make the sensor yourself and save, not only financially but also aesthetically.
Video: making a touch switch
How the device works
After a light touch to the panel, a signal is produced that is converted and causes the relay to turn on.
Using built-in universal touch-type devices, a smart home system is equipped. They are used to control the operation of heating devices, opening and closing window shutters and for other purposes.
The operating principle of the device is based on current regulation using a microcircuit, whereas conventional switches use standard sliding contacts. This board avoids short circuits. This increases the service life of the lamps and the service life of the switch.
Switch chip
Household models of electronic devices are used in a network with a voltage of 220 V. Sconces are connected to them, they control and regulate the backlight or main illumination.
The main advantage of such switches is ease of control. They differ from ordinary ones by a special sensor that records the heat of the hands. It responds to touch or to a sound signal.
Since the touch sensor cannot independently reproduce signals sufficient to adjust the lighting equipment directly, amplifying devices, for example, transistors or other elements, are installed in the devices.
Types of touch switches
Products come in 4 types:
- capacitive type;
- optical-acoustic view;
- view on the control panel;
- view with timer.
The types are different in operating principle, external design, and suit different needs.
Capacitive
A popular device. It is highly sensitive, activated when people approach. For it to work, you need to move your hand next to the touch surface. It is logical to place it in the kitchen, since there is no need for direct contact to trigger the sensor.
Advantages of capacitive switches
Advantages of capacitive products:
- Easy to care for.
- They look stylish and modern.
- Convenient for practical use.
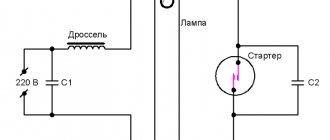
Optical-acoustic switches
As the name suggests, the devices respond to sound and movement in the sensor’s operating area. If there is no one in the room, the light turns off.
With control panel
Models with a remote control (sending a signal) are easy to use in apartments and private houses with children and people with disabilities. Then children won't be able to fool around by flipping the switch. If you don’t want to get up to turn off the equipment or lower the curtains, you can press the remote control button. She should always be there.
With timer
The specific mode of turning on and off the light is real with a timer. Devices are universal if they have a timer. Use gives comfort; you can use all types of lamps: standard, halogen, LED.
The products are safe. When closed, shutdown occurs automatically. There are indicators that notify you of the current state of the device (off/on). You can independently build an operating mode, program activation and deactivation. Electrical energy consumption is reduced.
Users note the modern design of the devices, efficiency and reliability.
Touch switches (with remote control) TLINK
Laziness is the engine of progress, no matter how strange it may sound. Just think, many inventions were invented to make our lives easier. This time, the Chinese decided to make life easier for our family for the New Year by introducing touch switches that can also be controlled remotely, but seriously, I just wanted to remotely turn off the lights in the kitchen and adjust the lighting in the living room. The stars aligned as usual - the switch in the house broke, some Chinese store sent me a coupon, my memory helpfully slipped in memories of touch switches, a day off. Everything, everything pushed me to conduct marketing research. Having rummaged through the music, I found the words LIVOLO, VHOME, BROADLINK, FUNRY, SESOO and, of course, and where would we be without it, the famous brand NONAME. In addition to these words, from the reviews I realized that all these switches are made, if not in the same basement, then at least in neighboring ones, all that remains is to find a place where they are sold cheaper. Aliexpress and the unknown brand NONAME TLINK won. I’m surprised by the search on Aliexpress; the switch in question was found not by searching for the words “touch switch,” but by clicking on links to similar products. The TLINK & Store store not only gave the best prices with free delivery at the time of order (December 17), but moreover, it included each switch with a remote control, while other sellers had lots with remote controls that were much more expensive or the remote controls were sold out separately. Even without the discount that was in effect at the time of purchase, the seller’s price is almost the minimum (the remote control is included, which means an extra 2-3 dollars in savings). I ordered one switch with a large remote control and six switches with a small remote control (all switches on 2 lines):
The pictures show prices at the time of ordering, taking into account the discount for purchasing in the mobile application, I paid $51.61 for everything. Each box contained a switch, a remote control, instructions, two screws and a capacitor. A capacitor can be useful if you are going to control a gas-discharge energy-saving lamp. Since the switch has some negligible current draw even when turned off, some HID lamps will either glow/flicker faintly or occasionally flicker faintly when turned off. To get rid of this unwanted effect, you should connect the supplied capacitor in parallel with the lamp. LED lamps and incandescent lamps do not suffer from this problem, so all the capacitors went to the rest of the radio components.
Instructions. Describes the characteristics of the device, connecting the device and setting the remote control buttons:
Characteristics: - operating voltage 90-250 V AC (170-240 V is written on the switch itself) - switching power: 3-300 W (for LED or energy-saving lamps 3-150 W, up to 100 W is written on the switch itself) per channel — dimensions 86x86x36 mm (protruding part from the wall 10 mm) — radio channel frequency 433 MHz
Let's take a closer look at the components of the kit and the device.
Capacitor 0.1 uF 275 V
Remotes:
Above the buttons there is a blue LED that lights up when the button is pressed. Each of the remote control buttons can be programmed for one of three actions: - on/off - on - off More precisely, the remote control and its buttons are unique (a unique button code is transmitted), and the switch is programmed (linked to this code).
Let's see what's inside the remotes besides the blue neon 
A standard battery used in car alarm remotes, a quartz resonator, a microcircuit, 4 buttons and some wiring
The blue protective film is easily removed
from the inside of the switch itself. The front panel of the switch can be easily removed, just pry it off with a screwdriver
Under the glass of the front panel there is a touch sensor board on which sensor pads, plastic light-diffusing plates covered with a white film are located, and under each SMD plate there are components - a two-color LED and a limiting resistor.
The touch sensor board can be easily removed (pry it off with a screwdriver), exposing the power board
On the reverse side of the touch sensor board there are sensor amplifiers, a microcontroller (an unknown chip without a designation), non-volatile memory ATMEL 24C02N, a blue radio channel board and a connector for communication with the power board, which also holds the sensor board.
Power board
Mounted on the power board are a power supply, optocouplers decoupling between the boards - EL357N, a tweeter, the actual power elements - triacs BTA16-600 and a certain amount of wiring. Triacs are quite powerful, they can switch current up to 16 Amps, but here they are used without radiators and hence the limitation of 100-300 W load.
The installed switches pleasantly indicate the on channel with a red backlight, the off channel with a weak blue backlight, in the light the blue backlight is almost invisible, and in the dark it is very comfortable and does not bother your eyes
The outer surface of the switch is 10 mm away from the wall
A little about installation and configuration. There is one small subtlety not mentioned in the installation instructions, more precisely, if you follow the instructions letter by letter everything will be fine, but if you do as I did (and you shouldn’t do that :) you will find that the installed switch does not work and beeps with its own beeper as if one or both buttons were triggered and held. So, if you connect the switch live, without de-energizing the wiring (and you shouldn’t do this, you might get an electric shock), you will get exactly this result after you put the glass on the switch. To cure the switch from this, after installation, you need to de-energize the lighting line by turning it off in the panel for a few seconds, the microcontroller in the switch will reboot, come to its senses and work as expected.
Programming. If you put your finger on the sensor and hold it after a few seconds you will hear one squeak, if you continue to hold it after a few seconds you will hear 2 squeaks, then 3 and then 4. To program the switch, place your finger on the switch and hold until the required number of signals, then release and press the programmable button on the remote control. The switch will remember the programmable action for this button on this remote control. — 1 beep = ON/OFF trigger action — 2 beeps = ON action — 3 beeps = OFF action — 4 beeps = erasing the switch memory for a given channel (no need to press the remote control button)
There is no point in highlighting the pros and cons of the purchase; everything works as stated. Instead, I will praise the seller - I ordered at night from December 16 to 17, on the morning of December 17, the seller informed me of the track, and on December 30 I already received the parcel. Perhaps the fastest parcel sent to me from China in 2017. I recommend purchasing with the next discount.
PS The seller is cunning, he has many identical lots with different discounts, so by following my link, open the seller’s store and look at the list of promotional items, most likely you will find even cheaper ones.
Device selection criteria
Key indicators for product selection:
- The number of equipment available for connection to one mechanism.
- Dimmer available. It allows you to control the lighting level.
- Equipped with a timer.
- Possibility of remote use.
Case material – glass or plastic. Glass is more expensive than plastic. There are many manufacturers and models on the market, so you can choose an option to suit your needs and financial capabilities.
Note! The voltage of the electrical network must comply with the requirements in the instructions for the specific device.
Selection rules
To take full advantage of all the benefits, you need to choose the right touch switch model. When choosing, you must be guided by the following criteria:
- the number of lamps that will be connected;
- dimmer location;
- is it planned to connect additional electrical appliances;
- operating voltage (12 or 220 volts);
- need for additional functions.
Only by taking these parameters into account will you be able to make the right choice. Now let's look at the most popular models.
How to connect a touch light switch
When installing the product, you need to choose the correct location. The manufacturer dictates the rules for the installation site. The device with the remote control must be located in a visible place from the rest room. Mechanisms sensitive to increases or decreases in temperature should be located away from heating radiators.
Connection diagrams for LED lamps may vary. During connection work, turn off the power supply. All wires need to be insulated.
To install overhead models, you need to make a recess in the wall. Installation can be carried out without the involvement of specialists.
Connection rules
Installation is carried out according to the scheme for keyboard devices. Most often there are 2 terminal contacts on the back panel. One is for load, the other is input. Expedient switching in the device system is carried out via a phase line. A conductor is sent to the input, and the voltage for the load is removed at the output.
The device may have several independent sections. Then the number of terminals for connection increases. To navigate, you need to use the classic scheme. Placement is carried out in traditional socket boxes. The chassis is fixed with reliable screws.
Touch sockets and switches (hereinafter S.V.) - 5 advantages
These devices have advantages over conventional switches:
- absence of moving parts and cracks - dust and moisture get inside through them;
- variety of design;
- There are models with built-in sockets and brightness adjustment;
- table lamps and mirrors use a metal case instead of a touch plate, and the electronic board is hidden from prying eyes.
- the cost of such devices does not exceed the price of conventional high-quality switches.
Design of a touch switch
Touch switches are divided according to the type and amount of load connected to them:
- including one or more lamps separately;
- walk-through - turn on the lamp from different places, from the ends of a long corridor or staircase;
- pulsed - supply voltage only during touch;
- with a built-in dimmer - long touch changes the brightness of the light.
Touch switch connection diagram
Connection diagrams
When carrying out installation, it is important to remember safety precautions. If you are not confident in your abilities, it is better to entrust the installation to professionals.
Network connection diagram
The touch switch is mounted in the same way as a regular one. Installation in 6 steps:
- Power outage.
- Removing the previous switch.
- Removing the top panel from the product being installed.
- Connecting wires to terminals.
- Place the structure in the box and secure it.
- Fixing the panel.
Activation project for pass-through touch switches
The connection type is similar to the method of connecting a touch switch. It is only important to correctly synchronize between devices.
Note. The switch operates correctly if synchronization is successful. If you do not make it, it works like a standard one.
To do this, you need to touch each switch, from 1 to the next. You need to stop at each for 4-5 seconds.
To cancel synchronization, you need to stop at the last switch for a while, after 10 seconds a sound notification will sound. It indicates the success of the completed task.
Connection diagram for pulse touch switches
The pulse device is in the “operation” mode when the button is pressed continuously. It is relevant for raising blinds and doorbells. Installation occurs according to the usual scheme.
Project for connecting touch switches with 12V current stabilizer
The starting current stabilizer and LED adapter must be located between the device and the switch. The circuit is relevant if the devices during operation consume a current many times greater than the rated value. This includes the hood motor.
Connection errors
The main problem during installation is always not taking into account the power of consumers. For most touch-sensitive light switches, the maximum throughput load is limited to 1 kW. In no case should it be exceeded. Most devices of this type do not contain safety elements that block excessive load. Hence their relative fire hazard when the maximum is exceeded.
Another relatively common mistake when installing 220V touch-sensitive light or energy switches is the incorrect connection of the contact groups. For example, it has been noticed more than once that they try to separate the zero of the power supply network with a control device, instead of a phase. Of course, this creates significant problems in its functioning; it becomes simply impossible.
The practical connection of a phase and a COM port for end devices does not make much sense. However, its purpose is different - to communicate with other switches or pass-through switches.
Installation errors
Errors are excluded if the rules are followed:
- It is necessary to turn off the power so that there is no short circuit, causing damage to the device.
- The glass front panel is installed and removed when the mechanism is de-energized.
- The front panel should not rest against the wall on one side. It should be parallel.
- The front part must be mounted immediately after installation to prevent contamination.
- Pressing the sensor cannot be done without the panel.
- If construction dust appears on the sensor, wipe it off quickly.
Homemade devices
You can make a touch switch yourself. This can save you at least 5,000 rubles (most likely more). You need to prepare tools and materials in advance.
You will need the following:
- Resistance is 30 ohms.
- 2 transistors KT315.
- Electric capacitor 100 mfk 16 V.
- A simple 0.22 µF capacitor.
- Semiconductor D226.
- Powerful battery or power supply (9 V output voltage).
The work should be done according to the following scheme:
Touch switch circuit
An elementary version using relays and transistors
The type of work is accessible to beginners. Any relay can be used. The main thing is that the operating range must fit within the range from 5 to 12 V. The load on a 220 V network must be withstand. The device is made by cutting getinax from a sheet of foil.
Any transistor can be used.
Application of infrared sensor
To manufacture this mechanism, you need to have experience in the relevant field. You need to have 2 microcircuits and certain elements:
- standard LED;
- infrared LED;
- relay;
- photodetector
A pulse generator will help make an inverter microcircuit. If there is a supply of the required action in the activity zone, the mechanism is triggered.
Design and details of capacitive touch sensors
When I began to develop a sensor system for water supply in a bidet, the most difficult task seemed to me to be the development of a capacitive occupancy sensor. This was due to a number of installation and operation restrictions. I didn’t want the sensor to be mechanically connected to the toilet lid, since it needs to be removed periodically for washing, and not to interfere with the sanitization of the toilet itself. That’s why I chose a container as a reacting element.
Presence sensor
Based on the above published diagram, I made a prototype. The parts of the capacitive sensor are assembled on a printed circuit board; the board is placed in a plastic box and closed with a lid. To connect the antenna, a single-pin connector is installed in the case; a four-pin connector RSh2N is installed to supply the supply voltage and signal. The printed circuit board is connected to the connectors by soldering with copper conductors in fluoroplastic insulation.
The capacitive touch sensor is assembled on two KR561 series microcircuits, LE5 and TM2. Instead of the KR561LE5 microcircuit, you can use the KR561LA7. 176 series microcircuits and imported analogues are also suitable. Resistors, capacitors and LEDs will suit any type. Capacitor C2, for stable operation of the capacitive sensor when operating in conditions of large fluctuations in ambient temperature, must be taken with a small TKE.
A sensor is installed under the toilet platform, on which the flush tank is installed in a place where, in the event of a leak from the tank, water cannot enter. The sensor body is glued to the toilet using double-sided tape.
The antenna sensor of the capacitive sensor is a piece of copper stranded wire 35 cm long insulated with fluoroplastic, glued with transparent tape to the outer wall of the toilet bowl a centimeter below the plane of the glasses. The sensor is clearly visible in the photo.
To adjust the sensitivity of the touch sensor, after installing it on the toilet, change the resistance of the trimming resistor R3 so that the HL2 LED goes out. Next, place your hand on the toilet lid above the location of the sensor, the HL2 LED should light up, if you remove your hand, it should go out. Since the human thigh is larger in mass than the hand, then during operation the touch sensor, after such adjustment, will be guaranteed to work.
Design and details of capacitive touch switch
The capacitive touch switch circuit has more parts and a larger housing was required to accommodate them, and for aesthetic reasons, the appearance of the housing in which the presence sensor was placed was not very suitable for installation in a visible place
I paid attention to connecting the phone. It was the right size and looked good. Having removed everything unnecessary from the socket, I placed a printed circuit board for a capacitive touch switch in it.
Having removed everything unnecessary from the socket, I placed a printed circuit board for a capacitive touch switch in it.
To secure the printed circuit board, a short stand was installed at the base of the case and a printed circuit board with touch switch parts was screwed to it using a screw.
The capacitive sensor was made by gluing a sheet of brass to the bottom of the socket cover with Moment glue, having previously cut out a window for the LEDs in them. When closing the lid, the spring (taken from a silicon lighter) comes into contact with the brass sheet and thus ensures electrical contact between the circuit and the sensor.
The capacitive touch switch is mounted on the wall using one self-tapping screw. For this purpose, a hole is provided in the housing. Next, the board and connector are installed and the cover is secured with latches.
Setting up a capacitive switch is practically no different from setting up the presence sensor described above. To configure, you need to apply the supply voltage and adjust the resistor so that the HL2 LED lights up when a hand is brought to the sensor, and goes out when it is removed. Next, you need to activate the touch sensor and move and remove your hand to the switch sensor. The HL2 LED should blink and the red HL3 LED should light up. When the hand is removed, the red LED should remain illuminated. When you raise your hand again or move your body away from the sensor, the HL3 LED should go out, that is, turn off the water supply in the bidet.
Reliable manufacturers of touch switches
Experts recommend the following manufacturers:
- The Belgians produce premium devices. High quality, perfect design are the characteristics of the company’s devices.
- A Russian manufacturer that appeared relatively recently. Good price, quality, thoughtful design - the components that brought success to the company.
- The manufacturer from France offers expensive products, but the price justifies the quality.
- Jung. The German manufacturer offers different models of touch switches. Many colors and textures.
- The Italian company creates reliable switch options.
Choosing the optimal model
The main determining indicator for the full operation of a touch switching device is the characteristics of the electrical network. The required voltage of 220 V is not suitable for all models. There are options with a deviation of 20-30%.
Therefore, when choosing, you should pay attention to the threshold voltage values indicated in the device characteristics. In case of significant deviations, it will be necessary to additionally install a stabilizer, through which the vibrations will be leveled
In order for the purchase of an electronic switch to meet all expectations and the device to significantly increase the level of comfort in the room, when choosing, you should take into account the necessary functionality that the device must have
To determine the appropriate model of a sensor product, it is necessary to take into account the priority capabilities that are necessary:
- The number of groups of light bulbs connected to the regulator - there can be one, two or three.
- Intensity. Some devices are additionally equipped with a dimmer, which changes the current supplied to the light bulbs.
- Built-in timer. In walk-through models, an automatic shutdown timer is installed that operates after a specified time. These devices are mostly used for corridors and staircases.
- Control method. It all depends solely on the preferences of the buyer. There are devices controlled by remote control, touch, sound, etc.
Having decided on the set of necessary functions, you should choose one of the presented manufacturers. The price category of devices is not cheap, therefore, when purchasing a low-cost product, you may encounter a low-quality analogue.
The Belgian brand Basalte is focused on luxury products. The Deseo model is the embodiment of multifunctionality and exquisite design. Almost all products have LED backlighting
The Belgian company Basalte produces high-quality touch control devices. The developments are focused on consumers with the highest demands.
Elite models are distinguished not only by their original design, but also by one of the highest price categories. Nevertheless, the cost is fully compensated by ease of use, the presence of various functions and simple adjustments.
Despite the fact that many buyers are biased towards Chinese products, Livolo was able to prove the quality characteristics of its products
Among the Chinese representatives, the company Livolo is noted. The main advantages of touch switches of this brand are the affordable cost of products and original design solutions for home improvement that can emphasize individuality.
At the same time, the range is not limited to technically simple models. It is also worth noting the constant replenishment of the assortment.
We also recommend reading our other material, where we talked in detail about how to assemble a touch switch yourself.
Results
Touch switches are an excellent alternative to mechanical devices in the same direction. They are dictated by modernity: reliability, efficiency, durability, stunning appearance.
Now the beginner knows how to connect the touch switch. It's worth spending a little time to complete this task. But you can choose the easy way - purchase a finished product. There are many offers in this direction on the market. You can make the sensor yourself, then you can save a little.
How to install
Connection diagram
Connection of touch switch models occurs as follows:
Note! Installation of the device is generally similar to that of a standard push-button switch;
- turn off the electricity;
- dismantle the old switch;
- remove the top part of the dimmer;
- we connect the “phase” and “zero” wires according to the diagram to the corresponding terminals;
- We install the dimmer in the mounting box and fix it here with screws and spacers.
As you can see, selecting and installing a touch switch is not difficult. You can do this kind of work without proper experience in about ten minutes. As a result, you will modernize your own home, adding several points to home comfort and coziness.