Where used, types
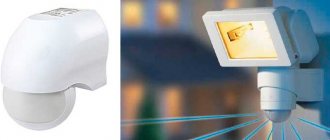
Products come in several types - ceiling, wall and for hidden installation. They are also conventionally divided into several types according to the principle of operation (we will discuss this in more detail below).
When choosing, consider the installation location. Sensors are divided into household and street lighting.
In the latter case, materials are used that protect the device from negative natural influences. It can be connected on the stairs or on the street. Household devices are designed for installation inside the house.
Depending on the circumstances, sensors that monitor movement can be connected to a spotlight, lamps, or even an Arduino smart home.
The main device manufacturers are ERA, Evan, TDM, LLT, Orbis, Duwi, Camelion, Brennenstuhl, Elektrostandard, FERON, REV, REXANT, Rubetek and others.
Characteristics
When purchasing a motion sensor, it is important to consider a number of parameters, which determine the features, connection location, and conditions for use.
Main characteristics when choosing:
- WEIGHT. Modern light sensors weigh from 25 to 240 g.
- Maximum load power. When choosing a product, you need to look at the permissible load. Thus, one sensor can switch devices with power from 60 to 2300 W. Please note that when using more powerful devices, it may be necessary to replace the wiring or install a machine with a higher rated current.
- VOLTAGE. The operating voltage varies in a wide range from 1.5 to 220 Volts. Conventionally, motion sensors are divided into several groups - 1.5 V, from 2.2 to 3.6 V, 220 V, 5 or 9 V.
- MAXIMUM VIEWING ANGLE. Here the range is from 30 to 360 degrees. In the latter case, the device operates along the entire perimeter of the room.
- RANGE. The minimum and maximum distance parameters are 8 and 120 m. Here you need to take into account the object on which lighting is provided. You should not choose sensors with an excessively high parameter, because they can react to the movement of strangers.
- RECOMMENDED INSTALLATION HEIGHT. Here the permissible parameter ranges from 1.2 to 16 m.
- PRESENCE OF LED INDICATOR. Some sensors are equipped with an LED that starts blinking when a signal is present. Other LED display options are also possible.
These are the main characteristics that you need to consider when purchasing. We will discuss the selection criteria in more detail below.
Scheme and principle of operation
There is a large selection of sensors on the market that react to movement and allow you to configure the switching on of lighting on different objects. When purchasing such devices, it is necessary to take into account the presence of several types.
Infrared
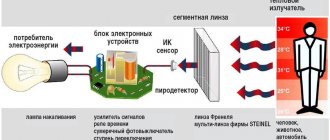
The products sense the heat emitted by the human body. The main element is a sensor with a Fresnel lens installed on it, which reacts to the approach of heat and bridges the contact group.
Operating principle:
- the radiation is focused into a narrow beam of light and directed to the sensor;
- the sensor detects the signal, receives it and gives a command to operate.
Such devices are conventionally divided into passive and active. In the first case, the response occurs to a change in temperature conditions, and in the second, the operation occurs in the event of a signal interruption.
Operating principle
The LED DPO lamp consists of a plastic/steel body, diffuser, radiation source (diode), driver, motion and light detector. Most often, a passive infrared motion sensor is installed, which detects thermal radiation emanating from an object. When a moving object enters the coverage area, the lamp lights up. After a configurable period of time after the movement stops, the lamp goes out. The reaction time and duration of illumination are set by the relay.
Some models have a built-in light detector. It evaluates the amount of light and closes the contact only if there is not enough light. This eliminates the possibility of triggering when it is light outside. Less commonly installed are models with an acoustic sensor that responds to the sound of steps, clapping, and conversations. The lighting turns off some time after the sound disappears. An acoustic detector is used simultaneously with a photo relay. This model is suitable for lighting entrances.
Criterias of choice
When purchasing a presence sensor to turn on the light, it is important to consider a number of criteria regarding installation and operation features.
Let's highlight the basic recommendations:
- DECIDE THE PLACE FOR INSTALLATION. For outdoor installation, it is advisable to choose devices with protection from IP 55 and higher (preferably from 65). If the product is mounted under a canopy and protected from water, the IP degree is suitable. If the motion sensor is planned to be installed inside, for example, to turn on lighting in a house, apartment or garage, there are no special requirements for the degree of protection.
- CONSIDER POSSIBLE OBSTACLES (WALLS). The most commonly used sensors are sound or infrared sensors. Microwave products are more suitable for security purposes.
- DECIDE YOUR VIEWING ANGLE. If the entrance to the room where the lighting is being adjusted is possible from several points, it is advisable to choose a sensor with a 360-degree angle and mounted on the ceiling. If there is only one passage, 180 degrees is enough.
- DECIDE ON POWER. Before purchasing a device, consider the consumption of the devices that will be connected to it. Sum up the resulting values and add 10-20% on top for reserve.
- CONSIDER YOUR ACTION RADIUS. For a small room, a minimum parameter of 6-10 meters is sufficient. To work over a large area, it is better to choose sensors with a large radius.
- PLEASE BE AWARE OF THE PRESENCE OF ANIMALS. If there are pets in the apartment or in the yard of the house that can affect the sensor, it is better to take devices with special protection.
- PAY ATTENTION TO THE PRESENCE OF A PHOTO RELAY. This is a big plus, because in this case the product turns on only in the absence of light.
We will pay special attention to the choice of lighting devices:
- When installing the sensor outdoors, use LED spotlights, which can easily withstand temperature changes and place less stress on the wiring.
- In open areas, it is better to use lamps that operate on the luminescent principle.
- When organizing driveway lighting, you can use all types of lamps, but in order to save money, it is better to choose the LED option.
Knowing the features of choosing a motion sensor and lighting elements, it is easier to make the right purchase and not make a mistake with the choice.
Scope of application
The acoustic sensor for lamp operation is used in the following areas:
- In utility rooms with rare human presence - storerooms, attics, basements, garages.
- In public places - underground passages, entrances, alleys.
- At industrial and warehouse facilities.
- In hospitals, clinics and other medical institutions, when the use of a switch contradicts the requirements of sanitary and epidemiological inspection.
- In houses, apartments, offices as a smart home system.
- At protected sites and territories - to scare away intruders.
- In the local area, cottage, garden.
- If necessary, declare an alarm - at military facilities, ports, bases.
When installing sound sensors in a home environment, several goals are achieved at once - increasing household comfort, saving energy and increasing the shelf life of lighting fixtures.
How to connect for lighting: on the stairs, in the apartment, on the street
There are five different connection schemes for lighting control. Let's look at the features of each option and common mistakes.
Circuits without a switch
To begin with, let's highlight circuit solutions that do not involve the use of a switch.
Two-wire connection
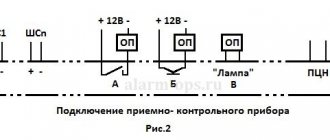
This is the simplest option, which involves the use of several elements - a 220 V circuit breaker, a sensor, a junction box and a lighting source). The principle of assembling the circuit is the same as when installing a lamp.
First, power is supplied to the indicator, and through it is directed to the lamp. It is better to assemble the chain in an individual circuit, rather than in a general lighting chain.
A simplified diagram is shown below.
Using this method, you can connect motion sensors to turn on the lights on the stairs, in an apartment or other object.
The action algorithm looks like this:
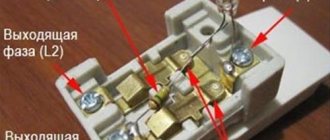
- Place a cable with three cores and a 1.5 square wire into the junction box and label the wires (indicate the phase, ground and neutral wires).
- Stretch two wires to the installation site of the control product, which gives the command to turn on the lighting.
- Place the device at a height of 120-200 cm from the floor. When installing, make sure that it does not interfere with the opening of doors or other mechanisms. It is not recommended to install near heating elements.
- Also place the cable that goes to the light source in the box.
- Connect all the wires using special terminal blocks - phase, neutral and ground.
- Connect the wires to the sensor. Place the phase on the terminal with L, and the second wire (from the lamp) on the load symbol.
- Finish the installation by installing the box and setting it up. Set the automatic mode, operating time interval and sensitivity level.
How does a motion sensor work to turn on a light?
The principle of operation of the device is quite simple. When motion is detected, a relay is activated, which closes the circuit and electricity is supplied to the bulbs. As a result, the light turns on. The duration of operation of the device is set in the settings. The light can stay on from a few seconds to 10 minutes. This means that if there is no movement, the circuit breaks and the supply of electricity to the light bulbs stops. Eventually the light turns off.
You may be interested in this Connection rn 113
To ensure normal operation of the system, it is important to connect all elements correctly
Note! To ensure normal operation of the device, many factors must be taken into account. Range, sensitivity and type of sensor matter. It is important to decide on the choice of installation location.
How to avoid false positives
To avoid false switching on of lighting in the circuit solutions discussed above, follow these tips:
- Do not place sensors near trees or heating devices.
- Always break only the phase.
- Make sure that light rays, for example from an incandescent lamp, do not penetrate to the sensor.
- Attach the product depending on the type (wall, ceiling).
- Do not install the device near air conditioners or windows where there is air movement.
- Make sure that the glass of the infrared product is clean and undamaged.
Following the above tips allows you to quickly and without errors connect a device to control lighting on the stairs, in an apartment or on the street.
How to connect to a spotlight
Another issue that requires consideration is how to properly connect a motion sensor to a floodlight.
To do this, you can use one of the following schemes:
- WITH THREE CONTACTS. In this case, the phase is supplied from the shield to terminal L. From output A, the wire goes to the input L of the spotlight. Voltage is supplied when the motion sensor is triggered. Contacts N are combined and directed to the shield. The ground is sent directly to the spotlight and connected to the PE to remove possible voltage from the metal housing.
- USING A SINGLE KEY SWITCH. In the solution discussed above, the use of a switch is not provided. But this can be fixed. As a rule, the switch is mounted in a phase break (before the product that controls the movement). In this case, when the switch is turned off, the voltage is removed from the entire circuit. The second option for connecting the switch is parallel to the phase and the output of the motion sensor. With this solution, you can turn on the lighting without being tied to other devices. When the switch is turned off, the entire circuit operates as usual.
- USING A TWO-KEY SWITCH. In this case, a certain symbiosis of the two circuit solutions discussed above is introduced. One contact of the switch breaks the phase, and the second comes in parallel. When both buttons are disconnected, the voltage is completely removed from the circuit. When the first key is turned off, the sensor operates in normal mode and turns on the spotlight when movement occurs. If only the second key is activated, voltage is immediately applied to the lamp.
- TWO SENSORS. The same principle applies here as discussed above. Two movement-controlling organs are arranged in parallel, after which they are connected to the power circuit and the spotlight.
- CONNECTING THE LAMP TO A LOWER VOLTAGE. If it is necessary to turn on the spotlight at a lower voltage (12, 24 or 36), a power supply is installed in front of the input, reducing 220 V to the required level. In this case, three wires (with ground) are supplied to the power supply input; only power is sent to the sensor.
- FOR A SEPARATE PHOTO RELAY. When installing old motion controllers without a photo relay, the latter must be connected separately. In this case, the wire goes from the output of the sensor to the relay, and after that to the input of the spotlight. The zeros are combined and the ground goes towards the light source.
Above are the basic diagrams that allow you to connect a spotlight with or without a switch. Here everyone makes a decision taking into account the current tasks and characteristics of the room.
How to connect to Arduino
Of no less interest is connecting a motion sensor to Arduino to organize a smart home.
To solve the problem you need to prepare:
- Arduino board;
- PIR motion control device;
- solderless breadboard;
- 220 Ohm resistance and LED;
- wires of the male-male and male-male types.
The name of the contact connections may differ from one manufacturer to another, so before performing work it is necessary to study the features of the module.
One pin is connected to GND, the next to VCC (5 V), and the remaining one to OUT (transmits a digital signal from the PIR sensor).
PIR sensors are almost identical in design. They have the necessary sensitivity at a distance of up to six meters, and visibility is 110*70 degrees. The output appears 0 or 1 depending on whether the fact of movement is detected.
How to set up a motion sensor
An important step in installing a device is its configuration. To do this, adjust the following parameters:
- installation angle. Many models are equipped with a hinge, which makes it easy to rotate the detector in the desired direction. The beams must cover the area with the highest possible probability of motion occurring;
- sensitivity. There are special buttons or a wheel on the case that allows you to easily adjust this parameter. The issue must be approached very carefully. It is important to adjust the equipment so that it responds to movement, but at the same time remains inactive when in the area of pets. Otherwise, the detector will respond to even minor changes;
- illumination This parameter allows you to adjust the operation of the device depending on the room lighting. There is no need to turn on the lights during the day. If adjusted correctly, the sensor will only operate in the evening and at night;
- delay. The parameter indicates the duration of burning of the lighting device after the signal is received by the detector. The adjustment is carried out differently in each case. It all depends on the needs. To begin with, the regulator is set to the minimum position, after which the delay time increases. You need to adjust the backlight carefully.
You might be interested in Simple soldering circuits
Ceiling lights are easy to install
Important! After setup, the equipment is tested in operation. Subsequent adjustments can be made depending on needs. All changes must be verified.
Can I do it myself?
Despite the low price of sensors, many people try to make the devices themselves and save money. The advantages of such a solution are the ability to thoroughly understand the principle of operation, reduce maintenance costs and “tailor” the device to specific application conditions.
In addition, with proper assembly, you can reduce costs and even upgrade the system.
But there are also disadvantages. Before you start work, you need to purchase equipment, draw a diagram, decide on dimensions and other points. This requires experience and knowledge. However, there is no guarantee that the finished scheme will work.
If you decide to assemble the motion sensor yourself, prepare the following items:
- circuit assembly housing;
- set of elements;
- soldering iron and wires of different sections;
- fastening;
- screwdriver;
- other materials - electrical tape, pliers, cambric.
To turn on the lighting, a sensor with a photocell built into it will be used. A photo relay will act as a switch.
To collect the diagram you will need:
- capacitor (C1);
- operational amplifier DA1;
- phototransistor (VT1);
- resistance R1 to load the collector and create an operating point;
- resistor R2 to implement feedback.
When assembled correctly, the circuit works like this. After light enters VT1, the element is triggered and the phototransistor opens, followed by charging C1. When the voltage is removed from VT1, the capacitor discharges and the voltage decreases.
The light source for the photocell can be a simple laser or an infrared LED.
The assembly proceeds according to the following algorithm:
- Assemble the power supply, adjust it and monitor the current output.
- Connect a resistor to the negative of the power source.
- Connect the diode using the cathode.
- Connect a tuning resistor to the anode.
- Connect the transistor emitter to the negative wire of the power supply.
- Connect the resistor to the base circuit.
After assembly, all that remains is to test the correct operation of the product when light hits it. Possible errors must be eliminated immediately upon detection.
Possible problems
Other reasons may also lead to false alarms and incorrect operation of the sensor, which we mentioned above:
- Installing a wall sensor on the ceiling. If such an error was made, the device will not work correctly because the viewing angles are different.
- Random activation of the sensor after it has been turned off. This often happens with IR products when there is a light source next to the device, the beam from which directly hits the sensitive element. Therefore, it is important to place it away from lighting fixtures.
- The influence of drafts, wind and glare. The sensor cannot be mounted on air conditioners, above windows, or in corridors where there is a strong draft. Above places where water accumulates and where direct sunlight falls. Reflected glare hitting the sensitive element of the sensor will lead to its frequent operation.
What does the abbreviation DPO mean?
- D – diode (light source).
- P – ceiling (installation method).
- O – for public buildings (purpose)
LEDs are protected from mechanical damage, produce a stable, even stream of light without pulsation, and last up to 50,000 hours or 15 years. Due to their efficiency and durability, LED DPO lamps are used to illuminate public buildings.
An LED lamp with an IR sensor or a motion sensor solves two problems:
- Increases security: an ordinary passer-by will not be injured while moving in the dark, and an attacker will not be able to approach the protected object unnoticed. Equipment with motion sensors is often installed together with security systems - burglar alarms, video surveillance.
- Saves energy. The lighting only works when there is movement in the area. The risk of not turning off the light or keeping the lamp constantly on for safety is reduced.
One of the advantages of installing LEDs in public buildings is that they do not require separate disposal and do not contain or emit harmful substances. This significantly reduces the cost of operating and maintaining electrical equipment.