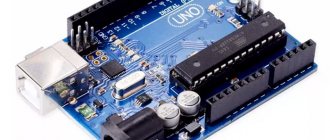
In this tutorial we will show you how to make your own DIY Arduino Uno board using the ATmega328p microcontroller IC. As a result, you will be able to understand how to make analogues of any boards in the future, plus create your own. Maybe you will even open your own company producing boards and microcontrollers.
Since Arduino is an open source platform, it is quite easy to learn about the innards and details of everything that makes Arduino what it is. So in this tutorial we will look at the Arduino Uno circuit, modify it a little according to our needs, make a PCB for it and solder the necessary components to create the final product.
We will not use any SMD components to create our version of Arduino Uno because not everyone has a soldering station and sometimes it is very difficult to find SMD components. Moreover, our method is cheaper than SMD components in most cases. For those who are just starting to understand electronics, surface mount technology of printed circuit boards is also called TMP (surface mount technology), SMT (surface mount technology) and SMD
-technology (from the English surface mounted device - a device mounted on a surface), and
components
for surface mounting are also called “chip components”.
We select the equipment for the project using the example of Arduino Mega 2560 R3
To create a full-fledged Smart Home system and perform its assigned functions, it is important to correctly approach the configuration and selection of equipment.
What's included in the package?
If your goal is a “Smart Home” based on Arduino, you need to prepare the following equipment - the Mega 2560 R3 board itself, an Ethernet module (ENC28J60), a motion sensor, as well as other sensors and controllers.
In addition, it is worth preparing a twisted pair cable, a resistor, a relay, a switch and a cable for the Ethernet module.
Additional tools are also needed - screwdrivers, soldering irons, etc.
Please note that you should buy kits for installing the system at certified points. This is due to the fact that the project uses electricity, and the use of counterfeits can lead to a decrease in safety.
All programs for adaptation can be found online on the official Arduino website https://arduino.ru. When choosing sensors, you should focus on the tasks that the Smart Home must solve.
Typically, motion, temperature, door opening and light sensors are required. The role of a door opening sensor can be performed by a regular reed switch.
The board is flashed using special software designed for various operating systems, including a USB cable. In this case, there is no need for programmers.
As for the software used in Arduino, it is written in C language. There are certain restrictions on the number of bytes, but the current memory is sufficient to implement the task.
Making your own Arduino Uno Mini
Part No. 1. Preface
Idea and direction of the project
I convey my great greetings to everyone and wish that reading my educational article does not waste your precious time. In this article (lesson) I want to offer each reader one of the many cheap ways to make your own arduino platform at home with your own hands, whatever they may be. I will also present several add-on boards for our microcontroller.
All radio amateurs and professionals once began to learn how to solder, make small devices, read electrical circuits, and so on. For example, having learned about arduino and its capabilities, I was almost immediately going to buy it, but, realizing how much it would cost me, I decided to purchase all the chemicals and reagents for making my own printed circuit board, since it is the most successful prospect in this case. You can make your own printed circuit boards quickly, conveniently, and at low cost of chemical components.
Part No. 2. Development and design of the project
The method for manufacturing printed circuit boards is, in our case, LUT (laser-iron technology for producing printed circuit boards). Thus, it is necessary to make a list of what is needed:
The next step will be the development and design of the microcontroller project, that is, its stages such as:
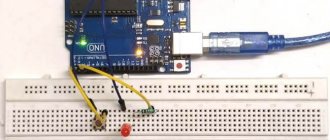
Assembling Arduino on a breadboard
Required Components
To work with the microcontroller you will need:
Assembly diagram
Assemble the components on the breadboard according to the following diagram:
Experiment "beacon" from Matryoshka
Add an LED on pin 13 to the circuit. To do this, repeat the first experiment from the Matryoshka Z - beacon set.
Please note that Arduino pin 13 is not pin 13 of the microcontroller. To find the desired pin, use the ATmega328 pinout
The experimental design has been assembled. All that remains is to flash our Arduino.
How to assemble a 3D Arduino printer with your own hands
It is quite possible to make a 3D printer with your own hands; to do this, you need to follow the instructions included with the Arduino kit. You can also follow the recommendations of professionals and teaching aids.
A 3D printer consists of the following parts:
- frame;
- controllers;
- guides;
- power unit;
- stepper motors;
- extruder
The first step is to construct the coordinate axes. To do this, you will need drives, for example, from CD/DVD, which were on the computer. You also need to purchase a Floppy drive; checking its functionality is mandatory. Its indicator is a step-by-step operating mode, carried out without direct current. Next you need to select stepper motors. The process of moving consumables requires a certain amount of power.
The next step is to select electronics. You will need the Arduino board itself, cable, drivers (5 pieces), radiators, power supply (suitable from a computer), fan, limit switches (optical or magnetic), heating table, thermistor, transistor, wires, plugs, heating device for the hotend, nozzles and bowden. You can actually buy them in a set; this will save time and effort without compromising quality. You can find a diagram for assembling the parts on the Internet.
At the last stage, download the Arduino IDE, install the firmware (Marlin is often used) and connect to the CNC controller. Having checked the electronics assembly in this way, you need to decide on the software that will be responsible for controlling the 3D printer. Example in the photo.
Its functions include the acceptability of the selected printing parameters: filling, section height and speed of layer-by-layer application of consumables. All that remains is to assess the condition of the electrical wiring, assemble the last elements (frame, case, fasteners) in accordance with the instructions and connect the self-assembled printer to the PC.
Calibration of the 3D printer is carried out taking into account the diameter of the pulley, the number of steps per revolution of the motor and micro-steps in the electronics system. The result of the operation is the final configuration of the firmware.
What types of boards are there?
By manufacturer
There are both official versions of Arduino boards and boards from third-party manufacturers. Original boards are distinguished by a high quality product, but the price is also higher. They are produced only in Italy and the USA, as evidenced by the inscription on the board itself.
Using the example of the most popular Arduino UNO board:
- Original board. It is supplied only in a branded box, has the company logo, and is marked on the board ports. Manufacturer price 20 €.
Original Arduino UNO board. Source
- Third party board. The quality is worse, but the price starts from 150 rubles. The quality of the board may affect its performance in the future. Although this is rare, the board may not work at all out of the box - it all depends on the integrity of the manufacturer and seller. To work with such boards, the CH340 driver is required, which is freely available. In all other respects, the development process is identical to the development process on original boards.
Arduino UNO board from a third party manufacturer. Source
By purpose
The UNO board has enough ports to handle most projects. However, sometimes UNO's capabilities may be insufficient, and sometimes they may be excessive. For this reason, both original and third-party manufacturers produce a large number of boards that differ in microcontroller characteristics, number of ports and functionality.
Various Arduino boards. Source
The most popular of them:
- Arduino Nano differs from UNO only in design. Nano is smaller.
- Arduino Mega is a board based on a powerful microcontroller. Has a large number of ports.
- Arduino Micro - has built-in support for a USB connection, and therefore can be used as an HID device (keyboard, mouse, MIDI device).
- Arduino Ethernet - has the ability to connect to the network via an Ethernet wire. The board also has a slot for a microSD card.
- Arduino Mini - slightly inferior in characteristics to UNO. The advantage of the board is its miniature design.
- Arduino Due is a board based on a 32-bit ARM microcontroller. Has a performance advantage over others.
- Arduino LilyPad - the form factor allows the board to be used in clothing and textiles.
- Arduino Yún - “it was necessary to install Linux...”. It has support for Linux distribution, built-in support for Ethernet and Wi-Fi, and a slot for microSD. Like Micro, it has built-in support for USB connection.
4
What is Arduino?
Arduino is a special tool that allows you to design electronic devices that have closer interaction with the physical environment in comparison with the same PCs, which actually do not go beyond virtual reality.
The platform is based on open source code, and the device itself is built on a printed circuit board with software embedded in it.
In other words, Arduino is a small device that provides control of various sensors, lighting systems, data reception and transmission.
Arduino includes a microcontroller, which is a microprocessor assembled on one circuit. Its specialty is its ability to perform simple tasks. Depending on the model, the Arduino device can be equipped with various types of microcontrollers.
There are several models of boards, the most common of them are UNO, Mega 2560 R3.
An equally important feature of the printed circuit board is the presence of 22 pins, which are located around the perimeter of the product. They are analog and digital.
The peculiarity of the latter is that it is controlled using only two parameters - a logical one or zero. As for the analog pin, there are many small regions between 1 and 0.
Today, Arduino is used to create electronic systems that can receive information from various sensors (digital and analog).
Arduino devices can work in conjunction with software on a computer or independently.
As for the boards, you can assemble them yourself or purchase a finished product. Arduino programming is done in the Wiring language.
READ ON THE TOPIC: Xiaomi Smart Home, review, equipment, connection and setup with your own hands, scenarios.