The device and principle of operation of the transistor
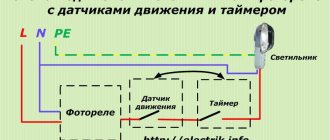
A transistor is a semiconductor device designed to amplify and generate electrical oscillations. Transistors are keys (buttons) in networks with direct current. Bipolar transistors can control an electrical circuit up to 50 V, field-effect transistors can control devices up to 100 V (with a gate voltage of 5 V). In AC networks I use relays.
Photo. The design of a field-effect and bipolar transistor
In the absence of voltage at the base or gate of the transistor, the emitter and collector junctions are in equilibrium, currents do not pass through them and are equal to zero. Thus, by applying a voltage of 5 V to the base of a bipolar transistor, we can turn on electrical circuits up to 50 Volts. Today, this semiconductor element is found in almost any device (phone, computer, etc.).
Transistors are the basis for building logic chips, memory chips, and computer microprocessors. A transistor is an electronic element made of semiconductor material, usually with three terminals, that allows the control of a high voltage current using an input signal. Using a transistor is the easiest way to connect a DC motor to the Arduino.
How to connect a transistor to Arduino
For this lesson we will need:
It is not possible to connect a DC motor directly to the digital or analog ports of the Arduino. This is due to the fact that the pins on the Arduino board are not capable of delivering a current of more than 40 mA. At the same time, a DC motor, depending on the load, needs hundreds of milliamps. Therefore, there is a need to control a high voltage electrical circuit with a transistor or Motor Shield L293D.
Connection diagram for DC motor to Arduino
Assemble an electrical circuit as in the figure above. If you look closely at the assembly on the breadboard, you will notice that the transistor plays the role of a button. If the button closes the electrical circuit when the pusher is pressed, then the transistor begins to pass current when voltage is applied to the base. Thus, we can make automatic or semi-automatic motor control using Arduino.
Sketch. Motor control via transistor
If you noticed, this is a sketch from the lesson - Turning on an LED on Arduino. From the point of view of the microprocessor, it is absolutely not important what is connected to Pin13 - an LED, a transistor or an LED driver for a Lightsaber on Arduino. Please note that resistor R1 pulls the base of the transistor to ground, and resistor R2 serves to protect the microcontroller port from overload.
Sketch. Motor control from sensor
The Arduino DC motor control sketch can be written differently. Let's add a photoresistor to the circuit and automatically turn on the motor when the light level in the room decreases. You can also use a liquid level sensor or any other sensor. In the sketch, we use if and else to control (turn on/off) the DC motor.
DC Motor Control with Arduino UNO
NPN mosfet connection to arduino
There's no problem here. Here are a couple of connection options:
If you also need to smoothly turn on/off the light bulb, or not at full power, but only at half, for example, you can squeak from the Arduino with a shim, and between the gate and source, connect another 300 microfarad capacitor. This is necessary to open the mosfet by half.. However, This is only suitable for a low-power light bulb, because a half-open mosfet has a non-acidic internal resistance and heats up like an iron.
For example, the mosfet h6n03l is suitable for this circuit. But there is a nuance in the choice of summaries. The one between the Arduino and the gate - the greater the resistance, the less current on the Arduino leg and the less likely it is to smoke. And the greater the resistance, the slower the mosfet opens. In short, 150 ohms is normal for Arduino (according to Ohm’s law I = E / R, I = 5 / 150 = 0.033 A - this is 33 milliamps, normal). Why is it needed at all? The fact is that the gate of a field worker has a certain capacitance and is, to some extent, a capacitor. So at the moment of switching, large currents pass through the gate, which the Arduino may not withstand. This is why you need a resistor between the gate and the pin.
And the second 10 kOhm type pull-up resistor is needed to keep the mosfet closed and the load turned off while the Arduino port is in an undefined state, for example during loading (the so-called Z-state).
But this scheme has a drawback - it is a bit slow. Switching will take 600ns, which is not suitable for all tasks. Here is the front and the recession.
Yellow is the output from the mosfet, green-turquoise-light blue is the output from the Arduino PWM. Yellow doesn't have time. To solve this problem, you need to install a couple of transistors as suggested here https://joost.damad.be/2012/09/dimming-12v-led-strip-with-mosfet-and.html
But this is not always necessary and, as a rule, the first scheme is sufficient. And by the way, there is a better option - about it at the end of the article.
This tutorial uses:
| Arduino Uno: | Buy |
| Infrared range finder: | Buy |
| High precision laser rangefinder with I2C: | Buy |
| A set of 100 resistors for all cases: | Buy |
| Small motor: | Buy |
| Weak servo: | Buy |
| Powerful servo drive: | Buy |
| Mosfet transistor for high voltage AC control: | Buy |
| Set of NPN transistors of 100 pieces: | Buy |
Connecting the motor to Arduino
As mentioned above, the Arduino cannot provide the motor with the necessary current and voltage. In such cases, transistors are used.
A transistor is a radio-electronic component made of semiconductor material capable of controlling a significant current in the output circuit from a small input signal, which allows it to be used to amplify, generate, switch and convert electrical signals. Transistors usually have 3 terminals: base, emitter and collector. The action algorithm can be formulated as follows: pass current from the collector to the emitter depending on the signal at the base. Transistors come in different types and ratings. You can read more about this on Wikipedia.
Be careful when choosing transistors for your projects. Some are designed to carry high voltage or high current. Also, many transistors will not open from 5 volts at the base. Always check the transistor specifications in the datasheet before purchasing. Also note that mosfet transistors are used to control alternating current.
Now let's connect the motor to the Arduino according to the following diagram:
Connecting the motor to the Arduino
As always, nothing complicated. The main thing is not to confuse the terminals of the transistor. Pay attention to the resistor through which the Arduino is connected to the base. This is a 1 kOhm resistor and we need it to protect our Arduino. In the video, a diode and a capacitor are added to the circuit, but they are not required. You can also add a 10-100 kOhm resistor between the emitter and collector for the stability of our circuit. Also do not forget that the ground at all voltage levels must be connected. And let's take a look at our code:
As you can see, the sketch is very simple. From the comments in the code you can easily figure out what's what. The only construct we haven't used yet is the for loop.
Connecting a servo drive is practically no different from connecting a motor. The difference is that the servo has 3 outputs. Plus, minus and logical. The video talks about this in detail.
Let's add an infrared rangefinder to our scheme. Just because we can