There are many situations when it will be useful to know how to measure resistance with a multimeter and whether it makes a difference which device is best to do this. Even if a person is not an avid radio amateur, when doing electrical work at home there is often a need to at least “ring” the wires - in fact, to make sure that the wire resistance is within acceptable limits.
How does a multimeter measure resistance?
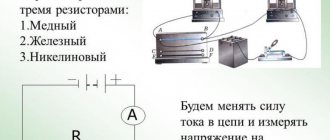
The principle of measuring resistance is based on Ohm's law, which in a simplified version states that the resistance of a conductor is equal to the ratio of the voltage on this wire to the current that flows through it. The formula looks like R (resistance) = U (voltage) / I (current). That is, 1 Ohm of resistance indicates that a current of 1 Ampere and a voltage of 1 Volt flows through the wire.
Accordingly, by passing a previously measured current with a known voltage through a conductor, its resistance can be calculated. Essentially, an ohmmeter (a device used to measure resistance) is a current source and an ammeter, the scale of which is graduated in Ohms.
Which multimeter to use
Measuring instruments are divided into universal (multimeters) and specialized, which are designed to perform one operation, but carry it out as quickly and accurately as possible. In a multimeter, the ohmmeter is only an integral part of the device and it still needs to be turned on in the appropriate mode. Specialized devices, in turn, also require some skills to use - you need to know how to connect them correctly and interpret the data received.
How to use analog and digital multimeters - in the following video:
Specialized measuring instruments
It is clear from Ohm’s law that a standard multimeter will not be able to measure large resistances, since it uses standard finger-type batteries or a Krona battery as a power source - the device simply does not have enough power.
If you often need to measure a large resistance, for example, insulation, then you need to purchase a megohmmeter.
It uses a dynamo or a powerful battery with a step-up transformer as a current source - depending on the class of the device, it can generate voltage from 300 to 3000 Volts.
It follows from this that the task, for example, how to measure grounding resistance with a multimeter, cannot have an unambiguous answer - in this case, you need to use a specialized device designed specifically for this purpose. Measurements are carried out according to certain rules and the use of such devices is the domain of specialists - without specialized knowledge, obtaining the correct result is quite problematic. Theoretically, you can check the resistance of the ground with a tester, but this will require assembling an additional electrical circuit, which will require at least a powerful transformer, like the one used on welding machines.
Digital and analog multimeters
Externally, these devices are easy to distinguish from each other - the digital one displays data in numbers, while the analogue one has a graduated dial and an arrow points to the desired value. Accordingly, a digital device is easier to use, since it immediately shows the finished value, but when working with an analog device, you will have to additionally interpret the output data.
Additionally, when working with such devices, you must take into account that the digital multimeter has a power supply discharge sensor - if the battery current is not enough, it will simply refuse to work.
The analog one in such a situation will not say anything, but will simply produce incorrect results.
Otherwise, for household purposes, any multimeter is suitable, the scale of which indicates a sufficient resistance measurement limit.
What is a multimeter
A multimeter or multitester is a compact, ergonomic and multifunctional device for measuring the basic parameters of an electrical network for any purpose. All multimeters allow you to measure current, voltage, resistance and even temperature with a certain accuracy using their probes.
Appearance of a typical dielectric plastic digital multimeter
There are two types of multimeters:
- Analogue, which display measurement results using mechanical display tools: arrows, bars and division values, showing the quantitative characteristics of the measured value;
- Digital. The most commonly used types of devices, the information is displayed through a built-in display, and all data is calculated digitally.
You may be interested in this Features of wire strippers
Megaohmmeter GM3123 for use in industrial high voltage networks
Turning the multimeter into ohmmeter mode and selecting measurement limits
The multimeter is controlled using a round rotary knob, around which there is a scale divided into sectors. They are separated from each other by lines or simply the inscriptions on them are different in color. To turn the multimeter into ohmmeter mode, you need to turn the knob to the sector area indicated by the “Ω” (omega) icon. The numbers that will indicate operating modes can be signed in three ways:
- Ω, kΩ – x1, x10, x100, MΩ. Typically, such designations are used on analog devices, in which what the arrow shows still needs to be translated into familiar values. If the scale is graduated, for example, from 1 to 10, then when each mode is turned on, the displayed result must be multiplied by the specified coefficient.
- 200, 2000, 20k, 200k, 2000k. This notation is used on electronic multimeters and shows in what range the resistance can be measured when the switch is set to a certain position. The prefix “k” denotes the prefix “kilo”, which in the unified measurement system corresponds to the number 1000. If you set the multimeter to 200k and it shows the number 186, this means that the resistance is 186000 Ohms.
- Ω – If there is only this icon on the ohmmeter body, then the multimeter is capable of automatically determining the range. The dial of such a device can usually display not only numbers, but also letters, for example, 15 kOhm or 2 MOhm.
The first two methods of labeling a scale have a direct relationship between the accuracy of displaying the results and their error. If you immediately turn on the maximum range, then a resistance of about 100-200 Ohms will most likely be displayed incorrectly.
The probes of the device must be plugged into the corresponding sockets - black in “COM”, and red in the one near which, among other symbols, there is an “Ω” icon.
What is wire insulation resistance
Insulation resistance is one of the most important parameters of any cables and conductors. This is based on the fact that all wires are subject to external influences during their operation. In addition to external influence, there are also internal ones: the influence of the cores of one wire on each other, interaction through electromagnetic fields. All this, one way or another, leads to leaks.
Industrial megger for measuring large resistance values
That is why any electrical and non-electrical wires are created with insulation that protects the conductor from external influences. Popular insulating materials include rubber, polyvinyl chloride, oil, wood and paper. These materials are used based on the purpose of the cable. For example, wires buried underground are insulated with relatively thick dielectric tape, while telecommunications cables may be enclosed in a simple aluminum foil wrapper.
Old Soviet analog bench ohmmeter
Important! Insulation is the protection of cores from exposure to otherworldly factors, protection of cores from each other, from short circuits and from various leaks. Insulation resistance is the amount of resistance between the conductors of a wire or between one of the conductors and the insulating layer.
Any material ages and deteriorates over time, which leads to deterioration of its characteristics and a decrease in insulation resistance to direct or alternating current. The insulation resistance characteristic is indicated on the cable and is standardized in its GOST. It is determined in laboratory conditions at a temperature of 20 degrees.
Carrying out resistance measurements with a professional megohmmeter
Low-frequency communication cables have a minimum insulation resistance of 5 Gigaohms per kilometer, and coaxial cables, in turn, have a minimum insulation resistance of 10 Gigaohms per kilometer. Measurement and testing of resistance is carried out on a regular basis with a megohmmeter: at mobile communication installations - once every 6 months, at high-risk facilities - once every 12 months, at other facilities - once every three years.
You may be interested in Checking the Ku202n thyristor
Resistor to increase the resistance of the electrical network
Wire continuity - checking the integrity of an electrical circuit section
There are two ways to test wires with a multimeter, the use of which depends on the presence of a sound signal in the device. This function, if it exists, can be activated on different devices by different switch positions - so you need to pay attention to the icons that are drawn on the device body.
The buzzer is shown as a dot, to the right of which three semicircles are drawn, each of the subsequent ones larger than the previous one. You must look for such an icon either separately, or above the smallest number of the resistances, or near the diode icon, which is displayed as an arrow on a line, with its sharp end resting on another line perpendicular to the first.
If you turn the tester into dialing mode, it will beep if the resistance of the conductor being measured is less than 50 Ohms. In some devices this can be 100 Ohms, so if accuracy is needed, then you need to check the device data sheet.
You can see the wiring clearly in the video:
The procedure for ringing is simple and intuitive - set the switch opposite the buzzer icon and use the probes to touch the ends of the conductor that needs to be “ringed”:
- If the wire is intact, the multimeter will emit a beep.
- If the wire is intact, but due to its length the resistance is greater than that at which the buzzer is triggered, then the display will display a number indicating its value.
- If the resistance is significantly greater than the range for which this operating mode is designed, then the display will show one - which means you need to move the switch to another mode and repeat the measurement.
- If the integrity of the wire is broken, then no indication will occur.
If an analog multimeter without a sound signal is used to “test” conductors, then it is set to the minimum measurement range - if, when the probes touch the wire, the arrow shows a value tending to zero, then the wire is intact. The same applies to digital devices without a buzzer.
Before checking the resistance of the conductors, you must first always perform a test of the device itself - touch the probes to each other. You also need to check how the device reacts to the human body - some people have a fairly low resistance and if you press the ends of the wire against the probes with your hands, the device can show that the conductor is intact, even if this is not the case.
Description of the multimeter
To date, a large number of multimeters have been developed. Basically they are divided into:
Analog testers display measured values on the screen with an arrow. Some professionals still prefer them, although these devices have been almost driven out of the market by digital tes. With these devices it is more convenient and clearer to observe changes in the measured parameters.
Digital multimeters display data on a display with numbers. These devices are very popular.
An analog device works well in the range of radio waves and electromagnetic fields. They do not need, unlike digital multimeters, autonomous power supply.
There is a switch on the body of the analog tester. Use it to select the measurement mode. Switching ranges is obtained by multiplying the value on the scale by the scale factor that the switch specified.
The uniform scale is afraid of overloads. If it has values from zero to a certain number, then the device may fail. This is likely if the measurements significantly exceed the permissible limits. Therefore, many analog multimeters are equipped with a logarithmic scale, where the range of possible measured values is from zero to infinity.
Two probes are connected to the device. The ends of the probes look like needles. Sometimes, for convenience, metal clips called “crocodiles” are put on them.
In budget models, the probes are not of very high quality, although they may look impressive in appearance.
When purchasing a device, you should pay attention to the fact that the wire is flexible and elastic. It should be held tightly near the entry point.
The analog multimeter does not require a power supply. It operates on the same principle as an ammeter.
When the probes are connected to a circuit or radio element, current begins to flow in the internal induction coils. Under the influence of the created magnetic fields, the pointer on the device deviates by a certain angle and indicates the value on the screen.
Read also: Solder for soldering food-grade copper
The digital tester is designed a little differently. Inside its case there is a microcircuit located on a printed circuit board. It is entirely responsible for processing input data.
Digital multimeters are more accurate and produce less error than their analog counterparts.
Control and monitoring elements are located on the front panel:
- mode and range switch;
- LCD display;
- connectors for probes.
Checking the indicator with a tester
To switch the multimeter to resistance measurement mode, use the rotary knob to select the “Omega” sector. This sector indicates the permissible measurement ranges . They are marked with marks 200, 2k, 20k, 200k, 2 M, 20 M, 200 M. These marks indicate the maximum measured resistance that is allowed in this range.
The value of the element being tested must be less than the rightmost value of the range, but greater than the left one. For example, if the value of the resistor being tested is tens of megaohms, then you need to select a range in the “Omega” sector from 20 mOhm to 200 mOhm.
If the resistance range of the resistor is unknown in advance, then you need to start measuring from the largest range. Then reduce the ranges, achieving the required accuracy.
If you set the range to be less than the resistance of the element, the data will not be displayed.
The probes are inserted into the corresponding sockets. The black probe of the device goes into the socket on the tester with the inscription “COM” (short for common), the red one goes into the socket next to which there is the designation “Omega”.
Wire testing process
Before starting any ringing, it is necessary to check the functionality of the device itself. It is possible that there are problems or breaks in the measuring system itself. The same insufficient contact of the probes. To check, the ends of the probes are connected to each other. If there are no breaks in the circuit and the device is operational, the display will show a zero value. Sometimes the values deviate slightly from zero. This is due to the resistance of the probes themselves and their terminals.
There are two ways to test wires. Their use depends on whether the device has a sound signal or not. If there is a sound function, then the corresponding icon will be drawn on the body.
Dialing is simple and intuitive. You need to set the switch to buzzer mode and bring the probes to the ends of the conductor being tested. The following tester behavior options are possible:
- If the wire is not damaged, a beep will sound.
- The wire may be intact, but it is too long. Then its resistance will be greater than that at which the buzzer sounds. Then the display will highlight a number with the resistance value.
- If the resistance is much greater than the set range, then one will appear on the display. You should select another mode and take the measurement again.
- If there is a break in the conductor, then there will be no indication.
In the case of testing radio components with an analog multimeter, it is set to the minimum possible measurement range. If, when the wire and probes come into contact, the arrow of the device is near zero, then there is no break.
Before measuring the resistance, in addition to the standard multimeter test, you need to conduct one more test. It is necessary to check the reaction of the tester's behavior on the human body. Some people have low resistance. If you hold the probes with your hands in places where there is no insulation, the tester may decide that the area being measured is not broken. Although in reality this will not be the case.
Nuances of resistance measurement
Measuring resistance with a multimeter is very similar to testing wires, but has its own characteristics.
First of all, the radio component being tested must be removed from the electrical board. Or at least one leg. Otherwise, the device can measure the overall resistance of the network, and not a specific part. If the part being tested has several pins, then it is completely desoldered from the board.
Before unsoldering an element from the board, you need to completely de-energize it, remove the galvanic batteries, turn off the switches and discharge the capacitors.
Visually inspect, checking the surface of the body. A burnt part (especially resistors) often has burnt rings on the body, significant darkened areas, and signs of melting.
It is necessary to set the optimal measurement range. Some tester models can detect it automatically.
If measurement accuracy is critical, measurement errors must be taken into account. For example, if the resistance on the resistor is 1kOhm (1000 Ohm), the tolerance percentage should be taken into account. This tolerance for resistors is 10%. As a result, actual resistance values will range from 900 to 1100 Ohms.
The same resistor, tested in the range up to 2000 kOhm, will show a resistance equal to one. But if you set the range to 2 kOhm, a more accurate number will appear on the tester display. For example, 0.97 or 1.02.
In some cases, it is possible to take measurements without desoldering the part from the board. This is only used in special cases. It is necessary to check whether there are shunt circuits in the electrical circuit. Semiconductors affect multimeter readings.
In this case, you need to study the circuit diagram. To make it easier to find problem areas and parts, electrical diagrams always show test points with the corresponding correct parameters.
It is unacceptable to touch the terminals of the element being tested with your hands when measuring resistance. The result will be predictably wrong.
Sometimes you have to take into account the so-called contact resistance. The tails of radio components and pure solder can become covered with an oxide film over time. It is recommended to clean the contact area a little or scratch it with a needle probe.
When measuring resistance, it is important to interpret the data correctly. For example, it is possible that the measurement value is equal to the maximum set as a limiting limit. This may indicate that the multimeter is broken. However, this is a rare scenario. Most likely, the limit is set incorrectly, and you need to increase it using the switch on the case.
If you have doubts about the correctness of the obtained values, it is advisable to measure the resistance value of a known-good and signed suitable element.
Read also: DIY mini gearbox
It is necessary to regularly check the condition of the galvanic battery inside the tester. Over time and with active use, the battery discharges. In practice, this leads to inaccurate results. In addition, the error increases in proportion to battery discharge.
Features of actions during isolation
Finding out the resistance of ordinary conductors and radio components is relatively simple. In the case of insulation there are special features. Illiterate actions by an electrician can lead to very bad consequences. An important rule: these measurements should be carried out in heated and warm rooms.
If such measurements are taken outdoors at low air temperatures, there is a high probability of microscopic ice formations inside the cable braid. Since water is a dielectric, its conductivity is minimal. Multimeters will not be able to recognize these inclusions. If a cable is moved from a cold street to a warm room, moisture may appear inside the wiring.
Actually, measuring the cable insulation resistance occurs as follows: you need to determine the neutral wire located in the distribution panel. The first probe is installed at the end of the neutral wire. The second probe is connected to the phase cable. When taking measurements, it is advisable to disconnect the ends from the terminals. All that remains is to select the correct limit and see the resistance value on the screen.
After which the resistance value is compared with the reference parameters. They are located in the Electrical Installation Rules. The tables below indicate values depending on the cable cross-section, its brand and many other parameters. If the measured data is within the acceptable range according to the tables, then the wiring is not broken. And there are no problems.
When you need to find out the presence of a ground loop in the wiring, there are several recommendations:
- In new houses, the voltage value in the phase-grounding chain is higher than in the phase-neutral one.
- A small voltage is possible between the neutral cable and the grounded cable. Due to low potential on the neutral wire.
In general, measuring resistance using modern testers is not difficult. Especially if it's a new digital multimeter. Managing it is very convenient and does not require deep professional skills.
The examiner only needs a small set of knowledge of the basics of constructing electrical circuits from school physics lessons. And of course, in any case, basic safety requirements must be observed.
Dear readers, I welcome you to the pages of the site https://zametkielectrika.ru .
Today I wrote the second part of the article, where we will continue to learn how to use a multimeter, tester or meter. In general, as you like.
You can read the first part of the article here: “ How to use a multimeter (part 1) ”
How to use a multimeter when measuring resistance
Attention. When checking the resistance in a circuit, you need to make sure that there is no voltage in it.
When measuring the resistance value with a multimeter, insert the red measuring probe into the “V/Ω” socket, and the black probe into the “com” socket.
Set the multimeter switch to range (Ω). It is specially highlighted in red.
Next, you need to make sure that the device (multimeter) is working properly. To do this, connect the red and black probes to each other. The multimeter will show the following:
The multimeter (“tester”) is working properly, which means you can carry out further electrical measurements .
There are 7 measurement limits in the (Ω) range: 200 (Ω), 2 (kΩ), 20 (kΩ), 200 (kΩ), 2 (MΩ), 20 (MΩ), and 200 (MΩ). Each value is the maximum value at a certain measurement limit. Also in this sector there is a function for “testing” circuits and checking diodes, but more on that later.
Most often I have to use a multimeter when measuring the resistance of an electrical wiring relay windings (coils) .
Now let’s take a visual measurement of resistance. As an example, let's take a coil from a relay with a rating unknown to us.
Here I want to inform you about a small subtlety, in contrast to measuring voltage. The fact is that when measuring an unknown resistance value, the multimeter switch can be set to any limit. This way we won't damage the multimeter.
We put the switch in the “2M” position, which will correspond to the multimeter’s measurement limit from o to 2 (MOhm) and connect the measuring probes to the coil terminals.
On the multimeter display we see only zeros instead of readings. This means that the coil has some resistance, but we have chosen the wrong measurement limit.
Then we set the switch to the “200K” position, which will correspond to the multimeter’s measurement limit from o to 200 (kOhm) and connect the measuring probes to the coil terminals.
We look at the measured value of the coil resistance on the display of a multimeter (“tester”). The coil resistance is 00.4 (kOhm). The value is preceded by a single zero, so you can reduce the limit by one more step.
We set the multimeter switch to the “20K” limit, which will correspond to the multimeter’s measurement limit from o to 20 (kOhm), and take the measurement again. Now on the multimeter screen we see the resistance value of our coil, which is 0.63 (kOhm). This looks more like the truth.
If you wish, you can try to reduce the measurement limit to “2K”, which will correspond to the multimeter measurement limit from o to 2 (kOhm) and measure the coil resistance again.
On the multimeter screen we see an even more accurate value of the coil resistance, which is 0.649 (kOhm).
We will not dwell on this and will try to reduce the limit to “200”, which will correspond to the measurement limit of the multimeter from o to 200 (Ohm). In this case, we will see the number “1” on the screen. This means that the coil resistance is greater than the set limit, or there is a break in the coil wire.
I would like to mention a few more words about the “dialing” mode. In this mode, when the resistance in the circuit is less than 70 (Ohm), a sound signal is heard. A very convenient feature.
Carrying out resistance measurements and what nuances may arise
The multimeter probes are connected to the same sockets and, in general, measuring resistance is performed in almost the same way as testing the continuity of wires, but since it is necessary to check not just the integrity of the conductor, this process has some features.
- Selecting measurement boundaries. When the measured resistance is at least approximately known, the regulator sets the nearest higher value (if the multimeter does not automatically detect it). If the resistance is not known exactly, then you should start measuring with the highest value, gradually switching the multimeter to a lower value.
- When accuracy is needed, errors must be taken into account. For example, if a resistor has a resistance of 1 kOhm (1000 Ohm) indicated on it, then firstly you need to take into account the tolerances for its manufacture, which are 10%. As a result, real numbers can be in the range from 900 to 1100 Ohms. Secondly, if you take the same resistor and set the multimeter to the maximum value, for example 2000 kOhm, then the device can show one, i.e. 1000 Ohm. If you then move the switch to the 2 kOhm position, then most likely the device will show another, more accurate figure, for example, 0.97 or 1.04.
- If you need to check the resistance of a part that is soldered into the board, then at least one of its pins must be desoldered. Otherwise, the device will show an incorrect result, since with a high degree of probability there are other conductors in parallel to the part being tested in the circuit.
If an element with several pins is being tested, then this part must be completely desoldered from the circuit.
- The human body conducts current and has a certain electrical resistance. Therefore, as in the case of parts soldered into the board, it is necessary to exclude the possibility of their contact with foreign objects - in this case, these are the hands of the person measuring. As a last resort, you can press the contact to the probe with the fingers of one hand, but touching the second one with the other hand is categorically unacceptable - the measurement result in this case will be obviously incorrect.
- In some cases, it is necessary to take into account the contact resistance of the contacts - even clean solder or the legs of unused radio components can become covered with an oxide film over time, so it is advisable to at least minimally clean the contact area or scratch it with the end of the probe.
How to check the wire resistance is clearly shown in the video:
How to use a multimeter when measuring resistance
After studying the instructions and preparing the multimeter for use, you can begin to take direct measurements. All actions are generally performed in the same way, regardless of the object being measured.
The black test lead must be inserted into the COM socket, and the red end of the conductor must be inserted into the VΩmA socket. Next, by turning the range switch, the multimeter must be turned on.
Before measuring small resistance parameters, the switch must be set in the “Ω” sector. Its final position is fixed opposite the number “200”. Thus, the measurement capability will be in the range from 0.1 to 200 ohms. Next, the measuring circuit must be checked for short circuits. To do this, the probes touch each other, and numbers from 0.3 to 0.7 appear on the screen, showing the resistance value in the test leads. This value should be checked every time you turn on the multimeter. If the wires are open, the number 1 will appear on the left edge of the display.
When taking measurements, you must simultaneously touch the contacts on the area. If the consumer or the circuit itself is in good condition, the readings of the device will differ, since all elements have different resistance. If the integrity of a fuse, cord or wire is checked, the resistance is in the low range, approximately 0.7-1.5 ohms. Connecting to current consumers gives results within 150-200 Ohms. The dependence of power on resistance becomes noticeable: the higher the power of the consumer, the lower its resistance.
Read also: Tungsten, what kind of material is it?
When the multimeter readings remain unchanged, the measurement range must be switched to 2000, which makes it possible to take measurements in the range from 0 to 2000 Ohms. If there is no result, you need to switch to the next value and take the measurement again. You should remember the high sensitivity of the multimeter in the “2000k” position. If you simultaneously touch the probes with your hands, the device will show the resistance of the human body and the data obtained will be distorted.
How to measure resistance with a multimeter - summary
The control of modern digital multimeters, and most analog ones, is made as convenient as possible for the operator and does not require deep knowledge. It is intuitively understandable even to a non-professional without specialized education - often, to master and properly use the device, it is enough to remember school physics lessons on building and testing electrical circuits. When taking measurements, it is advisable to remember the nuances listed above, because in any case they will “come out” while using the multimeter.