- Ways to clear a clogged sink
- Using baking soda and vinegar to clean the sink
- Removing deposits with salt and soda
- Use of chemicals
- Removing a blockage using a plunger
- Cleaning the sewer drain with a cable
- Application of hydraulic pump
- Cleaning the siphon without removing or disassembling
- Cleaning the siphon with disassembly
- How to prevent your sink from getting clogged
Due to the abundance of cleaning and grease, the problem of how to clean the siphon under the sink in the kitchen arises more often than in the bathroom. The recommended method for flushing the drain depends on the design of the siphon, the nature and intensity of the contamination.
To avoid stagnation of water and the formation of congestion in the sewer, it is necessary not only to clean the siphon in a timely manner, but also to prevent dirt and debris from entering the drain.
The kitchen sink is used more often than any other plumbing fixture in the house.
Varieties of plums
In general, there are different types of drains. One of the most common options in Europe and the USA is a drain, which is secured with a large lock nut. This is a fairly old fastening method, so it is found in houses built more than 15 years ago.
This drain is secured with a fixing nut. Plumbing mastic is used as a sealant.
- Sink.
- Drain body.
- Cover with plumber's mastic.
- Rubber gasket.
- Metal washer.
- Locking nut.
- Adapter.
- The nut that screws onto the drain body.
- Shank.
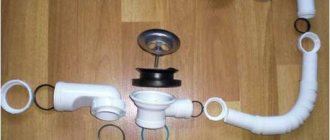
Plastic drain pipes located under the sink. This design will last for many years and is not afraid of rust.
Pipes for draining two sinks, with connected dishwasher cable. And again the kingdom of plastic.
Of course, this is an old drain option, but still quite popular. Another old option is a fixing pad, which is secured with a nut.
The old version of fastening the drain using a fixing plate and nuts. Requires the use of rubber gaskets and plumber's mastic where the drain borders the sink.
- Sink.
- Drain body.
- Cover with plumber's mastic.
- Rubber gasket.
- Flat iron washer.
- Protrusions.
- Grooves in the overlay.
- Mounting plate.
- Screws.
- To attach the mounting plate to the drain body, the grooves of the plate are put on the protrusions, after which the screws are tightened.
- Adapter.
- Screw.
- Shank.
Modern drain options are a simple overhead cup with an extremely simple design.
Design of a modern sink drain. Plumbing mastic won't hurt either.
- Drain body.
- Plumbing mastic.
- Sink.
- Pad.
- Cup overlay.
- Locking nut.
- Shank washer.
- Shank.
- Nut for attaching the shank to the drain body.
Connecting the sink drain pipes takes place in 4 simple steps.
Two options for sink drainage - with a lifting lid and a perforated surface.
Whatever drainage option you use, time inexorably leads to the fact that sooner or later the drain begins to leak.
The leak occurs where the drain is attached to the sink. Repairing a drain is quite simple.
Fixing a leak in the sink drain
It is not difficult to get rid of a leak, but the drain must first be removed.
First of all, unscrew the nut that secures the drain shank.
To remove the drain with the lining, simply unscrew the fixing nut using a pipe wrench or pliers.
- Unscrew the nut that secures the shank.
- Unscrew the drain cup lock nut.
- Use a pipe wrench or pliers.
- Washer.
- Bottom of the sink.
- Cup cover.
- Unscrew the nut.
- Shank nut.
- Shank.
- Unscrew or tighten the shank.
A pipe wrench is an essential tool for removing a sink drain.
Unscrew the nut securing the drain or the mounting screw. If the drain has a cup design, you cannot do without a pipe wrench or pliers. When the diameter of the nut is too large, you can turn it by placing a piece of wood or a chisel and gently hitting it with a hammer. Do not overdo it and remember that the nut is unscrewed counterclockwise.
This drain is secured with an extremely large nut. Often you can unscrew it only using a screwdriver (even better, a chisel) and a hammer. However, a pipe wrench should also work if you try hard enough.
- Metal washer.
- Rubber gasket.
- Nut for fastening the drain.
- Chisel or screwdriver.
- To remove the nut, turn it counterclockwise.
- Screw.
- Unscrew the nut to secure the shank.
- Shank.
- P-shaped shutter.
Often the entire drain rotates along with the nut. It needs to be secured in place using a piece of wood that can be inserted between the wall and the nut. Now follow these steps sequentially.
- Once the nut or screw is unscrewed, everything else is simple. Remove the rubber gasket and metal washer.
- Now we remove the drain itself from the sink.
- Clean it thoroughly to remove mineral deposits and old mastic.
- Apply a layer of fresh mastic to the area where the drain is installed. Now press the drain against it.
- Reinstall the gasket and washer. Sometimes, if they are very worn out, it is better to replace them.
- Tighten the fixing nut or mounting screw.
- Clean any remaining mastic in the sink to keep the drain looking nice and tidy.
Before screwing the machine screw back in, be sure to use sealing tape to wrap it around the threads of the shank mount.
Done - now the drain will not leak.
Stagnation protection
Stagnation occurs due to the negligence of people who let hair, wool, paper, etc. into sewer drains. Siphon needs regular maintenance. In order not to have to worry about cleaning the siphon under the sink, it is enough to pour diluted chemicals into the drain from time to time or use a plunger.
It is impossible to completely protect against clogging. However, by performing the operations described above every few months (as well as cleaning the shower stall), the risk of stagnation is minimized.
Currently reading
- Everything about choosing a chrome siphon for a sink
- Let's talk about high-quality drainage in the form of a shower siphon
- Characteristics and instructions of a bottle siphon for a washbasin
- Comparison of drain blockage removers
Sink Drain Cover Repair
As a rule, the drain in our sinks is closed with a regular plastic stopper, which prevents any debris and food waste from entering the pipe.
However, in the USA and Europe there are often sinks where the drain is closed with a special lifting lid. It opens by pressing the lever located next to the faucet valves.
This is what the mechanism for lifting the sink drain cover looks like. The lid lift level can be adjusted within a fairly wide range.
- To adjust, unscrew the screw and move the lever.
- To adjust, squeeze the clamp and move the lever.
- Sink.
- Drain cover.
- Hinge nut.
- Articulated lever.
- Lifting lever.
- Adjustment screw.
- Lift arm clamp.
- Spring clamp.
An example of a typical sink drain, equipped with a lever that allows you to conveniently lift the lid.
The mechanism that lifts the lid is usually mounted behind the sink. The lifting lever is connected to the adjustment screw by means of a corresponding clamp. In this case, the lifting arm is controlled by a hinged arm via a spring. Pressing the hinged lever allows the drain cover to lift.
The lifting height can be controlled using an adjustment screw. If you loosen it, just move the clamp up or down and select the position of the cover that you need, after which the screw will lock.
Sometimes the lid is attached directly to the hinged arm, and sometimes it just sits on the drain.
Sink drain covers come in many different types.
- Rotate and lift the cover to remove it.
- Pull the hinge lever and lift the cover.
- Lift the hinge arm and remove the cover.
- Tilt and rotate when lifting.
- Iron cover.
- Pad.
- Articulated lever.
If the cover is not fixed in any way, then it can be simply removed for cleaning.
Some lids have a special hook that connects it to the hinged arm. To remove such a cover, just twist it.
In other models, the lever passes directly through the cover itself, so it can only be removed by unscrewing the pivot arm retaining nut and pulling the lever out of the cover. When you tighten the nut back, do not forget to use sealing mastic or tape.
Adjusting the Sink Drain Cover
As we already described in the previous article, many sinks use special lift-up lids rather than regular plug-in lids.
Lifting such a cover is very simple - just press the lever located next to the mixer valves. The process of raising and lowering the lid is carried out through a spring mechanism hidden under the sink.
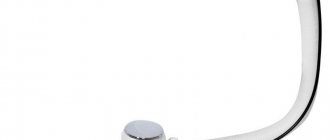
Chrome plated drain cover with lever for the sink.
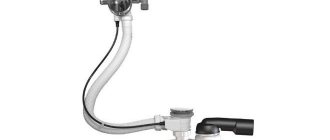
The so-called plunger mechanisms have become widespread, when the lever rotates on a hinge and, thereby, moves the lifting lever up or down. At the end of this lifting arm is a weight that closes the drain.
Lever design of the drain cover.
- Pad.
- A cover located on the drain of an overflow pipe.
- Tension spring.
- The lid is closed.
- The lid is open.
- Overflow.
- Pad.
- Thread for changing the location of the lever.
- Lifting lever.
- First nut.
- Bath wall.
- Plastic element with nuts.
- Second nut.
- Overflow pipe.
- Drain.
- Plunger.
- Plastic element with thread.
- Drain hole.
- Nuts.
- A plunger seat that, when blocked, shuts off the water.
- To the trap that is under the floor.
Part of the mechanism for lifting the drain cover located under the sink.
As a rule, the weight should completely cover the drain. However, if water still flows out, it means that the hole for the weight is very clogged. Cleaning it is not difficult at all.
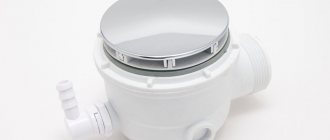
Method seven: removing the sump
The problem of blockage is solved by removing the siphon sump. A septic tank is a place where garbage accumulates. This method takes much less time than the previous one, but does not become any less effective.
Procedure:
- Prepare a bucket and place it under the still assembled siphon;
- Unscrew the sump;
- Remove all debris from it and clean the walls from grease stains;
- Screw on the sump;
- Turn on the water and check how easily it flows;
- Once again, pay attention to the sump: if installed incorrectly, leaks are likely.
If the problem is not solved and the water still flows with difficulty, you need to completely disassemble the siphon.
It will be interesting: Which shower cabin is suitable for your bathroom
How to clean a drain hole
Both the hole itself and the weight blocking the drain are often cleaned.
Let's see how this can be done.
- Remove all screws from the sink drain hole.
- Remove the entire plunger mechanism from the pipe.
- The weight should be properly cleaned by placing it in apple cider vinegar or regular vinegar for a while.
- The drain itself is simply washed with water.
- Now insert the plunger mechanism into place.
- Secure the drain hole with screws.
Clean the lid lifting mechanism.
- Unscrew the overflow cover from the bathtub.
- Pull the lift lever and plunger out of the overflow pipe hole.
- Threaded lifting lever.
- Plunger.
Often water leaks into the drain hole because the weight in the closed position does not reach the drain hole. This problem can be solved by lengthening the lift arm.
Method four: soda, salt, water
Another way is to use three components at once for washing. When water, salt and soda interact, a chemical reaction occurs to form a solution that has cleansing properties.
Algorithm:
- Mix half a glass of baking soda and half a glass of salt. Pour the resulting mass into the siphon;
- Pour boiling water into the drain;
- Wait for the reaction to complete. Do not use the sink for eight hours;
- After the expiration date, rinse the sink with warm water.
May be interesting: What you need to know when choosing a kitchen sink
The most convenient time to perform the procedure is at night.
Replacing and repairing a siphon under the sink: 5 useful plumbing tips
There is no need to do any special chemicals, since the possibility of extending the lever is provided on the lever itself. Simply unscrew the nuts and move the plastic part of the lever to the desired position.
How to adjust the length of the lift lever in the mechanism for lifting the drain cover.
- To decrease the length, move the nut up, move the plastic piece, and move the second nut up. To lengthen the lever, all the same steps are performed in reverse order.
- The lift arm that leads to the pivot arm is threaded.
- First nut.
- Plastic element.
- Lever to plunger.
There are, of course, lifting levers of other designs, however, the method of changing the length of the lever remains approximately the same.
Scheme of the lifting mechanism for draining
As for the lifting mechanism that is used to lift the drain cover, it is shown in the following drawing.
When you turn the handle, the spring is compressed, after which the drain hole opens. Otherwise, the spring is released and the lid opens, blocking the drain. The specific mechanism may differ, but the general principle of the mechanism remains the same.
- A rotary handle is used to open or close the drain cover.
- Turn the handle.
- Back view.
- Front view.
- Pad.
- Cover for overflow pipe.
- Pen.
- Earring.
- Overflow pipe.
- Spring.
- Lifting lever.
- Pipe wall.
- Drain cover.
- Sealing ring.
- Flange.
- Drain.
- Rolling lever.
- Nuts.
- To the shutter, which is located under the floor.
Typically, the bottom of the lift arm is a spring. In this case, the handle with which the lid lock is controlled interacts with the lifting lever. At the end of this lever there is a spring, which is in contact with another swinging lever.
When you turn the handle, the lever presses on the spring, and the lid rises, opening the drain. As soon as you turn the handle in a different direction, the pressure is released from the spring, causing the lid to “automatically” close. The device, frankly speaking, is very primitive, but effective.
The lever mechanism can also be cleaned if desired. In addition, the sink drain cover is often equipped with a rubber seal, which wears out quickly and also requires replacement.
If you lift the lid, it is easy to pull the swing arm out. To put it back, you need to carefully turn the lever so that it fits into the horizontal plane of the drain pipe.
- The lever is pulled up and to the side and inserted in the same way.
- Lid.
- Flange.
- Drain.
To get the levers, you need to unscrew the mounting screws in the right places. These levers are then easily removed, similar to how a plunger mechanism can be removed. To change the force with which the spring presses on the lever, it is enough to change the length of the lifting lever. To do this, you need to turn the nut that secures the spring. As a result, the lid will tightly close the drain hole and there will be no leaks for you.
Do not forget to clean all parts of the mechanism using regular table or apple cider vinegar, which perfectly dissolves mineral deposits. All levers should move smoothly and without problems.
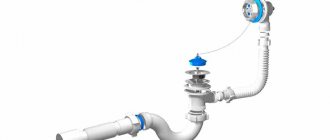
What types of siphons are there?
There are three varieties of them. Here they are:
Something tells me that in your kitchen it is the first type. Ask, how do I know? It's just the most common of all. The lower part (in the picture there are two arrows going up from it) can be unscrewed, so it is very convenient to clean it, unlike the other two.
The materials can also be different, but the most common is good old plastic. Unlike steel, it does not rust, and in other respects it is not particularly different in its useful properties: it does not retain dirt, and it can also be cleaned even with aggressive chemicals, but it doesn’t matter. Of course, such a siphon is less durable, but it is not subject to special loads, so this is not so important.
Reference! If you want to “hit the metal” in your kitchen, there are brass and stainless steel models especially for your rocker soul.
Drain cover with spring
Continuing the conversation about lifting lids for sink drains, let’s say a few words about such a variety as spring lids.
This cover works very simply and conveniently. To open it, just press the top. In this case, you will not need to use complex lever mechanisms, which are very difficult to repair.
The spring cap has a surprisingly simple design, without the need for levers or other mechanisms.
- The lid is closed.
- The lid is open.
- Press to close the lid.
- Washer gasket.
- Round drain cover.
- Spring mechanism.
- Round plastic tube.
- Press to open the cover.
- Mechanism for lifting the lid.
- Water flow.
- Spring mechanism.
- Round plastic tube.
Designer sink drain cover from BLANCO. A very simple and affordable solution if you are confused by the complex lid lifting mechanisms described in our article. But the good thing about choosing topics is that no one can impose someone else’s point of view on you. Choose what you like.
To install such a cover for a sink, just purchase it at any plumbing store. It comes with all the necessary parts, and this kind of cover can be installed in just a few minutes.
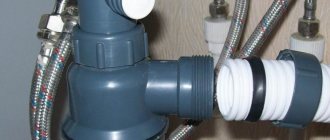
Checking the tightness of connections
Sink assembly diagram.
As for sealing the seam between the siphon and the sewer pipe under the sink, a sealant is used for this. If we are talking about sealing a seam for a toilet or urinals, then cement mortar is used for this. When installing, you need to carefully ensure that the threads are not stripped or the gaskets are damaged. In order to check how tight the connection is, turn on the water.
When performing sealing, professionals recommend additionally “winding up” the threads. This especially applies to those cases where there is a loose fit. To do this, tow or special silicone tape is wound around the thread. In this case, the nut should fit tightly. Then the thread is coated with paste and the part is screwed on. At the end of the procedure, you should conduct a leak test by turning on the water for 2 - 3 minutes. If this part does not leak, the work is done efficiently.
Tools for repair
- screwdriver;
- cleaning cable, which can be replaced with wire or a metal brush on a long handle;
- container for draining dirty water.