Plumbing fixtures can break, and everyone knows this. The easiest way is to call a plumber, but if you know how the toilet tank fittings work, you can repair it yourself. The first thought that arises when trying to repair it yourself is how to remove the lid from the cistern of a modern toilet? At first glance, this seems difficult. For example, Roca or Jika models have lids with buttons. The main thing is to unscrew the button correctly and get to the fittings.
General recommendations for handling the toilet
Since the drain system is located inside the tank, you need to remove the top part. Push-button models are similar to each other in external design. Old toilets are much easier to deal with. Their covers can be easily lifted up and quickly returned to their original place after repair.
Once the cover is removed, never remove the fitting in a hurry. It is important to remember in what order all its elements are located so as not to make mistakes during assembly. The tank lids are made of ceramic and can break if handled carelessly. Prepare a small container in advance. You will need to put all the fasteners, clamps and other spare parts into it.
When disassembling the fittings, do not use unnecessary force, do everything carefully. If the button does not give in at first, you should not hit it with a hammer or pliers: fragile parts may break, and it will be difficult or impossible to find the same ones. The best way is to try to unscrew it manually. If there are no manufacturing defects or serious damage inside, it can be easily unscrewed.
Drain system - operating principle
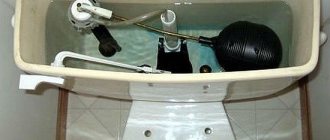
Modern toilet systems, in most cases, are compact designs. This assembly features a small flush cistern mounted on a ceramic platform (the base of the toilet).
This design feature allows you to reduce the size of the toilet to a minimum, while the flush water pressure level will be sufficient to flush away all the waste. Also, the small size of the device allows you to carry out independent, timely repairs of the drainage device, without specialists.
It will be interesting to replace the faucet in the bathroom.
Internal organization
The plumbing market is literally filled with all kinds of plumbing fixtures; the cost is determined by the popularity of the manufacturer. The materials from which they are made, the fittings installed in them, the general functionality of the entire system.
What can break inside
If the float is damaged, it stops holding water inside the tank, and it begins to overflow over its edges. In this case, the old float must be replaced with a new one. When the float is empty inside, depressurization may occur since it is constantly in contact with water.
Helpful advice! The crack or hole is temporarily sealed with a soldering iron, but after 1 or 2 months the float will still have to be replaced.
If the lever part of the float fails, it must also be completely replaced.
A defect in the fittings can be caused by improper actions of the plumber. If the installation of backlash connections was carried out with deviations from accepted standards, the fixing elements become weakened. This defect is easy to fix. Simply turn the top clockwise.
If the shut-off valve is faulty, water may leak out. Testing the shut-off valve is simple: press it slightly by hand. If water flows, it means the cause of the breakdown is in it. The fittings are disassembled, the container is cleaned, including its bottom. If necessary, replace the old gasket with a new one. The same is done when the siphon membrane is deformed.
Breakdown options
Even expensive plumbing equipment breaks down. You shouldn’t call a plumber for the slightest reason. Any user can fix the problem with his own hands.
- Float. If the water is not retained inside the tank, but overflows over the edges, then the operation of the float mechanism is most likely impaired.
- Misalignment during installation. If backlash connections were installed with deviations from the standards, then over time the fasteners become unbalanced. To eliminate the defect, it is enough to return them to their original positions by simply turning the upper part. Depending on the design, for example, in the luxury suntek model, the fasteners are re-fixed after adjusting the entire mechanism.
- Depressurization. Happens in the case of a hollow plastic float. The damaged integrity of a segment can be restored by soldering the damaged part with a soldering iron. But this is a temporary measure that allows you to extend operation for 1 - 2 months and no more. In the future, it is recommended to completely replace the part.
- Deformation of the lever part of the float. There are many reasons, but there is only one piece of advice: replace the mechanism. Of course, you can straighten a bent lever to a horizontal position. But experience shows that this will not help for long. Moreover, you can buy both parts of the drain mechanism and parts of the device, including the lid, in online stores.
- Stop valve. Not only the service life of the toilet cistern depends on the correct functioning of the shut-off valves. How can I check if this part is faulty? Having opened the tank lid from the edge, press the valve with your hand. If water continues to flow, there is a problem. There is no way to do this without dismantling. Having disassembled the structure, thoroughly clean all components, including the bottom of the tank. If necessary, replace the gasket. The most likely cause of the breakdown is this.
- Membrane deformation. Malfunctions of the siphon membrane are a common source of damage. It is not possible to repair the part.
The replacement is carried out in five stages. During work, special attention should be paid to the tank fastenings.
- Drain the water from the drain tank.
- Secure the lever by tying it to the bar.
- Unscrew the nuts. First, the one that attaches the pipe to the tank, then the one that secures the siphon to the lever itself at the base of the cistern.
- Replace the membrane.
- Assemble the device parts according to the manufacturer's diagram.
From the above it follows that information about the device and strict adherence to step-by-step instructions is sufficient for independent repair.
How to remove a one-button tank
Each toilet is equipped with a system that collects water and controls its quantity. Most elements are made of plastic and non-ferrous metal, and they are controlled using buttons.
Removing the toilet cistern lid is easy with one button. The valve mechanism of older models is equipped with a clamping nut that secures the cover. In new models, this role of the nut is performed by a one-button or two-button head. The algorithm of actions is simple and looks like this:
- press the head;
- drain some water;
- carefully turn left;
- turn it out of the sleeve all the way;
- Having removed the button and disassembled it, open the cover.
If the tank has two buttons
Removing a toilet lid with one button is much easier than with two. With this design, it will be a little more difficult to disassemble it - due to different methods of fixation. The repair procedure looks something like this:
- the small button is pressed down;
- an inner wall will appear;
- there is a small groove on the wall behind which there is a latch;
- through the groove, using a screwdriver, press out the fixing element;
- take out the large button, and then the small one;
- unscrew the screw under them.
After these manipulations, opening the toilet lid (tank) will be easy.
There are tanks with a decorative nickel washer. First you need to unscrew it, and then unfold the lid across the toilet. Now all that remains is to press the fastening brackets inside the button and free it from the fastening elements.
Open by yourself
An old toilet model will not present any difficulties for you: just lift the lid and unscrew the fasteners at the top of the flush mechanism.
Removing a toilet lid with a button is a more difficult task. So that you don’t have to resort to the help of strangers, we’ll look at ways to open the toilet tank yourself.
Among the available tools, prepare a slotted screwdriver, that is, a flat one, and another metal object with a flat tip.
Model No. 1 with one button on the surface of the tank lid
- Using a screwdriver, carefully and slowly turn the ring that is located around the button. Move counterclockwise and be as careful as possible to avoid damaging the surface of the lid.
- As soon as the first shift occurs, you can put the screwdriver aside and continue to unscrew the ring by hand.
- Having completely unscrewed the ring, you need to finally remove it and in the end you will get a plastic cylinder.
- You can now lift the reservoir lid slightly.
- Carefully turn it 900 so that the top of the toilet is positioned transversely to the tank.
- Once the lid is in a perpendicular position, you will be able to remove the double-sided clothespin that holds the button.
- Move one end of the clothespin to the right and the other to the left, while simultaneously rotating the clothespin along its axis.
- You can now remove the toilet lid.
- Place it carefully on a flat and stable surface so that it does not break.
- Repair faults and check all mechanisms.
- Reassemble the tank in reverse order.
One button tank
As you can see, disassembling a toilet cistern with one button is quite simple. The main thing is to follow the instructions and be extremely careful.
When repairing a toilet, a funny paradox occurs: it is always easier to disassemble than to assemble. Therefore, if you do not have instructions for assembling the mechanism, carefully remember your actions, or even better, write them down.
Model No. 2 with two buttons on the surface of the tank lid
- To disassemble the two-button mechanism, press down on one half of the button and locate the small slot on the inside side of the other button.
- Use a screwdriver to grab the slot and remove half of the button.
- Then remove the other half of the button.
- You will receive a small hole in which you will find a slotted screw - you need to remove it.
- Lift the toilet lid slightly and begin to rotate it. As in the previous instructions, place the lid across the toilet cistern.
- Now you need to remove the double-sided clothespin, one end of which move to the left, the other to the right. By rotating around its axis, the clothespin will allow you to finally disassemble the toilet tank.
- During repair work, the tank lid must be placed on a hard and stable surface so that it does not accidentally break, bringing you even more trouble.
- After completing all the repair processes, check the operation of the toilet in a disassembled state. If there are no complaints, proceed to assembling the toilet cistern.
- Assembling the tank and closing it with a lid is as easy as disassembling it - do each step of the instructions in reverse order.
Model with two buttons
If a new toilet model begins to “mope”, do not rush to get upset; you can easily fix many problems yourself.
If you want to carry out even the smallest repair work on the toilet, remember that work should only begin with the water turned off. If you do not turn off the water in the riser, you can simply flood the apartment and the neighbors below.
Reconnect the water only after assembling the plumbing to check its operation.
A leaking toilet tank is a fairly simple breakdown that requires a little time and only men’s hands
When working at home with plumbing fixtures of any kind, you need to prepare in advance a place for temporary storage of all parts and components, to exclude any contact of children and animals with toilet or bathtub components. Small parts risk being swallowed or eaten, large parts risk falling and breaking.
A leaking toilet tank is a fairly simple breakdown that requires a little time and only a man’s hands. Don’t rush to call a plumber and look for a new toilet model. Be smart and deal with the problem at home yourself, which is both cheaper and more profitable.
How to dismantle a toilet cistern
If you need to completely remove the drain tank, this is also a feasible task. Typically, it is secured to two bolts, the diameter of which is from 5 to 7 mm. The fastening may consist of two studs with threads on both sides. There are no longer steel fasteners in modern toilets.
The tank is attached to the back of the toilet bowl. It stands on a ceramic shelf with two holes, coaxial with the holes in the bottom of the container. Studs pass through them for fastening with double-sided spacers and a nut tie. The tank is connected to the bowl using a pipe. The place where they meet is insulated with a special seal to prevent water from leaking onto the floor.
The operating algorithm looks like this:
- shut off the water;
- disconnect the tube (hose);
- empty the tank, completely draining the water;
- unscrew the release button;
- remove the cover;
- The remaining water is collected with a soft cloth or absorbent sponge;
- unscrew the nuts under the shelf;
- carefully lift the container;
- moved to a place convenient for work.
Replacing and adjusting the fill valve
Replacement involves unscrewing the nut securing the old valve and tightening a similar nut on the new valve. Of course, there must be a rubber gasket on the inside of the tank to ensure a tight seal.
However, there are a couple of nuances associated with installing the fill valve.
- Bottom fittings are often equipped with a fine plastic filter, which must be placed between the fill valve and the hose. Throw it away immediately: it will constantly become clogged with fine sand, which is safe for the operation of the valve. A coarse filter at the entrance to the apartment is much more effective.
- The flexible hose is connected without tension or bending with a small radius. The load on the fitting will significantly reduce the already short service life of the hose.
Attention: when tightening the union nut, do not use too much force. Not only are they unnecessary for soft padding; Excessive force can also cut off the threads on the valve.
How to adjust the valve actuation level in modern kits?
There are two options.
- The float can move with some effort along a plastic rail with projections
. To raise or lower it, just move the rack to the wider part of the hole in the float slot.
- Screw adjustment is no less common
. The float is adjusted by turning (using a screwdriver or manually) a long plastic screw.
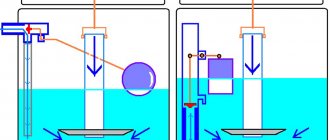
How to disassemble the drain mechanism
One or two buttons provide double drainage of water. The drainage mechanism consists of two elements: one drains water, and the other collects it into the tank. Such designs are made in different ways. This can be a head with two buttons (large and small), as well as a thread for a valve. Sometimes the threaded part is located at the bottom of the valve mechanism. The design includes a gasket-seal and a fastening nut. After removing the cover and buttons, you need to remove the gasket. It looks like a rubber ring, and its inner part has the shape of a regular pentagon. The water collection system is designed in the same way.
Useful tips
After removing the cover, it should be immediately placed away from the work site. It is made of fragile material (porcelain), so it can crack.
Basic tips:
- the upper part of the tank is installed back only if the system’s functionality is fully checked - water should be collected and flushed well,
- Having repaired the main mechanism, it is worth checking the float,
- at the end, they test the reliability of the valve, which should tightly shut off the liquid supply,
- The button should be pressed with optimal force.
Important! All components must be handled with care. If disassembling the cover does not help fix the problem, it is better to contact a professional plumber.
How to remove a tank from an old toilet
If you become the owner of an old toilet, you will have to repair it often. The advantage of older models is that they are much easier to repair than new ones. Their design is not complicated, because there are no “double buttons” in it: you can remove the drain tank at any time.
In an old toilet there is always a float, which is “responsible” for collecting and draining water. The drainage is controlled by traction: you need to pull up the handle located at the top, or pull the rope, which will activate the mechanism. To remove the cover, you need to unscrew the drain handle and the nut with washer. The fittings of old tanks look like a float and a lever-valve type drain. It is attached to the inner wall of the container through two holes in the bottom.
Sometimes you can see screws in old drainage containers. They are held in place with a screwdriver, not forgetting the nuts that are located below. They need to be carefully unscrewed, securing the screws with a screwdriver so that they do not dangle. To completely dismantle the fittings, you need to unscrew two more bolts holding the drain rocker. The dialing module is removed after disconnecting the hose.
This is interesting! You can still see the tanks with the old trigger levers. They are embedded into the side wall of the container, and the lid is not fixed in anything.
Rules for caring for plumbing fixtures
You need to constantly take care of your plumbing fixtures so that urinary stone deposits and other substances do not accumulate inside the ceramic products. The best way to avoid this is to clean the toilet regularly using simple products. Soft powders work well - for example, Pemolux. You can sometimes use Sanox to clean rust and water marks.
Ceramics is a material that is resistant to household chemicals, but it cannot be cleaned with iron brushes. The surface of the product quickly wears out and takes on an unsightly appearance. For internal cleaning of tanks, special products are sometimes used to avoid premature wear of the fittings and their clogging.
It's good when the toilet looks clean and white, but this is not always the case. Much depends on the condition of the plumbing and water in…
To keep your toilet looking clean, always use a brush. Treat it with disinfectants from time to time. One of them is ordinary “Whiteness”. It can always be used if a person is not allergic to chlorine-containing compounds. It both disinfects and cleans, leaving a pleasant and light smell of cleanliness in the toilet.
If problems arise with the drain tank, anyone can figure out even a “complex” two-button system, disassemble the mechanism and fix the breakdown. The main thing is to do everything carefully and carefully.
Features of covers of foreign models
If you have an Ifo toilet, you will need a flat-head screwdriver to remove the lid. Under the button you will find a nut. Unscrew it with a socket wrench and remove a small container that looks like a cup. It is held in place by pushers, and if you press them at the same time, the cup rises up. Once it is at the top, carefully remove the lid and set it aside.
The cover of the model from the Ika company is removed as follows: first, unscrew two buttons, then the screw. You will need a Phillips screwdriver for this. After removing the glass, the lid can be easily removed. If you bought a “solid” toilet from the Gustavsberg company, you need to press the button inward, find the groove and pull out the structure using a flat-head screwdriver. At the bottom you will find a plastic nut that also needs to be unscrewed.
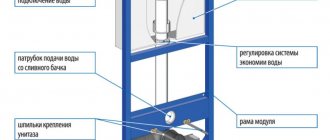
Installations
Installations stand apart from the range of products for bathrooms. Often, in innovative toilet models, the cistern lid is removed only after dismantling a section of the wall.
How to remove the lid from the toilet tank in this case. General recommendations for analysis are as follows:
- Lightly press the bottom of the button and remove the button from bottom to top.
- Use a Phillips screwdriver to tighten the mounting screws.
- Remove the clamps and remove the plastic pushers.
- Remove the brackets.
- Unscrew the latches located at the top and remove the partition.
- By moving the tap all the way against the axis, turn off the water.
- Remove the filling valve mechanism with rocker.
- Remove the latch by bending the petals.
- Without removing the flush valve from the tank, remove its upper part by turning it counterclockwise and set it aside. Having thus reduced the size of the drain mechanism, carefully remove it out.
Installation of the mechanism is carried out according to the manufacturer's instructions.
Installed toilet cisterns
Installations - special designs of flush cisterns. Installation models are designed in such a way that when disassembling the tank, you have to partially demolish the wall. The cover is removed approximately according to the following algorithm:
- lightly press the button below;
- remove it by lifting it from bottom to top;
- unscrew the screws using a Phillips screwdriver;
- carefully remove the fasteners;
- remove the pushers from the plastic;
- remove the brackets;
- press out the upper latches;
- remove the partition;
- turn off the water in the tank by moving the tap all the way;
- remove the valve mechanism and rocker;
- bend the petals and remove the lower clamp.
The flush valve does not need to be removed. When disassembling, only the upper part is removed. To do this, turn it counterclockwise. The upper part of the valve is set aside separately. The drain mechanism has become smaller and can now be easily removed from the tank.
Step-by-step instruction
Before opening the toilet tank lid, it is recommended that you familiarize yourself with the structure of the plumbing according to the diagram. How to disassemble a toilet cistern with a button:
- In the direction indicated in the manufacturer's diagram, turn the ring until it is completely unscrewed. Remove the plastic ring cylinder.
- It became possible to slightly lift the toilet lid. Now you need to carefully lift the lid and turn it 90 degrees until it takes a position across the tank and it becomes possible to remove the double-sided clothespin that secures the mechanism button to its location.
- It is better to put the removed toilet cistern lid with the button aside for safety.