During use, faucets wear out and become rusty, so the bathroom faucet needs to be replaced. Another reason why you need to replace the faucet is a renovation in the bathroom, in which the old plumbing does not fit into the updated interior.
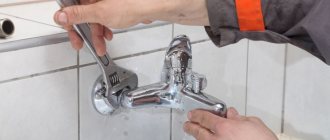
To change a faucet, you don’t have to call a technician from the housing office or invite an outside specialist: you can do all the work yourself, even if you don’t have any special skills as a plumber. Faucets are divided into two types: single-lever and double-valve, and according to the installation method they are wall-mounted and bathroom-mounted.
Single lever mixer.
Double valve faucet.
Mixer installed on the side of the bathtub.
Note! When replacing an old mixer, a new model should be selected with the same connection method so that you do not have to change the pipe layout. If the faucet is installed in a new location during renovations in the bathroom with remodeling, the mixer can be selected of any type.
Design of single-lever models
A distinctive characteristic of this type of mixer can be considered a lever that simultaneously performs the functions of two heads at once. With its help, the temperature and pressure of the supplied jet are regulated.
In the first case, the tap handle moves to the right or left, in the second - up or down. Typically, these processes are combined, allowing the user to set the option that is most comfortable for him.
The design of single-lever accessories is extremely simple. Typically such a device consists of the following parts:
- body – can be made of different materials;
- spout - depending on the purpose of the tap, it can be low, high or medium;
- switch - a lever with which the temperature and flow strength are set;
- cartridge – for regulating the flow of water, which is an analogue of a faucet axle box.
In addition, single-valve devices also use service elements, such as gaskets. Often such accessories are also equipped with additional components that increase comfort of use. Among them are aerators that saturate the flowing stream with air, built-in dispensers for detergents and much more.
Single lever faucets can be made from a variety of materials. Chrome-plated models have become especially popular, but on the market you can also find accessories made of copper, brass or granite imitation
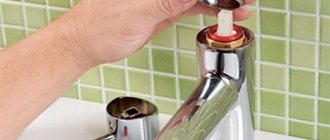
Dismantling the old tap
The mixer to be replaced is removed as follows:
- shut off the root valves at the entrance of the water supply to the apartment and open the taps on the mixer to relieve excess pressure;
- cover the bathtub and sink with rags so that accidentally falling parts do not damage the enamel or ceramics. It is important to close the drain holes so that small parts do not fall there;
- Use a wrench to unscrew the mixer nuts from the eccentrics. If it gets stuck due to lime deposits, add brake fluid or kerosene and after 15 minutes. try again. In particularly advanced situations, use WD-40 liquid. This composition effectively softens rust, paint, glue and all kinds of deposits, for which it is popularly nicknamed “liquid key”.
After unscrewing the nuts, the old mixer is placed in a basin so that the small amount of water remaining in it does not leak onto the floor.
Locking element options
In models with one lever, two types of units that regulate water flow can be used. Let's take a closer look at their device.
Ball lever
Such a unit is a ball made of stainless steel, in which special holes and fasteners are provided, with the help of which the sleeve with the ball located inside is attached to the structure.
When the lever is turned, the holes on the ball move, blocking or clearing the path for the movement of cold and hot water, thereby regulating the temperature and flow pressure.
Schematic representation of a single-lever valve with a ball functional unit, with detailed illumination of all fastening, safety and other service elements
Lever valves with a ball mechanism are highly resistant to hydraulic shocks.
However, such models have a number of disadvantages, which include:
- relative high cost;
- rapid accumulation of scale on the ball element;
- intensive wear of rubber gaskets.
- the difficulty of repair, which is why you often have to dismantle the old one and select a new mixer.
Due to the listed disadvantages, mixers of this design are used less and less in everyday life and in production. In contrast, ball valves, installed in front of plumbing fixtures on water supply pipes to control the water supply, have almost completely replaced valve models.
Disc crane models
Such accessories are favored by consumers and specialists. The operating mechanism of such mixers is ceramic disc cartridges, similar to ceramic disc mechanisms that are used in two-valve devices.
The disk mixer, a schematic representation of which is shown in the figure, is considered a more practical functional model, since it allows cartridge replacement
Externally, this element looks like a plastic cylinder, usually blue. However, hidden under the body are two plates made of snow-white, carefully polished ceramic. One of these disks can move depending on changes in the position of the lever.
In order for water to flow into the spout, the holes on the upper and lower parts must match. If this does not happen, the flow is blocked and does not enter the tap.
Disc models have a number of advantages:
- moderate cost;
- the ability to replace cartridge elements, which facilitates repairs;
- reluctance to form scale, which hardly accumulates on ceramic surfaces.
The weak point of such structures is their sensitivity to foreign inclusions in the water flow, as well as to sudden pressure surges in the water network.
The cartridge discs are made of well-polished ceramic, which ensures a good fit. The service life of mixers largely depends on the quality of these parts.
Mixer with thermostat
If a model with a thermostat is malfunctioning, you will need the help of a specialist. The fact is that the connection diagram for the temperature indicator depends on the manufacturer. In addition, this device has very delicate contacts that can be easily damaged if disassembled incorrectly. The figure below schematically shows the main components of a thermostatic mixer.
Photo - disassembly of a model with a thermostat
Video: Cleaning the thermostat from scale in a Vado mixer https://www.youtube.com/watch?v=9uSOhcbDJd8
How to disassemble a lever device?
To repair models with one locking mechanism, it is necessary, first of all, to disassemble the structure in order to remove the damaged element. It is replaced with a similar new part. Repairing a lever mixer is quite easy, but you need to act very carefully.
Disassembling a disk product
To dismantle the accessory, you will need a set of the following tools - a screwdriver and a hex key.
The following algorithm of actions is used:
- First of all, you need to shut off the hot/cold water pipes.
- You should free yourself from the plug, which can be removed with a screwdriver.
- Using a hex key, unscrew the screw part that connects the lever to the rod, where the water is regulated.
- Having done this, you can manually remove the crane lever. Then you need to unscrew the ceramic nut, as well as the clamping nut that secures the top plate.
This allows access to the mixer disc. You can take it out and insert a new cartridge into the resulting space, but you need to ensure the correct position of the holes on this part.
After which all operations are carried out in reverse order. Having assembled the faucet and completed the manipulations, you can turn on the water to check the correct assembly.
When going to the store to buy a new cartridge, it is advisable to take the failed disk. Models may differ in the diameter of the holes available and the fasteners located on the bottom edge of the products. It is better to give preference to cartridges with a silicone gasket, as they are better resistant to water.
Disassembling the ball mixer
A similar process is performed in the same way as described above, but there are some nuances. First of all, you also need to turn off the water. After this, using a screwdriver, the decorative plug is removed, the fixing screw is unscrewed and the nut that holds the faucet mechanism in the correct position is removed.
It is worth keeping in mind that if the ball accessory is seriously damaged, the entire mixer will have to be replaced. Repair of the ball device is only possible if the problems are caused by a worn out rubber gasket or the faucet being clogged with abrasive materials.
In some faucet models, the handle fits quite tightly into the control rod. To release the part, it is recommended to carefully pry it off with the end of a screwdriver.
Constantly dripping water from the faucet usually indicates problems with the gasket.
To resolve the issue, you need to take the following steps:
- As described above, the screw is unscrewed and the lever is removed.
- The connection is removed from the thread, after which the screw is unscrewed with a screwdriver. If plaque is found on it, it must be carefully removed with a soft cloth.
- The ball is removed from the structure, after which the worn gaskets are carefully removed and replaced with new parts.
- Upon completion of the process, the ball is put back in place, and the seals are attached using a plastic nut.
- The lever is placed again, and then the screw that secures this part is screwed in.
After completing these operations, the crane is checked.
Problems with the ball mixer being clogged are indicated by a thin stream of water even with the tap at maximum pressure.
In this case, you need to follow the following instructions:
- unscrew the nut from the mixer spout;
- remove the mesh and rinse it thoroughly with water;
- insert the part back, and then re-tighten the nut.
If the manipulations described above did not help solve the problem, you need to replace the device and install a new faucet in the kitchen or bathroom.
Particular care must be taken when loosening and tightening the locking nuts. Excessive force can easily damage the elements.
Disassembling a Grohe faucet
The Grohe faucet, despite the fact that it is disassembled according to similar rules as a single-lever faucet, I have placed in a separate subsection of this article. The reason lies in its popularity and reliability.
The peculiarity of Grohe is that it does not have flexible water connections on the threads like other faucets. That is, if we rotate them, we will not unscrew them. They are fixed from the inside. To do this you will need:
- Remove the handle. This is usually done with a hexagon.
- Then remove the cap - Grohe can have it either threaded or non-threaded.
- Then remove the cartridge - usually you need to unscrew 2 screws with a screwdriver.
- Carefully push out the plastic spacer with a screwdriver;
- Remove the O-rings from the flexible hoses;
- Remove the clamp that holds the liner in the housing.
All! Access for flexible connections is obtained and the mixer is disassembled. As you can see, the disassembly process is very similar to the instructions that I gave at the beginning of the article. It is important to understand that taps from different manufacturers are disassembled in a generally similar way, but there may be some nuances, like Grohe with the same gasket, the type of tool used in the work, the number of screws to unscrew, and so on.
Prevention of breakdowns of single-lever models
Since replacing a faucet is quite expensive, you need to think about simple preventative measures that can extend the working life of this important part.
These include:
- regular inspection of mixers to identify the slightest signs of leakage;
- installation of filtering equipment to improve water quality;
- elimination of high humidity in places where plumbing fixtures are located.
Before independent installation or dismantling, and even more so before carrying out repairs, you must carefully study the structure of the mixer and the instructions and strictly follow the instructions. All connecting nodes must be sealed with special compounds or fum tape to avoid leaks.
The condition of the tap is positively influenced by the aerator, which mixes water with air. If the model does not have a built-in device, it can be purchased separately and installed on the mixer
It is also important to take a responsible approach to choosing models for the bathroom or kitchen. When purchasing a faucet, it is better to avoid silumin products made from an alloy of aluminum and silicon. Although such models are inexpensive, they quickly break down.
It is better to give preference to models made of brass, copper or chrome-plated steel, produced by well-established brands.
Classification of faults
Groups of faults can be distinguished:
- violation of the tightness of the shut-off and control unit: water does not completely shut off or flows through the rod;
- external leaks at joints;
- reduction in water pressure;
- violation of smooth switching, flow adjustment;
- inability to maintain the specified mixing temperature;
- complete or partial destruction of parts;
- unacceptable deterioration in appearance.
The main reasons causing failure are:
- natural wear and tear of elements;
- manufacturing defects;
- low-quality materials;
- corrosion of metal;
- salt deposits due to increased mineralization of water, especially calcium and iron;
- abnormal mechanical loads;
- careless handling.
We will consider repairing a bathroom faucet in case of various failures in more detail below.
The best manufacturers on the market
Modern single-lever models are very popular, which is why they are presented in the collections of leading companies engaged in the production of plumbing accessories. Among the most famous brands belonging to different price categories are the following.
GROHE – wide functionality and high quality
None of the faucet ratings is complete without models from the German brand Grohe. Despite their rather high cost, they have earned the attention of consumers with their modern design solutions, durability and reliability.
Accessories of this brand are often equipped with many additional options, which ensures comfortable operation. Among the wide range of single-lever kitchen appliances, users most often note the Concetto 32663001 model with a 45-centimeter pull-out spout, which practically replaces a pull-out watering can.
The faucet uses a virtually silent aerator and a reliable SilkMove ceramic cartridge. A popular model for the bath is the Euroeco 32743000 faucet with an aerator and a special water saving regulator.
Grohe faucets and other accessories have a classic design, making them easy to fit into any room design.
LEMARK – original solutions
The Czech company produces mainly single-lever products with a high spout, which are convenient to use in the kitchen. Sometimes they also have a built-in dispenser into which liquid detergents are poured. The models are available in a wide range of shades, which allows you to choose the faucet to match the color of the sink.
At the same time, the catalog also presents traditional chrome-plated products, which serve as a universal option. The top best models according to users included the Comfort LM3061C kitchen mixer, as well as the Pramen LM3318C shower unit.
Owners of these devices note the impressive design of the devices, thoughtful design and high quality. Some claim that they have been using Lemark accessories for several years without any repairs.
Lemark single lever faucets are often equipped with additional accessories and fixtures, such as a pull-out shower head, for added ease of use.
OMOIKIRI – Japanese technology
Plumbing accessories from the Japanese brand “Omoikiri” impress with their unique design, as well as the highest quality and long service life. The manufacturer provides a five-year warranty on all products. Many models have a double spout, thanks to which tap water is supplied separately from drinking water.
The rating of the best models for the kitchen includes the Tonami-C single-lever mixer, made of lead-free chrome-plated brass. The accessory has a double spout with a 360° rotation angle and a built-in aerator. At the same time, users note the reliability and durability of the crane.
Although the cost of Omoikiri products is quite high, users consider it justified. The models are distinguished by their reliability, long-term operation, and original appearance.
IDDIS is the best Russian manufacturer
The products of the Russian company are very popular due to their diverse range and affordable price. They are also of acceptable quality and, with proper care, can last up to 5-7 years without repairs.
Among the accessories that have earned high user reviews, we can note the universal single-lever faucet IDDIS Vane VANSBL0i10 with a swivel spout, a retractable head with a square shower, and an aerator nozzle.
The reliable and simple kitchen faucet Alborg K56001C is also popular. Due to its low spout, this model is best used in shallow sinks.
IDDIS models usually have a classic design and a chrome-plated surface, making them a perfect match for common stainless steel sinks
KAISER – German quality at an affordable price
The Kaiser brand produces a wide range of faucets that have different types of spouts - pull-out, stationary, rotary, flexible. The products are distinguished by their magnificent appearance, while their cost is quite affordable.
Among the presented models, users especially noted the Kaiser 13044 kitchen faucet with a body made of high-quality brass.
In addition to its excellent appearance, this sanitary accessory has two built-in aerators and a water filter. The high spout has the ability to rotate 360 degrees, which guarantees easy access to all corners of the sink.
Kaiser catalogs present not only traditional chrome options, but also stylish accessories made in bronze or granite.
Ball
A very repairable type of fittings. Rubber spring-loaded seats, springs, a cuff, and less often a ball must be replaced. Elementary disassembly:
- We remove the plug.
Remove the plug.
- Let's release the stopper.
Let's release the stopper.
- We remove the lever.
We remove the handle.
- We unscrew the clamping ring with a special key or pliers.
Unscrew the ring.
- Unscrew the cap.
Unscrew the cap.
- We take out the leash, cuff, ball.
We take out the ball.
- Use a screwdriver to remove the seats with springs.
We remove the saddles with springs.
- By pulling up, we disconnect the gander; if there are no leaks at the connection when turning, the operation is unnecessary.
Visual aid from Canadian experts:
Conclusions and useful video on the topic
The video below describes in detail the structure of a single-lever mixer, its disassembly and correction of the most common breakdowns:
Single-lever faucets are a modern type of plumbing fixture that has gained popularity due to its excellent consumer properties. The advantages of such devices include a long service life and ease of maintenance.
The ability to correctly disassemble an accessory will help you quickly replace a failed part. Thanks to this, the service life of an expensive product is extended and there is no need to replace it.
Would you like to talk about how you selected or repaired a single-lever faucet? Do you want to share your own experience as a novice plumber that might be useful to site visitors? Please write comments, ask questions, post photos in the block below.
Shower switches
The outdated ball design is being replaced by piston (spool) switches: eccentric and push-button. The first ones are located in the central bore of the housing or in a separately attached diverter. The latter are typical for single-lever options and are located on the spout.
The plunger is removed from the central bore as follows:
- We disconnect the gander and remove the handle in the same way as a ball switch.
- Unscrew the rod fitting. We take it out together with the eccentric rod.
- Using a small hexagon, we remove the piston down.
Let's look at disassembling the push-button option using Grohe as an example:
Sequence of operations:
- Disconnect the shower hose.
- Use a screwdriver to keep the valve from rotating.
- Unscrew the button cap.
- Use a hexagon to unscrew the assembled mechanism.
KOHLER diverter replacement process: