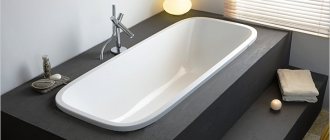
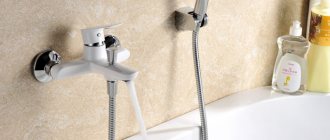
One type of bathtub faucet is rim-mounted. A built-in faucet is increasingly being chosen when installing an acrylic bathtub, because such a device looks original and modern, and you can install it yourself if you have the necessary tools.
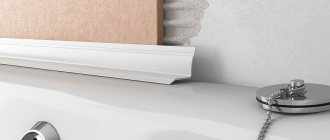
Note! To install a mortise model, the edges of the bathtub must be sufficiently wide: at least 7–8 cm.
Disadvantages to be aware of
Despite all the advantages that are described in detail in advertising brochures, before purchasing a faucet for a rim, you should think about a number of problems, especially if the owner of the house plans to install it himself.
First of all, you should not buy an inexpensive model, since due to the nature of their operation, these plumbing products are subject to high loads. A low-quality faucet will have to be replaced very soon.
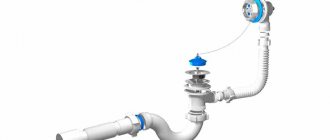
The most vulnerable element of such a mixer is the shower hose. Most of the time it is in a curled state, so it gradually becomes deformed. Soon cracks appear on the hose, it begins to leak and requires replacement. Unfortunately, even expensive and high-quality faucets are not immune to problems with the hose.
The shower head hose of the mortise mixer is located in a coiled state behind the bathtub body or behind the false panel. Constant deformation of this element leads to its frequent breakdowns
You will have to come to terms with the fact that the hose needs to be changed periodically. Prudent buyers immediately take a spare hose to perform this simple repair as soon as the need arises. Particularly vulnerable in this regard are faucets whose spout also serves as a shower head.
Amateur craftsmen who do not have much experience in plumbing work should remember that at home it is easiest to install an on-board faucet on an acrylic bathtub. When working with a product made of cast iron or steel, the enamel will almost certainly be damaged, which can cause corrosion. As a result, the bathtub will have to be repaired or completely replaced.
It is better for an inexperienced master to entrust this work to a reliable specialist. Another way to solve the problem is to purchase a bathtub with a ready-made hole for installing a mixer. True, acrylic bathtubs are usually supplied with this option. Of course, when choosing a mixer, you will have to take into account the size of such a hole.
Features of the design of a mortise mixer
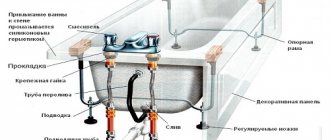
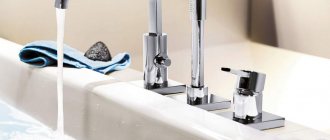
For installation on the side of the bathtub, manufacturers most often offer so-called modular models, although there is also an option in the form of a monoblock. Before starting installation, you should carefully study the design of your mixer, as well as the manufacturer’s recommendations for its installation and further operation.
Elements of a modular type mortise mixer can be installed separately, but they are controlled from a common center, which increases the level of comfort
Monoblock models are usually supplied assembled, but modular devices consist of several elements.
First of all, this is the tap - the central part of the mixer, on the body of which there are three outlets:
- for hot water;
- for cold water;
- for spout.
There is a separate space for connecting a shower head. These entrances have standard sizes, so the buyer can decide for himself exactly where the spout and shower head will be located. The connection to hot and cold water pipes is made using special half-inch eccentrics.
This diagram allows you to get an idea of the features of installing a mortise mixer on the side of an acrylic bathtub, as well as the necessary consumables
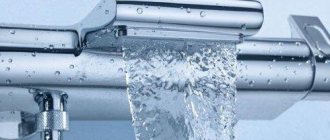
High-quality mortise mixers from well-known brands have the ability to withstand quite serious water hammer. In many models, the separately located shower head is controlled by a lever mounted on the spout body. This design automatically switches the water supply from the shower back to the spout when the watering can is returned to its place.
Bathroom faucets, their types and choice of installation location
When buying a bathroom faucet, it is important not to get lost in the abundance of models offered. When going to the store, you should already know exactly what device you need to buy.
Currently, bathroom faucets are available in three installation options:
- wall-mounted - the most common and familiar;
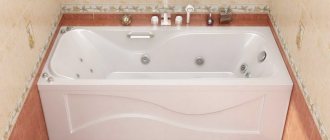
- onboard, installed on the side of the bath (which must be at least 7-8 cm wide, otherwise installation will be impossible);
- A mixer on a stand or a special shelf is an expensive device, the cost of which is several times higher than that of a conventional mixer.
The latter option is rarely used, since its installation requires quite a lot of space, which is simply not available in a standard bathroom. You will need to choose a place to install the faucet only if you are installing a new bathroom during the construction of a house or a major renovation of a bathroom.
Here you need to focus on the following considerations:
- Select the installation location by eye and evaluate whether it will be convenient to use the mixer.
- If it is a mixer with a shower, then it must be mounted at a height of 120 cm from the bottom of the bath after its installation.
- If the faucet handle also rotates the sink, then the height needs to be selected even more carefully. Please note that the height of the sink is rarely less than 85 cm. To this you need to add the size of the faucet itself and the height necessary for convenient hand washing.
- You should not mount the mixer on the horizontal line that is located at the height of the curb, which is usually made at a height of 100 cm from the floor. It is better to place the device where the wall is lined with smooth tiles, otherwise the faucet reflectors will not adhere tightly to the surface (the curb usually has a rough coating).
Some useful tips
The best time to install a faucet on an acrylic bathtub is during the period of renovation and installation of a new bathtub. Installation of the device is carried out before connecting the bath to the sewer and installing a decorative screen.
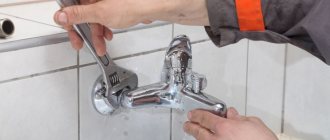
If you decide to replace a conventional wall-mounted faucet with a mortise model, you will have to carry out some finishing work after installing and dismantling the old faucet.
To provide access to the communications of a mixer installed on the side of the bath, you can use a convenient folding screen, false panel or inspection hatch
It is possible that the entire bathtub will have to be dismantled and installed again. These costs of time, effort and money must be taken into account. If it is necessary to install a non-removable version of the decorative bath screen, you can make an inspection hatch in it to provide access to communications.
When installing a mortise mixer on the side of an acrylic bathtub, manufacturers recommend using a special strip. Indeed, acrylic is not as durable a material as cast iron or steel. According to manufacturers, the presence of a hole in the side weakens the structure. Planks and panels serve to strengthen the side and prevent its possible deformation.
In practice, masters do not attach importance to this point and do without any planks. This element often has to be trimmed and adjusted to the size and configuration of the side. The side usually has a rounded shape, which significantly complicates such an adjustment.
In order not to tinker with this problem and waste time, home craftsmen simply ignore the manufacturer’s recommendations.
Fortunately, there have been no reports of a collapsed faucet installed without a bracket yet. Nevertheless, one should remember this danger and wisely assess the balance of risks and costs for installing a reinforcing strip. If its shape matches the configuration of the side, it makes sense to strengthen the structure.
Methods for installing a faucet in a bathroom
There are several options for installing a crane:
- hidden installation on the wall - the tap is placed on the wall, the pipes are covered with tiles or plasterboard;
- wall mounting with a special stand;
- installation of a bathtub faucet.
Hidden installation is more difficult to do, since it is more difficult for a plumber to reach communications. If you have enough free space in the bathroom, you can make a separate counter, connect the faucet and cover the communications with ceramic tiles.
Features of drilling through enamel
In addition to the usual tools, such as a marker, tape measure, screwdriver and drill, you will need a special feather drill designed for drilling glass and ceramics, as well as transparent tape and a piece of plasticine. After marking, the drilling site should be carefully sealed with tape.
Then you need to make a round side from a piece of plasticine and stick it around the circumference so that the place for drilling is in the center. The area limited by the plasticine side should be three times the size of the hole for the mixer. It turns out to be a flat round platform with a side. You need to pour water into it.
After this, you can start drilling in the center of the marking. It is recommended to use a drill with a diameter of 6mm at a speed of about 500-600 revolutions. The pressure should be moderate. During such careful drilling, a narrow through hole will appear in the side of the bathtub, through which the water present at the drilling site will flow out.
Now you should make a small cap from plasticine and stick it to the bottom of the side so that the resulting hole is in the center. You need to pour water again and re-drill using a 12 mm drill. The pressure should be light. When the drill goes right through the side, you can remove all the plasticine and evaluate the quality of the work; chips on the enamel should be minimal.
After this, you need to widen the hole to the required size to install the mixer. To do this, new markings are made, indicating the boundaries of the hole. The surface must be sealed again with transparent tape.
The hole should be widened using a grinder using a rubber attachment with sandpaper. The speed should be set to maximum, but the applied force should remain minimal.
Experts do not recommend that beginners make holes in the side of a cast iron or steel bathtub themselves. Problems are caused by the presence of enamel, which performs not only decorative, but also protective functions. If drilling is done incorrectly, there is a high risk of irreversible damage to this layer.
When the hole is wide enough, you can use a nozzle with a diameter of 20 mm. It should be understood that with minimal effort, which will protect the enamel from damage, the work will not progress too quickly. You will have to work with the grinder for more than an hour. When the hole is ready, insert the o-ring into it and install the mixer in the usual manner.
There are other ways to accurately drill into enamel surfaces. Some craftsmen simply glue a metal plate to the enamel and drill through such a “sandwich”. The metal will protect the enamel from damage. Others carefully remove some of the enamel with a grinder before drilling, and then drill with a hole saw.
Finally, there is a way to drill into cast iron with a diamond core cutter using a wood jig. But in this case, the cutter must be cooled quite often by pouring water on it.
Installation of an expensive tap
To install a faucet in a bathroom correctly, you need to understand the design of products from different manufacturers and know the intricacies of installing faucets of a particular brand. Especially if you choose a good European option - many of them are now equipped with a water saving system.
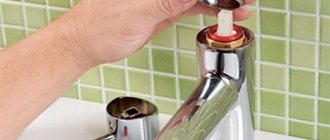
Incorrect installation will reduce all the advantages of an expensive purchase to zero. If installed incorrectly, the rubber gaskets can be pinched, pipe joints may be poorly insulated, and the valve may not be assembled correctly. Having your bathroom faucet professionally installed will extend its lifespan.